Step 1: Setup Google Cloud Platform (GCP)
WARNING: Google owned GCP projects might be enforced by Enforcer (ECP). In this case the installation will fail, asking for a security key. To avoid this, create a new GCP project (it takes about 24 hours for ECP to find your project), or use a public one that is not enforced while we try to find a permanent solution for this issue.
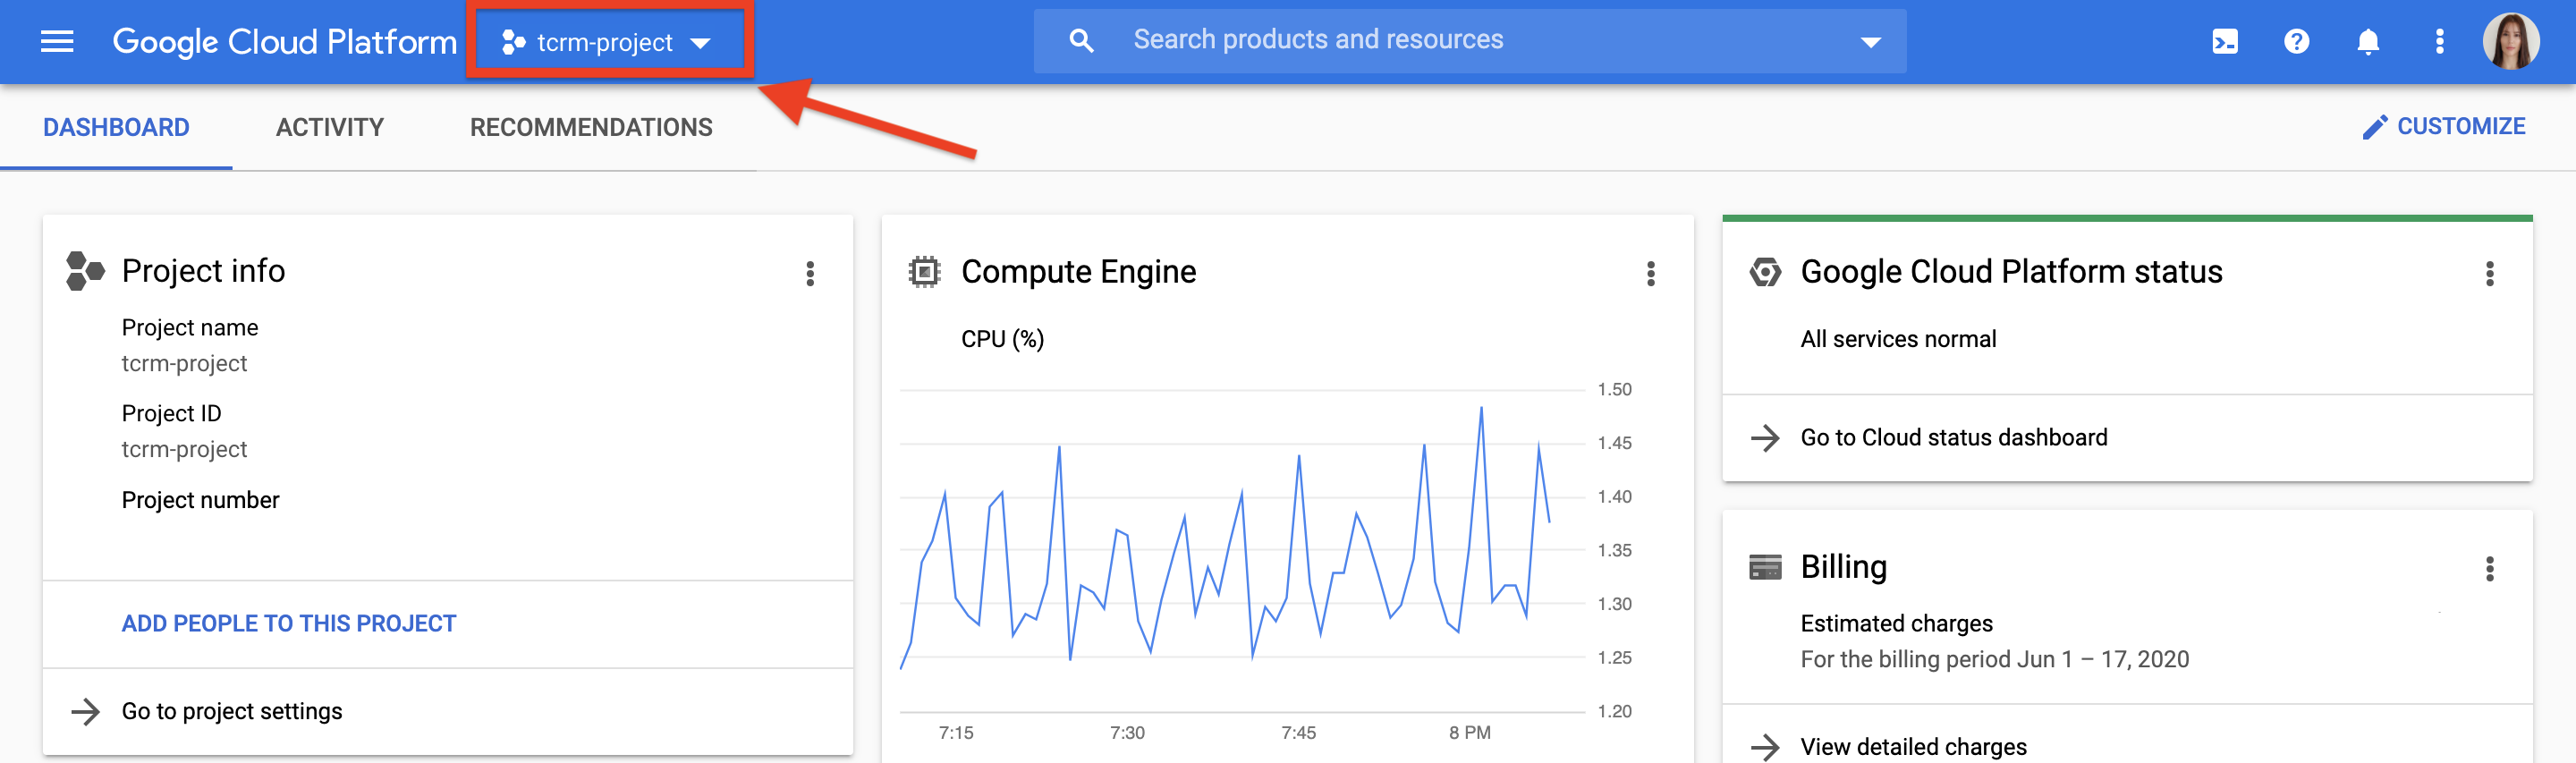
1.1 Select or Create a GCP Project
Create a new
Google Cloud Platform project,
or use an existing one. Open it and make sure you can see the project name at
the top of the page.
Step 2: Install TCRM
2.1 Request Access to TCRM Code Folder
Until TCRM will be open sourced and available externally, cloning permission is needed for each use. Submit this request form to get access for cloning the TCRM code folder.
2.2 Install TCRM
Click on the Cloud Shell Icon on the top right corner of the page to open the GCP command line.

Run the following command in the shell to clone the TCRM code folder:
git clone https://github.com/google/TaglessCRM.git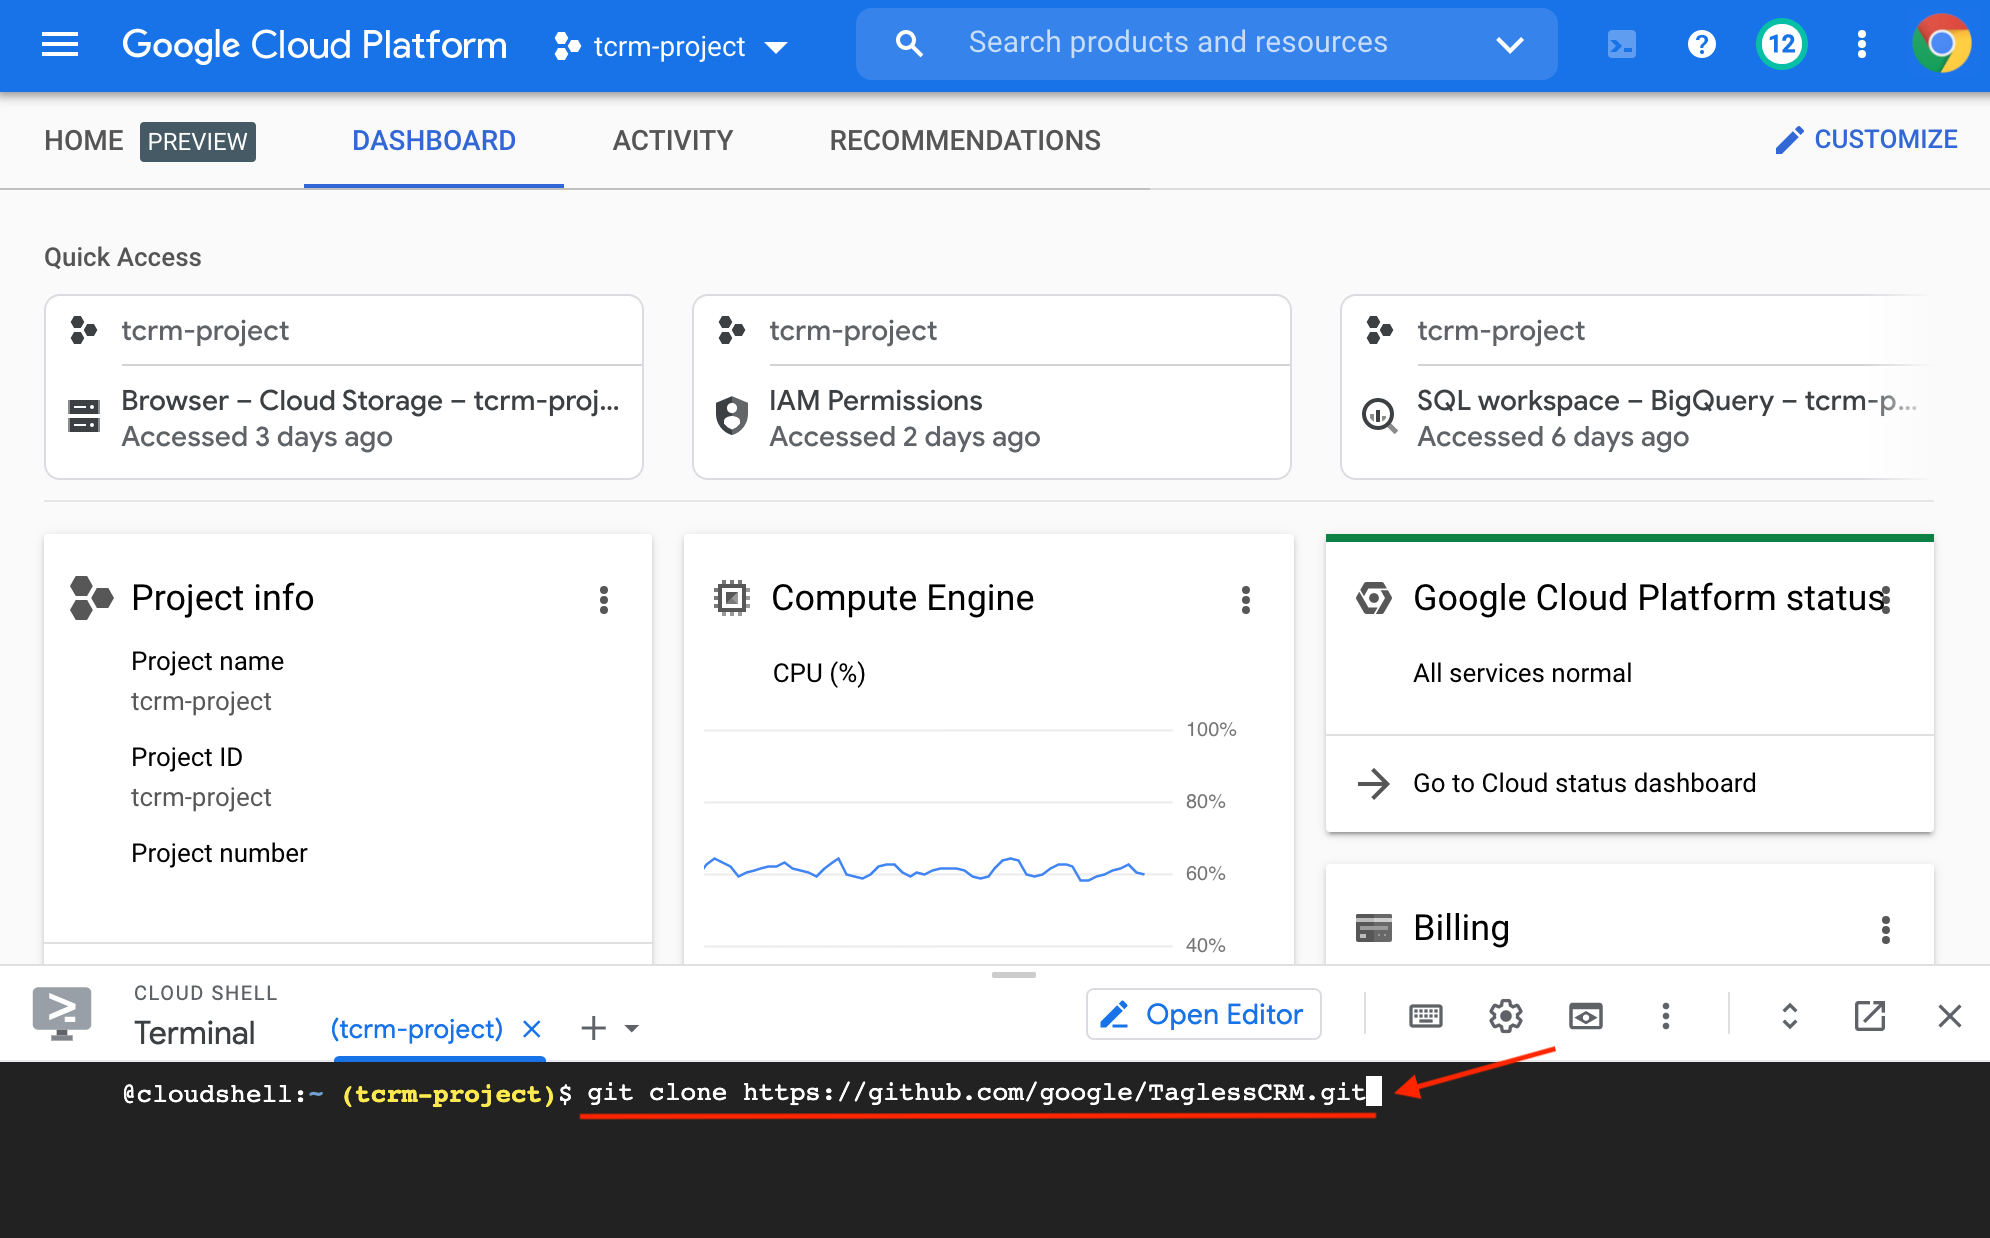
Next, run this command:
cd TaglessCRM && sh setup.sh --project_id=$GOOGLE_CLOUD_PROJECT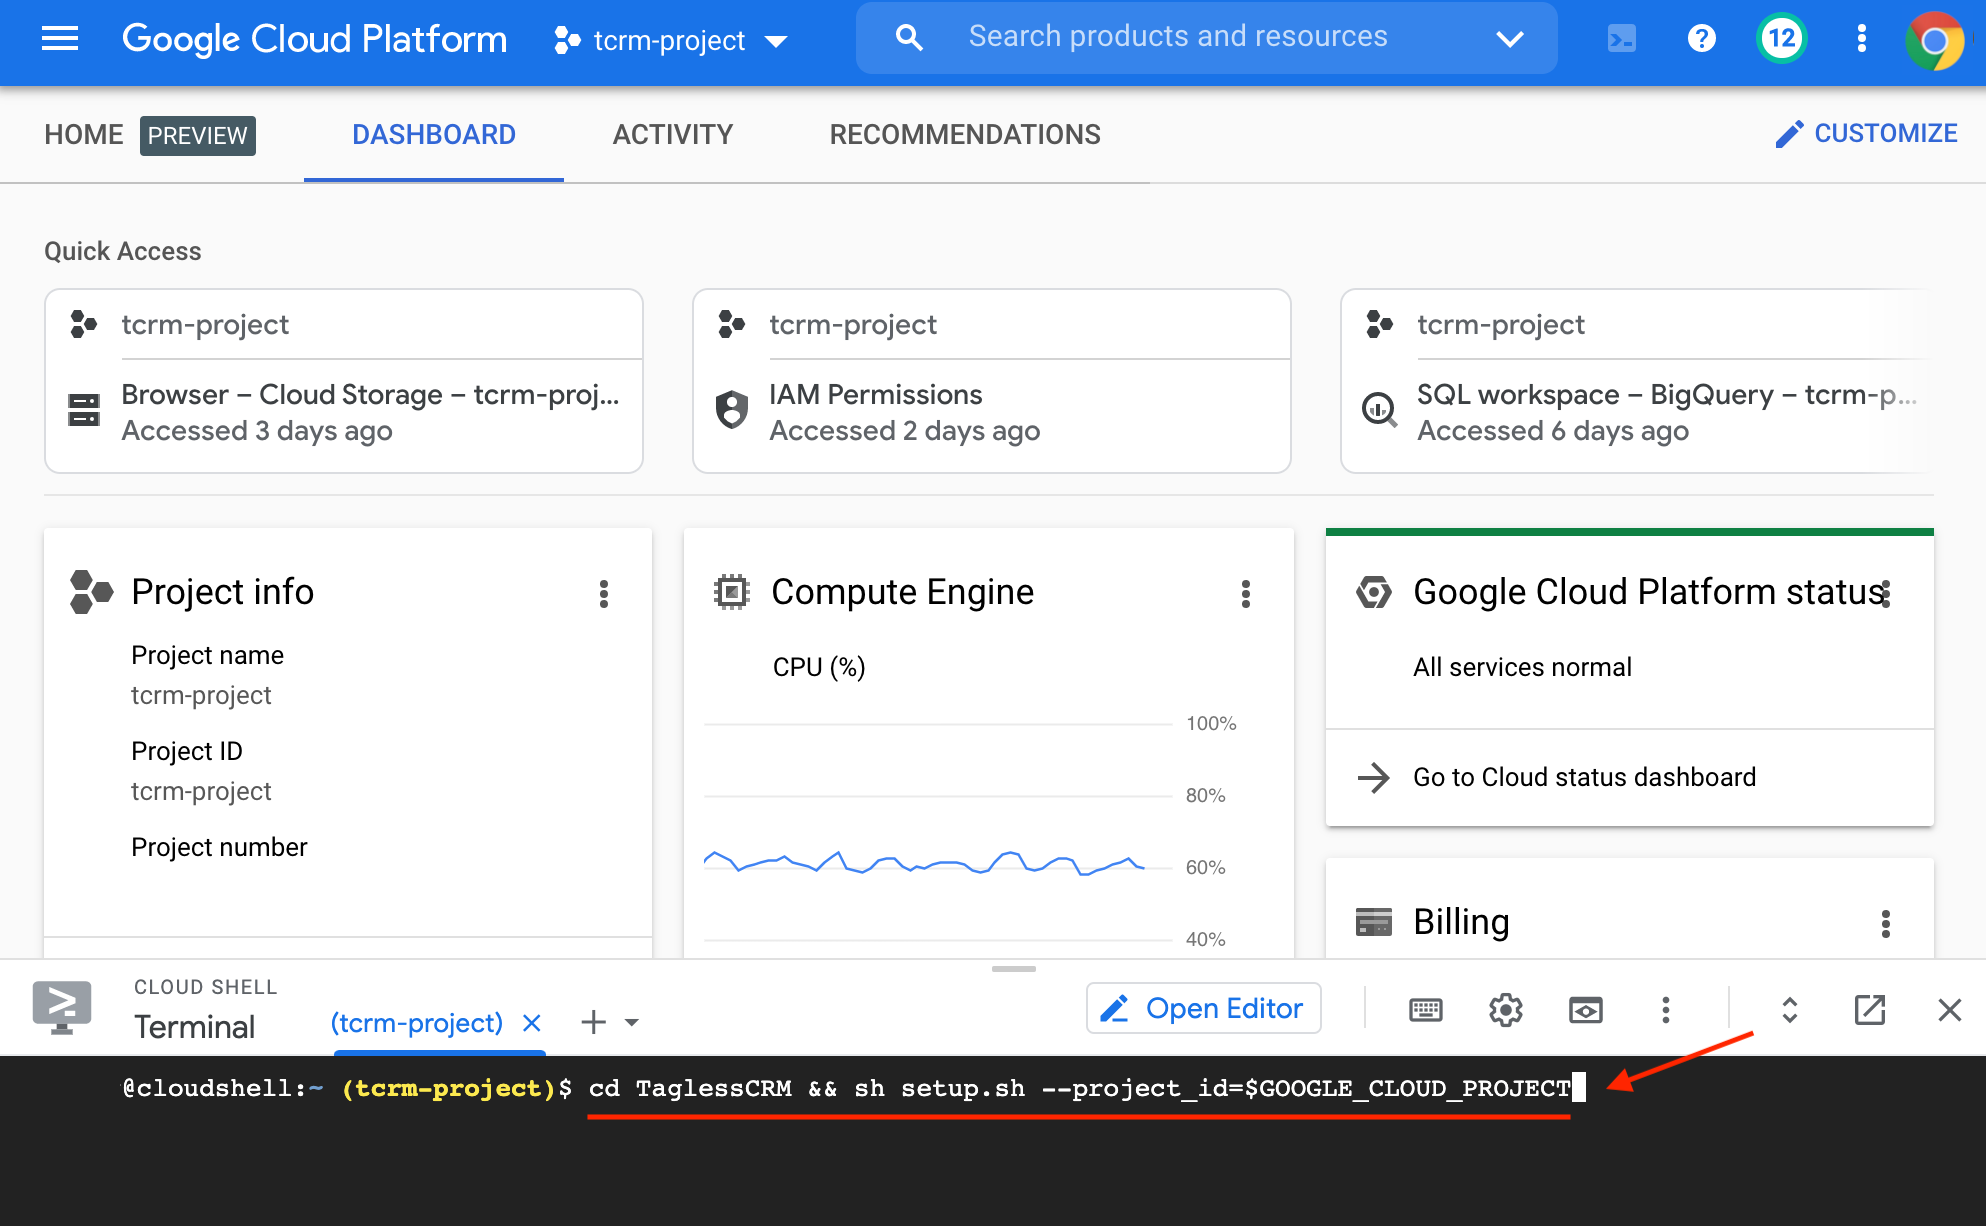
NOTE: This command will do the following 3 steps:
- Create a Python virtual environment, and install all the required Python packages.
- Enable the required Cloud APIs in the GCP project.
- Create a Cloud Composer environment, and deploy the TCRM DAGs into it.
NOTE: The installation run should take about 2 hours. Please wait until the script will finish running.
Step 3: Configure Airflow and Set Up Variables
3.1 Setup BigQuery Connection
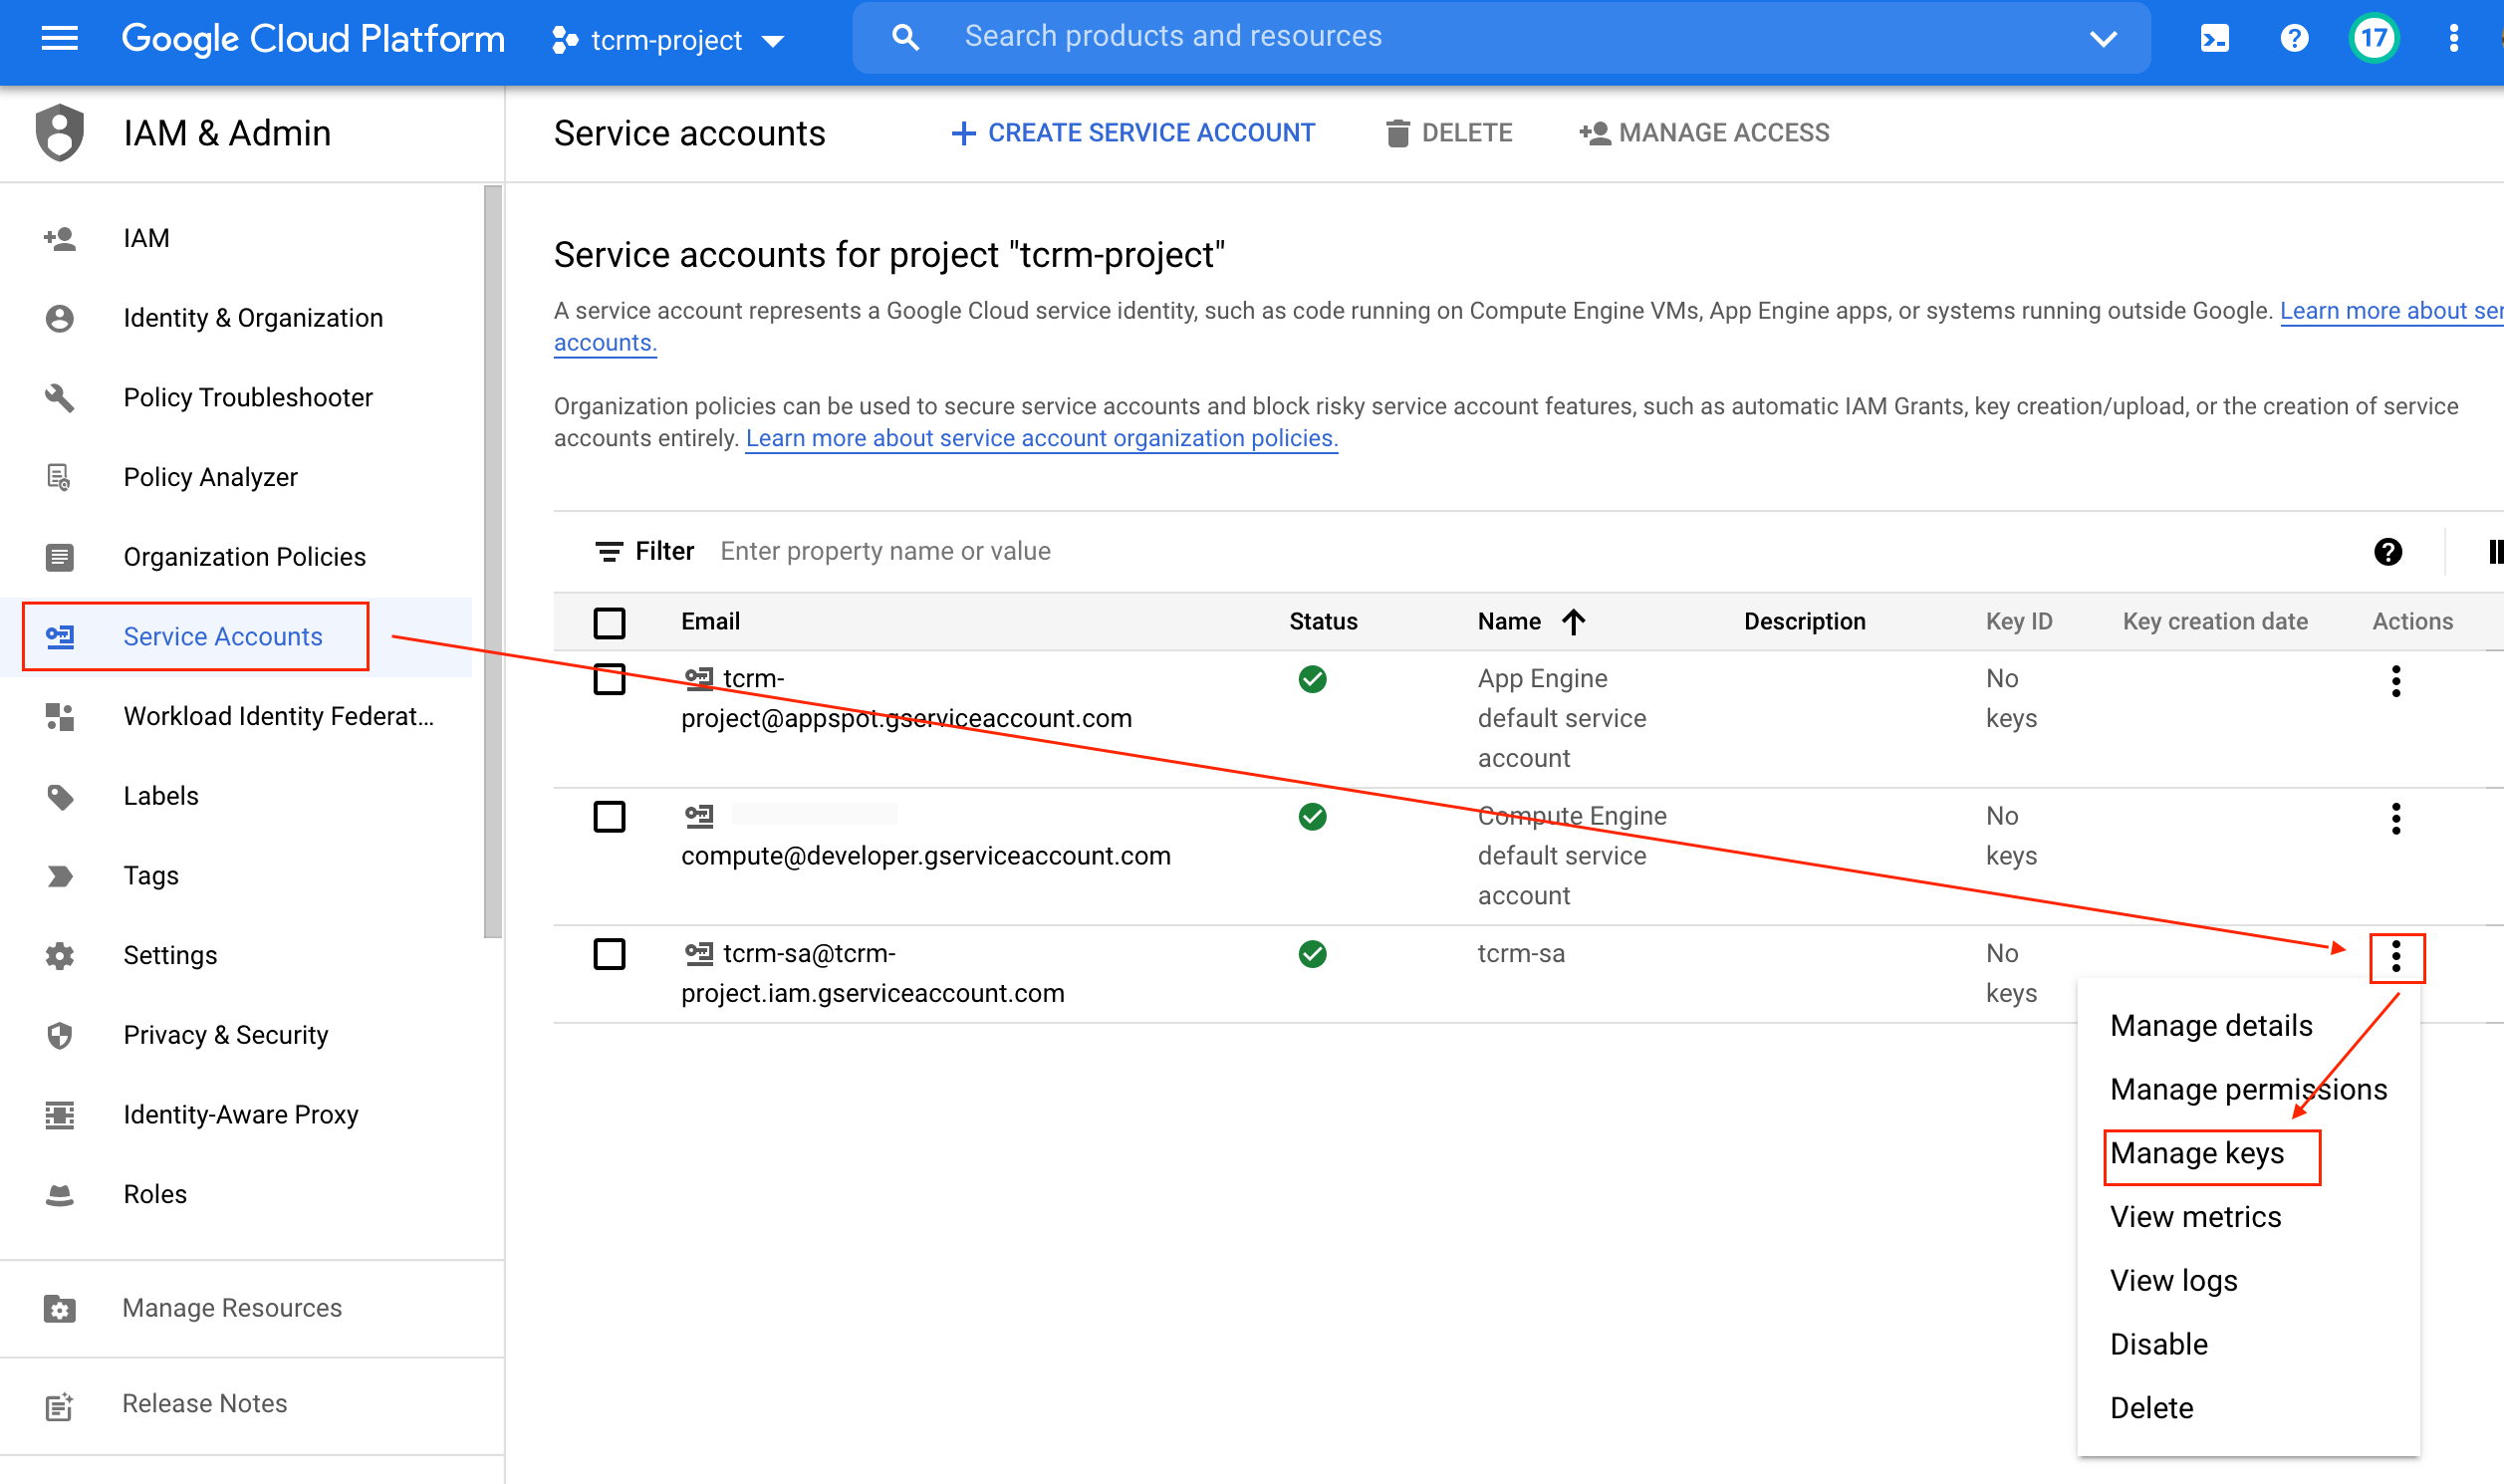
To read data from BigQuery, you must link your service account to the BigQuery connection.
Click on Identity → Service Accounts. Then click on the three dots next to the
service account that starts with tcrm-sa and select Create Key → JSON →
Create.

Open the downloaded key in a text editor and copy the JSON within.
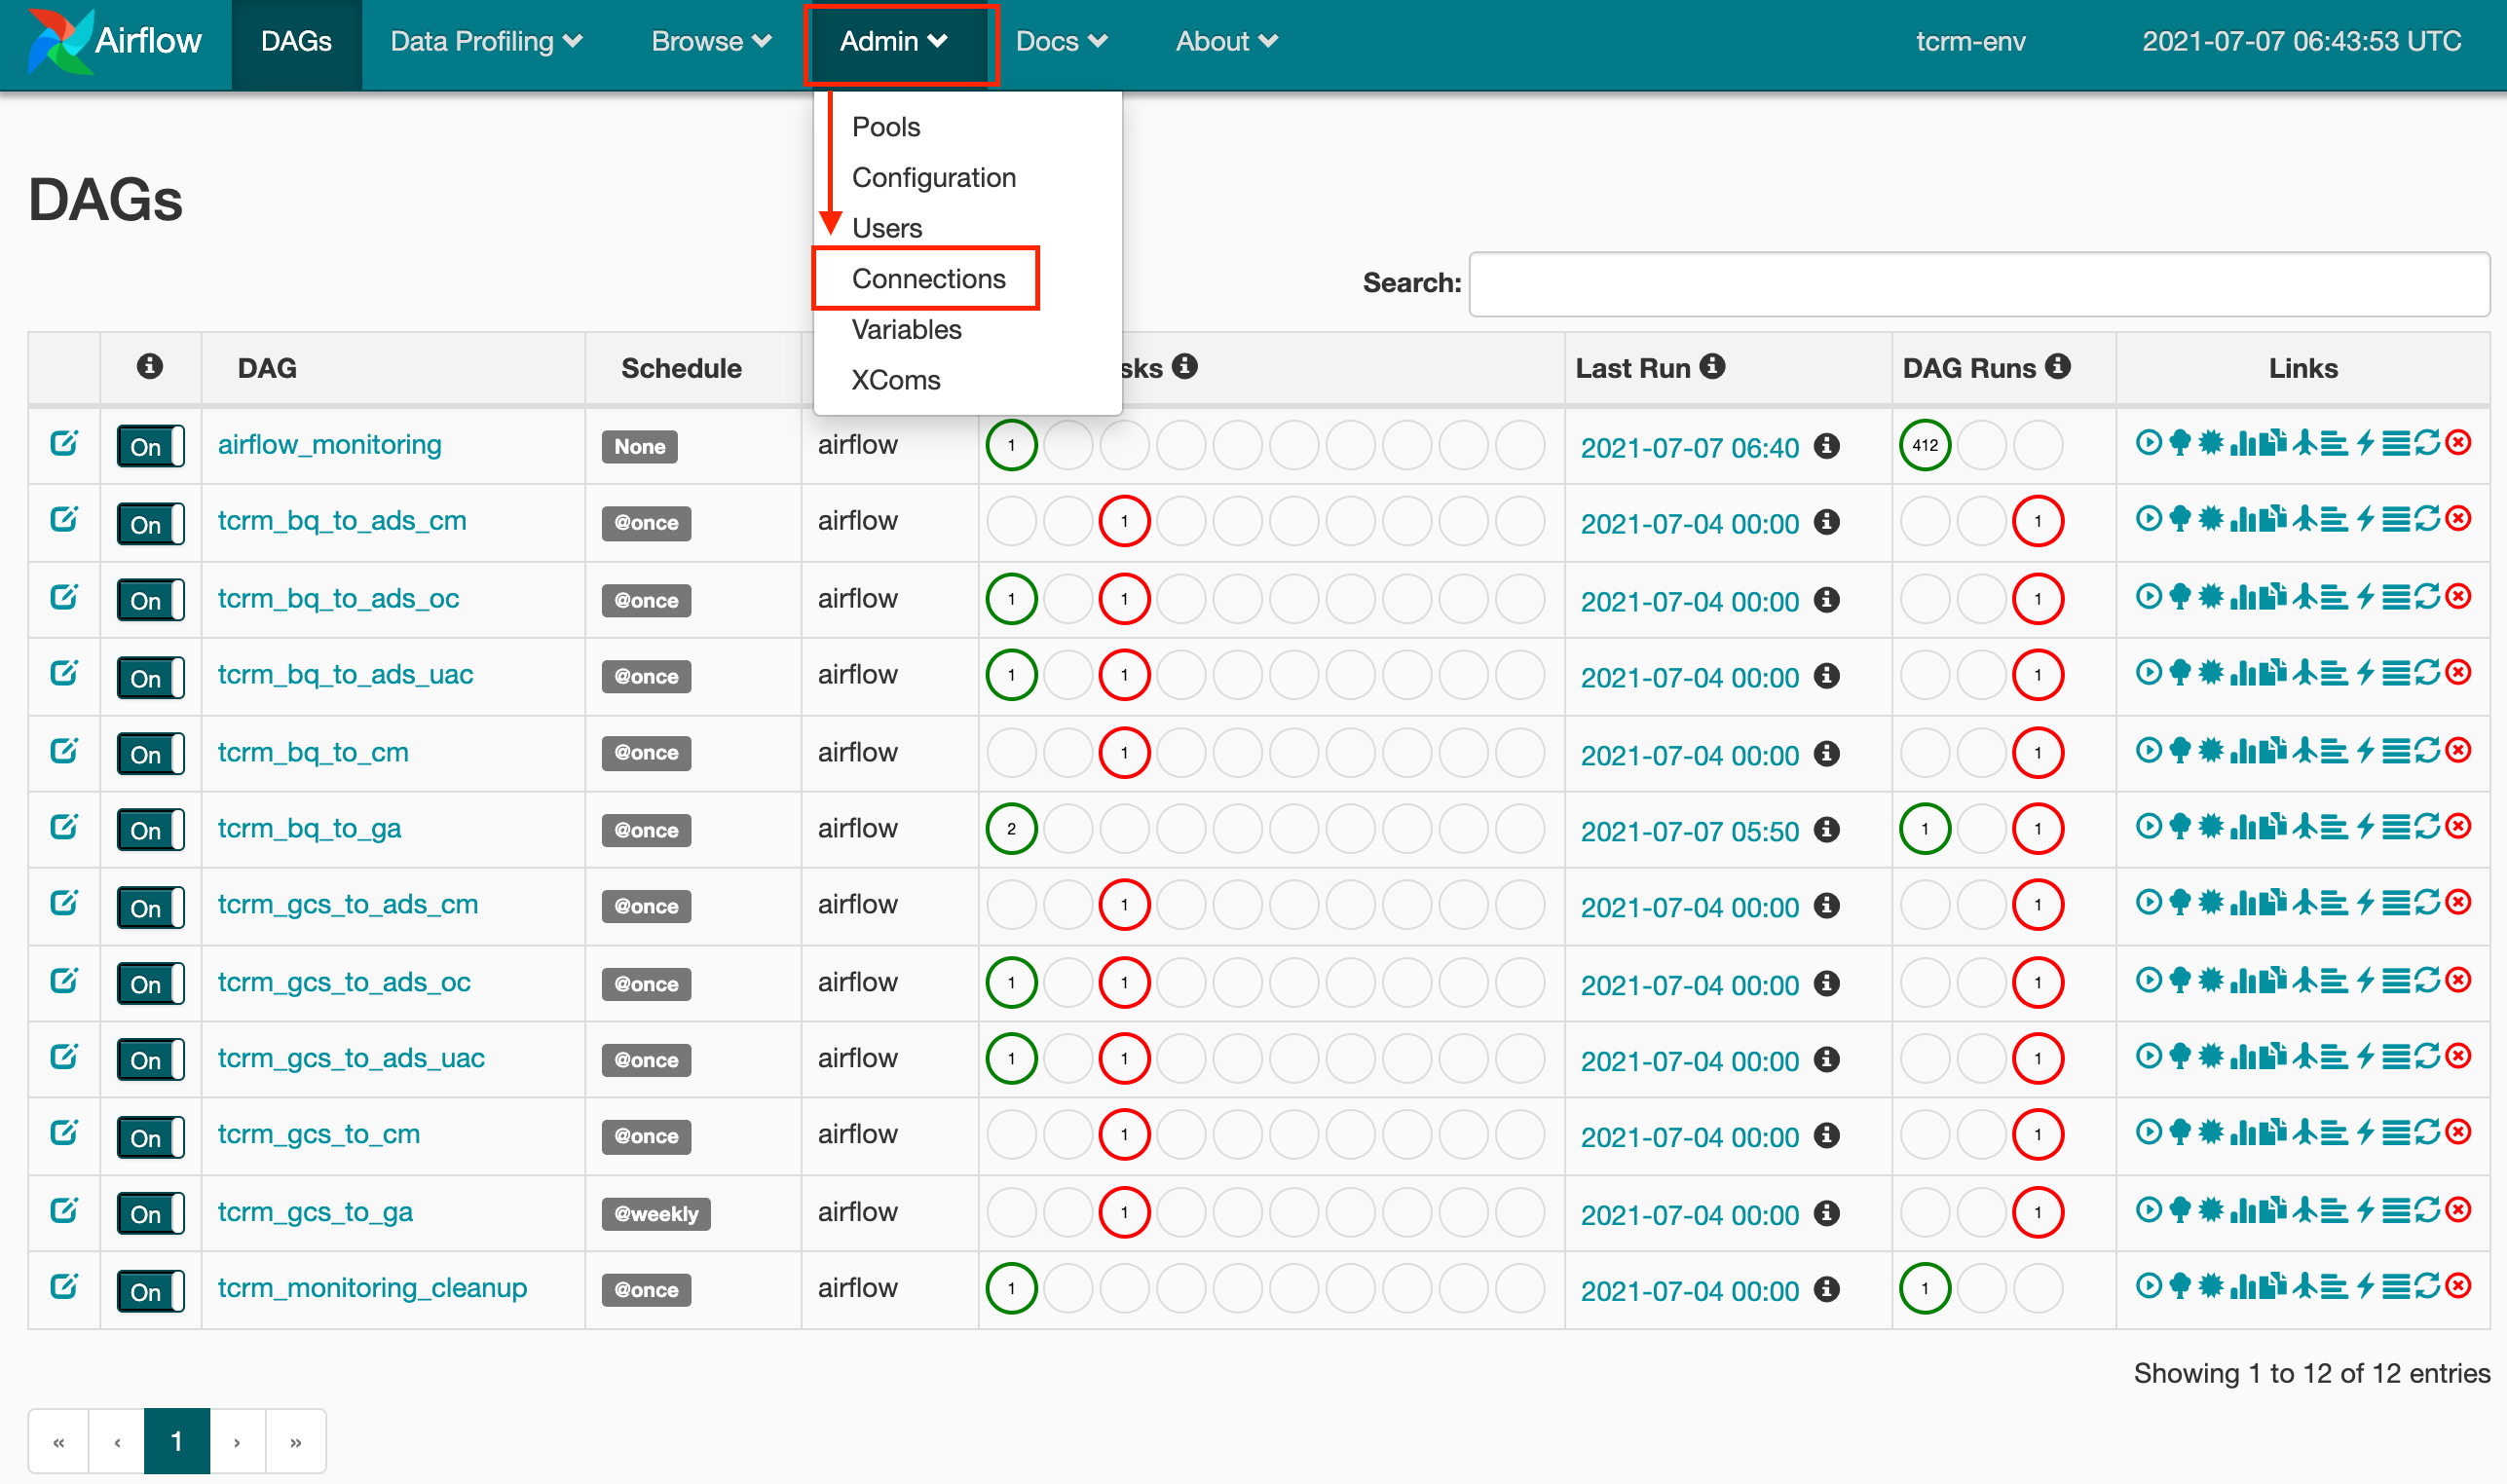
Go back to Airflow (Composer → Airflow) and select Admin → Connections.
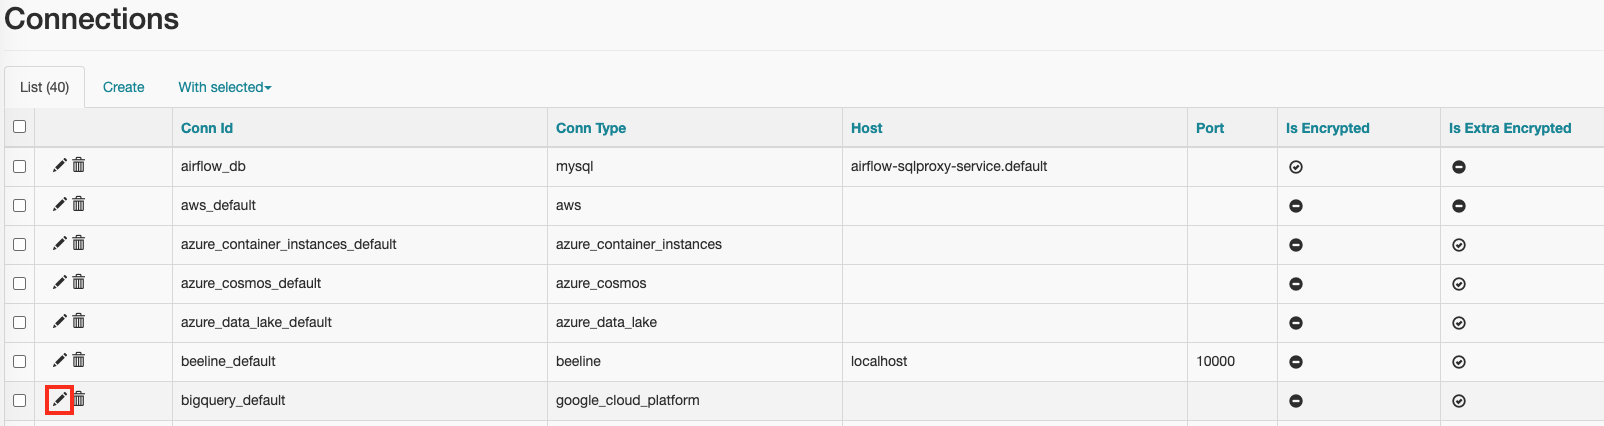
Click on the pencil icon next to the connection bigquery_default.
NOTE: The default connection name is bigquery_default. If you are using a
different BigQuery connection name please make sure to set the
monitoring_bq_conn_id and bq_conn_id Airflow variables (variables, not
connections) with the new connection name.
TIP: Refer to this page for more details on managing Airflow connections.
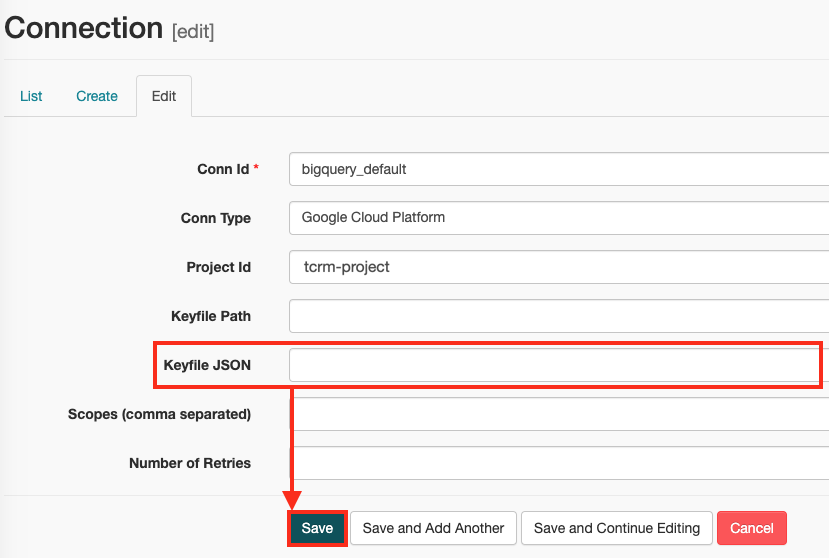
Paste the service account JSON into the Keyfile JSON field and click save.
3.2 Setup variables using Airflow UI
Open the menu on the top left part of the screen. Then click on
Composerto open the Composer environments page.
In the Composer Screen, find the row named
tcrm-envon the left side of the list. In that row, click theAirflowlink to open the Airflow console.
In the Airflow console, on the top menu bar, click on
Adminoption, then chooseVariablesfrom the drop down menu.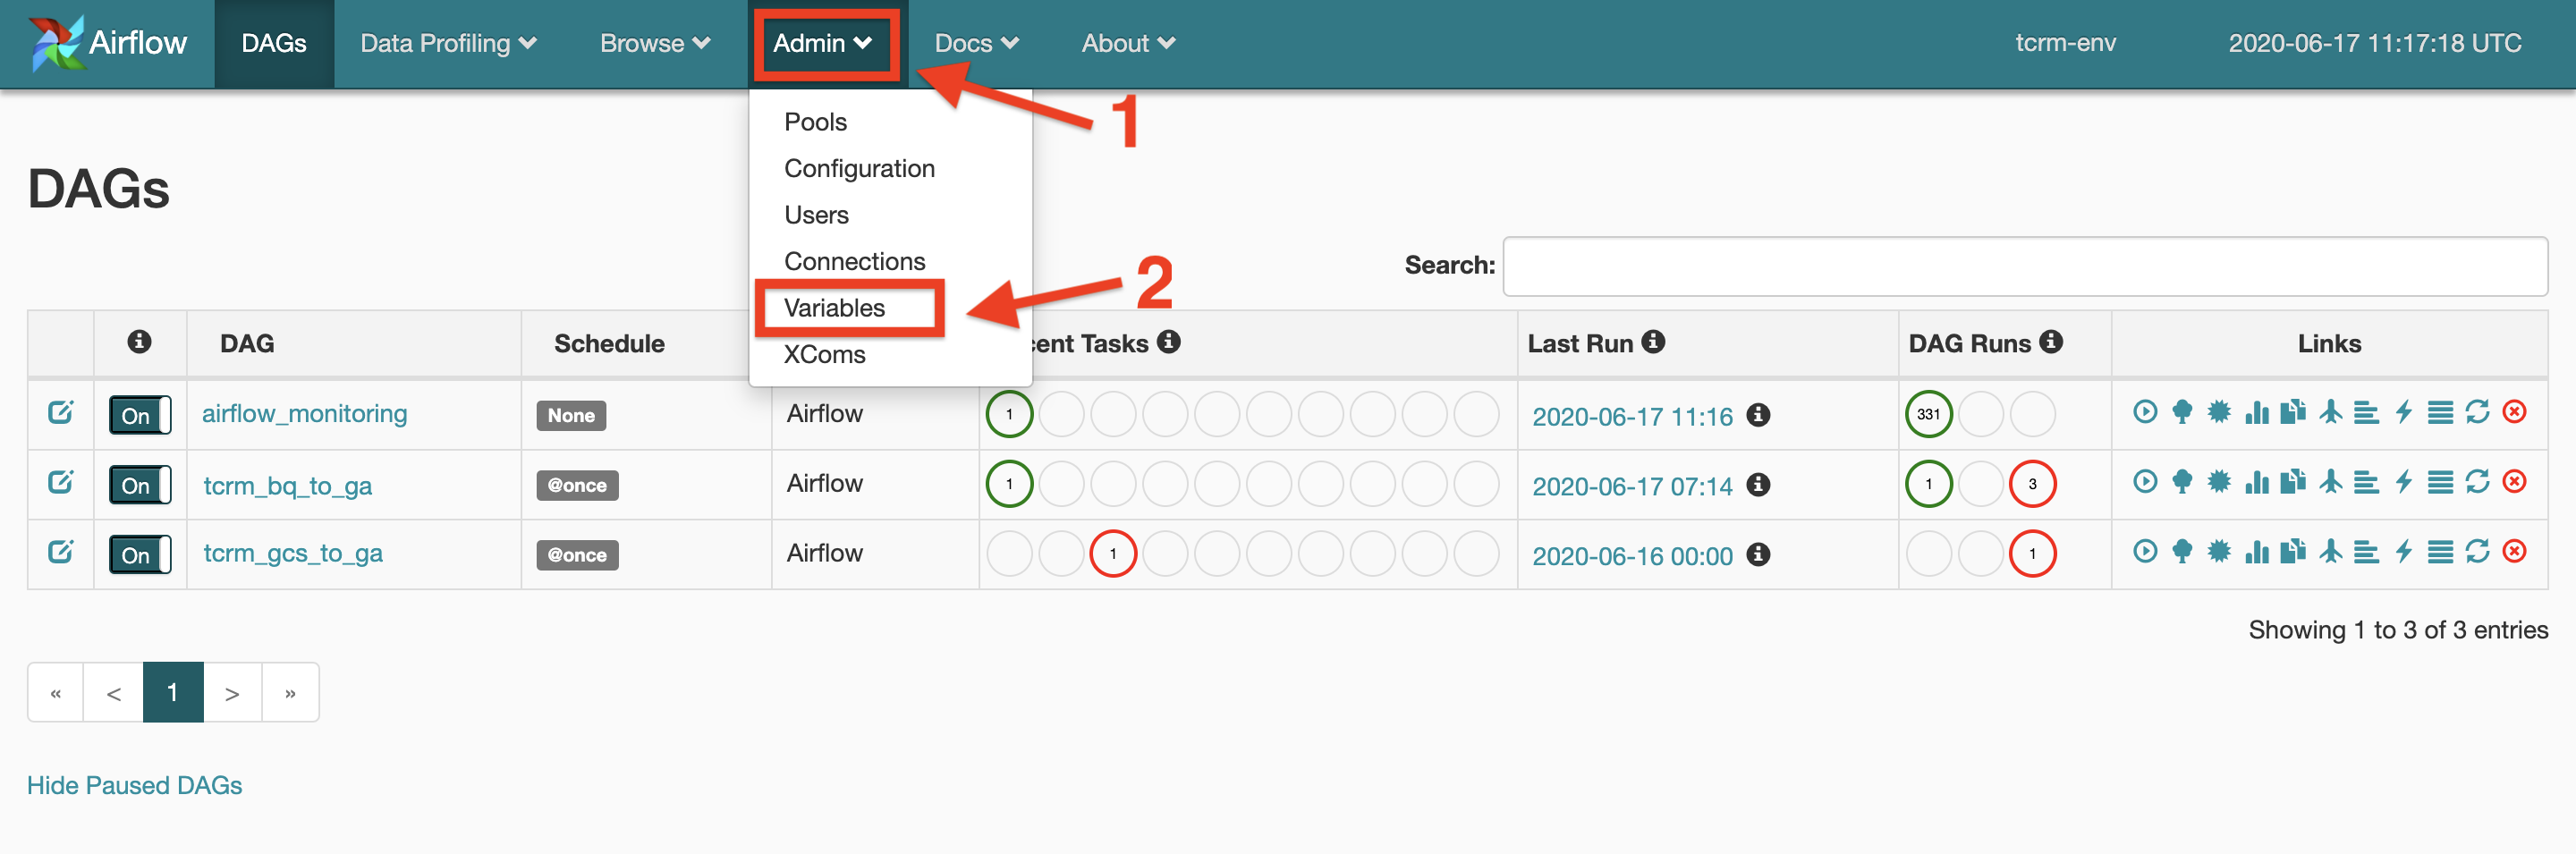
In the Variables screen click on
Create.
To add a new variable enter the variable key name and the value, then click on
save. Refer to the next 2 steps to see which variables are needed for each DAG.
3.3 Configure General DAG variables
The following table containes the general variables needed by all the DAGs.
Those variables have default values already automatically set up for you so
you don't need to change anything if the default values fit your needs. You
can change these variables, however, at any time by setting an Airflow variable
with the same Variable Name to another value.
To allow for different DAGs to have different configurations some varriables'
names will contain the DAG name as a prefix. Pleease be sure you replace the
<DAG Name> part and use the right DAG name.
For example: to set the schedule variable for tcrm_gcs_to_ga DAG, take the
variable name from the below table <DAG Name>_schedule and create a variable
called tcrm_gcs_to_ga_schedule. To schedule tcrm_gcs_to_ads_oc DAG, create a
variable called tcrm_gcs_to_ads_oc_schedule.
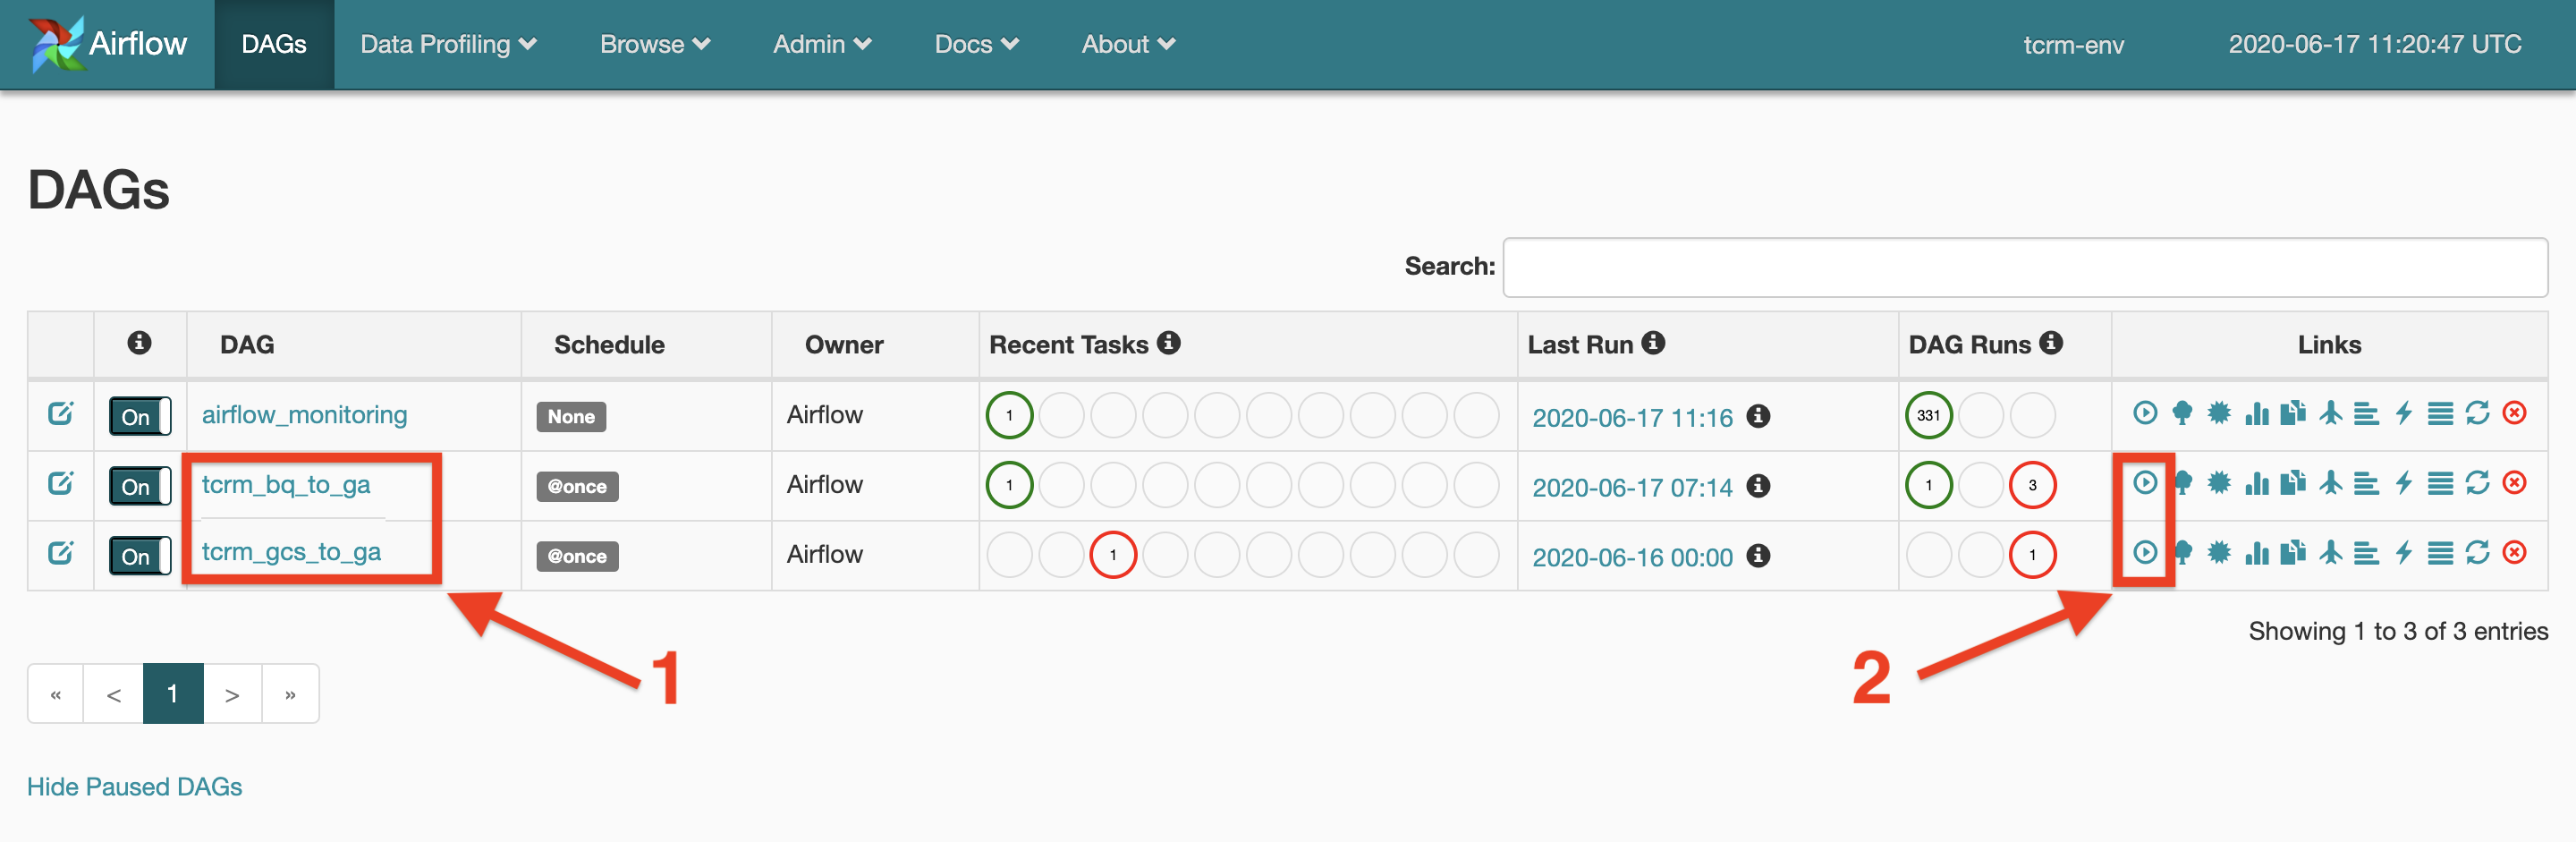
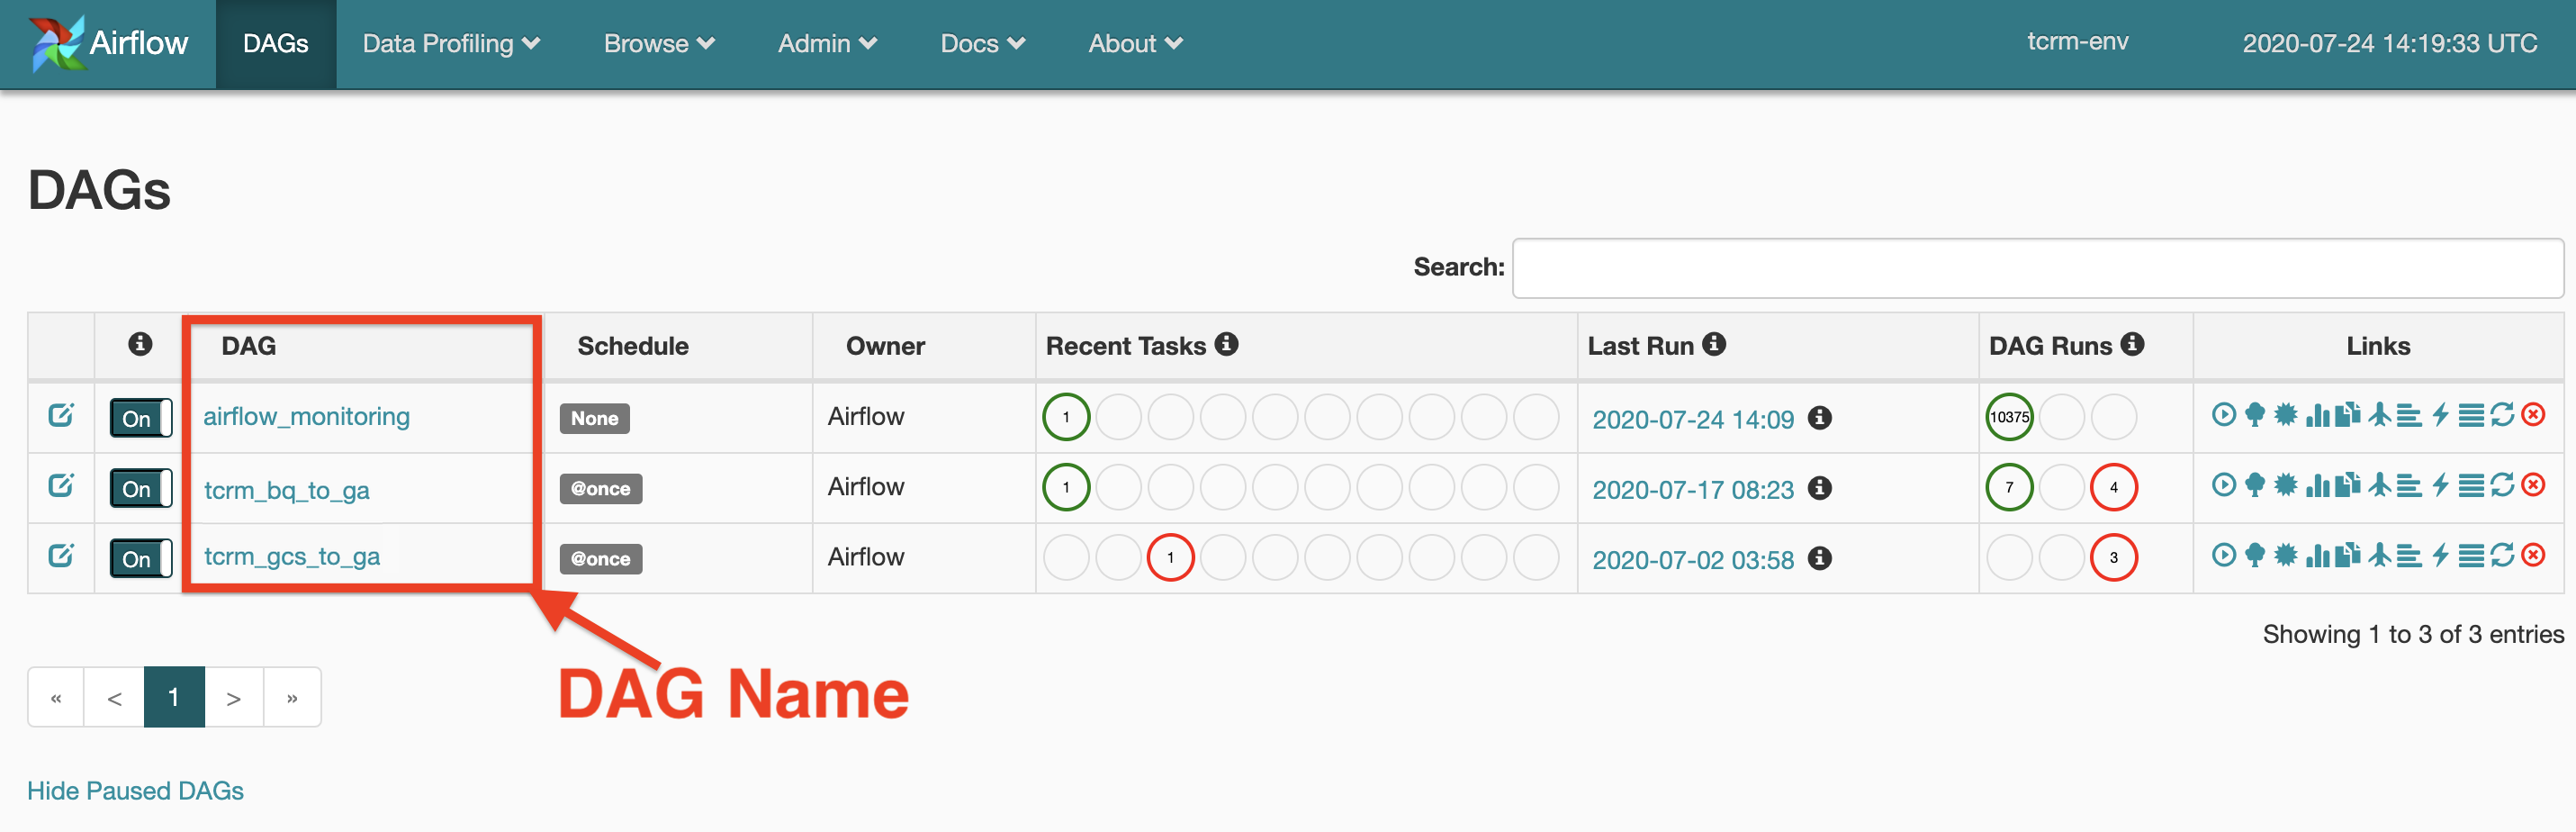
The DAG name can be found in the Airflow UI in the DAGs tab:
3.3.1 General Variable Table
| Variable Name | Default Value | Variable Information |
|---|---|---|
<DAG_Name>_retries |
0 |
Integer. Number of times Airflow will try to re-run the DAG if it fails. We recommend to keep this at 0 since TCRM has its own retry mechnism. Seting it to any other integer however will not cause errors, but it will not attempt to re-send previously faild events. |
<DAG_Name>_retry_delay |
3 |
Integer. Number of minutes between each DAG re-run. |
<DAG_Name>_schedule |
@once |
A DAG Schedule. See section 3.3.2 Schedule a DAG for more information on how to schedule DAGs. |
<DAG_Name>_is_retry |
1 |
1 to enable, 0 to disable. Whether or not the DAG should retry sending previously failed events to the same output source. This is an internal retry to send faild events from previous similar runs. It is different from the Airflow retry of the whole DAG. See the Retry Mechanism section of this Usage Guide for more information. |
<DAG_Name>_is_run |
1 |
1 to enable, 0 to disable. Whether or not the DAG should includ a main run. This option can be disabled should the user want to skip the main run and only run the retry operation. See the Run section of this Usage Guide for more information. |
<DAG_Name>_enable_run_report |
0 |
1 to enable, 0 to disable. Indicates whether the DAG will return a run report or not. Not all DAGs have reports. See the Reports section of this Usage Guide for more information. |
<DAG_Name>_enable_monitoring |
1 |
1 to enable, 0 to disable. See the Monitoring section of this Usage Guide for more information. |
monitoring_dataset |
tcrm_monitoring_dataset |
The dataset id of the monitoring table. |
monitoring_table |
tcrm_monitoring_table |
The table name of the monitoring table. |
monitoring_bq_conn_id |
bigquery_default |
BigQuery connection ID for the monitoring table. This could be the same or different from the input BQ connection ID. |
3.3.2 Schedule a DAG
To setup the DAG scheduler, create a schedule variable for each DAG you want to
schedule. The variable name should start with the DAG name, followed by
_schedule.
The value of the variable should be the interval you wish to schedule your DAG to. For example:
Insert @once to run the DAG only once, or insert @daily or @weekly to set
the DAG to run accordingly. Refer to this
guide to
find out about all the available scheduling options.
These are optional variables. If schedule variables are not set, the default
schedule for all DAGs is @once.

3.4 Configure specific DAG variables
The folowing section indicates which variables are needed to run each DAG. You will only need to set up variables for the DAGs you are planning to use.
3.4.1 tcrm_bq_to_ga DAG
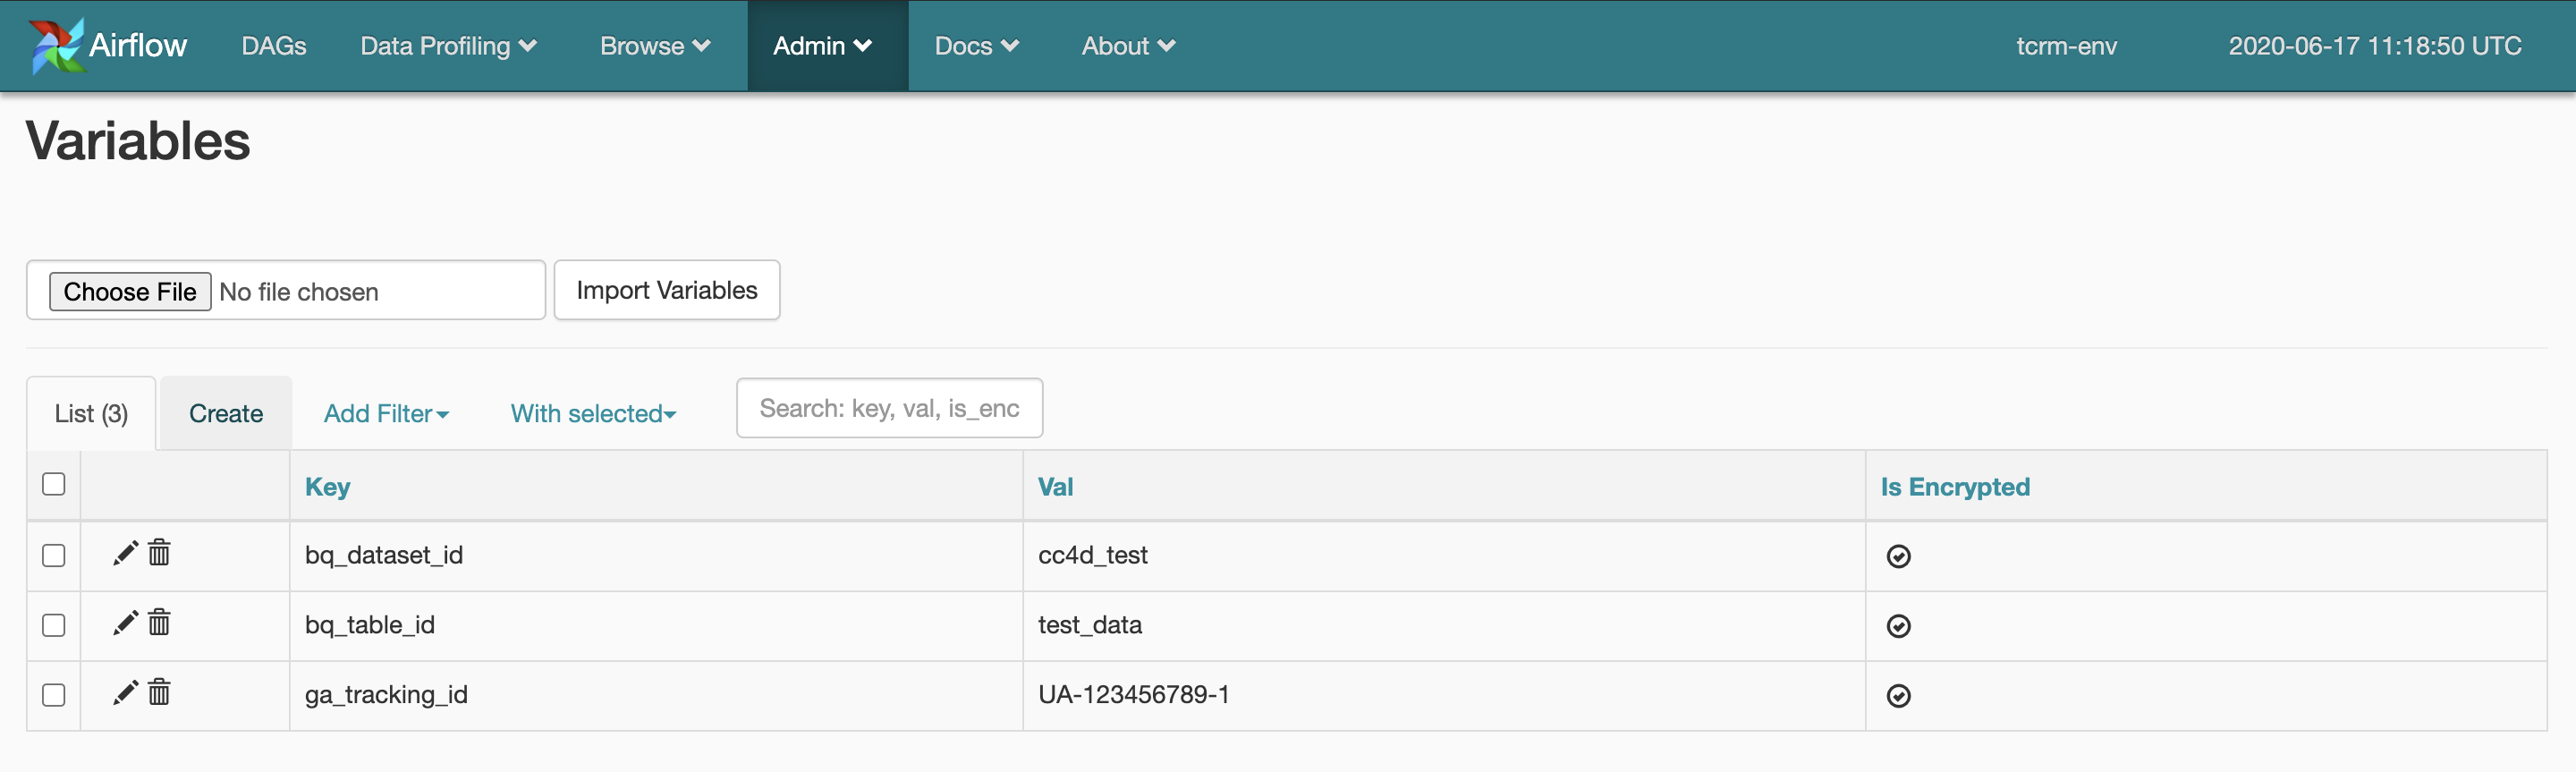
To to run the tcrm_bq_to_ga DAG set the following variables:
bq_dataset_id: The name of the BigQuery dataset containing the data. Example:my_datasetbq_table_id: The name of the BigQuery table containing the data. Example:my_tablega_tracking_id: Google Analytics Tracking ID. Example:UA-123456789-1
3.4.2 tcrm_gcs_to_ga DAG
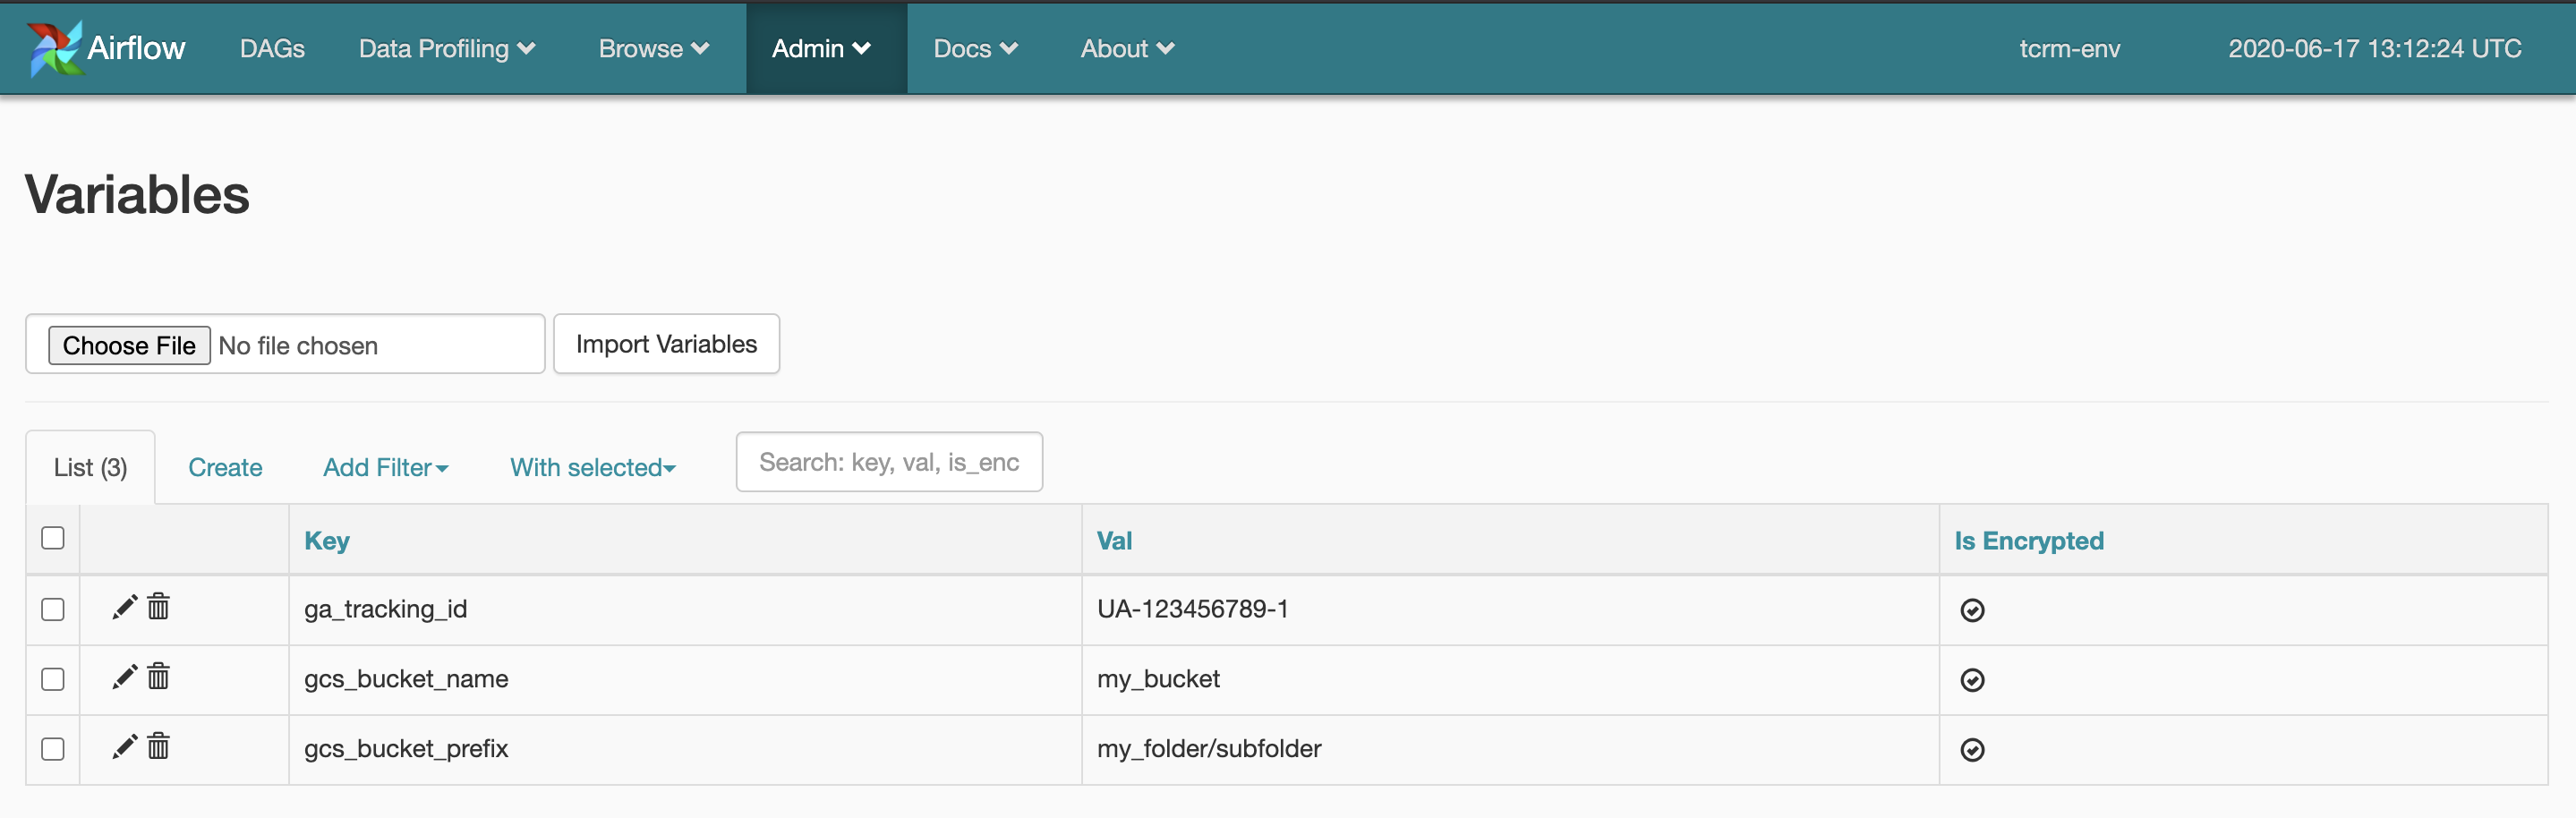
To run the tcrm_gcs_to_ga DAG set the following variables:
gcs_bucket_name: Cloud Storage bucket name. Example:my_bucketgcs_bucket_prefix: The path to the data folder inside the bucket. Example:folder/sub_foldergcs_content_type(optional): Cloud Storage content type. EitherJSONorCSV.ga_tracking_id: Google Analytics Tracking ID. Example:UA-123456789-1
3.4.3 tcrm_bq_to_ads_oc DAG
To run the tcrm_bq_to_ads_oc DAG set the following variables:
bq_dataset_id: The name of the BigQuery dataset containing the data. Example:my_datasetbq_table_id: The name of the BigQuery table containing the data. Example:my_tableads_credentials: The authentication info for Google Adwords API, please refer to 3.5.1 Create ads_credentials YAML string for Google Ads Authentication for more information.
3.4.4 tcrm_gcs_to_ads_oc DAG
To run the tcrm_gcs_to_ads_oc DAG set the following variables:
gcs_bucket_name: Cloud Storage bucket name. Example:my_bucketgcs_bucket_prefix: The path to the data folder inside the bucket. Example:folder/sub_foldergcs_content_type(optional): Cloud Storage content type. EitherJSONorCSV.ads_credentials: The authentication info for Google Adwords API, please refer to 3.5.1 Create ads_credentials YAML string for Google Ads Authentication for more information.
3.5 Authentication against Google Platforms
3.5.1 Create ads_credentials YAML string for Google Ads Authentication
To authenticate yourself against Google Ads you will need to create a YAML formatted string and save it as an Airflow parameter. This parameter will be used by TCRM for authentication between TCRM and Google Ads. The string format is as follows:
developer_token: abcd
client_id: test.apps.googleusercontent.com
client_secret: secret
refresh_token: 1//token
login_customer_id: 1234567890
use_proto_plus: True
login_customer_id is located on the top right above your email after you log in to Google Ads. The customer id should be a MCC account id that includes the Google Ads accounts that you want to automate.

developer_token is located in API Center after you log in to your Google Ads MCC account.


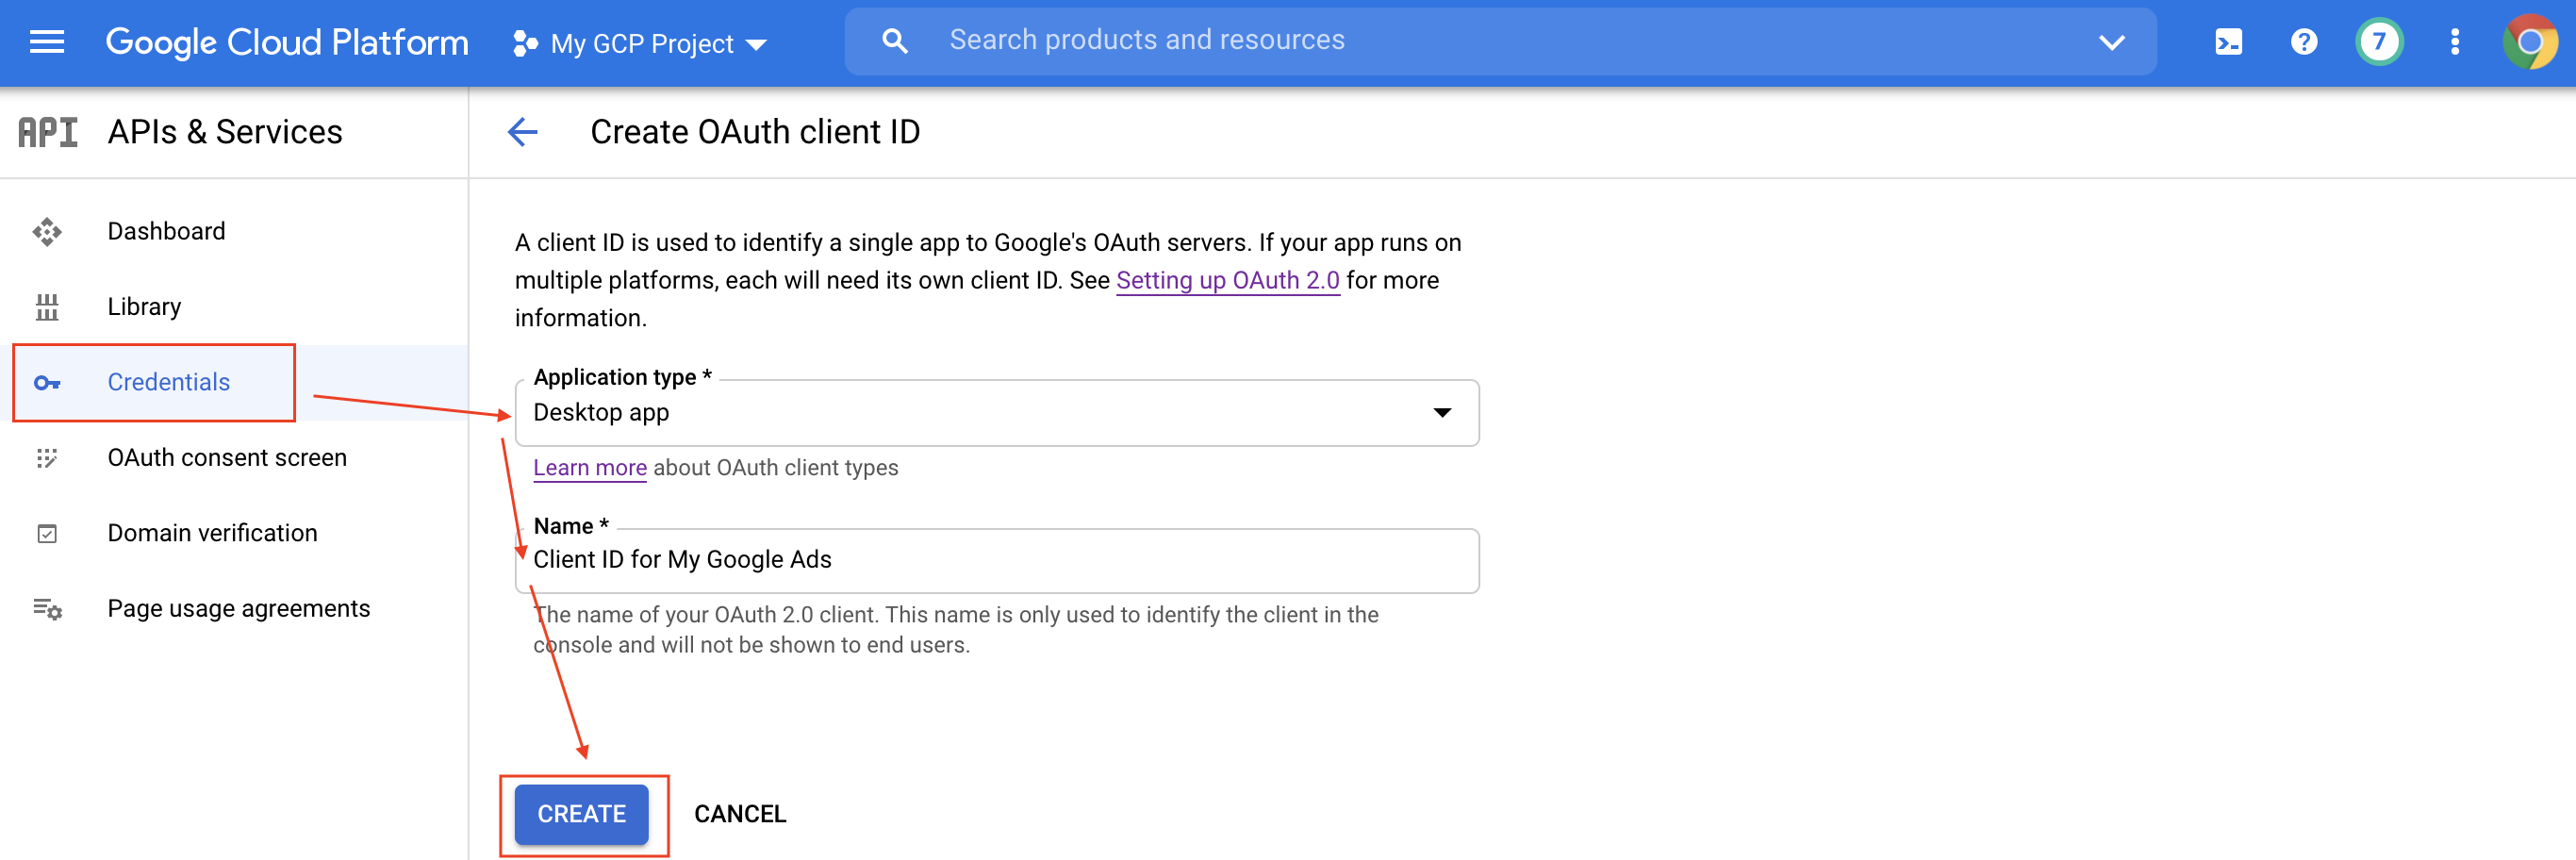
client_id and client_secret can be created in the APIs & Services page in the GCP console.


refresh_token can be generated by doing the following:
Execute the Python script with the required parameters in a terminal.
python generate_refresh_token.py --client_id INSERT_CLIENT_ID
--client_secret INSERT_CLIENT_SECRET
Click on the link.

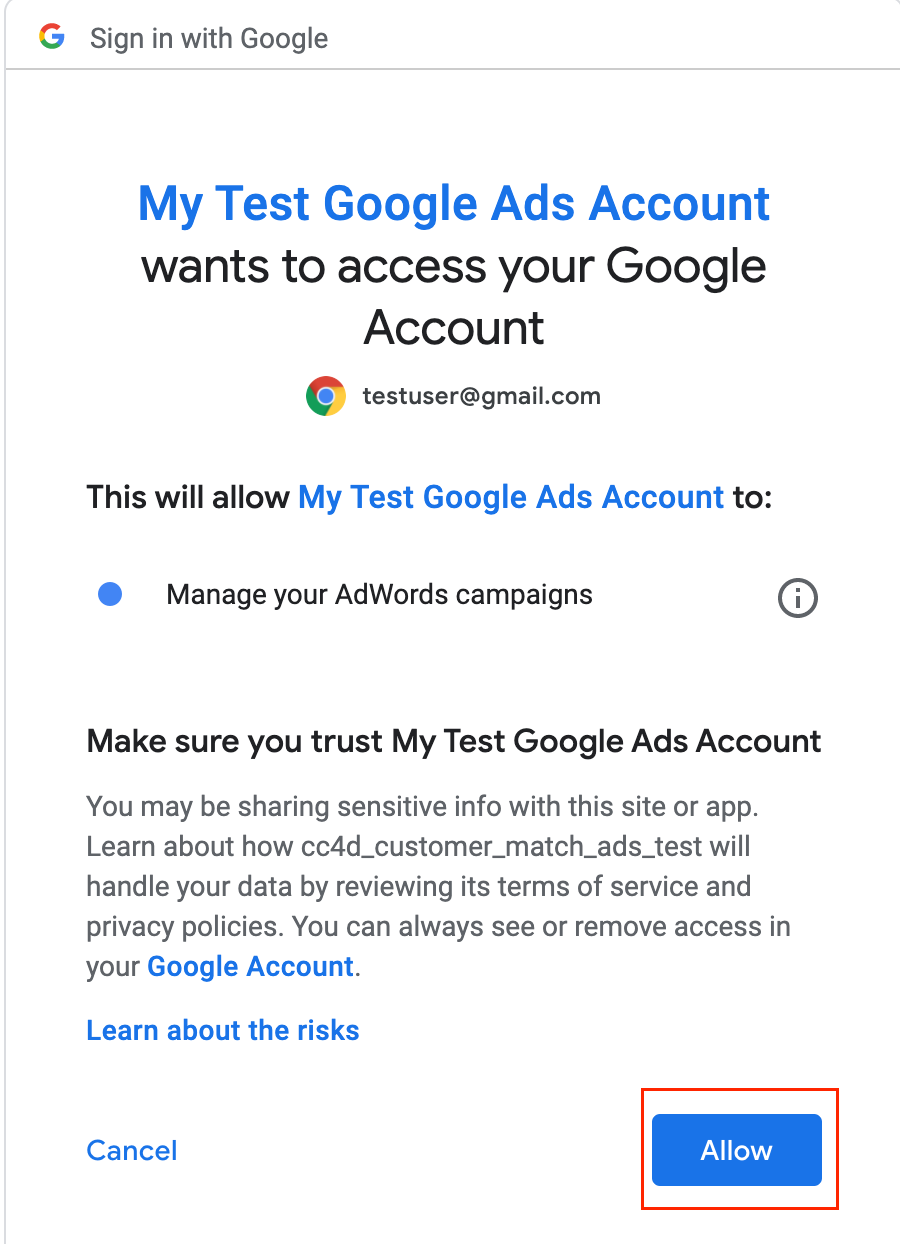
- Choose the email account that has the permission to modify your Google Ads data and click Allow.

- Copy the code and paste it into the terminal after the code. The refresh token will be shown below.


Step 4: Prepare Data to Send
4.1 Prepare Data for Google Analytics (GA)
NOTE: Refer to the Measurement Protocol API for the detailed requirements.
To send your data to GA you can choose from the following 3 options:
From BigQuery using the
tcrm_bq_to_gaDAG in SQL table Format.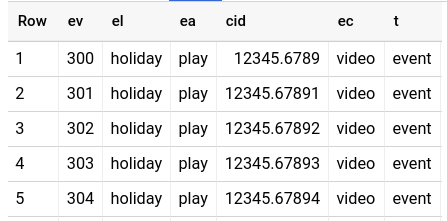
From Google Cloud Storage using the
tcrm_gcp_to_gaDAG in JSON Format.
{"cid": "12345.67890", "t":"event", "ec": "video", "ea": "play", "el": "holiday", "ev": "300" }
{"cid": "12345.67891", "t":"event", "ec": "video", "ea": "play", "el": "holiday", "ev": "301" }
{"cid": "12345.67892", "t":"event", "ec": "video", "ea": "play", "el": "holiday", "ev": "302" }
{"cid": "12345.67893", "t":"event", "ec": "video", "ea": "play", "el": "holiday", "ev": "303" }
- From Google Cloud Storage using the
tcrm_gcp_to_gaDAG in CSV Format.
cid,t,ec,ea,el,ev
12345.67890,event,video,play,holiday,300
12345.67891,event,video,play,holiday,301
12345.67892,event,video,play,holiday,302
12345.67893,event,video,play,holiday,303
WARNING: To make sure GA will accept the data sent from TCRM you would need to
configure GA's bot filtering. To do this, go to Admin -> View Settings -> Bot
Filtering in your
Google Analytics UI
and uncheck “Exclude all hits from known bots and spiders”.
4.2 Prepare Data for Google Ads Offline Conversion
To send your data to Google Ads you can choose from the following 3 options:
From BigQuery using the
tcrm_bq_to_ads_ocDAG in SQL table Format.
From Google Cloud Storage using the
tcrm_gcs_to_ads_ocDAG in JSON Format.
{"conversionName": "my_conversion_1", "conversionTime":"20191030 122301 Asia/Calcutta", "conversionValue": "0.47", "googleClickId": "gclid1"}
{"conversionName": "my_conversion_1", "conversionTime":"20191030 122401 Asia/Calcutta", "conversionValue": "0.37", "googleClickId": "gclid2"}
{"conversionName": "my_conversion_2", "conversionTime":"20191030 122501 Asia/Calcutta", "conversionValue": "0.41", "googleClickId": "gclid3"}
{"conversionName": "my_conversion_2", "conversionTime":"20191030 122601 Asia/Calcutta", "conversionValue": "0.17", "googleClickId": "gclid4"}
- From Google Cloud Storage using the
tcrm_gcp_to_ads_ocDAG in CSV Format.
conversionName,conversionTime,conversionValue,googleClickId
my_conversion_1,20191030 122301 Asia/Calcutta,0.47,gclid1
my_conversion_1,20191030 122401 Asia/Calcutta,0.37,gclid2
my_conversion_2,20191030 122501 Asia/Calcutta,0.41,gclid3
my_conversion_2,20191030 122601 Asia/Calcutta,0.17,gclid4
Step 5: Run TCRM
In the Airflow console click on the DAGs option from the top menu bar. Find
the DAG you’d like to run in the list on the left. Then run it by clicking the
Play button on the right side of the list.