You can configure your mobile apps using the Google Analytics for Firebase SDK
to work with server-side tagging in Google Tag Manager.
Server-side tagging lets you stage, redact, and augment your data before
sending it onward to destination products like Google Analytics. Learn more
about [Server-side tagging](https://developers.google.com/tag-platform/tag-manager/server-side/overview).
To set up server-side tagging for mobile apps:
1. [Get your app ready for server-side tagging](https://developers.google.com/tag-platform/tag-manager/server-side/server-side-tagging-for-mobile-apps#step_1_get_your_app_ready_for_server-side_tagging)
2. [Configure your server container to support mobile traffic](https://developers.google.com/tag-platform/tag-manager/server-side/server-side-tagging-for-mobile-apps#step_2_configure_your_server_container_to_support_mobile_traffic)
3. [Enable server-side tagging in your Google Analytics property](https://developers.google.com/tag-platform/tag-manager/server-side/server-side-tagging-for-mobile-apps#step_3_enable_server-side_tagging_in_your_ga4_property)
## Prerequisites
- You need to include the Google Analytics for Firebase SDK in your app and connect it to your Google Analytics property. Learn more about the [Google
Analytics for Firebase SDK](https://firebase.google.com/docs/analytics/get-started).
- You need a Google Tag Manager account and a server container. If you don't have one, [create a new Tag Manager account and
container](https://support.google.com/tagmanager/answer/6103696).
- You need to [set up a tagging server](https://developers.google.com/tag-platform/tag-manager/server-side/overview#set_up_a_tagging_server).
## Step 1: Get your app ready for server-side tagging
### iOS
1. Enable the server-side tagging upload feature and set up the custom URL
scheme for server-side tagging debug mode in the `Info.plist` file.
Replace the `BUNDLE_ID` on the following with the app's bundle identifier.
...
CFBundleURLTypes
CFBundleTypeRole
None
CFBundleURLName
BUNDLE_ID
CFBundleURLSchemes
tagmanager.sgtm.c.BUNDLE_ID
GOOGLE_ANALYTICS_SGTM_UPLOAD_ENABLED
2. To enable the debug or preview mode, add a call to [`Analytics.handleOpen(_:)`](https://firebase.google.com/docs/reference/swift/firebaseanalytics/api/reference/Categories/FIRAnalytics(AppDelegate)#handleopen_:)
in a lifecycle method to pass the launch URL.
### SwiftUI
@main
struct MyApplication: App {
var body: some Scene {
WindowGroup {
ContentView()
.onOpenURL { url in
Analytics.handleOpen(url)
}
}
}
}
### UIScene
class SceneDelegate: UIResponder, UIWindowSceneDelegate {
func scene(_ scene: UIScene, willConnectTo session: UISceneSession,
options connectionOptions: UIScene.ConnectionOptions) {
...
if let urlContext = connectionOptions.urlContexts.first {
let url = urlContext.url
Analytics.handleOpen(url)
}
}
}
For apps that don't use SwiftUI or UIScene, no action is required. SDK
receives the launch URL from the
`ApplicationDidFinishLaunchingNotification`.
### Android
1. Install the latest [release](https://firebase.google.com/support/release-notes/android) of the Google Analytics for Firebase SDK.
2. Enable sGTM by adding the following to the application's
`AndroidManifest.xml` file.
> [!NOTE]
> **Note:** **``** should be all lowercase letters. Scheme matching in the [Android
> framework](https://developer.android.com/guide/topics/manifest/data-element#scheme) is case-sensitive, unlike the RFC.
## Step 2: Configure your server container to support mobile traffic
The following section assumes you have an existing server-side tagging
deployment and are familiar with its concepts. If you're new to server-side
tagging, you may take the [server-side tagging fundamentals course](https://developers.google.com/tag-platform/learn/sst-fundamentals).
### Set up the Google Analytics: GA4 (App) client
A client is a Tag Manager resource type that intercepts certain types of
incoming requests and generates events that can be passed to a destination,
like Google Analytics. In this case, the HTTP request is a Google Analytics
event, so you need to configure the built-in Google Analytics: GA4
(App) client. You only need one Google Analytics client per data source such as
GA SDK and website. Learn more about [How clients
work](https://developers.google.com/tag-platform/tag-manager/server-side/intro#how_clients_work).
1. In your server container, go to **Clients** and click **New**.
2. Click **Client Configuration** , then select **Google Analytics: GA4 (App)**.
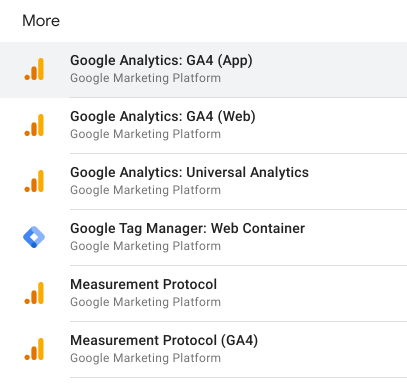
3. Enter a name for your client and click **Save**.
### Configure your Google Analytics: GA4 tag
To send data to Google Analytics, you'll need to create a Google Analytics:
GA4 tag in the server container. The client parses the incoming
HTTP request into an event data object. The tag will take this event data
object, map it to the correct format, and then send it to Google Analytics.
1. In your server container, go to **Tags** and click **New**.
2. Click **Tag Configuration** , then choose **Google Analytics: GA4**.
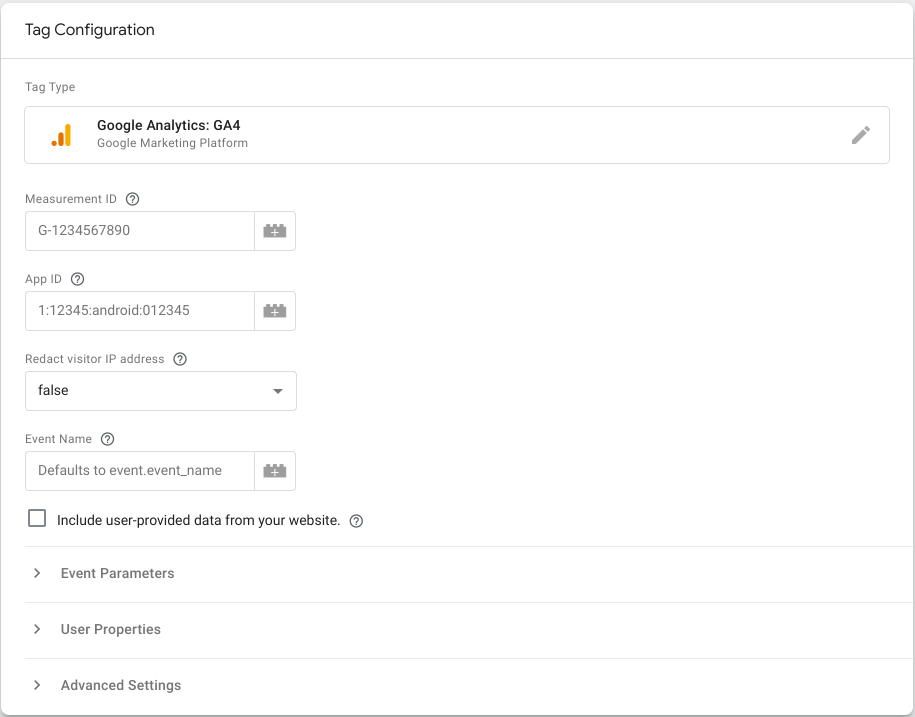
By default, the tag will inherit all the relevant fields and parameters from the
event data object created by the client:
- If the incoming Google Analytics request passes through the **Google Analytics: GA4 (App)** client, the tag inherits the App ID and event parameters.
- If the incoming Google Analytics requests passes through the **Google Analytics: GA4 (Web)** client, the tag inherits the Measurement ID and event parameters.
> [!TIP]
> **Tip:** You can optionally use [transformations](https://developers.google.com/tag-platform/tag-manager/server-side/transformations) to include, exclude, or modify event parameters output from your client before they are exposed to tags. With transformations, you can safeguard sensitive information and have fine-grained control over what event parameters are available for further processing.
### Set up triggers for mobile traffic
You should then establish when the GA4 tag should fire. The Google Analytics:
GA4 (App) client parses the incoming request into an event data object, and the
tag will inherit its values. Therefore, you will typically want the tag to fire
whenever the GA4 client claims the request.
To set up the triggers:
1. In the tag settings, click **Triggering**.
2. To create a new trigger, click the **+** icon in the top right corner.
3. Click **Trigger Configuration** to choose the trigger type.
4. Choose **Custom** or **Custom Event** from the list.
- The **Custom trigger** type, by default, fires the tag when any event is generated by a server-side client.
- The **Custom Event** trigger type can be used to fire the tag on a specific event name or an event that matches a regular expression pattern.
5. To enable the list of activation conditions for this trigger such as to fire
only on mobile or web events data, select **Some Events**.
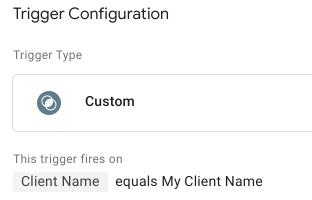
1. You'll see **Event Name** pre-selected. Click that selector and select **Choose Built-In Variable** from the list.
2. To automatically return the name of the client that generated the event, select **Client Name**.
3. Use the name of the client you configured earlier to set the condition accordingly. Your trigger should look like this:
> [!NOTE]
> **Note:** The name of the client is what you specified in the previous step. The type of client is Google Analytics: GA4 (App). The Client Name variable returns the name and not the type of the client.
6. Save the trigger and enter a descriptive name. For example, you can use "All
GA4 App Events."
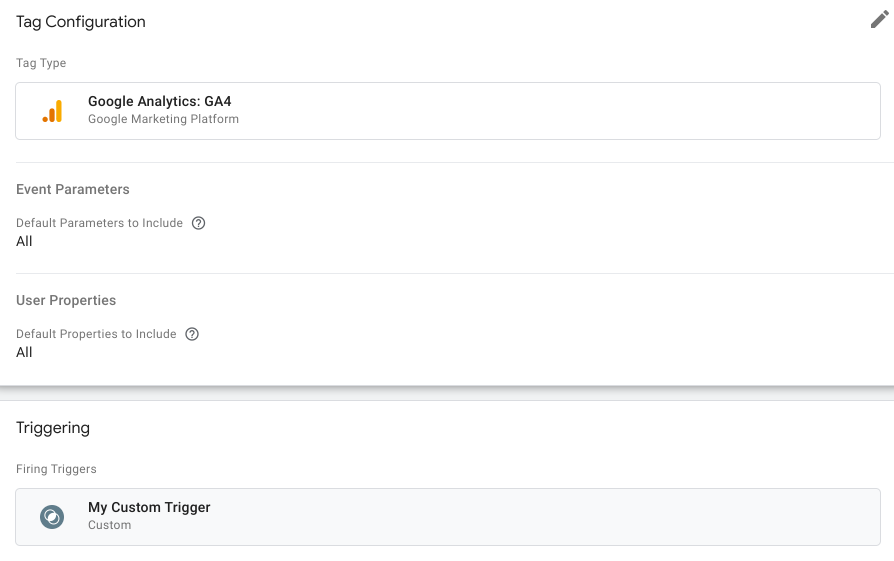
7. You should now be back in the tag settings with the new trigger in its
place. Save the tag and enter a descriptive name, for example "GA4." Your
tag should look like this:
> [!TIP]
> **Tip:** To omit certain events from being sent onward, you may choose to use custom triggers with conditional logic based on the event name (or some other variable) or to add trigger exceptions. Learn more about [Firing triggers and trigger
> exceptions](https://support.google.com/tagmanager/answer/7679318).
### Preview your container
You can use Google Tag Manager to [preview and debug your server container](https://developers.google.com/tag-platform/tag-manager/server-side/debug)
before publishing the changes. Note that previewing won't work until you've
[enabled server-side tagging in your Google Analytics property](https://developers.google.com/tag-platform/tag-manager/server-side/server-side-tagging-for-mobile-apps#step_3_enable_server-side_tagging_in_your_ga4_property).
To have your app requests trigger the preview configuration, you need to:
1. Select **Preview** while in your Google Tag Manager server container.
2. Click the **More Actions** icon **⋮** on the top right and select **Send requests from an app**.
3. Enter your app ID and click **Generate QR Code**.
> [!NOTE]
> **Note:** The app ID must start with a letter. Alternatively, you can use any unique ID that starts with a letter as long as it matches with the ID used in the `Info.plist` or `AndroidManifest.xml` file.
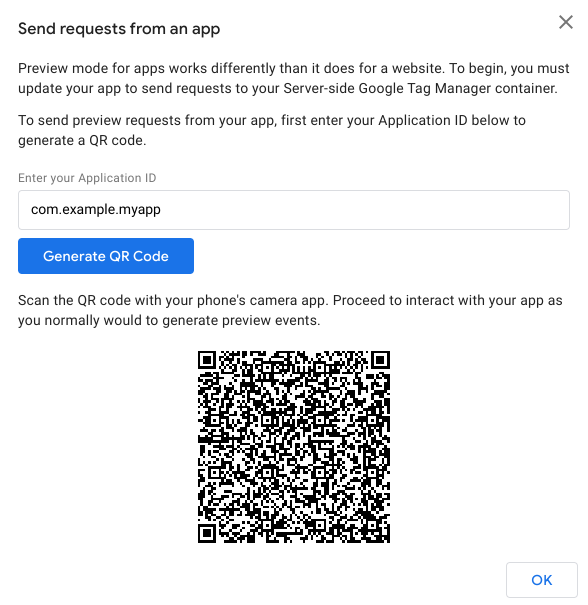
4. Scan the QR code with your phone's camera app. Proceed to interact with your
app as you normally would to generate preview events.
5. Click **OK** to close the dialog.
### Publish your container
After you've verified your changes, publish the container to make those changes
live for all traffic. Learn more about
[Publishing, versions, and approvals](https://support.google.com/tagmanager/answer/6107163).
## Step 3: Enable server-side tagging in your Google Analytics property
1. In your Google Analytics property, go to **Admin**.
2. Open **Data streams**.
3. Select your application's stream configuration from the iOS or Android tab.

4. Click **Configure SDK settings** , then **Configure server-side Tag Manager**.
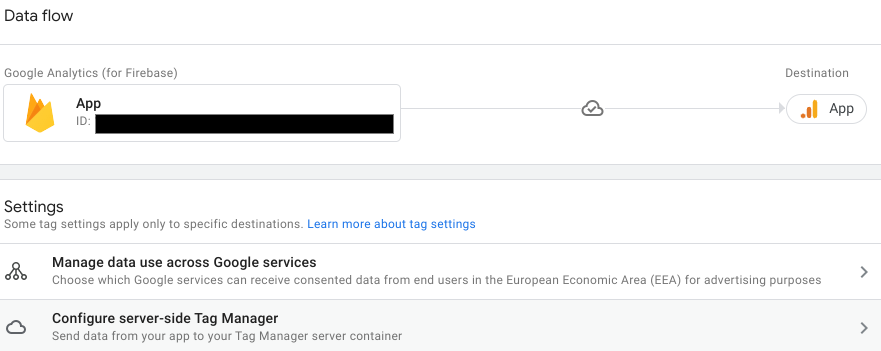
5. To enable the SDK to send measurement data to the server container URL:
1. Toggle the **Send data to a server-side Tag Manager container**.
2. Copy the server container URL. You can find this in your Google Tag Manager by going to **Admin** \> **Container Settings** \> **Server container URLs**.
3. Select the percentage of traffic you want to route to the server
container. You may choose an option under 100% to validate your server
setup and configuration before using server-side tagging for all of your
traffic.
> [!NOTE]
> **Note:** Use the Debug devices only option to enable only apps that are opened using the [Preview mode](https://developers.google.com/tag-platform/tag-manager/server-side/server-side-tagging-for-mobile-apps#preview-your-container) to send data to your server.
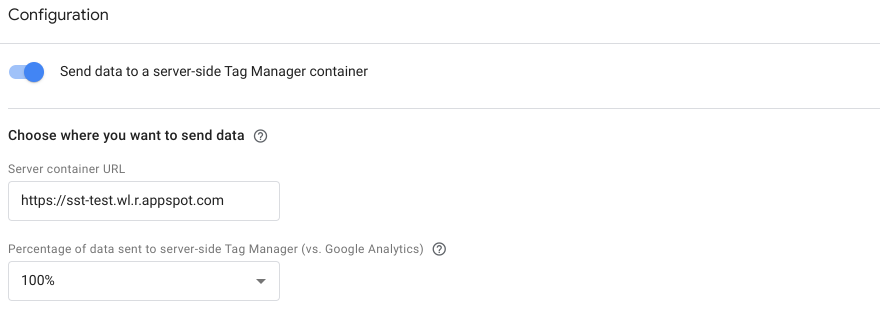
6. Click **Save**. The SDK will retrieve the updated server container URL and
direct measurement data to it.
## Known limitations
- For Android applications:
- Automatically logged [in-app purchases](https://firebase.google.com/docs/analytics/measure-in-app-purchases) rely on integration with Google Play backend and won't be sent to the server container.
- `app_remove` event won't be reported on Android.
- Connecting your app data streams in Google Analytics to your Google Ads
account is still necessary to ensure that your SDK data and conversions are
imported into Google Ads. Server-side tagging does not offer any inherent
integration between your SDK and Google Ads.
> [!NOTE]
> **Note:** The Google Analytics for Firebase SDK is designed and optimized to send data to Google Analytics. Google Analytics can then be linked to Google Ads for conversion reporting, audience creation, campaign optimization, and modeling. This includes server-side tagging for apps, and we encourage customers to take advantage of the integration between Google Analytics and server-side tagging in Google Tag Manager.
## API
You can use the Tag Manager REST API to access the Tag Manager configuration
data. For more information about the API:
- Refer to the [Developer's Guide](https://developers.google.com/tag-platform/tag-manager/api/v2/devguide) to learn how to work with the API.
- Review the [Tag Manager API Reference](https://developers.google.com/tag-platform/tag-manager/api/reference/rest/v2) to familiarize yourself with Tag Manager resources and available operations.