Configuring the Google Analytics 4 data stream
A server container can digest any type of HTTP request dispatched from an online source. However, the recommended way of collecting data is through a Google tag or a gtag.js event running in the web browser. In this part of the course, you’ll learn how to set up a Google tag on the web page, using Tag Manager.
Parallel measurement
If you already have a Google Analytics 4 tracking setup on the website, keep it as it is for now. Don't change your current tracking setup to send data to the server container yet.
Instead, set up a new Google Analytics 4 property for the server-side dispatch. That way you can copy the existing tags one-by-one, until you have a dual-tagged Google Analytics 4 setup on the website.
Dual-tagging means that you essentially duplicate your existing tagging to collect data to a GA4 property for client-side hits and to a GA4 property for server-side hits.
If your intent is to move all data collection to go through your server container, you need to wait until your server-side measurement is at parity with your client-side measurement. At that point you modify your tags to collect to the server, removing your dual-tagging setup in the process.
You can, of course, choose to collect some data directly from the browser to vendors and have some pass through the server container. This type of hybrid collection is very common.
About the Google Analytics client
First, you need to set up a client in the server container. A client is a Tag Manager resource type that intercepts certain types of incoming HTTP requests and generates events that are passed to a destination, like Google Analytics 4.
In this case, the HTTP request is a Google Analytics 4 event, so you need to configure the built-in Google Analytics: GA4 client. You only need one GA4 client.
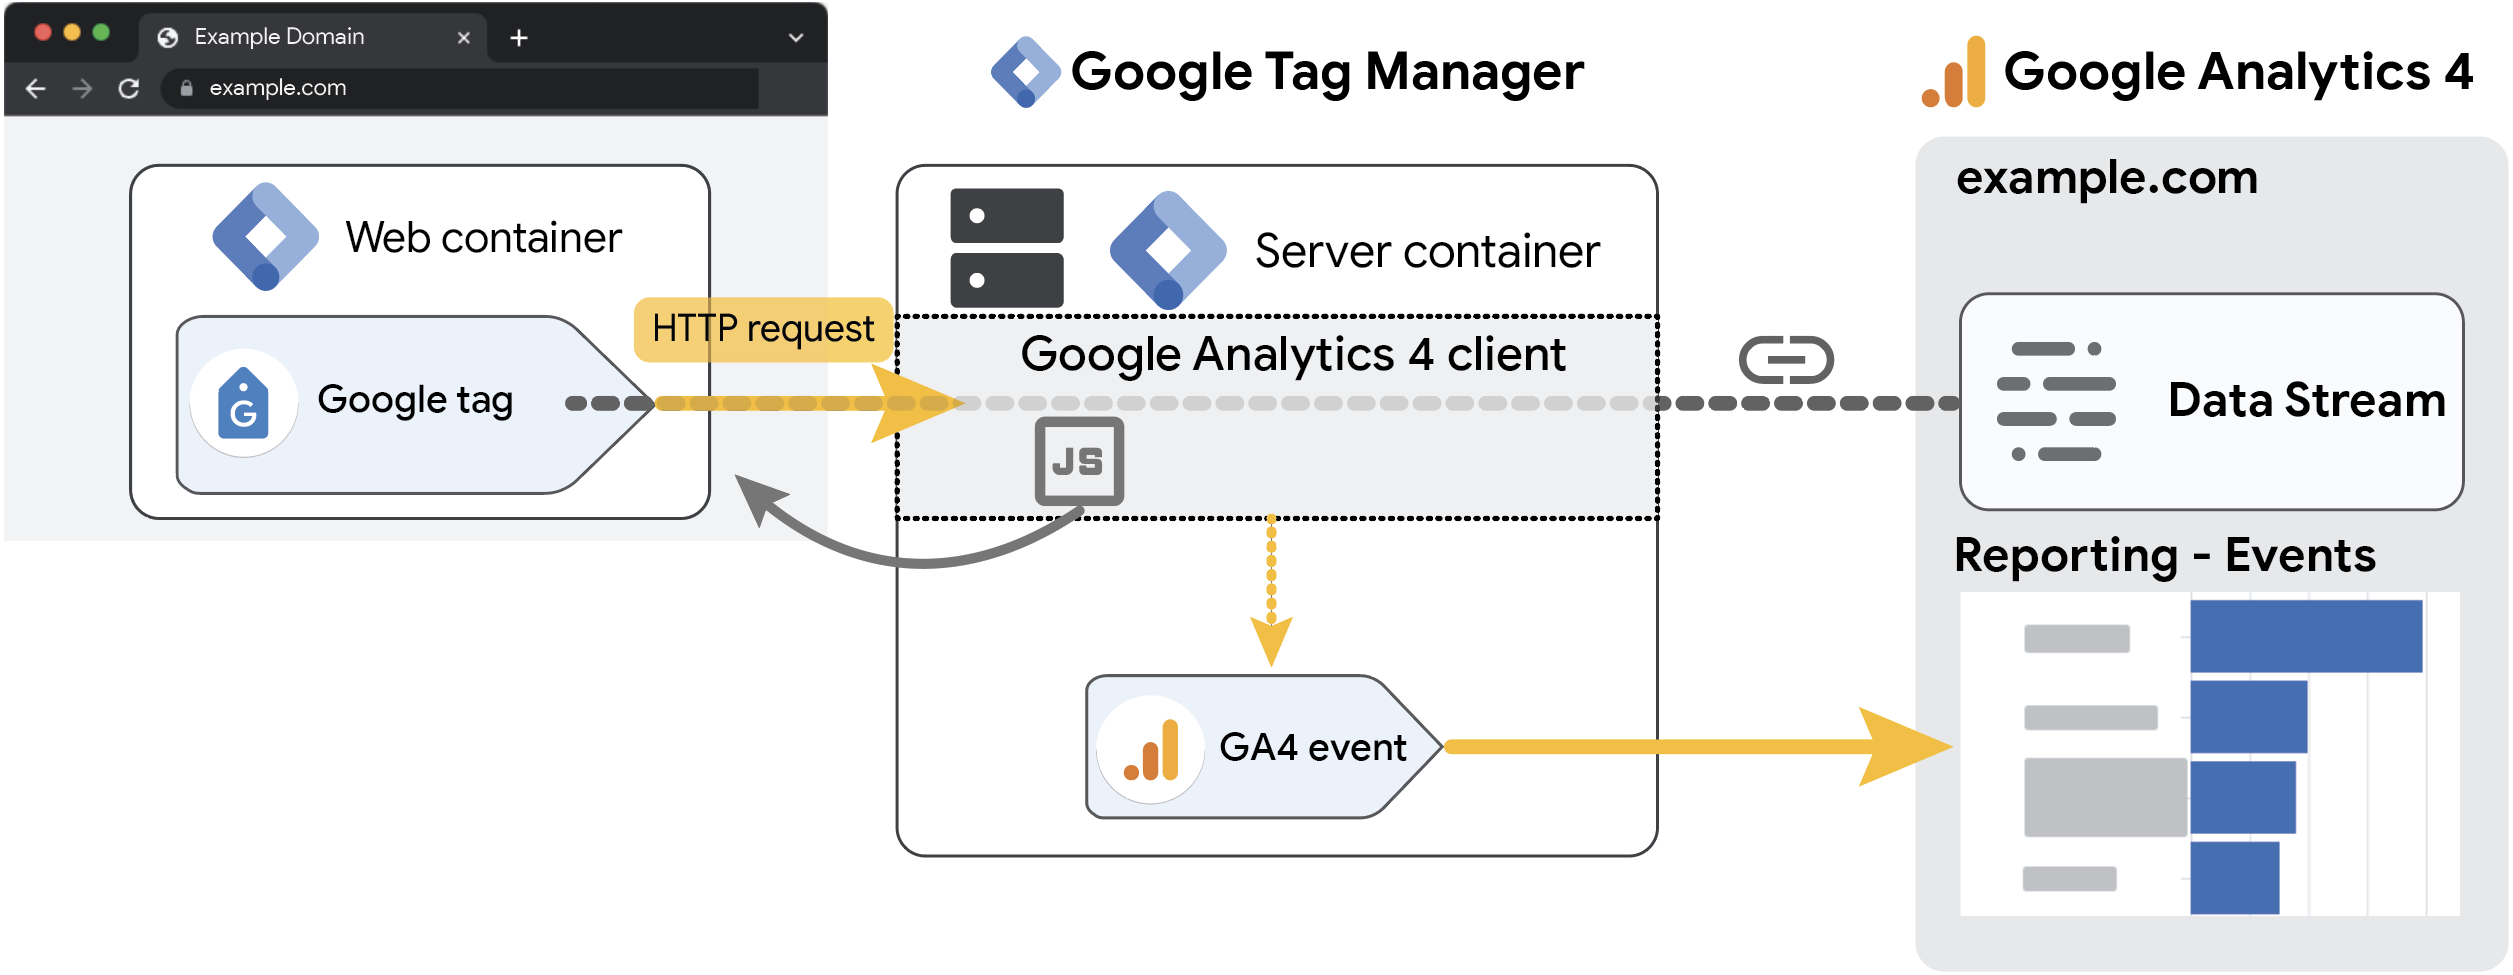
The GA4 client has a dual purpose.
- It serves as a proxy for Google Analytics 4 library that loads in the browser. GA4, just like any other analytics service running in the browser, requires a JavaScript library to work. Instead of the browser loading this library directly from Google's content distribution network, you can configure the GA4 client to allow the library to be loaded through your server container instead.
- The client also serves as a proxy for the GA4 event requests themselves. Instead of the browser sending the events directly to Google's analytics servers, they are first sent to the server container, where the GA4 client intercepts them and dispatches them onward to Google servers (and any other destinations you like).
Setting up the GA4 client
To set up the GA4 client in the server, follow the next four steps.
1. Configure the client
To configure the GA4 client:
- In your server container, open Clients.
- Click on the GA4 client to open its configuration.
- Set up your GA4 client with the following parameters. Save when you are done.
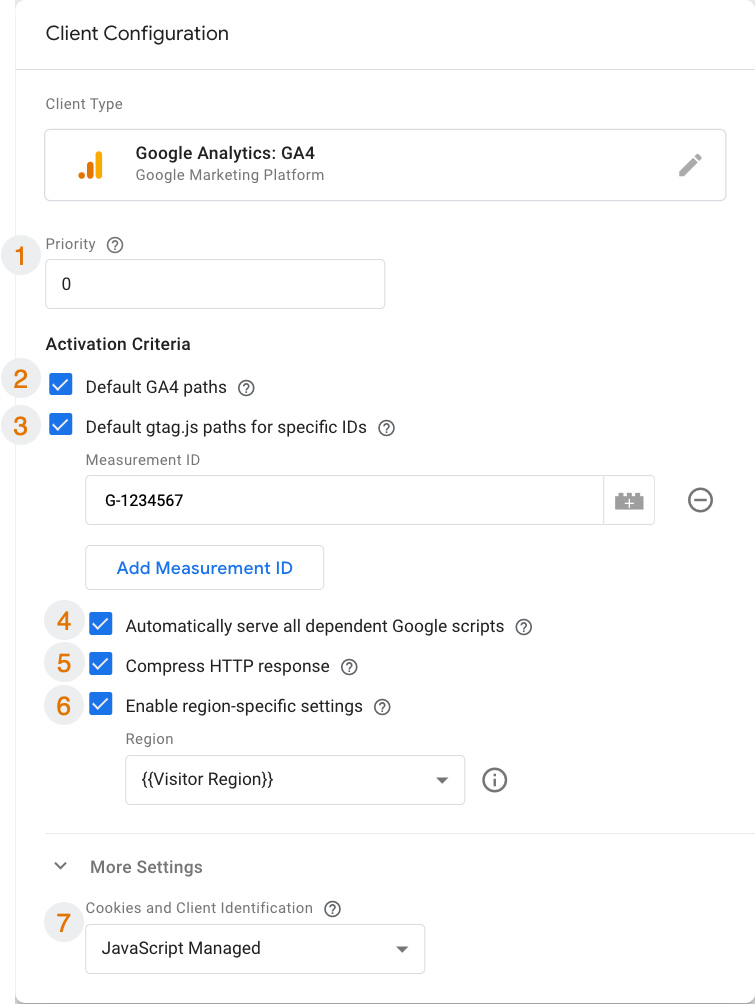
| 1 | Priority | Only one client can claim an incoming request, but there can be
multiple clients trying to claim the same request. The
Priority setting establishes the order in which
clients get to evaluate the request. For example, if you have a
client with the priority of 100, it will get a chance to claim the
request before another client with a lower number (99 or
less). In this case, you only have one client that's interested in Google Analytics 4 requests, so you don't have to change the default value of 0. |
| 2 | Default GA4 paths | If the box is checked: The GA4 client will activate when the incoming
request matches a GA4 event request URL. These requests typically
have path signatures like /collect and
/g/collect and
/j/collect.If the box is not checked: The Client will not claim incoming GA4 events. Leave this option checked, as parsing incoming event requests is one of the key purposes of this client. |
| 3 | Cookies and Client Identification | Set the value to JavaScript Managed, as that's the
only method that will work until you change the domain settings of
your server container. The GA4 client can utilize a server-managed cookie for GA4 client identification in first-party contexts, which you set up later in the course. |
2. Configure the tag
Next, you'll need to create a Google Analytics: GA4 tag in the server container.
The client parses the incoming HTTP request into an event data object. The tag's purpose is to take this event data object, map it to the correct format, and then dispatch it to the Google Analytics 4 servers.
- In your server container, navigate to Tags and create a New Tag.
- Click on the Tag Configuration window to open the tag selector. Choose Google Analytics: GA4 from the list.
- Leave all the fields with their default values.
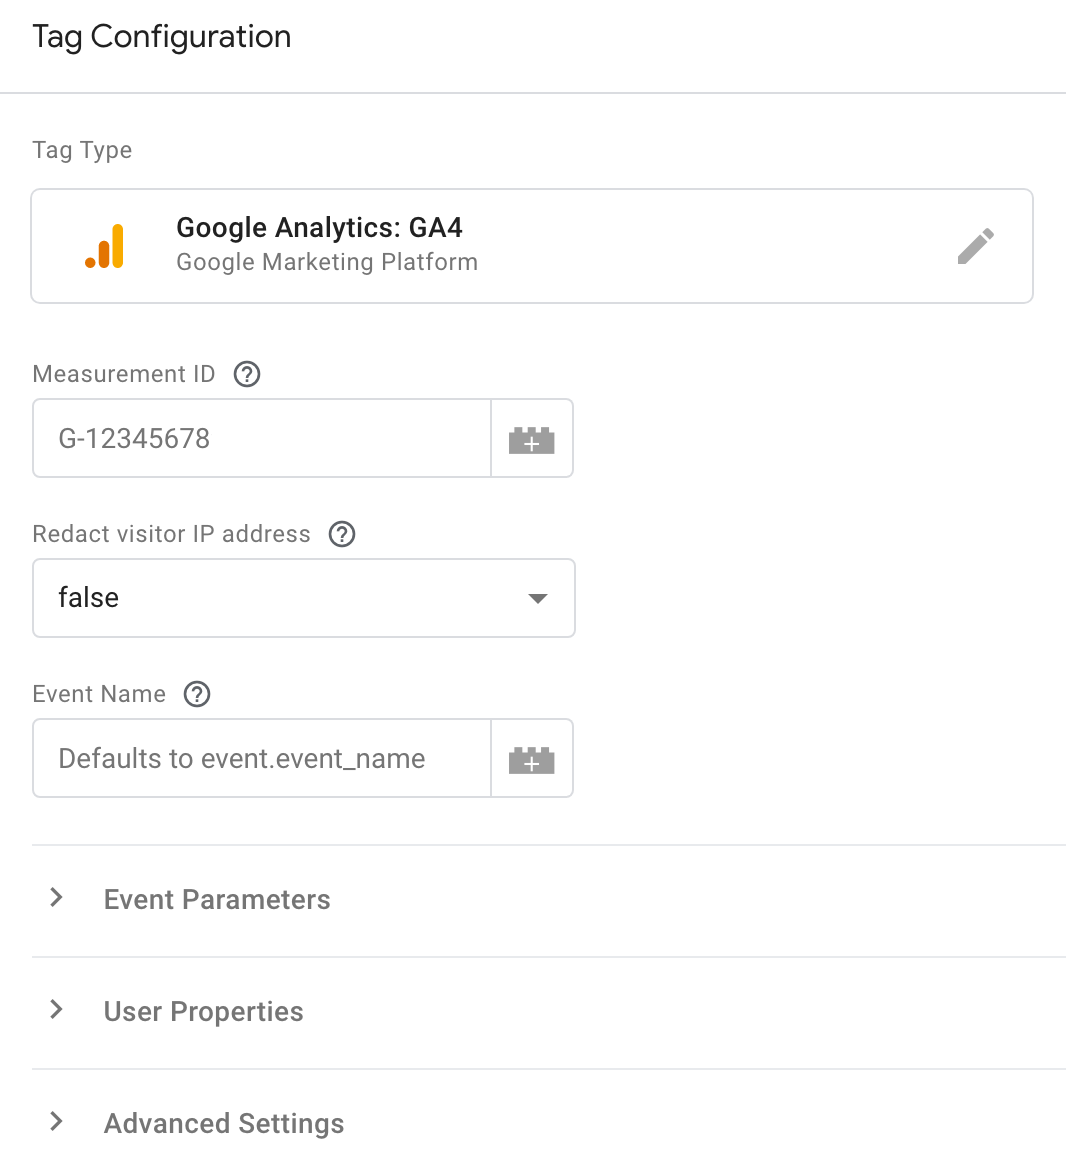
By default, the tag will inherit all the relevant fields and parameters from the event data object created by the client. The incoming Google Analytics 4 request passes through the Google Analytics: GA4 client, and the tag inherits the Measurement ID and event parameters.
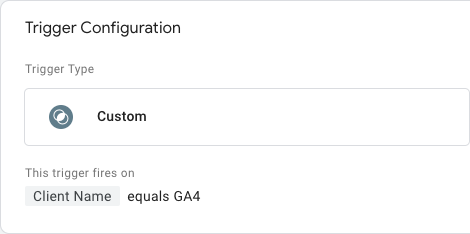
3. Add a trigger to the tag
Next, establish when this tag should fire. The Google Analytics 4 client parses the incoming request into an event data object, and the tag will inherit its values. Therefore, the tag needs to fire whenever the GA4 client generates an event data object.
To set up the trigger:
- In the tag settings, click the Triggering area to open the trigger selection overlay.
- To create a new trigger, click the + icon in the top right corner.
- In the overlay, click the Trigger Configuration area to choose the trigger type.
- Choose Custom from the list. This trigger type, by default, fires the tag when any event is generated by a server-side client. You need to modify it a little to make sure that only events generated by our GA4 client will be able to fire the tag.
- Select Some Events to enable the list of activation conditions for this trigger.
- In the list of available Variables, you'll see Event Name pre-selected. Click that selector and select Choose Built-In Variable from the list.
- To automatically return the name of the client that generated the event, select the Client Name variable.
- The name of the client you configured earlier was GA4, so
set the condition accordingly.
Result: Your trigger should look like this:
- Save the trigger and name it descriptively, for example "All GA4 Events".
- You should now be back in the tag settings, with the new trigger in its
place. Save the tag and name it descriptively, for example "GA4".
Result: Your tag should look like this: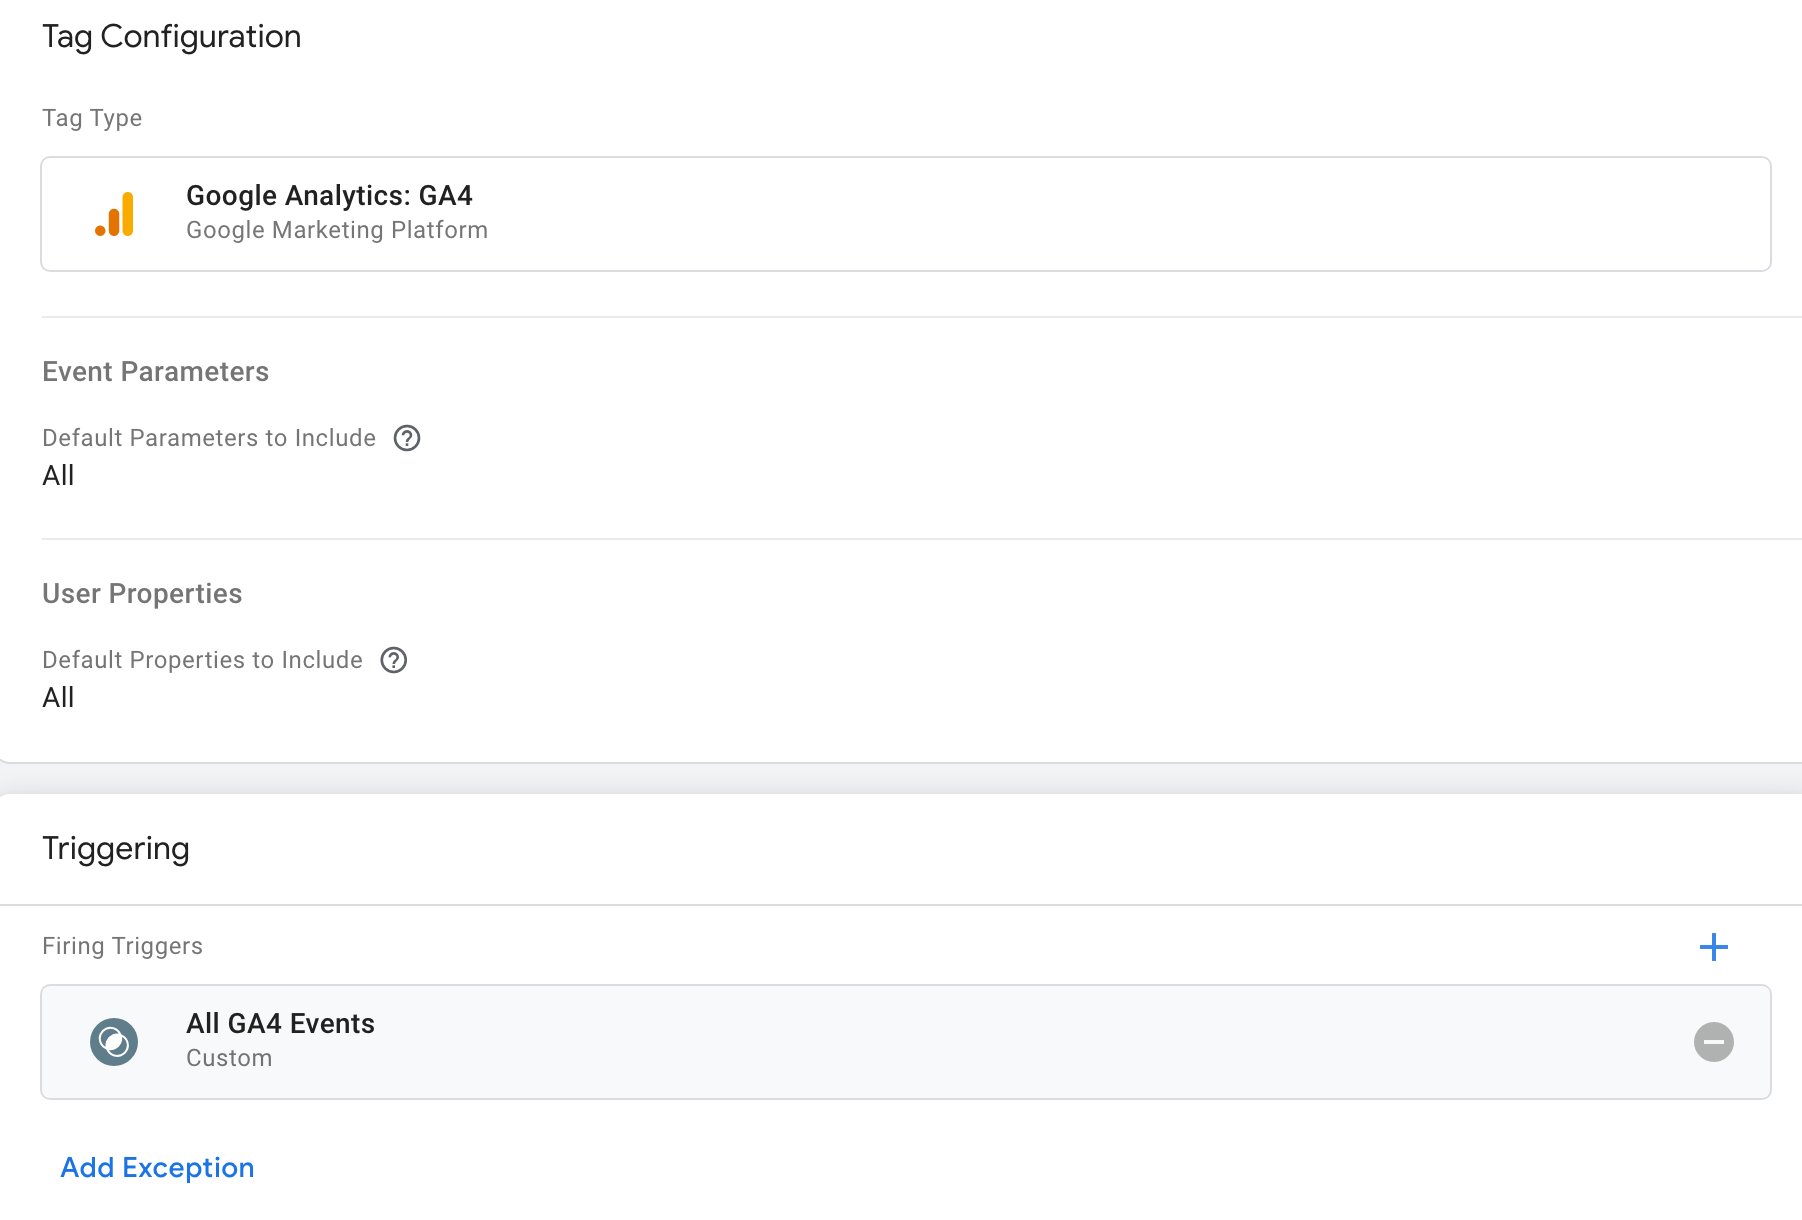
Because the only pre-built trigger (All Pages) isn't sufficient for our need to handle all events (and not just page views), we'll need to create a new trigger.
Next, you need to configure a tag in the web browser to dispatch data to the server-side tagging environment.
4. Configure a Google tag in the web container
You can configure Google Analytics 4 using Tag Manager or gtag.js.
To establish data flow from your web container to GA4, you need to set up a Google tag:
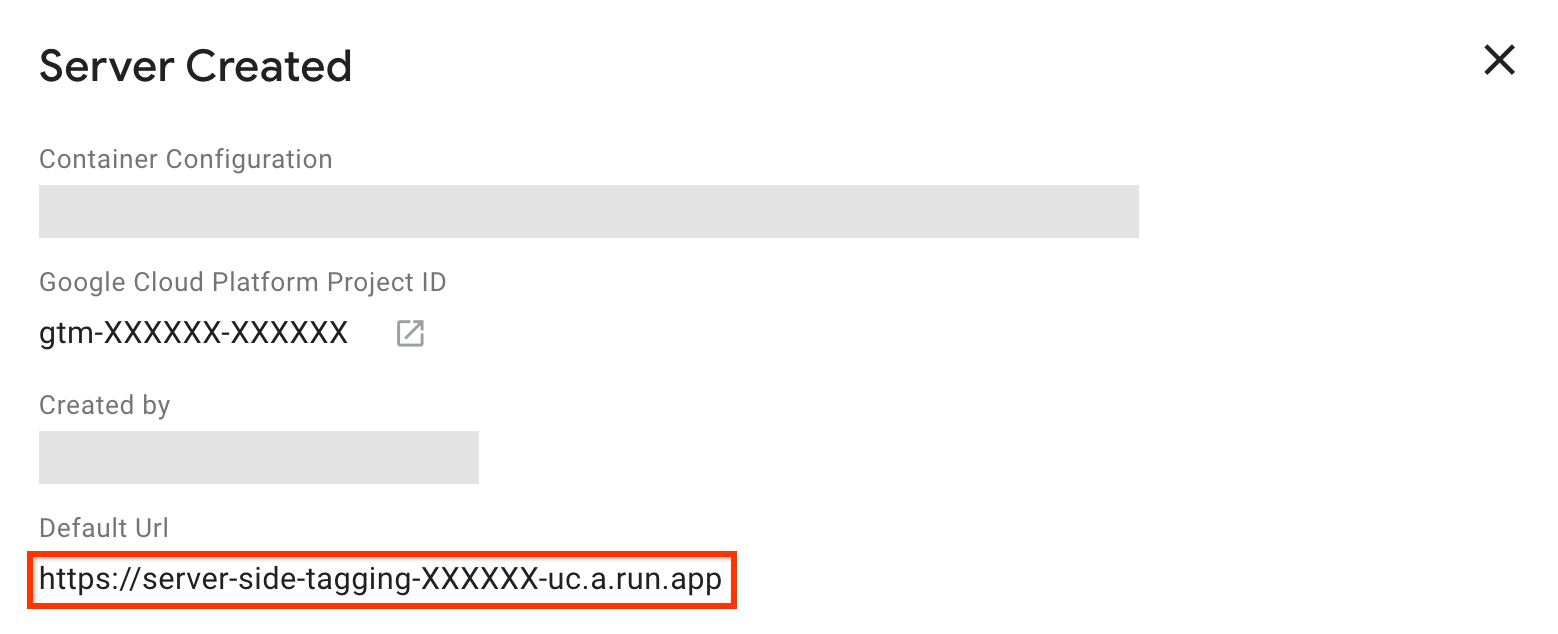
- In your server container, click the Container ID (GTM-XXXXXX) in the top navigation bar to open the container information overlay.
- Note of the Default Url value of your server container. You will need this shortly. This is the URL to which your browser tag needs to send the requests.
- In the website's web container, open the Tags menu.
- Create a New tag of the type Google tag.
- In Tag ID, supply the tag ID of your Google tag. Where can I find my Google tag ID?
- In the section Configuration settings, add the following parameters:
Name:server_container_url
Value: Enter the URL you noted in step 2. - Add a trigger to this tag as you normally would in your Google Tag Manager process. For example, the All Pages trigger loads the tag on page load and then sends all your events to the server container.
Verify the data flow
After configuring the Google tag in your web container, verify that data is flowing correctly to your server container.
UI verification
Use Tag Manager Preview mode to verify that the server is receiving events:
- In your server container, click the Preview button.
- In a separate tab, navigate to a page on your website where the Google tag is implemented.
- In the Preview window, verify that you see incoming requests (e.g.,
collect?v=2) in the Summary panel.
API verification
You can also verify the requests directly in your browser's Developer Tools:
- Open your website and open the browser's Developer Tools (usually F12).
- Navigate to the Network tab.
- Filter for requests to your Default URL (the server container URL).
- Verify that outgoing requests are being sent to your tagging server instead of
google-analytics.com.
For more detailed instructions, see the Preview and debug guide.
Summary
Great job! You've set up the Google Analytics 4 to work with your server-side setup.
Next, you'll learn the tools verify your setup and debug when needed.