This developer guide describes how to implement Google Tag Manager in a mobile application.
Introduction
Google Tag Manager enables developers to change configuration values in their mobile applications using the Google Tag Manager interface without having to rebuild and resubmit application binaries to app marketplaces.
This is useful for managing any configuration values or flags in your application that you may need to change in the future, including:
- Various UI settings and display strings
- Sizes, locations, or types of ads served in your application
- Game settings
Configuration values may also be evaluated at runtime using rules, enabling dynamic configurations such as:
- Using screen size to determine ad banner size
- Using language and location to configure UI elements
Google TagManager also enables the dynamic implementation of tracking tags and pixels in applications. Developers can push important events into a data layer and decide later which tracking tags or pixels should be fired. TagManager currently supports the following tags:
- Google Mobile App Analytics
- Custom Function Call tag
Before you Begin
Before using this getting started guide, you'll need the following:
- A Google Tag Manager Account
- A new Tag Manager container and value collection macro
- A mobile application for Android in which to implement Google Tag Manager
- The Google Analytics Services SDK, which contains the Tag Manager library.
If you're new to Google Tag Manager, we recommend that you learn more about containers, macros, and rules (Help Center) before continuing this guide.
Getting Started
This section will guide developers through a typical Tag Manager workflow:
- Add the Google Tag Manager SDK to your project
- Set Default Container Values
- Open the Container
- Get Configuration Values from the Container
- Push Events to the DataLayer
- Preview & Publish the Container
1. Adding the Google Tag Manager SDK to Your Project
Before using the Google Tag Manager SDK, you'll need to unzip the SDK package
and add the library to the build path of your project and add permissions
to your AndroidManifest.xml file.
First, add the Google Tag Manager library to the /libs folder of
your project.
Next, update your AndroidManifest.xml file to use the following permissions:
<uses-permission android:name="android.permission.ACCESS_NETWORK_STATE" />
<uses-permission android:name="android.permission.INTERNET" />
2. Adding a Default Container File to your Project
Google Tag Manager uses a default container on the first run of your application. The default container will be used until the app is able to retrieve a fresh container over the network.
To download and add a default container binary to your application, follow these steps:
- Sign in to the Google Tag Manager web interface.
- Select the Version of the container you'd like to download.
- Click the Download button to retrieve the container binary.
- Add the binary file to
the following path:
<project-root>/assets/tagmanager/
The default filename should be the container ID (for example GTM-1234). Once you've
downloaded the binary file, be sure to remove the version suffix from the filename
to ensure you follow the correct naming convention.
Although using the binary file is recommended, if your container does not contain rules or tags,
you may choose to use a simple
JSON
file instead.
The file must be located in a new /assets/tagmanager
folder of your Android project and should follow this naming convention:
<Container_ID>.json. For example, if your container ID
is GTM-1234, you should add your default container values to
/assets/tagmanager/GTM-1234.json.
3. Opening a Container
Before retrieving values from a container, your application needs to open the container. Opening a container will load it from disk (if available), or will request it from the network (if needed).
The easiest way to open a container on Android is by using
ContainerOpener.openContainer(..., Notifier notifier), as in the following example:
import com.google.tagmanager.Container;
import com.google.tagmanager.ContainerOpener;
import com.google.tagmanager.ContainerOpener.OpenType;
import com.google.tagmanager.TagManager;

import android.app.Activity;
import android.os.Bundle;

public class RacingGame {

  // Add your public container ID.
  private static final String CONTAINER_ID = "GTM-YYYY";

  volatile private Container mContainer;

  @Override
  public void onCreate(Bundle savedInstanceState) {
    super.onCreate(savedInstanceState);
    TagManager mTagManager = TagManager.getInstance(this);

    // The container is returned to containerFuture when available.
    ContainerOpener.openContainer(
        mTagManager,                            // TagManager instance.
        CONTAINER_ID,                           // Tag Manager Container ID.
        OpenType.PREFER_NON_DEFAULT,            // Prefer not to get the default container, but stale is OK.
        null,                                   // Time to wait for saved container to load (ms). Default is 2000ms.
        new ContainerOpener.Notifier() {        // Called when container loads.
          @Override
          public void containerAvailable(Container container) {
            // Handle assignment in callback to avoid blocking main thread.
            mContainer = container;
          }
        }
    );
    // Rest of your onCreate code.
  }
}
In this example, ContainerOpener.openContainer(..., Notifier notifier) is used to
request a saved container from local storage. By handling the assignment of
mContainer in the containerAvailable callback, we ensure that the
main thread is not blocked. If the saved container is older than 12 hours, the
call will also schedule a request to asynchronously retrieve a fresh container
over the network.
This sample implementation represents the simplest way to open and retrieve
values from a container using the ContainerOpener convenience class.
For more advanced implementation options, see Advanced Configuration.
4. Getting Configuration Values from the Container
Once the container is open, configuration values may be retrieved using
the get<type>Value()
methods:
// Retrieving a configuration value from a Tag Manager Container.

// Get the configuration value by key.
String title = mContainer.getStringValue("title_string");
Requests made with a non-existent key will return a default value appropriate to the type requested:
// Empty keys will return a default value depending on the type requested.

// Key does not exist. An empty string is returned.
string subtitle = container.getStringValue("Non-existent-key");
subtitle.equals(""); // Evaluates to true.
5. Pushing Values to the DataLayer
The DataLayer is a map that enables runtime information about your app, such as touch events or screen views, to become available to Tag Manager macros and tags in a container.
For example, by pushing information about screen views into the DataLayer map, you can set up tags in the Tag Manager web interface to fire conversion pixels and tracking calls in response to those screenviews without needing to hard code them into your app.
Events are pushed to the DataLayer using push() and the
DataLayer.mapOf() helper method:
//
// MainActivity.java
// Pushing an openScreen event with a screen name into the data layer.
//

import com.google.tagmanager.TagManager;
import com.google.tagmanager.DataLayer;

import android.app.Activity;
import android.os.Bundle;

public MainActivity extends Activity {

  public void onCreate(Bundle savedInstanceState) {
    super.onCreate(savedInstanceState);

  }

  // This screen becomes visible when Activity.onStart() is called.
  public void onStart() {
    super.onStart();

    // The container should have already been opened, otherwise events pushed to
    // the DataLayer will not fire tags in that container.
    DataLayer dataLayer = TagManager.getInstance(this).getDataLayer();
    dataLayer.push(DataLayer.mapOf("event",
                                   "openScreen",      // The event type. This value should be used consistently for similar event types.
                                   "screenName",      // Writes a key "screenName" to the dataLayer map.
                                   "Home Screen")     // Writes a value "Home Screen" for the "screenName" key.
    );
  }
  // Rest of the Activity implementation
}
In the web interface, you can now create tags (like Google Analytics tags) to fire for each screen view by creating this rule: {{ event }} equals "openScreen". To pass the screen name to one of these tags, create a data layer macro that references the "screenName" key in the data layer. You can also create a tag (like a Google Ads conversion pixel) to fire only for specific screen views, by creating a rule where {{ event }} equals "openScreen" && {{ screenName }} equals "ConfirmationScreen".
6. Previewing & Publishing a Container
Macro values will always correspond to the current published version. Before publishing the latest version of a container, you can preview your draft container.
To preview a container, generate a preview URL in the Google
Tag Manager web interface by selecting the version of the container
you'd like to preview, and then selecting Preview. Hang on to
this preview URL as you'll need it in later steps.

Next, add the following Activity to your application's
AndroidManifest.xml file:
<!-- Google Tag Manager Preview Activity -->
<activity
  android:name="com.google.tagmanager.PreviewActivity"
  android:label="@string/app_name"
  android:noHistory="true" >  <!-- Optional, removes the PreviewActivity from activity stack. -->
  <intent-filter>
    <data android:scheme="tagmanager.c.application_package_name" />
    <action android:name="android.intent.action.VIEW" />
    <category android:name="android.intent.category.DEFAULT" />
    <category android:name="android.intent.category.BROWSABLE"/>
  </intent-filter>
</activity>
Open the link on an emulator or physical device to preview the draft container in your app.
When you're ready to make your draft configuration values available to your application, publish the container.
Advanced Configuration
Google Tag Manager for Mobile has a number of advanced configuration options that allow you to select values based on runtime conditions using rules, manually refresh the container, and get additional options for opening containers. The following sections outline several of the most common advanced configurations.
Advanced Options for Opening Containers
The Google Tag Manager SDK provides several methods for opening containers that can give you more control over the loading process:
TagManager.openContainer()
TagManager.openContainer() is the lowest level and most flexible API for opening a
container. It returns immediately with a default container and
also asynchronously loads a container from disk or the network if no saved
container exists, or if the saved container is not fresh (> 12 hours old).
mContainer = tagManager.openContainer(CONTAINER_ID, new Container.Callback() {

  // Called when a refresh is about to begin for the given refresh type.
  @Override
  public void containerRefreshBegin(Container container, RefreshType refreshType) {
    // Notify UI that the Container refresh is beginning.
   }

  // Called when a successful refresh occurred for the given refresh type.
  @Override
  public void containerRefreshSuccess(Container container, RefreshType refreshType]) {
    // Notify UI that Container is ready.
  }

  // Called when a refresh failed for the given refresh type.
  @Override
  public void containerRefreshFailure(Container container,
                                      RefreshType refreshType,
                                      RefreshFailure refreshFailure) {
    // Notify UI that the Container refresh has failed.
  }
Throughout the loading process, TagManager.openContainer() issues
several lifecycle callbacks so that your code can find out when the
loading request begins, whether and why it fails or succeeds, and whether
the container was ultimately loaded from disk or network.
Unless it is acceptable for your application to use the default values, you will need to use these callbacks to know when a saved or network container has loaded. Note that you will be unable to load a saved or network container if this is the first time the app is run and there's no network connection.
TagManager.openContainer() passes the following enum
values as arguments to these callbacks:
RefreshType
| Value | Description |
|---|---|
Container.Callback.SAVED
|
The refresh request is loading a locally saved container. |
Container.Callback.NETWORK
|
The refresh request is loading a container over the network. |
RefreshFailure
| Value | Description |
|---|---|
Container.Callback.NO_SAVED_CONTAINER
|
There is no saved container available. |
Container.Callback.IO_ERROR
|
An I/O error prevented refreshing the container. |
Container.Callback.NO_NETWORK
| There is no network connection available. |
Container.Callback.NETWORK_ERROR
|
A network error has occurred. |
Container.Callback.SERVER_ERROR
|
An error on the server has occurred. |
Container.Callback.UNKNOWN_ERROR
|
An error that can't be categorized has occurred. |
Methods for Opening Non-Default and Fresh Containers
ContainerOpener wraps TagManager.openContainer()
and provides two convenience methods for opening containers:
ContainerOpener.openContainer(..., Notifier notifier) and
ContainerOpener.openContainer(..., Long timeoutInMillis).
Each of these methods takes an enumeration requesting either a non-default or fresh container.
OpenType.PREFER_NON_DEFAULT is recommended for most applications and
attempts to return the first available non-default container within a given
timeout period, either from disk or network, even if that container is greater
than 12 hours old. If it returns a stale saved container, it will also make an
asynchronous network request for a fresh one.
When using OpenType.PREFER_NON_DEFAULT, a default
container will be returned if no other container is available, or if the timeout period is
exceeded.
OpenType.PREFER_FRESH attempts to return a fresh container from
either disk or network within the given timeout period.
It returns a saved container if a network
connection is unavailable and/or the timeout period is exceeded.
It is not recommended to use OpenType.PREFER_FRESH
in places where a longer request time may noticeably affect user experience,
such as with UI flags or display strings. You may also use
Container.refresh()
at any time
to force a network container request.
Both of these convenience methods are non-blocking.
ContainerOpener.openContainer(..., Long timeoutInMillis) returns a
ContainerOpener.ContainerFuture object, whose get method returns a
Container as soon as it has loaded (but that will block until then).
The ContainerOpener.openContainer(..., Notifier notifier) method takes a single callback,
called when the container is available,
which can be used to prevent blocking the main thread.
Both methods have a default timeout period of
2000 milliseconds.
Evaluating Macros at Runtime using Rules
Containers can evaluate values at runtime using rules. Rules may be based on criteria like device language, platform, or any other macro value. For example, rules can be used to select a localized display string based on the language of the device at runtime. This can be configured by using the following rule:
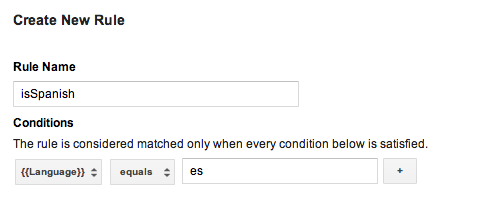
You can then create value collection macros for each language, and add this rule to each macro, inserting the appropriate language code. When this container is published, your application will be able to display localized display strings, depending on the language of the user's device at runtime.
Note that if your default container needs rules, you must use a binary container file as your default container.
Learn more about configuring rules (Help Center).
Binary Default Container Files
Default containers that need rules should use a binary container file instead of a JSON file as the default container. Binary containers offer support for determining macro values at runtime with Google Tag Manager rules, whereas JSON files do not.
Binary container files may be downloaded from the Google Tag Manager web
interface and
should be added to your project's
/assets/tagmanager/ folder and follow this pattern:
/assets/tagmanager/GTM-XXXX, where the filename represents your
container ID.
In cases where a JSON file as well as a binary container file are present, the SDK will use the binary container file as the default container.
Using Function Call Macros
Function Call Macros are macros that are set to the return value of a specified function in your application. Function Call Macros can be used to incorporate runtime values with your Google Tag Manager rules, such as determine at runtime which price to display to a user based on the configured language and currency of a device.
To configure a function call macro:
- Define the function call macro in the Google Tag Manager web interface. Arguments may optionally be configured as key-value pairs.
- Register a
FunctionCallMacroHandlerin your application usingContainer.registerFunctionCallMacroHandler()and the function name you configured in the Google Tag Manager web interface, overriding itsgetValue()method:/** * Registers a function call macro handler. * * @param functionName The function name field, as defined in the Google Tag * Manager web interface. */ mContainer.registerFunctionCallMacroHandler(functionName, new FunctionCallMacroHandler() { /** * This code will execute when any custom macro's rule(s) evaluate to true. * The code should check the functionName and process accordingly. * * @param functionName Corresponds to the function name field defined * in the Google Tag Manager web interface. * @param parameters An optional map of parameters * as defined in the Google Tag Manager web interface. */ @Override public Object getValue(String functionName, Map<String, Object> parameters)) { if (functionName.equals("myConfiguredFunctionName")) { // Process and return the calculated value of this macro accordingly. return macro_value } return null; } });
Using Function Call Tags
Function Call Tags enable pre-registered functions to be executed whenever
an event is pushed into the data layer and the tag rules
evaluate to true.
To configure a function call tag:
- Define the function call tag in the Google Tag Manager web interface. Arguments may optionally be configured as key-value pairs.
- Register a function call tag handler in your application using
Container.registerFunctionCallTagHandler():/** * Register a function call tag handler. * * @param functionName The function name, which corresponds to the function name field * Google Tag Manager web interface. */ mContainer.registerFunctionCallTagHandler(functionName, new FunctionCallTagHandler() { /** * This method will be called when any custom tag's rule(s) evaluates to true. * The code should check the functionName and process accordingly. * * @param functionName The functionName passed to the functionCallTagHandler. * @param parameters An optional map of parameters as defined in the Google * Tag Manager web interface. */ @Override public void execute(String functionName, Map<String, Object> parameters) { if (functionName.equals("myConfiguredFunctionName")) { // Process accordingly. } } });
Setting a Custom Refresh Period
The Google Tag Manager SDK will attempt to retrieve
a fresh container if the current container age exceeds 12 hours. To set a
custom container refresh period, use
Timer
, as in the
following example:
timer.scheduleTask(new TimerTask() {
  @Override
  public void run() {
    mContainer.refresh();
  }
}, delay, <new_period_in milliseconds>);
Debugging with Logger
The Google Tag Manager SDK prints errors and warnings to logs by default.
Enabling more verbose logging can be helpful for debugging and is possible by
implementing your own Logger with
TagManager.setLogger, as in this example:
TagManager tagManager = TagManager.getInstance(this);
tagManager.setLogger(new Logger() {

  final String TAG = "myGtmLogger";

  // Log output with verbosity level of DEBUG.
  @Override
  public void d(String arg0) {
    Log.d(TAG, arg0);
  }

  // Log exceptions when provided.
  @Override
  public void d(String arg0, Throwable arg1) {
    Log.d(TAG, arg0);
    arg1.printStackTrace();
  }

  // Rest of the unimplemented Logger methods.

});
Or, you can set the LogLevel of the existing Logger by using
TagManager.getLogger().setLogLevel(LogLevel)
,
as in this example:
// Change the LogLevel to INFO to enable logging at INFO and higher levels.
TagManager tagManager = TagManager.getInstance(this);
tagManager.getLogger().setLogLevel(LogLevel.INFO);