Developer Guide for Resonance Audio for Unreal
This guide shows you how to configure and control spatialization, room effects, and occlusion settings in real time using the Resonance Audio plugin for Unreal.
The steps here build on the completed steps in Getting Started with the Resonance Audio Plugin for Unreal. If you are new to working with the Resonance Audio plugin for Unreal or have not yet set up your development environment, start there.
Prerequisites
This guide uses the Blueprint_Effect_Fire object that you set up in the Getting Started guide.
To follow the steps included here, you’ll need the same Blueprint_Effect_Fire
object.
Configure Spatialization plugin settings
Directivity
-
In the Unreal Engine editor, to go Content, double-click on the
FireSoundSpatializationSettingsasset that you created earlier. Expand the Directivity tab. -
In the Pattern field type
0.5and in the Sharpness field type2.0.These values cause sound to be emitted from the front of the source and severely attenuated from the back.
-
Check Toggle Visualization. This option lets you display the visualization of sound source directivity patterns directly in the viewport.
You can apply a scale factor to your visualization. This does not affect the sound properties of your sound sources.
By default, directivity visualization rendering is enabled only in the editor and not in the actual game.
Note: Directivity visualization meshes are created for all sound sources in your project using the current Resonance Audio Spatialization Source Settings asset.
Source spread (width)
This parameter lets you control how wide the source appears and can be used to simulate volumetric sound sources as opposed to point-like sources.
For purposes of this tutorial, leave the value at the default 0.0, which
corresponds to the narrowest possible source.
Near-field effect
This parameter lets you simulate the behavior of a sound source at a short distance, such as within one meter, from your head.
Set Gain to its maximum value of 9 in order to get the most physically correct amplitude boost (including low-frequency boost) of a near-field source.
Make sure to avoid clipping when using normalized audio samples because the output can be amplified by up to 25dB, depending on the frequency content.
Distance attenuation
To enable Resonance Audio Distance attenuation:
-
In your Audio Component Details panel, disable UE4 distance attenuation by unchecking Enable Volume Attenuation in the Attenuation Distance tab.
-
Go back to
FireSoundSpatializationSettingsand select an attenuation curve in the Distance attenuation section. For example, select Logarithmic. -
Leave other parameters unchanged.
-
Save your settings and close
FireSoundSpatializationSettings.
Control spatialization in real time using Blueprints
You can control directivity and spread parameters of your sound sources in real time using Blueprints.
-
In the editor, select your
Blueprint_Effect_Fireobject and go to the Details tab. -
In the blueprint editor, go to Event Graph.
-
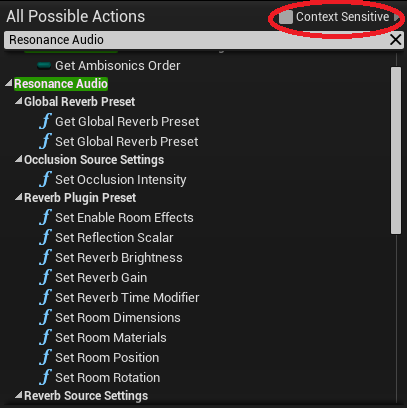
Right-click anywhere in the blueprint editor window to bring up a helper window with possible actions.
-
Uncheck Context Sensitive.
-
Type “Resonance Audio” to filter the available actions.
You should now be able to find functions for controlling Resonance Audio Spatialization Source Settings. -
Click Set Sound Source Spread to bring this function into the blueprint editor.
-
(Optional) You can create a Set Sound Source Directivity or Set Sound Source Near Field Effect Gain functions in the same way.
Create a Resonance Audio Spatialization Source Settings reference
The above functions require a Target. In our case, these are Resonance Audio Spatialization Source Settings assets.
-
In the My Blueprint panel on the left, select Variables and click + to create a new variable.
-
Your object type should be Resonance Audio Spatialization Source Settings. Type this name and the relevant options should appear.
-
Select an Object Reference as a variable type and provide a name for it. For example, you can use “FireSpatializationSettings”.
-
Drag and drop the reference into the blueprint editor.
When prompted, select Get. -
Click Compile.
Set the variable’s default value
-
Click the
FireSpatializationSettingsreference that you just created. -
In the Details window on the right, find the Default Value setting.
-
Set the default value to the name of the plugin settings asset that you created earlier. This asset’s name is
FireSoundSpatializationSettings. -
You can now use this reference as a target for Set Sound Source Spread and Set Sound Source Directivity functions.
-
Click Compile.
Review your results
You should now have something like this:
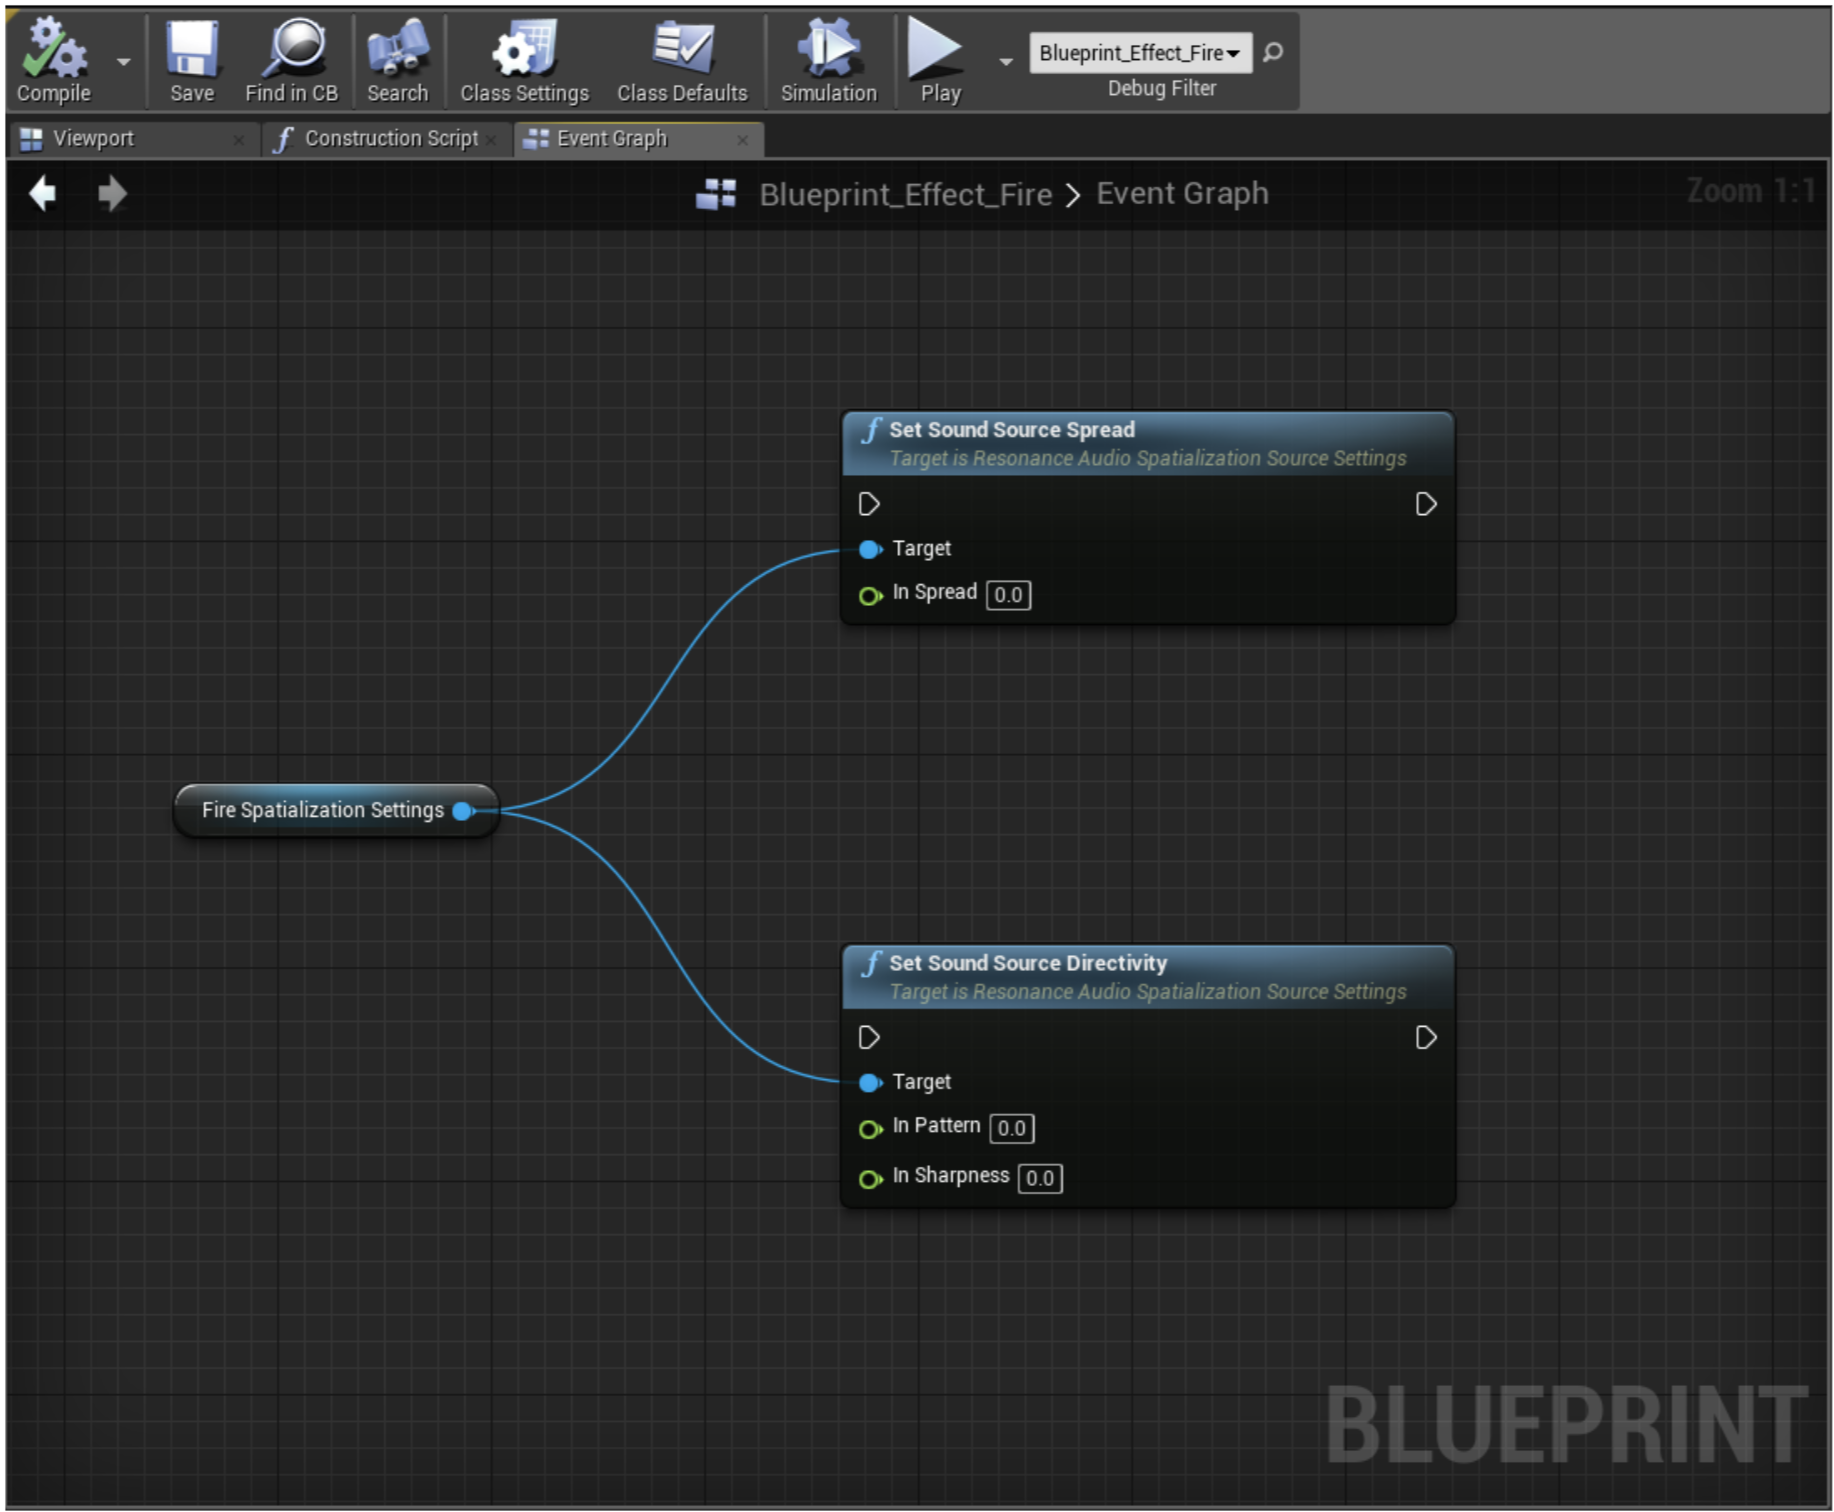
The green inlets in the functions indicate that they expect float values. These values are set whenever the functions are executed (gray triangles).
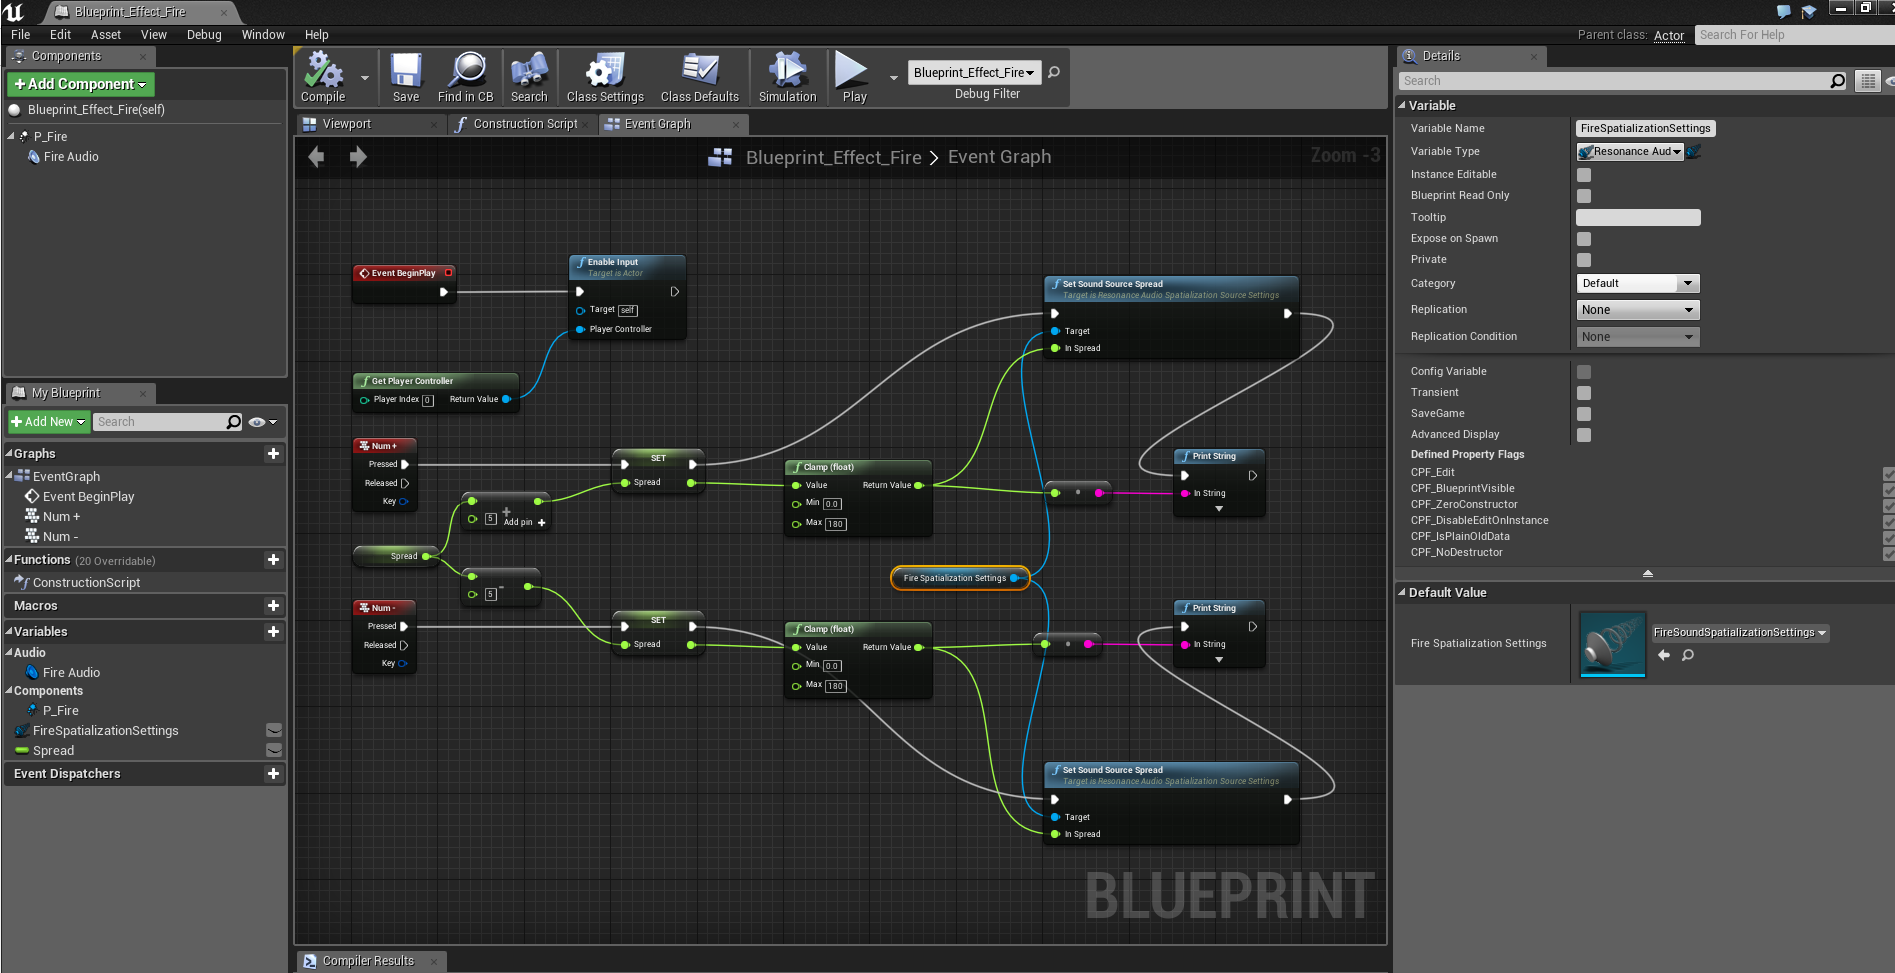
There are several ways in which you can interact with the functions. You can also configure where the float data comes from in the game.
As an example, the following blueprint uses numeric keys +/- to change spread by increments of five degrees and outputs debug messages to the screen:
Using the Reverb plugin
Resonance Audio lets you add and control Room Effects in your game using either a Global Reverb or by attaching Resonance Audio Reverb Plugin Effects to Unreal’s Audio Volumes. You can also use both methods simultaneously.
Set up the Global Reverb Preset
To set up the Global Reverb Preset in your project:
-
Open Settings and select Project Settings….
-
Scroll down to Plugins > Resonance Audio.
-
Open the General settings tab and find the Global Reverb Preset drop-down.
-
Click the drop-down and from Create New Asset select Resonance Audio Reverb Plugin Preset.
-
Save the new asset as GlobalReverbPreset.
Now you can use the above preset to enable room effects in your scene.
-
Double-click the GlobalReverbPreset to open the settings for editing.
Note: You can also access this preset in Content Browser > Content.
-
Select Enable Room Effects.
-
In Dimensions enter
4000,3000, and2000. For now, these are arbitrary values, but we will change them later in this tutorial. -
From the Acoustic Materials drop-down lists, choose Uniform material for each surface.
Note: Uniform material ensures that reverb decay time and reflections strength are the same for all frequencies. You can select different materials as needed to better suit the actual environment you are modelling.
-
Leave all other settings unmodified.
-
Save your settings and click Play. The spatialized sound effect now plays with Room Effects applied.
Add and control Room Effects using Audio Volumes
You can use the Resonance Audio reverb plugin with Unreal Engine’s Audio Volumes.
The reverb plugin enables multiple room effect volumes, sometimes called “reverb zones”, in a single level. This provides an intuitive visual interface for creating multiple reverberant environments.
Audio Volumes in Unreal Engine pass their room transform properties (position, rotation and dimensions) to the reverb plugin, where room effect parameters are updated accordingly.
In this part of the tutorial, you’ll create an Audio Volume in your project and assign a Resonance Audio Reverb Plugin Preset to it. This enables reverberation when the player is inside the Audio Volume.
Create an Audio Volume
-
Go to Modes and find Volumes > Audio Volume.
-
Drag and drop the Audio Volume into the editor window. Make sure that the Audio Volume encompasses your sound source.
-
(Optional) Go to Details > Transform > Scale to increase the Audio Volume scale. For example, increase the X & Y scale to 2.0.
Add a Resonance Audio Reverb Plugin Preset to the Audio Volume
-
Select the Audio Volume. In its Details panel, open the Reverb tab.
-
In the Reverb Plugin Effect drop-down list, locate the Create New Asset section and select Resonance Audio Reverb Plugin Preset.
-
Save the newly created asset as “AudioVolumeReverbPreset”.
-
Leave all other parameters in the Audio Volume as default.
-
Double-click on the
AudioVolumeReverbPresetasset to open it for editing. -
Select Enable Room Effects.
-
Select Get Transform from Audio Volume. This enables the preset to use the Audio Volume’s room transform for reverberation when the listener is inside the Audio Volume.
-
From the Acoustic Materials drop-down lists, select the Uniform material for each surface.
-
Leave all other settings unmodified.
-
(Optional): To change the room transform (for example, location, rotation, dimensions of the room) modify the Audio Volume’s transform directly.
-
Click Play. Verify that a different reverb effect is applied to your sound source whenever the player is inside the audio volume.
Note: When the player leaves the Audio Volume, Resonance Audio
switches back to the GlobalReverbPreset. To disable room effects
altogether when the player is outside the Audio Volume(s), remove the
GlobalReverbPreset from Project Settings… > Plugins >
Resonance Audio. To do this, click the drop-down in Global Reverb
Settings and select Clear from the Current Asset section.”
Creating additional rooms
When creating additional rooms, you can use the same or different reverb properties. Use one of the following options:
Use the same reverb properties
You can create additional rooms using the same reverb properties. To do this, duplicate the existing Audio Volume.
If you change the transform of the new Audio Volume, the Resonance Audio plugin detects and updates the transform when you switch rooms. However, changing other room properties, such as reverb gain or materials, affects all Audio Volumes that share the same preset.
Use different reverb properties
-
Create a new Audio Volume.
-
In the Audio Volume’s Details panel, go to Reverb > Reverb Plugin Effect.
-
Select Create New Asset > Resonance Audio Reverb Plugin Preset from the drop-down list.
-
Provide a descriptive name for your new preset. For example, use “WoodenRoomReverbPreset” to name a room with wooden materials.
-
Click Save.
-
You can now modify the new preset to match the sound properties that you need for your space.
Control Room Effects using Blueprints
You can control room effects parameters in real time using Blueprints. This is similar to controlling spatialization parameters in real time using Blueprints with the exception that now you should use Resonance Audio Reverb Plugin Preset as your object reference.
Within a blueprint, you can use the following functions to control Room Effects:
Add or remove Room Effects for individual sound sources
You can choose which sound sources are affected by room effects. To do this:
-
Select the
Blueprint_Effect_Fireobject and open the Details panel. -
Select
Fire Audioand navigate to Attenuation Reverb Send. -
Select Enable Reverb Send.
-
Scroll down to Attenuation Plugin Settings.
-
In Plugin Settings > Reverb Plugin Settings click + to add a new array element.
-
Open the Reverb Plugin Settings tab and click the drop-down currently set to none.
-
Under Create New Asset, select Resonance Audio Reverb Source Settings.
-
Save the newly created asset as “FireSoundReverbSettings”.
-
Open
FireSoundReverbSettingsasset for editing and in the Reverb Settings section, toggle Bypass Room Effect on. -
Click Play and verify that the sound is no longer affected by the room effects.
Using the Occlusion plugin
Use the Resonance Audio Occlusion plugin to apply frequency-dependent attenuation to the direct sound of your sound source whenever a visibility check indicates that your sound source is occluded by another game object. This plugin lets you ensure that only the direct sound path is affected, while early reflections and reverb still render correctly.
To enable the occlusion effect for your sound source:
-
Select the
Blueprint_Effect_Fireobject and open the Details panel. -
Select
Fire Audioand navigate to Attenuation Occlusion. -
Select Enable Occlusion.
-
Scroll down to Attenuation Plugin Settings.
-
In Plugin Settings > Occlusion Plugin Settings click + to add a new array element.
-
Open the Occlusion Plugin Settings tab and click the drop-down currently set to none.
-
Under Create New Asset, select Resonance Audio Occlusion Source Settings.
-
Save the newly created asset as “FireSoundOcclusionSettings”.
-
Open the
FireSoundOcclusionSettingsasset for editing and in the Occlusion Settings sections, increase the Occlusion Intensity to1.0. -
Click Play. Move behind the nearest cube object in the level. Verify that the fire sound is attenuated. It should sound muffled.
Note: Higher Occlusion Intensity values cause more frequencies to be absorbed so that the sound becomes more low-pass filtered.
Control reverb & occlusion source settings using Blueprints
You can control reverb & occlusion source settings in real time using Blueprints. This is similar to controlling spatialization parameters in real time using Blueprints with the exception that now you should use Resonance Audio Reverb Source Settings & Resonance Audio Occlusion Source Settings as your object references.
Troubleshooting
To troubleshoot, you can inspect Resonance Audio debug messages.
-
Go to Window > Developer Tools > Output Log.
This window is usually at the bottom of your screen next to the Content Browser. -
Type “ResonanceAudio” to filter the
debugmessages.