Last update: 2025-10-31
Version: 1.2
| Version | Description | Date Updated |
|---|---|---|
| 1.2 | Deprecation of QR code transactions in Brazil | 2025-10-31 |
| 1.1 | In-store transactions using QR code is now required | 2024-10-21 |
| 1.0 | Initial version | 2022-03-21 |
This page is specific to Brazilian issuers and highlights the most important
**local requirements that must be met** before launching Google Pay in
Brazil. It can also be used to improve existing integrations in order to make
the most of Google Pay features.
## Local requirements
### Card provisioning
Currently, there are two ways of
[provisioning](https://developers.google.com/pay/issuers/guides/overview/key-concepts#tokenization) a card
on Google Pay:
- [Manual Provisioning](https://developers.google.com/pay/issuers/guides/overview/integration-process)
- [Push Provisioning](https://developers.google.com/pay/issuers/apis/push-provisioning/android).
**Manual Provisioning (MP)** refers to tokenizations initiated from the
[Google Wallet app](https://play.google.com/store/apps/details?id=com.google.android.apps.walletnfcrel).
**Android Push Provisioning (PP)** refers to tokenizations that are initiated
within the banking app. Further details of both forms will be covered in the
next sections.
### Transactions
In Brazil, tokenized cards can be used to perform in-store using NFC and [e-commerce](https://developers.google.com/pay) transactions.
> [!WARNING]
> **Warning:** Effective **December 2025**, QR code transactions in Brazil will no longer be supported. Issuers are no longer required to support QR code transactions as part of their Google Pay integration. Previous guidance requiring QR code support is superseded by this notice.
### Launch requirements for Brazilian issuers
Below are the current local requirements to launch your Google Pay integration in Brazil:
1. **Android Push Provisioning** is mandatory.
2. **Manual Provisioning** with, at least, one of the following [Identity \& Verification (ID\&V)](https://developers.google.com/pay/issuers/guides/integration/identity-and-verification) methods: **OTP SMS, OTP Email or [App-to-App](https://developers.google.com/pay/issuers/tsp-integration/app-to-app-idv)**, is also mandatory.
3. Support for in-store using NFC and [e-commerce](https://developers.google.com/pay) transactions is mandatory.
4. Meet the **exit criteria** for both [Android Push Provisioning](https://developers.google.com/pay/issuers/apis/push-provisioning/android/launch-process#exit_criteria) and [Manual Provisioning](https://developers.google.com/pay/issuers/guides/testing/launch-requirements) with a special attention to:
- **Tokenization success rate** of **90%**
- **Transaction success rate** of **90%**
5. **No current issues** as depicted in sections [MP Common Issues](https://developers.google.com/pay/issuers/overview/region_specific/brazil#mp_common_issues_) and [PP Common Issues](https://developers.google.com/pay/issuers/overview/region_specific/brazil#pp_common_issues_)
**Examples of valid integrations:**
- Card provisioning using PP and MP with OTP SMS. Support in-store transactions using NFC and e-commerce transactions
- Card provisioning using PP and MP with App-to-App. Support in-store transactions using NFC and e-commerce transactions
- Card provisioning using PP and MP with OTP SMS, Call center. Support in-store transactions using NFC and e-commerce transactions
**Examples of invalid integrations:**
- Card provisioning using MP only, with OTP SMS and App-to-App as ID\&V methods (PP is missing)
- Card provisioning using PP and MP with Callcenter as ID\&V method (OTP SMS, OTP Email or App-to-App is missing)
- Card provisioning using PP only (MP missing)
## Manual Provisioning (MP)
**Manual Provisioning** refers to tokenizations that are, normally, initiated from [Google Wallet app](https://play.google.com/store/apps/details?id=com.google.android.apps.walletnfcrel).
The screens below show a common user flow for adding a card to Google Pay:
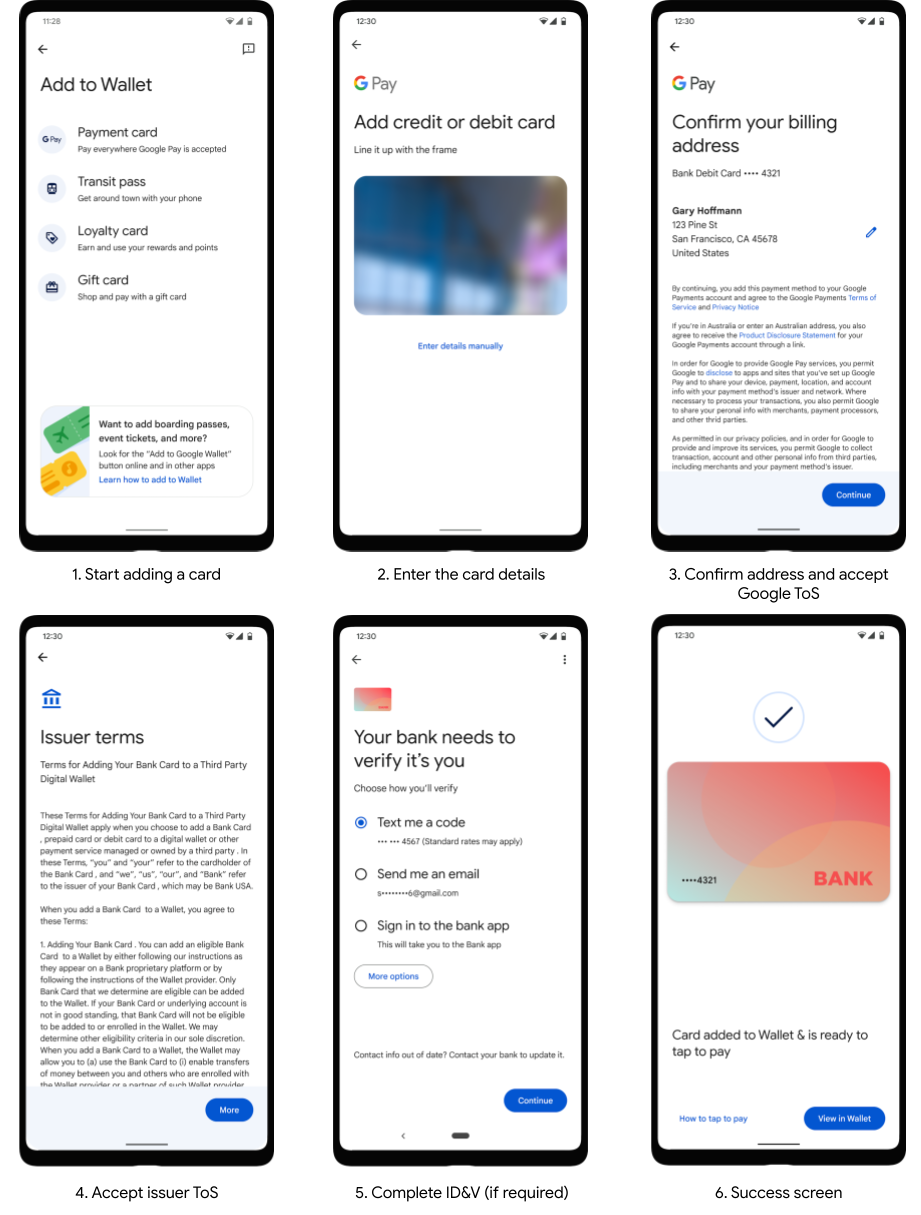
In Brazil it's very common, during the MP tokenization flow, to ask for an extra step of verification ([ID\&V](https://developers.google.com/pay/issuers/guides/integration/identity-and-verification), shown in screen 5 above), leading to the **Yellow** [authentication path](https://developers.google.com/pay/issuers/guides/integration/identity-and-verification#authentication-paths). However, other paths also exist such as **Green** and **Red** and, if used wisely, could improve significantly cardholders experience.
### Which authentication path should I assign to my cardholder?
Whenever a tokenization takes place, Google Pay will send [risk scores](https://developers.google.com/pay/issuers/guides/integration/identity-and-verification#risk-scores) to both Network and Issuer. We recommend Issuers to evaluate both Google Pay risk scores along with its internal signals in order to determine which authentication path must be taken. High Google Pay account and device scores, for instance, could lead to the **Green** path.
If the Yellow [authentication path](https://developers.google.com/pay/issuers/guides/integration/identity-and-verification#authentication-paths) is chosen, a robust [Identity \& Verification (ID\&V)](https://developers.google.com/pay/issuers/guides/integration/identity-and-verification) method should be provided and, in Brazil, at least one of the following methods should be implemented: **OTP SMS, OTP Email or [App-to-App](https://developers.google.com/pay/issuers/tsp-integration/app-to-app-idv)** in order to have the launch approved.
### Integration process
Below is the integration process for Manual Provisioning. Networks in Brazil are fully capable of guiding Issuers in this type of integration. Reach out to your Network for further details.
| **Step** | **Teams Involved** | **Details** |
|---|---|---|
| **1. Onboard** | **Issuer \& Google** | Issuers onboard and sign the NDA / CTA agreements through [Issuer Console](https://pay.google.com/business/console?business_type=financial_institution) and obtain access to [Issuer documentation](https://developers.google.com/pay/issuers). |
| **2. Integrate** | **Issuer \& Network** | Networks and Issuers work together to develop two-party integration. Further details in [this link](https://developers.google.com/pay/issuers/guides/integration/overview). |
| **3. Test** | **Issuer \& Network** | Issuers successfully complete all end to end Google Pay [test cases](https://developers.google.com/pay/issuers/guides/testing/functional-testing), working with Networks as needed. |
| **4. Launch** | **Issuer \& Network** | Issuers complete [pre-launch requirements](https://developers.google.com/pay/issuers/guides/testing/exit-criteria), and confirm readiness with Network; Network notifies Google of launch date. **Notice that Android Push Provisioning is mandatory in Brazil, therefore this feature must also be implemented before launching**. |
### MP common issues
Below are the most common issues faced by Issuers during a Manual Provisioning integration:
| **Common Issue** | **Details** |
|---|---|
| Not meet the recommended **success rates** indicated in the [exit criteria](https://developers.google.com/pay/issuers/guides/testing/launch-requirements) | - **Tokenizations success rate** must be greater than 90% **Yellow** path success rate. - **Transactions success rate** must be greater than 90% success rate. |
| **Issuer name in token data incorrect or inconsistent** | Issuer names are required to be consistent across all portfolios and Networks and must clearly identify the Issuer by name. [ISO Latin characters](https://en.wikipedia.org/wiki/ISO_basic_Latin_alphabet) are preferred but other types are allowed as long as they are consistent. |
| **Terms of Service, Privacy Policy and Website link issues** | Issuers must use **HTTPS** links and cannot use links that use Apple Pay/Samsung Pay/other wallets in URL. Issuers may use one page for multiple wallets as long as the page and url do not reference one wallet. |
| **Issuer package name missing or incorrect** | Issuers with an Android app are expected to set their Android package name to their production app. This is required for Issuers who support App-to-App ID\&V. |
### Highly recommended links
- [Manual Provisioning best practices](https://developers.google.com/pay/issuers/guides/overview/best-practices)
- [Security considerations](https://developers.google.com/pay/issuers/guides/overview/security)
- [Compatibility](https://developers.google.com/pay/issuers/guides/overview/about-google-pay#compatibility)
## Android Push Provisioning (PP)
**Android Push Provisioning** refers to tokenizations that are initiated within the banking app. The screens below illustrate the user flow:

During a PP tokenization, since the cardholder is already within the Issuer app, the provisioning normally goes through the **Green** [authentication path](https://developers.google.com/pay/issuers/guides/integration/identity-and-verification#authentication-paths), not requiring, therefore, the [Identity \& Verification (ID\&V)](https://developers.google.com/pay/issuers/guides/integration/identity-and-verification) step which leads to a better user experience.
### Sample app, API reference and flow diagrams
Google Pay provides a [Sample app](https://developers.google.com/pay/issuers/apis/push-provisioning/android/android-sample-app) that can be used, along with the [PP API reference](https://developers.google.com/pay/issuers/apis/push-provisioning/android/api-client-setup) and [flow diagrams](https://developers.google.com/pay/issuers/apis/push-provisioning/android/flow-diagrams), to have a solid understanding on how to integrate the banking app to PP API. We recommend both UX and developers teams to check the Sample app features and code in order to accelerate the development and launch.
### Integration process
Below is the integration process for Android Push Provisioning. Networks in Brazil are fully capable of guiding Issuers in this type of integration. Reach out to your Network for further details.
| **Step** | **Teams Involved** | **Details** |
|---|---|---|
| **1. Onboard** | **Issuer \& Google** | - Access the PP API documentation on our [Developers Site](https://developers.google.com/pay/issuers/apis/push-provisioning/android). - Prior to starting design and development, review the following materials: [API Flow Diagrams](https://developers.google.com/pay/issuers/apis/push-provisioning/android/flow-diagrams), [UX Brand Guidelines](https://developers.google.com/pay/issuers/apis/push-provisioning/android/branding-guidelines) and [Security Considerations](https://developers.google.com/pay/issuers/apis/push-provisioning/android/security-considerations). |
| **2. Design** | **Issuer \& Google** | - Complete your proposed application [UX design](https://developers.google.com/pay/issuers/apis/push-provisioning/android/launch-process#uxbranding_review) showing the PP entry point within the Issuer app. - Document UX design and application flow and submit it for branding review within [Issuer Console](https://pay.google.com/business/console?business_type=financial_institution). - Complete [App Allowlisting](https://developers.google.com/pay/issuers/apis/push-provisioning/android/allowlist) by using our [App allowlist request form](https://support.google.com/googlepay/contact/upp_api_onboarding). |
| **3. Test** | **Issuer \& Network** | - Download the latest PP SDK release [here](https://developers.google.com/pay/issuers/apis/push-provisioning/android/releases) and [setup your environment](https://developers.google.com/pay/issuers/apis/push-provisioning/android/setup). Development in the [sandbox](https://developers.google.com/pay/issuers/guides/resources/sandbox) environment is recommended. - Complete app development, referencing the [Developer documentation](https://developers.google.com/pay/issuers/apis/push-provisioning/android/api-client-setup), as needed. Work with your TSP to [generate the OPC](https://developers.google.com/pay/issuers/apis/push-provisioning/android/push-provisioning-objects#opaque-payment-card-opc) and for [troubleshooting](https://developers.google.com/pay/issuers/apis/push-provisioning/android/push-provisioning-objects#troubleshooting_opc_errors) any encountered issues. - Complete all [test cases](https://developers.google.com/pay/issuers/apis/push-provisioning/android/test-cases) to validate successful implementation of PP API. |
| **4. Launch** | **Issuer \& Google** | - Submit videos of your developed application in production for [app review](https://developers.google.com/pay/issuers/apis/push-provisioning/android/launch-process#app_review) so that we can verify if it meets all UX requirements and [test cases](https://developers.google.com/pay/issuers/apis/push-provisioning/android/test-cases). - Complete [final field testing and exit criteria](https://developers.google.com/pay/issuers/apis/push-provisioning/android/launch-process#field_testing) in production. - Submit a request for [Launch Approval](https://developers.google.com/pay/issuers/apis/push-provisioning/android/launch-process#request_launch_approval) through our [Launch approval request form](https://support.google.com/faqs/contact/pp_api_metrics). - Google will validate testing results, and if no issues are identified, the Google Pay team will provide written approval to launch by email. |
### PP common issues
Below are the most common issues faced by Issuers during an Android Push Provisioning integration:
| **Common Issue** | **Details** |
|---|---|
| **Opaque Payment Card (OPC) Troubleshooting** | Google is not able to troubleshoot OPC issues since it's a encrypted object and only Networks know how to build it and are able to decrypt it. Nonetheless, Google Pay provides Issuer developers with a way to capture the error message during a Push Provisioning tokenization. The returned errors message can be sent to the Network POC in order to identify what is wrong. All the steps to check the OPC error can be seen in [this link](https://developers.google.com/pay/issuers/apis/push-provisioning/android/push-provisioning-objects#troubleshooting_opc_errors). |
| **Not displaying GPay buttons prominently on high-traffic screens** | To ensure users see the Google Pay button, add it to screens within your existing user flows. Make sure there is a clear connection between the button and the user's credit or debit card. Do not display Google Pay buttons on screens that don't show their cards. |
| **Only display Google Pay button if the smartphone has NFC** | That's not correct because Google Pay can also be used for secure e-commerce payments. NFC is only required for contactless payments. |
| **Banking app not able to resolve "yellow-pathed" tokens leading to errors during tokenization** | Details of the scenario and how to handle it in [this link](https://developers.google.com/pay/issuers/apis/push-provisioning/android/wallet-operations#resolving_yellow_path). |
| **Banking app not always in sync with the wallet** | Details of the scenario and how to handle it in [this link](https://developers.google.com/pay/issuers/apis/push-provisioning/android/integration-steps#keeping_in_sync_with_the_wallet). |
### Highly recommended links
- [Planning the integration](https://developers.google.com/pay/issuers/apis/push-provisioning/android/integration-steps)
- [Android Push Provisioning best practices](https://developers.google.com/pay/issuers/apis/push-provisioning/android/branding-guidelines#best_practices)
- [Security considerations](https://developers.google.com/pay/issuers/apis/push-provisioning/android/security-considerations)
- [FAQ](https://developers.google.com/pay/issuers/apis/push-provisioning/android/faq)