The MediaPipe Pose Landmarker task lets you detect landmarks of human bodies in an image or video. You can use this task to identify key body locations, analyze posture, and categorize movements. This task uses machine learning (ML) models that work with single images or video. The task outputs body pose landmarks in image coordinates and in 3-dimensional world coordinates.
These instructions show you how to use the Pose Landmarker for web and JavaScript apps. For more information about the capabilities, models, and configuration options of this task, see the Overview.
Code example
The example code for Pose Landmarker provides a complete implementation of this task in JavaScript for your reference. This code helps you test this task and get started on building your own pose landmarker app. You can view, run, and edit the Pose Landmarker example code using just your web browser.
Setup
This section describes key steps for setting up your development environment specifically to use Pose Landmarker. For general information on setting up your web and JavaScript development environment, including platform version requirements, see the Setup guide for web.
JavaScript packages
Pose Landmarker code is available through the MediaPipe @mediapipe/tasks-vision
NPM package. You can
find and download these libraries by following the instructions in the platform
Setup guide.
You can install the required packages through NPM using the following command:
npm install @mediapipe/tasks-vision
If you want to import the task code via a content delivery network (CDN) service, add the following code in the <head> tag in your HTML file:
<!-- You can replace JSDeliver with another CDN if you prefer -->
<head>
  <script src="https://cdn.jsdelivr.net/npm/@mediapipe/tasks-vision/vision_bundle.js"
    crossorigin="anonymous"></script>
</head>
Model
The MediaPipe Pose Landmarker task requires a trained model that is compatible with this task. For more information on available trained models for Pose Landmarker, see the task overview Models section.
Select and download a model, and then store it within your project directory:
<dev-project-root>/app/shared/models/
Create the task
Use one of the Pose Landmarker createFrom...() functions to
prepare the task for running inferences. Use the createFromModelPath()
function with a relative or absolute path to the trained model file.
If your model is already loaded into memory, you can use the
createFromModelBuffer() method.
The code example below demonstrates using the createFromOptions() function to
set up the task. The createFromOptions() function allows you to customize the
Pose Landmarker with configuration options. For more information on configuration
options, see Configuration options.
The following code demonstrates how to build and configure the task with custom options:
const vision = await FilesetResolver.forVisionTasks(
  // path/to/wasm/root
  "https://cdn.jsdelivr.net/npm/@mediapipe/tasks-vision@latest/wasm"
);
const poseLandmarker = await poseLandmarker.createFromOptions(
    vision,
    {
      baseOptions: {
        modelAssetPath: "path/to/model"
      },
      runningMode: runningMode
    });
Configuration options
This task has the following configuration options for Web and JavaScript applications:
| Option Name | Description | Value Range | Default Value |
|---|---|---|---|
runningMode |
Sets the running mode for the task. There are two
modes: IMAGE: The mode for single image inputs. VIDEO: The mode for decoded frames of a video or on a livestream of input data, such as from a camera. |
{IMAGE, VIDEO} |
IMAGE |
numPoses |
The maximum number of poses that can be detected by the Pose Landmarker. | Integer > 0 |
1 |
minPoseDetectionConfidence |
The minimum confidence score for the pose detection to be considered successful. | Float [0.0,1.0] |
0.5 |
minPosePresenceConfidence |
The minimum confidence score of pose presence score in the pose landmark detection. | Float [0.0,1.0] |
0.5 |
minTrackingConfidence |
The minimum confidence score for the pose tracking to be considered successful. | Float [0.0,1.0] |
0.5 |
outputSegmentationMasks |
Whether Pose Landmarker outputs a segmentation mask for the detected pose. | Boolean |
False |
Prepare data
Pose Landmarker can detect poses in images in any format supported by the host browser. The task also handles data input preprocessing, including resizing, rotation and value normalization. To landmark poses in videos, you can use the API to quickly process one frame at a time, using the timestamp of the frame to determine when the poses occur within the video.
Run the task
The Pose Landmarker uses the detect() (with running mode IMAGE) and
detectForVideo() (with running mode VIDEO) methods to trigger
inferences. The task processes the data, attempts to landmark poses, and
then reports the results.
Calls to the Pose Landmarker detect() and detectForVideo() methods run
synchronously and block the user interpose thread. If you detect poses
in video frames from a device's camera, each detection blocks the main
thread. You can prevent this by implementing web workers to run the detect()
and detectForVideo() methods on another thread.
The following code demonstrates how execute the processing with the task model:
Image
const image = document.getElementById("image") as HTMLImageElement;
const poseLandmarkerResult = poseLandmarker.detect(image);
Video
await poseLandmarker.setOptions({ runningMode: "VIDEO" });

let lastVideoTime = -1;
function renderLoop(): void {
  const video = document.getElementById("video");

  if (video.currentTime !== lastVideoTime) {
    const poseLandmarkerResult = poseLandmarker.detectForVideo(video);
    processResults(detections);
    lastVideoTime = video.currentTime;
  }

  requestAnimationFrame(() => {
    renderLoop();
  });
}
For a more complete implementation of running an Pose Landmarker task, see the code example.
Handle and display results
The Pose Landmarker returns a poseLandmarkerResult object for each detection
run. The result object contains coordinates for each pose landmark.
The following shows an example of the output data from this task:
PoseLandmarkerResult:
  Landmarks:
    Landmark #0:
      x            : 0.638852
      y            : 0.671197
      z            : 0.129959
      visibility   : 0.9999997615814209
      presence     : 0.9999984502792358
    Landmark #1:
      x            : 0.634599
      y            : 0.536441
      z            : -0.06984
      visibility   : 0.999909
      presence     : 0.999958
    ... (33 landmarks per pose)
  WorldLandmarks:
    Landmark #0:
      x            : 0.067485
      y            : 0.031084
      z            : 0.055223
      visibility   : 0.9999997615814209
      presence     : 0.9999984502792358
    Landmark #1:
      x            : 0.063209
      y            : -0.00382
      z            : 0.020920
      visibility   : 0.999976
      presence     : 0.999998
    ... (33 world landmarks per pose)
  SegmentationMasks:
    ... (pictured below)
The output contains both normalized coordinates (Landmarks) and world
coordinates (WorldLandmarks) for each landmark.
The output contains the following normalized coordinates (Landmarks):
xandy: Landmark coordinates normalized between 0.0 and 1.0 by the image width (x) and height (y).z: The landmark depth, with the depth at the midpoint of the hips as the origin. The smaller the value, the closer the landmark is to the camera. The magnitude of z uses roughly the same scale asx.visibility: The likelihood of the landmark being visible within the image.
The output contains the following world coordinates (WorldLandmarks):
x,y, andz: Real-world 3-dimensional coordinates in meters, with the midpoint of the hips as the origin.visibility: The likelihood of the landmark being visible within the image.
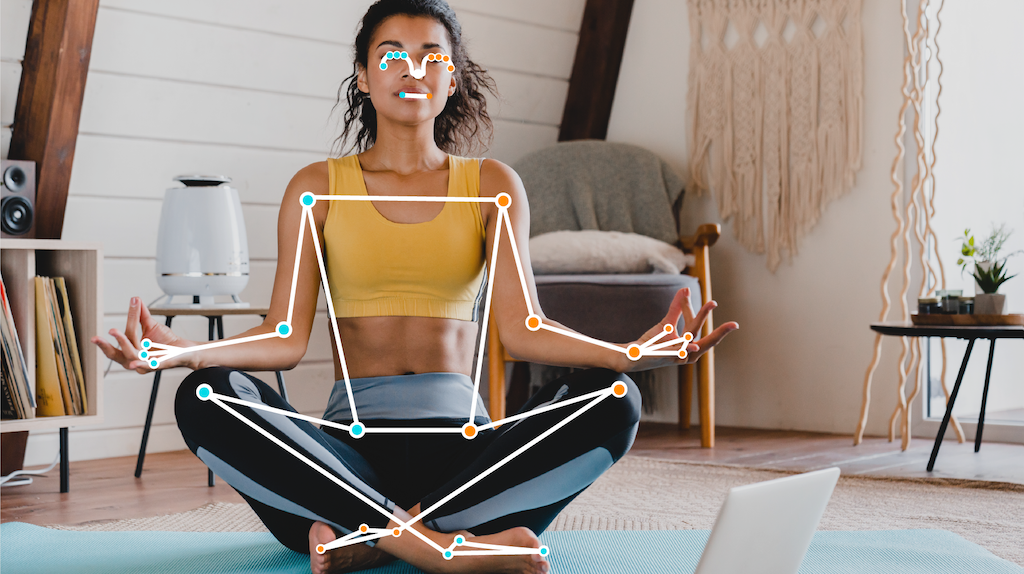
The following image shows a visualization of the task output:
The optional segmentation mask represents the likelihood of each pixel belonging to a detected person. The following image is a segmentation mask of the task output:

The Pose Landmarker example code demonstrates how to display the results returned from the task, see the code example