The MediaPipe Pose Landmarker task lets you detect landmarks of human bodies in an image or video. You can use this task to identify key body locations, analyze posture, and categorize movements. This task uses machine learning (ML) models that work with single images or video. The task outputs body pose landmarks in image coordinates and in 3-dimensional world coordinates.
The code sample described in these instructions is available on GitHub. For more information about the capabilities, models, and configuration options of this task, see the Overview.
Code example
The example code for Pose Landmarker provides a complete implementation of this task in Python for your reference. This code helps you test this task and get started on building your own pose landmarker. You can view, run, and edit the Pose Landmarker example code using just your web browser.
If you are implementing the Pose Landmarker for Raspberry Pi, refer to the Raspberry Pi example app.
Setup
This section describes key steps for setting up your development environment and code projects specifically to use Pose Landmarker. For general information on setting up your development environment for using MediaPipe tasks, including platform version requirements, see the Setup guide for Python.
Packages
The MediaPipe Pose Landmarker task requires the mediapipe PyPI package. You can install and import these dependencies with the following:
$ python -m pip install mediapipe
Imports
Import the following classes to access the Pose Landmarker task functions:
import mediapipe as mp
from mediapipe.tasks import python
from mediapipe.tasks.python import vision
Model
The MediaPipe Pose Landmarker task requires a trained model that is compatible with this task. For more information on available trained models for Pose Landmarker, see the task overview Models section.
Select and download the model, and then store it in a local directory:
model_path = '/absolute/path/to/pose_landmarker.task'
Use the BaseOptions object model_asset_path parameter to specify the path
of the model to use. For a code example, see the next section.
Create the task
The MediaPipe Pose Landmarker task uses the create_from_options function to
set up the task. The create_from_options function accepts values
for configuration options to handle. For more information, see
Configuration options.
The following code demonstrates how to build and configure this task.
These samples also show the variations of the task construction for images, video files, and live stream.
Image
import mediapipe as mp

BaseOptions = mp.tasks.BaseOptions
PoseLandmarker = mp.tasks.vision.PoseLandmarker
PoseLandmarkerOptions = mp.tasks.vision.PoseLandmarkerOptions
VisionRunningMode = mp.tasks.vision.RunningMode

options = PoseLandmarkerOptions(
    base_options=BaseOptions(model_asset_path=model_path),
    running_mode=VisionRunningMode.IMAGE)

with PoseLandmarker.create_from_options(options) as landmarker:
  # The landmarker is initialized. Use it here.
  # ...
Video
import mediapipe as mp

BaseOptions = mp.tasks.BaseOptions
PoseLandmarker = mp.tasks.vision.PoseLandmarker
PoseLandmarkerOptions = mp.tasks.vision.PoseLandmarkerOptions
VisionRunningMode = mp.tasks.vision.RunningMode

# Create a pose landmarker instance with the video mode:
options = PoseLandmarkerOptions(
    base_options=BaseOptions(model_asset_path=model_path),
    running_mode=VisionRunningMode.VIDEO)

with PoseLandmarker.create_from_options(options) as landmarker:
  # The landmarker is initialized. Use it here.
  # ...
Live stream
import mediapipe as mp

BaseOptions = mp.tasks.BaseOptions
PoseLandmarker = mp.tasks.vision.PoseLandmarker
PoseLandmarkerOptions = mp.tasks.vision.PoseLandmarkerOptions
PoseLandmarkerResult = mp.tasks.vision.PoseLandmarkerResult
VisionRunningMode = mp.tasks.vision.RunningMode

# Create a pose landmarker instance with the live stream mode:
def print_result(result: PoseLandmarkerResult, output_image: mp.Image, timestamp_ms: int):
    print('pose landmarker result: {}'.format(result))

options = PoseLandmarkerOptions(
    base_options=BaseOptions(model_asset_path=model_path),
    running_mode=VisionRunningMode.LIVE_STREAM,
    result_callback=print_result)

with PoseLandmarker.create_from_options(options) as landmarker:
  # The landmarker is initialized. Use it here.
  # ...
For a complete example of creating a Pose Landmarker for use with an image, see the code example.
Configuration options
This task has the following configuration options for Python applications:
| Option Name | Description | Value Range | Default Value |
|---|---|---|---|
running_mode |
Sets the running mode for the task. There are three
modes: IMAGE: The mode for single image inputs. VIDEO: The mode for decoded frames of a video. LIVE_STREAM: The mode for a livestream of input data, such as from a camera. In this mode, resultListener must be called to set up a listener to receive results asynchronously. |
{IMAGE, VIDEO, LIVE_STREAM} |
IMAGE |
num_poses |
The maximum number of poses that can be detected by the Pose Landmarker. | Integer > 0 |
1 |
min_pose_detection_confidence |
The minimum confidence score for the pose detection to be considered successful. | Float [0.0,1.0] |
0.5 |
min_pose_presence_confidence |
The minimum confidence score of pose presence score in the pose landmark detection. | Float [0.0,1.0] |
0.5 |
min_tracking_confidence |
The minimum confidence score for the pose tracking to be considered successful. | Float [0.0,1.0] |
0.5 |
output_segmentation_masks |
Whether Pose Landmarker outputs a segmentation mask for the detected pose. | Boolean |
False |
result_callback |
Sets the result listener to receive the landmarker results
asynchronously when Pose Landmarker is in the live stream mode.
Can only be used when running mode is set to LIVE_STREAM |
ResultListener |
N/A |
Prepare data
Prepare your input as an image file or a numpy array,
then convert it to a mediapipe.Image object. If your input is a video file
or live stream from a webcam, you can use an external library such as
OpenCV to load your input frames as numpy
arrays.
Image
import mediapipe as mp

# Load the input image from an image file.
mp_image = mp.Image.create_from_file('/path/to/image')

# Load the input image from a numpy array.
mp_image = mp.Image(image_format=mp.ImageFormat.SRGB, data=numpy_image)
Video
import mediapipe as mp

# Use OpenCV’s VideoCapture to load the input video.

# Load the frame rate of the video using OpenCV’s CV_CAP_PROP_FPS
# You’ll need it to calculate the timestamp for each frame.

# Loop through each frame in the video using VideoCapture#read()

# Convert the frame received from OpenCV to a MediaPipe’s Image object.
mp_image = mp.Image(image_format=mp.ImageFormat.SRGB, data=numpy_frame_from_opencv)
Live stream
import mediapipe as mp

# Use OpenCV’s VideoCapture to start capturing from the webcam.

# Create a loop to read the latest frame from the camera using VideoCapture#read()

# Convert the frame received from OpenCV to a MediaPipe’s Image object.
mp_image = mp.Image(image_format=mp.ImageFormat.SRGB, data=numpy_frame_from_opencv)
Run the task
The Pose Landmarker uses the detect, detect_for_video and detect_async
functions to trigger inferences. For pose landmarking, this involves
preprocessing input data and detecting poses in the image.
The following code demonstrates how to execute the processing with the task model.
Image
# Perform pose landmarking on the provided single image.
# The pose landmarker must be created with the image mode.
pose_landmarker_result = landmarker.detect(mp_image)
Video
# Perform pose landmarking on the provided single image.
# The pose landmarker must be created with the video mode.
pose_landmarker_result = landmarker.detect_for_video(mp_image, frame_timestamp_ms)
Live stream
# Send live image data to perform pose landmarking.
# The results are accessible via the `result_callback` provided in
# the `PoseLandmarkerOptions` object.
# The pose landmarker must be created with the live stream mode.
landmarker.detect_async(mp_image, frame_timestamp_ms)
Note the following:
- When running in the video mode or the live stream mode, also provide the Pose Landmarker task the timestamp of the input frame.
- When running in the image or the video model, the Pose Landmarker task blocks the current thread until it finishes processing the input image or frame.
- When running in the live stream mode, the Pose Landmarker task returns immediately and doesn’t block the current thread. It will invoke the result listener with the detection result every time it finishes processing an input frame. If the detection function is called when the Pose Landmarker task is busy processing another frame, the task will ignore the new input frame.
For a complete example of running an Pose Landmarker on an image, see the code example for details.
Handle and display results
The Pose Landmarker returns a poseLandmarkerResult object for each detection
run. The result object contains coordinates for each pose landmark.
The following shows an example of the output data from this task:
PoseLandmarkerResult:
  Landmarks:
    Landmark #0:
      x            : 0.638852
      y            : 0.671197
      z            : 0.129959
      visibility   : 0.9999997615814209
      presence     : 0.9999984502792358
    Landmark #1:
      x            : 0.634599
      y            : 0.536441
      z            : -0.06984
      visibility   : 0.999909
      presence     : 0.999958
    ... (33 landmarks per pose)
  WorldLandmarks:
    Landmark #0:
      x            : 0.067485
      y            : 0.031084
      z            : 0.055223
      visibility   : 0.9999997615814209
      presence     : 0.9999984502792358
    Landmark #1:
      x            : 0.063209
      y            : -0.00382
      z            : 0.020920
      visibility   : 0.999976
      presence     : 0.999998
    ... (33 world landmarks per pose)
  SegmentationMasks:
    ... (pictured below)
The output contains both normalized coordinates (Landmarks) and world
coordinates (WorldLandmarks) for each landmark.
The output contains the following normalized coordinates (Landmarks):
xandy: Landmark coordinates normalized between 0.0 and 1.0 by the image width (x) and height (y).z: The landmark depth, with the depth at the midpoint of the hips as the origin. The smaller the value, the closer the landmark is to the camera. The magnitude of z uses roughly the same scale asx.visibility: The likelihood of the landmark being visible within the image.
The output contains the following world coordinates (WorldLandmarks):
x,y, andz: Real-world 3-dimensional coordinates in meters, with the midpoint of the hips as the origin.visibility: The likelihood of the landmark being visible within the image.
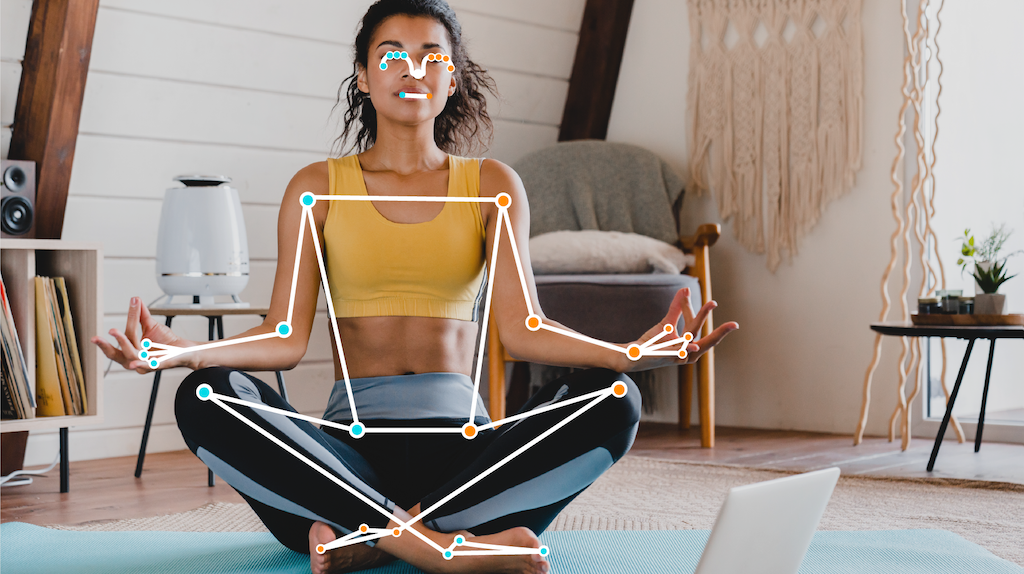
The following image shows a visualization of the task output:
The optional segmentation mask represents the likelihood of each pixel belonging to a detected person. The following image is a segmentation mask of the task output:

The Pose Landmarker example code demonstrates how to display the results returned from the task, see the code example for details.