Select platform: [Android](https://developers.google.com/maps/documentation/android-sdk/views.md.txt "View this page for the Android platform docs.") [iOS](https://developers.google.com/maps/documentation/ios-sdk/views.md.txt "View this page for the iOS platform docs.") [JavaScript](https://developers.google.com/maps/documentation/javascript/vector-map.md.txt "View this page for the JavaScript platform docs.")
With Maps SDK for iOS, you can change the user's viewpoint of the map
by changing the map's camera.
With Maps SDK for iOS, your users can tilt and rotate your
maps to adjust them to an orientation useful for their context. At any zoom
level, users can pan the map or change its perspective with very little latency.
Changes to the camera don't change markers, polylines, or other graphics you've
added, although you might want to change these additions to fit better with the
new view.
## The map's view
The Maps SDK for iOS uses the [Mercator
projection](https://en.wikipedia.org/wiki/Mercator_projection)
to represent the world's surface (a sphere) on your device's screen (a flat
plane).
> [!NOTE]
> **Note:** A Mercator projection has a finite height longitudinally (north/south) but an infinite width latitudinally (east/west). This characteristic means the map view repeats infinitely east and west. In the north and south directions, the base map imagery is cut using the Mercator projection at approximately +/- 85 degrees to make the resulting map shape square, which allows easier logic for tile selection.
## The camera position
The map view is modeled as a **camera** looking down on a flat plane. The position
of the camera (and hence the rendering of the map) is specified by the
following properties: [target (latitude/longitude location)](https://developers.google.com/maps/documentation/ios-sdk/views.md.txt#target_location),
[bearing](https://developers.google.com/maps/documentation/ios-sdk/views.md.txt#bearing_orientation), [tilt](https://developers.google.com/maps/documentation/ios-sdk/views.md.txt#tilt_viewing_angle),
and [zoom](https://developers.google.com/maps/documentation/ios-sdk/views.md.txt#zoom).
:camera:
### Target (location)
The camera target is the location of the center of the map, specified as
latitude and longitude coordinates.
The latitude can be between -85 and 85 degrees, inclusive. Values above or below this range will be clamped to the nearest value within this range. For example, specifying a latitude of 100 will set the value to 85. Longitude ranges between -180 and 180 degrees, inclusive. Values above or below this range will be wrapped such that they fall within the range (-180, 180). For example, 480, 840 and 1200 will all be wrapped to 120 degrees.
### Bearing (orientation)
The camera bearing specifies the compass direction, measured in degrees from true north, corresponding
to the top edge of the map. If you draw a vertical line from the center of the map to the top edge
of the map, the bearing corresponds to the heading of the camera (measured in degrees) relative
to true north.
A bearing of 0 means that the top of the map points to true north.
A bearing value 90 means the top of the map points due east (90 degrees on a compass). A value
180 means the top of the map points due south.
The Maps API lets you change a map's bearing. For example, someone driving a car
often turns a road map to align it with their direction of travel, while hikers using a map and
compass usually orient the map so that a vertical line is pointing north.
### Tilt (viewing angle)
The tilt defines the camera's position on an arc directly over the map's
center position, measured in degrees from the
[nadir](https://en.wikipedia.org/wiki/Nadir)
(the direction pointing directly below the camera). A value of 0 corresponds to a camera pointed
straight down. Values greater than 0 correspond to a camera that is pitched toward the horizon by
the specified number of degrees.
When you change the viewing angle, the map appears in perspective, with far-away features
appearing smaller, and nearby features appearing larger. The following
illustrations demonstrate this.
In the images below, the viewing angle is 0 degrees. The first image shows a
schematic of this; position **1** is the camera position, and position **2**
is the current map position. The resulting map is shown below it.
|---|---|
|  The map displayed with the camera's default viewing angle. |  The default viewing angle of the camera. |
In the images below, the viewing angle is 45 degrees. Notice that the camera
moves halfway along an arc between straight overhead (0 degrees) and the ground (90 degrees),
to position **3** . The camera is still pointing at the map's center point, but the area
represented by the line at position **4** is now visible.
|---|---|
|  The map displayed with a viewing angle of 45 degrees. | 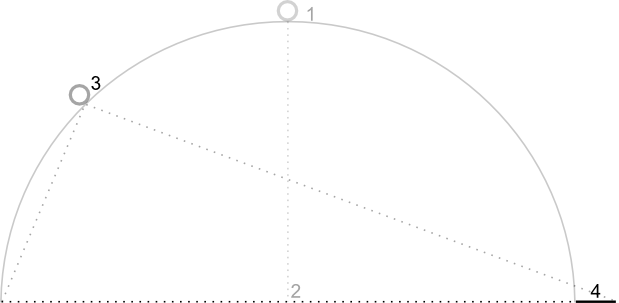 A camera viewing angle of 45 degrees. |
The map in this screenshot is still centered on the same point as in the
original map, but more features have appeared at the top of the map. As you
increase the angle beyond 45 degrees, features between the camera and the map
position appear proportionally larger, while features beyond the map position
appear proportionally smaller, yielding a three-dimensional effect.
### Zoom
The zoom level of the camera determines the scale of the map. At larger zoom
levels more detail can be seen on the screen, while at smaller zoom levels
more of the world can be seen on the screen.
At zoom level 0, the scale of the map is such that the entire world has
a width of approximately 256 points.
Increasing the zoom level by 1 doubles the width of the world on the screen.
Hence at zoom level N, the width of the world is approximately
256 \* 2^N^ points. For example, at zoom level 2, the whole world is approximately
1024 points wide.
The zoom level need not be an integer. The range of zoom
levels permitted by the map depends on a number of factors including target,
map type and screen size. Any number out of the range will be converted to the
next closest valid value, which can be either the minimum zoom level or the
maximum zoom level. The following list shows the approximate level of detail
you can expect to see at each zoom level:
- 1: World
- 5: Landmass/continent
- 10: City
- 15: Streets
- 20: Buildings
> [!NOTE]
> **Note:** Due to screen size and density, some devices may not support the lowest zoom levels. Use the [`minZoom`](https://developers.google.com/maps/documentation/ios-sdk/reference/objc/Classes/GMSMapView.md.txt#minzoom) property of `GMSMapView` to get the minimum zoom level possible for the map.
The following images show the visual appearance of different zoom levels:
|---|---|---|
|  A map at zoom level 5. |  A map at zoom level 15. |  A map at zoom level 20. |
## Set the initial camera position
Set the initial camera position using the
[`GMSCameraPosition`](https://developers.google.com/maps/documentation/ios-sdk/reference/objc/Classes/GMSCameraPosition.md.txt)
object, that lets you to set latitude and longitude of the target along with
bearing, tilt, and zoom.
To set the initial camera position, create a [`GMSMapViewOptions`](https://developers.google.com/maps/documentation/ios-sdk/reference/objc/Classes/GMSMapViewOptions.md.txt)
object and set the `camera` property to a `GMSCameraPosition`. Then pass your
options to the
[`GMSMapView`](https://developers.google.com/maps/documentation/ios-sdk/reference/objc/Classes/GMSMapView.md.txt)
convenience constructor.
### Swift
```swift
let options = GMSMapViewOptions()
options.camera = GMSCameraPosition.camera(withLatitude: -33.8683, longitude: 151.2086, zoom: 16)
let mapView = GMSMapView(options:options)
```
### Objective-C
```objective-c
GMSMapViewOptions *options = [[GMSMapViewOptions alloc] init];
options.camera = [GMSCameraPosition cameraWithLatitude:-33.8683
longitude:151.2086
zoom:16];
GMSMapView *mapView = [[GMSMapView alloc] initWithOptions:options];
```
You can also create the `GMSMapView` object using the default `UIView` init
method. In this case, the camera position starts at the default location and you
change it after creation.
### Swift
```swift
let options = GMSMapViewOptions()
options.frame = self.view.bounds
let mapView = GMSMapView(options:options)
```
### Objective-C
```objective-c
GMSMapViewOptions *options = [[GMSMapViewOptions alloc] init];
options.frame = self.view.bounds;
GMSMapView *mapView = [[GMSMapView alloc] initWithOptions:options];
```
## Change the camera position
You can programmatically change the camera position to set the location,
bearing, tilt, and zoom. While `GMSMapView` provides several methods that you
can use to change the camera position, you typically use `GMSCameraPosition` or
`GMSCameraUpdate`:
- [`GMSCameraPosition`](https://developers.google.com/maps/documentation/ios-sdk/reference/objc/Classes/GMSCameraPosition.md.txt)
contains properties and methods you use to change every camera position
parameter: target, bearing, tilt, and zoom.
- [`GMSCameraUpdate`](https://developers.google.com/maps/documentation/ios-sdk/reference/objc/Classes/GMSCameraUpdate.md.txt)
lets you change target, bearing, tilt, and zoom, and also contains additional
convenience methods to support scrolling, advanced zooming, centering the
camera within predefined boundaries, and more.
When you move the camera, you can choose to "snap" the camera to the new
position, meaning there is no animation, or animate the move. For example, if
you animate a change to the camera's target location, the animation pans from
the earlier location to the new one.
The animation interpolates between the current camera attributes and the new
camera attributes. You can control the duration of the animation using [Core
Animation](https://developer.apple.com/documentation/quartzcore).
### Use `GMSCameraPosition`
To change the camera with
[`GMSCameraPosition`](https://developers.google.com/maps/documentation/ios-sdk/reference/objc/Classes/GMSCameraPosition.md.txt),
you create a new object or copy an existing object and then set it on the
`GMSMapView` object. Use the `GMSCameraPosition` object to snap the camera to
the new location with or without animation.
Use a `GMSCameraPosition` object to configure any camera properties such as
latitude, longitude, zoom, bearing, and viewing angle. You then use that object
to set the `camera` property of `GMSMapView`.
### Swift
```swift
let fancy = GMSCameraPosition(
latitude: -33,
longitude: 151,
zoom: 6,
bearing: 270,
viewingAngle: 45
)
mapView.camera = fancy
```
### Objective-C
```objective-c
GMSCameraPosition *fancy = [GMSCameraPosition cameraWithLatitude:-33.8683
longitude:151.2086
zoom:6
bearing:30
viewingAngle:45];
[mapView setCamera:fancy];
```
Omit any `GMSCameraPosition` property that you want to set to its default value.
To animate the move, use the `animateToCameraPosition:` method instead of
setting the `camera` property.
### Use `GMSCameraUpdate`
[`GMSCameraUpdate`](https://developers.google.com/maps/documentation/ios-sdk/reference/objc/Classes/GMSCameraUpdate.md.txt)
lets you update the camera position, and choose whether to snap-to or animate-to
that new position. The advantage of `GMSCameraUpdate` is convenience. You can
use `GMSCameraPosition` to perform the same tasks as `GMSCameraUpdate`, but
`GMSCameraUpdate` provides additional helper methods to make it easier to
manipulate the camera.
For example, to use `GMSCameraPosition` to increment the current zoom level, you
have to first determine the current zoom level, then create a
`GMSCameraPosition` object where you set the zoom to a value one greater than
the current zoom.
Alternatively, construct a `GMSCameraUpdate` object with the `zoomIn:` method.
Then update the camera by passing the `GMSCameraUpdate` object to the
`GMSMapView` `animateWithCameraUpdate:` method.
### Swift
```swift
// Zoom in one zoom level
let zoomCamera = GMSCameraUpdate.zoomIn()
mapView.animate(with: zoomCamera)
```
### Objective-C
```objective-c
// Zoom in one zoom level
GMSCameraUpdate *zoomCamera = [GMSCameraUpdate zoomIn];
[mapView animateWithCameraUpdate:zoomCamera];
```
Use the `GMSMapView` `moveCamera:` method to snap the camera to the new position
instead.
In the next example, you use `GMSCameraUpdate` to animate a move of the camera
to center it on Vancouver.
### Swift
```swift
// Center the camera on Vancouver, Canada
let vancouver = CLLocationCoordinate2D(latitude: 49.26, longitude: -123.11)
let vancouverCam = GMSCameraUpdate.setTarget(vancouver)
mapView.animate(with: vancouverCam)
```
### Objective-C
```objective-c
// Center the camera on Vancouver, Canada
CLLocationCoordinate2D vancouver = CLLocationCoordinate2DMake(49.26, -123.11);
GMSCameraUpdate *vancouverCam = [GMSCameraUpdate setTarget:vancouver];
[mapView animateWithCameraUpdate:vancouverCam];
```
#### Construct a `GMSCameraUpdate` object
Construct a `GMSCameraUpdate` object by using one of its methods.
`zoomIn:` and `zoomOut:`
: Change the current zoom level by 1.0, while keeping
all other properties the same.
`zoomTo:`
: Changes the zoom level to the given value, while keeping all other
properties the same.
`zoomBy:`
: Increases (or decreases, if the value is negative) the zoom level
by the given value.
`zoomBy:atPoint:`
: Increases (or decreases, if the value is negative) the
zoom level by the given value, while retaining the specified point's
position on the screen.
`setTarget:`
: Changes the camera's latitude and longitude, while preserving
all other properties.
`setTarget:zoom:`
: Changes the camera's latitude, longitude, and zoom, while
preserving all other properties.
`setCamera:`
: Sets a new `GMSCameraPosition`.
`scrollByX:Y:`
: Changes the camera's latitude and longitude to move the map
by the specified number of points. A positive x value causes the
camera to move to the right, so that the map appears to have moved to the
left. A positive y value causes the camera to move down, so that the map
appears to have moved up. The scrolling is relative to the camera's current
bearing. For example, if the camera has a bearing of 90 degrees, then
east is "up".
`fitBounds:`
: Transforms the camera to center the specified bounds on the screen at
the greatest possible zoom level. Applies a default
padding to the bounds of 64 points.
`fitBounds:withPadding:`
: Transforms the camera to center the specified bounds on the
screen at the greatest possible zoom level. Use this method to specify the
same padding, in points, for all sides of the bounding box.
`fitBounds:withEdgeInsets:`
: Transforms the camera to center the specified bounds on the
screen at the greatest possible zoom level. With `UIEdgeInsets`,
you specify padding for each side of the bounding box independently.
> [!NOTE]
> **Note:** The `fitBounds:` methods account for both the [padding](https://developers.google.com/maps/documentation/ios-sdk/configure-map.md.txt#map_padding) that you've set on the map, as well as any padding specified when you fit to bounds. For example, if you specify 100 points of padding around your `GMSMapView`, and then call the `fitBounds:` method, the camera transformations account for the 64 points of default padding in addition to the 100 points of custom padding.
### Use `GMSMapView` to change a single property
[`GMSMapView`](https://developers.google.com/maps/documentation/ios-sdk/reference/objc/Classes/GMSMapView.md.txt)
provides several methods that let you move the camera without the use of a
`GMSCameraPosition` object or `GMSCameraUpdate` object. With these methods, such
as `animateToLocation:` or `animateToZoom:`, you can animate a change to a
single camera property.
> [!NOTE]
> **Note:** While `GMSMapView` provides methods to change a single property, you typically use `GMSCameraPosition` or `GMSCameraUpdate` to move the camera, including when you want to change multiple camera properties.
For example, use the `toViewingAngle:` method to animate a change to the camera
tilt.
### Swift
```swift
mapView.animate(toViewingAngle: 45)
```
### Objective-C
```objective-c
[mapView animateToViewingAngle:45];
```
## Set target (location)
The location determines the center of the map. Locations are specified by
latitude and longitude, and represented programmatically by a
`CLLocationCoordinate2D`, created with `CLLocationCoordinate2DMake`.
Use `GMSCameraPosition` to change the location. In this example, the map snaps
to the new location.
### Swift
```swift
let target = CLLocationCoordinate2D(latitude: -33.868, longitude: 151.208)
mapView.camera = GMSCameraPosition(target: target, zoom: 6)
```
### Objective-C
```objective-c
CLLocationCoordinate2D target =
CLLocationCoordinate2DMake(-33.868, 151.208);
mapView.camera = [GMSCameraPosition cameraWithTarget:target zoom:6];
```
To animate the change and pan the map to the new location, you can use the
`animateToCameraPosition:` method instead of setting the `camera` property. Or,
use the `animateToLocation:` method on `GMSMapView`.
### Swift
```swift
mapView.animate(toLocation: CLLocationCoordinate2D(latitude: -33.868, longitude: 151.208))
```
### Objective-C
```objective-c
[mapView animateToLocation:CLLocationCoordinate2DMake(-33.868, 151.208)];
```
You can also create a `GMSCameraUpdate` object to move the camera. Use its
built-in method, `scrollByX:Y:`, to specify the number of points to scroll the
camera in the X and Y directions. In this example, you scroll the camera 200
points to the right and 100 points down:
### Swift
```swift
// Move the camera 200 points to the right, and 100 points downwards
let downwards = GMSCameraUpdate.scrollBy(x: 200, y: 100)
mapView.animate(with: downwards)
```
### Objective-C
```objective-c
// Move the camera 200 points to the right, and 100 points downwards
GMSCameraUpdate *downwards = [GMSCameraUpdate scrollByX:200.0 Y:100.0];
[mapView animateWithCameraUpdate:downwards];
```
## Set bearing (orientation)
The bearing is the compass direction, measured in degrees from true north, for
the top edge of the map. For example, a bearing of 90 degrees results in a map
where the top edge points due east.
Set the bearing programmatically with `GMSCameraPosition` or `GMSCameraUpdate`
or with the `animateToBearing:` method of `GMSMapView`.
### Swift
```swift
mapView.animate(toBearing: 0)
```
### Objective-C
```objective-c
[mapView animateToBearing:0];
```
## Set tilt (viewing angle)
The viewing angle is the camera's position on an arc between directly over the
map's center position and the surface of the Earth, measured in degrees from the
[nadir](https://en.wikipedia.org/wiki/Nadir) (the direction
pointing directly below the camera). When you change the viewing angle, the map
appears in perspective, with features between the camera and the map position
appearing proportionally larger, and features beyond the map position appearing
proportionally smaller, yielding a three-dimensional effect.
The viewing angle can range between 0 (pointing straight down at the map), and
up to a zoom-level dependent maximum. For zoom level 16 or higher, the maximum
angle is 65 degrees. For zoom level 10 or lower, the maximum angle is 30
degrees.
Set the viewing angle programmatically using `GMSCameraPosition` or
`GMSCameraUpdate` or with the `animateToViewingAngle:` method of `GMSMapView`.
### Swift
```swift
mapView.animate(toViewingAngle: 45)
```
### Objective-C
```objective-c
[mapView animateToViewingAngle:45];
```
## Set zoom
The zoom level of the camera determines the scale of the map. At larger zoom
levels, you can see more detail on the screen, while at smaller zoom levels, you
can see more of the world.
Set the zoom programmatically with `GMSCameraPosition` or `GMSCameraUpdate` or
with the `animateToZoom:` method of `GMSMapView`.
### Swift
```swift
mapView.animate(toZoom: 12)
```
### Objective-C
```objective-c
[mapView animateToZoom:12];
```
The following example uses the `zoomIn:` method to construct a `GMSCameraUpdate`
object to animate a zoom in by one level from the current level.
### Swift
```swift
// Zoom in one zoom level
let zoomCamera = GMSCameraUpdate.zoomIn()
mapView.animate(with: zoomCamera)
```
### Objective-C
```objective-c
// Zoom in one zoom level
GMSCameraUpdate *zoomCamera = [GMSCameraUpdate zoomIn];
[mapView animateWithCameraUpdate:zoomCamera];
```
## Set boundaries
To move the camera so an entire area of interest is visible at the greatest
possible zoom level, set boundaries for the camera view. For example, if you
want to display all gas stations within five miles of the user's current
position, move the camera so they are all visible on the screen:
1. Calculate the [`GMSCoordinateBounds`](https://developers.google.com/maps/documentation/ios-sdk/reference/objc/Classes/GMSCoordinateBounds.md.txt) that you want to be visible on the screen.
2. Use the `cameraForBounds:insets:` method of `GMSMapView` to return a new `GMSCameraPosition`.
Set these bounds so that the given `GMSCoordinateBounds` fits entirely
within the current map's size. Note that this method sets the tilt and bearing
of the map to 0.
The following example demonstrates how to change the camera so that the cities
of Vancouver and Calgary both appear in the same view.
### Swift
```swift
let vancouver = CLLocationCoordinate2D(latitude: 49.26, longitude: -123.11)
let calgary = CLLocationCoordinate2D(latitude: 51.05,longitude: -114.05)
let bounds = GMSCoordinateBounds(coordinate: vancouver, coordinate: calgary)
let camera = mapView.camera(for: bounds, insets: UIEdgeInsets())!
mapView.camera = camera
```
### Objective-C
```objective-c
CLLocationCoordinate2D vancouver = CLLocationCoordinate2DMake(49.26, -123.11);
CLLocationCoordinate2D calgary = CLLocationCoordinate2DMake(51.05, -114.05);
GMSCoordinateBounds *bounds =
[[GMSCoordinateBounds alloc] initWithCoordinate:vancouver coordinate:calgary];
GMSCameraPosition *camera = [mapView cameraForBounds:bounds insets:UIEdgeInsetsZero];
mapView.camera = camera;
```
> [!NOTE]
> **Note:** The `cameraForBounds:insets:` method accounts for the [padding](https://developers.google.com/maps/documentation/ios-sdk/configure-map.md.txt#map_padding) set on the `GMSMapView` in addition to the insets specified here.
### Restrict the user's panning to a given area
These scenarios set the bounds of the map but the user can then scroll or pan
outside of these bounds. Instead, you may want to constrain the coordinate
center bounds of the focal point of the map (the camera target) so that users
can only scroll and pan within these bounds.
For example, a retail app for a shopping center or airport may want to constrain
the map to specific bounds, letting users scroll and pan within those bounds.
To restrict panning to specific bounds, set the `cameraTargetBounds` property of
`GMSMapView` to a `GMSCoordinateBounds` object that defines the required bounds.
To later remove the restriction, set `cameraTargetBounds` to nil.
### Swift
```swift
mapView.cameraTargetBounds = bounds
```
### Objective-C
```objective-c
mapView.cameraTargetBounds = bounds;
```
The following diagram illustrates a scenario when the camera target is
constrained to an area that is slightly larger than the viewport. The user can
scroll and pan, provided the camera target remains within the bounded area. The
cross represents the camera target:
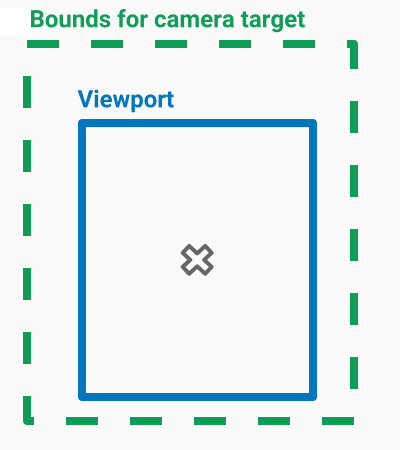
The map always fills the viewport, even if that results in the viewport showing
areas that are outside the defined bounds. For example, if you position the
camera target at a corner of the bounded area, the area beyond the corner is
visible in the viewport but users cannot scroll further into that area. The
following diagram illustrates this scenario. The cross represents the camera
target:

In the following diagram, the camera target has very restricted bounds, offering
the user very little opportunity to scroll or pan the map. The cross represents
the camera target:

### Set a minimum or maximum zoom
The global constants `kGMSMinZoomLevel` and `kGMSMaxZoomLevel` define the
minimum or maximum zoom values. By default, the `minZoom` and `maxZoom`
properties of `GMSMapView` are set to these constants.
> [!NOTE]
> **Note:** The permitted range of zoom levels can also depend on the map type, screen size, and other factors. Any number out of the permitted range is converted to the next closest valid value.
To restrict the range of zoom levels available to the map, set a min and max
zoom level. The following code restricts the zoom level to between 10 and 15.
### Swift
```swift
let camera = GMSCameraPosition(
latitude: 41.887,
longitude: -87.622,
zoom: 12
)
let options = GMSMapViewOptions()
options.camera = camera
let mapView = GMSMapView(options: options)
mapView.setMinZoom(10, maxZoom: 15)
```
### Objective-C
```objective-c
GMSCameraPosition *camera = [GMSCameraPosition cameraWithLatitude:41.887
longitude:-87.622
zoom:12];
GMSMapViewOptions *options = [[GMSMapViewOptions alloc] init];
options.camera = camera;
GMSMapView *mapView = [[GMSMapView alloc] initWithOptions:options];
[mapView setMinZoom:10 maxZoom:15];
```
You must set the zoom range with the `setMinZoom:maxZoom:` method; however, you
can read the current values using the `minZoom` and `maxZoom` properties. This
approach is helpful when restricting only one of the values. The following code
changes only the minimum zoom level.
### Swift
```swift
mapView.setMinZoom(12, maxZoom: mapView.maxZoom)
```
### Objective-C
```objective-c
[mapView setMinZoom:12 maxZoom:mapView.maxZoom];
```
If, after updating the min and max zoom, the camera's zoom level is set to a
value outside of the new range, the current zoom automatically updates to
display the nearest valid value. For example, in the code following, the
original zoom is defined as 4. When the zoom range is later set to 10-15, the
current zoom is updated to 10.
### Swift
```swift
// Sets the zoom level to 4.
let camera2 = GMSCameraPosition(
latitude: 41.887,
longitude: -87.622,
zoom: 4
)
let options2 = GMSMapViewOptions()
options2.camera = camera2
let mapView2 = GMSMapView(options: options2)
// The current zoom, 4, is outside of the range. The zoom will change to 10.
mapView2.setMinZoom(10, maxZoom: 15)
```
### Objective-C
```objective-c
// Sets the zoom level to 4.
GMSCameraPosition *camera2 = [GMSCameraPosition cameraWithLatitude:41.887
longitude:-87.622
zoom:4];
GMSMapViewOptions *options2 = [[GMSMapViewOptions alloc] init];
options2.camera = camera2;
GMSMapView *mapView2 = [[GMSMapView alloc] initWithOptions:options2];
// The current zoom, 4, is outside of the range. The zoom will change to 10.
[mapView setMinZoom:10 maxZoom:15];
```