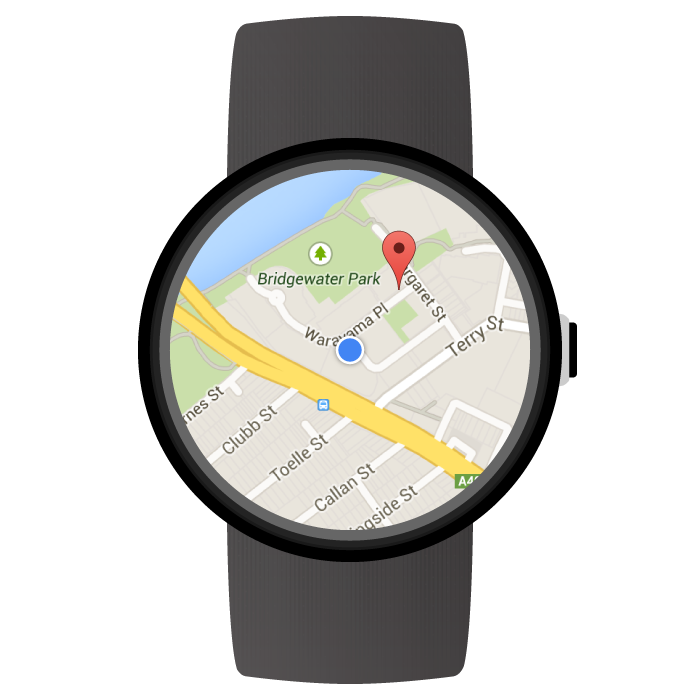
Using the Maps SDK for Android, you can create a map-based [wearable app](https://developer.android.com/wear)
that runs directly on Wear OS by Google devices. Users of your app
can see their location on the map just by glancing at their wrists. They can
plot their position on a route, for example, then zoom in for details, or tap a
marker to see an info window supplied by your app.
This page describes the API functionality available on a wear device and
helps you get started building your app.
## Getting started on Wear OS
Building a wearable app with the Maps SDK for Android is fundamentally the
same as building a Google Maps app for any other Android device. The difference
lies in your design for the smaller form factor of the wearable device, to
optimize the app's usability and performance.
[Android Studio](https://developer.android.com/studio) is the recommended tool for Wear OS development,
as it provides project setup, library inclusion, and packaging conveniences.
For general help with designing a wearable app, refer to the
[Wear OS design guidelines](https://developer.android.com/training/wearables/design/getting-started). For help with creating your
first wearable app, see the guide to [creating wearable apps](https://developer.android.com/training/wearables/get-started/creating).
## Building your first maps app on Wear OS
This quick guide assumes you are familiar with the Maps SDK for Android,
that you have followed the Wear OS guides to create a wearable module in
your app, and that you now want to add a map to the wearable module.
### Adding dependencies for your wear module
Ensure that the following dependencies are included in the `build.gradle.kts` file
of your app's Wear OS module:
```
dependencies {
// ...
// Modern Android projects use version catalogs to manage dependencies. To include the necessary dependencies,
// first add the following to your libs.versions.toml file:
//
// [versions]
// playServicesMaps = "20.1.0"
// wear = "1.4.0"
// wearable = "2.9.0"
//
// [libraries]
// play-services-maps = { group = "com.google.android.gms", name = "play-services-maps", version.ref = "playServicesMaps" }
// wear = { group = "androidx.wear", name = "wear", version.ref = "wear" }
// wearable-compile = { group = "com.google.android.wearable", name = "wearable", version.ref = "wearable" }
// wearable-support = { group = "com.google.android.support", name = "wearable", version.ref = "wearable" }
compileOnly(libs.wearable.compile)
implementation(libs.wearable.support)
implementation(libs.play.services.maps)
// This dependency is necessary for ambient mode
implementation(libs.wear)
// Android Test Dependencies
androidTestImplementation(libs.ext.junit)
androidTestImplementation(libs.espresso.core)
androidTestImplementation(libs.uiautomator)
androidTestImplementation(libs.truth)
androidTestImplementation(libs.junit)
// If your project does not use a version catalog, you can use the following dependencies instead:
//
// compileOnly("com.google.android.wearable:wearable:2.9.0")
// implementation("com.google.android.support:wearable:2.9.0")
// implementation("com.google.android.gms:play-services-maps:20.1.0")
// implementation("androidx.wear:wear:1.4.0")
// androidTestImplementation("androidx.test.ext:junit:1.3.0")
// androidTestImplementation("androidx.test.espresso:espresso-core:3.7.0")
// androidTestImplementation("androidx.test.uiautomator:uiautomator:2.3.0")
// androidTestImplementation("com.google.truth:truth:1.4.5")
// androidTestImplementation("junit:junit:4.13.2")
}
```
For more information about the dependencies, see the guide to [Add a
Wear OS module in your existing project](https://developer.android.com/training/wearables/get-started/creating#add-wear-os-module).
### Implementing a swipe-to-dismiss gesture and set the initial background color
It's recommended that you use a `SwipeDismissFrameLayout` to display the map on
the wearable device. Using the `SwipeDismissFrameLayout` class, you can
implement the [swipe-to-dimiss](https://developer.android.com/training/wearables/overlays/exit#swipe-to-dismiss) gesture giving users a
way to exit the app by swiping from the leftmost edge of the screen.
To set a custom initial background color, use the `map:backgroundColor` XML
attribute to define the color to display until the actual map tiles load.
Add the `SwipeDismissFrameLayout` and `backgroundColor` elements to your layout
definition as the container of the `SupportMapFragment`:
```
```
When you obtain the `SwipeDismissFrameLayout` object in your activity, add a
callback and set the behavior of the callback to perform the necessary dismiss
action as shown below:
### Kotlin
```kotlin
class MainActivity :
AppCompatActivity(),
OnMapReadyCallback,
AmbientModeSupport.AmbientCallbackProvider {
public override fun onCreate(savedInstanceState: Bundle?) {
super.onCreate(savedInstanceState)
// Set the layout. It only contains a SupportMapFragment and a DismissOverlay.
setContentView(R.layout.activity_main)
// Enable ambient support, so the map remains visible in simplified, low-color display
// when the user is no longer actively using the app but the app is still visible on the
// watch face.
try {
val controller = AmbientModeSupport.attach(this)
Log.d(MainActivity::class.java.simpleName, "Is ambient enabled: " + controller.isAmbient)
} catch (e: Exception) {
Log.w(MainActivity::class.java.simpleName, "Ambient mode unavailable on this device: ${e.message}")
}
// Retrieve the containers for the root of the layout and the map. Margins will need to be
// set on them to account for the system window insets.
val mapFrameLayout = findViewById(R.id.map_container)
mapFrameLayout.addCallback(object : SwipeDismissFrameLayout.Callback() {
override fun onDismissed(layout: SwipeDismissFrameLayout) {
onBackPressed()
}
})
// Obtain the MapFragment and set the async listener to be notified when the map is ready.
mapFragment = supportFragmentManager
.findFragmentById(R.id.map) as SupportMapFragment
mapFragment.getMapAsync(this)
}
// ...
}
```
### Java
```java
public class MainActivity extends AppCompatActivity
implements OnMapReadyCallback, AmbientModeSupport.AmbientCallbackProvider {
public void onCreate(Bundle savedState) {
super.onCreate(savedState);
// Set the layout. It only contains a SupportMapFragment and a DismissOverlay.
setContentView(R.layout.activity_main);
// Enable ambient support, so the map remains visible in simplified, low-color display
// when the user is no longer actively using the app but the app is still visible on the
// watch face.
try {
AmbientModeSupport.AmbientController controller = AmbientModeSupport.attach(this);
Log.d(
MainActivity.class.getSimpleName(),
"Is ambient enabled: " + controller.isAmbient());
} catch (Exception e) {
Log.w(
MainActivity.class.getSimpleName(),
"Ambient mode unavailable on this device: " + e.getMessage());
}
// Retrieve the containers for the root of the layout and the map. Margins will need to be
// set on them to account for the system window insets.
final SwipeDismissFrameLayout mapFrameLayout =
(SwipeDismissFrameLayout) findViewById(R.id.map_container);
mapFrameLayout.addCallback(
new SwipeDismissFrameLayout.Callback() {
@Override
public void onDismissed(SwipeDismissFrameLayout layout) {
onBackPressed();
}
});
// Obtain the MapFragment and set the async listener to be notified when the map is ready.
mapFragment = (SupportMapFragment) getSupportFragmentManager().findFragmentById(R.id.map);
mapFragment.getMapAsync(this);
}
// ...
}
```
### Adding a map
Use the [`onMapReady(GoogleMap)`](https://developers.google.com/android/reference/com/google/android/gms/maps/OnMapReadyCallback.md.txt#onMapReady(com.google.android.gms.maps.GoogleMap)) callback method as usual,
to get a handle to the [GoogleMap](https://developers.google.com/android/reference/com/google/android/gms/maps/GoogleMap.md.txt) object. The callback is
triggered when the map is ready to be used. In the callback method, you can
add markers or polylines to the map, add listeners, or move the camera. The
example below adds a marker near the Sydney Opera House:
### Kotlin
```kotlin
private val sydney = LatLng(-33.85704, 151.21522)
override fun onMapReady(googleMap: GoogleMap) {
// Add a marker with a title that is shown in its info window.
googleMap.addMarker(
MarkerOptions().position(sydney)
.title("Sydney Opera House"),
)
// Move the camera to show the marker.
googleMap.moveCamera(CameraUpdateFactory.newLatLngZoom(sydney, 10f))
}
```
### Java
```java
private static final LatLng SYDNEY = new LatLng(-33.85704, 151.21522);
@Override
public void onMapReady(@NonNull GoogleMap googleMap) {
// Add a marker with a title that is shown in its info window.
googleMap.addMarker(new MarkerOptions().position(SYDNEY).title("Sydney Opera House"));
// Move the camera to show the marker.
googleMap.moveCamera(CameraUpdateFactory.newLatLngZoom(SYDNEY, 10));
}
```
## Enabling ambient mode
The Maps SDK for Android supports [ambient mode](https://developer.android.com/training/wearables/apps/always-on.html) for wearable
apps. Apps that support ambient mode are sometimes called *always on* apps.
Ambient mode is activated when the user is no longer actively using the app,
and allows the app to remain visible on the wearable device.
The Maps SDK for Android provides a simplified, low-color rendering
of the map for use in ambient mode, and the map style automatically adjusts when
the device swaps from interactive to ambient mode. All markers, objects, and UI
controls disappear in ambient mode. This reduces the power consumption of your
app and ensures a consistent look and feel with other ambient apps, such as
watch faces.
Take the following steps to ensure your app uses the map's ambient mode:
1. Update your Android SDK to include the Android 6.0 (API 23) or higher platform, which provides the APIs that allow activities to go into ambient mode. For information on how to update your SDK, see the Android documentation on [adding SDK packages](https://developer.android.com/sdk/installing/adding-packages.html#GetTools).
2. Make sure your project targets Android 6.0 or higher, by setting the `targetSdkVersion` to 23 or higher in the [app manifest](https://developer.android.com/guide/topics/manifest/manifest-intro.html).
3. Add the wearable dependencies to your app's `build.gradle.kts` file. See the [sample on this page](https://developers.google.com/maps/documentation/android-sdk/wear.md.txt#dependencies).
4. Add the wearable shared library entry into the wearable app manifest, as described in the Android training class on [keeping your app visible](https://developer.android.com/training/wearables/apps/always-on.html).
5. Add the `WAKE_LOCK` permission to the handheld and wearable app manifests, as described in the Android training class on [keeping your app visible](https://developer.android.com/training/wearables/apps/always-on.html).
6. In the `onCreate()` method of your activity, call the [`AmbientModeSupport.attach()`](https://developer.android.com/reference/androidx/wear/ambient/AmbientModeSupport#attach(T)) method. This tells the operating system that the application is always on, so that when the device powers down it should enter ambient mode rather than returning to the watch face.
7. Implement the `AmbientModeSupport.AmbientCallbackProvider` interface in your Activity so that it can receive ambient mode state changes.
8. Set your map to support ambient mode. You can do this by setting the attribute `map:ambientEnabled="true"` in the activity's XML layout file, or do it programmatically by setting `GoogleMapOptions.ambientEnabled(true)`. This setting informs the API that it must pre-load the necessary map tiles for use in ambient mode.
9. When the activity switches to ambient mode, the system calls the [`onEnterAmbient()`](https://developer.android.com/reference/android/support/wearable/activity/WearableActivity.html#onEnterAmbient(android.os.Bundle)) method in the `AmbientCallback` you provide. Override [`onEnterAmbient()`](https://developer.android.com/reference/android/support/wearable/activity/WearableActivity.html#onEnterAmbient(android.os.Bundle)) and call `SupportMapFragment.onEnterAmbient(ambientDetails)` or `MapView.onEnterAmbient(ambientDetails)`. The API swaps to a non-interactive and low-color rendering of the map.
10. Similarly, in [`onExitAmbient()`](https://developer.android.com/reference/android/support/wearable/activity/WearableActivity.html#onExitAmbient()) call `SupportMapFragment.onExitAmbient()` or `MapView.onExitAmbient()`. The API swaps to the normal rendering of the map.
The following code sample enables ambient mode in the activity:
### Kotlin
```kotlin
class AmbientActivity :
AppCompatActivity(),
AmbientModeSupport.AmbientCallbackProvider {
private lateinit var mapFragment: SupportMapFragment
public override fun onCreate(savedInstanceState: Bundle?) {
super.onCreate(savedInstanceState)
// Set the layout. It only contains a SupportMapFragment and a DismissOverlay.
setContentView(R.layout.activity_main)
// Enable ambient support, so the map remains visible in simplified, low-color display
// when the user is no longer actively using the app but the app is still visible on the
// watch face.
try {
val controller = AmbientModeSupport.attach(this)
Log.d(AmbientActivity::class.java.simpleName, "Is ambient enabled: " + controller.isAmbient)
} catch (e: Exception) {
Log.w(AmbientActivity::class.java.simpleName, "Ambient mode unavailable on this device: ${e.message}")
}
// Obtain the MapFragment and set the async listener to be notified when the map is ready.
mapFragment = supportFragmentManager
.findFragmentById(R.id.map) as SupportMapFragment
}
override fun getAmbientCallback(): AmbientModeSupport.AmbientCallback =
object : AmbientModeSupport.AmbientCallback() {
/**
* Starts ambient mode on the map.
* The API swaps to a non-interactive and low-color rendering of the map when the user is no
* longer actively using the app.
*/
override fun onEnterAmbient(ambientDetails: Bundle) {
super.onEnterAmbient(ambientDetails)
mapFragment.onEnterAmbient(ambientDetails)
}
/**
* Exits ambient mode on the map.
* The API swaps to the normal rendering of the map when the user starts actively using the app.
*/
override fun onExitAmbient() {
super.onExitAmbient()
mapFragment.onExitAmbient()
}
}
}
```
### Java
```java
public class AmbientActivity extends AppCompatActivity
implements AmbientModeSupport.AmbientCallbackProvider {
private SupportMapFragment mapFragment;
public void onCreate(Bundle savedState) {
super.onCreate(savedState);
// Set the layout. It only contains a SupportMapFragment and a DismissOverlay.
setContentView(R.layout.activity_main);
// Enable ambient support, so the map remains visible in simplified, low-color display
// when the user is no longer actively using the app but the app is still visible on the
// watch face.
try {
AmbientModeSupport.AmbientController controller = AmbientModeSupport.attach(this);
Log.d(
AmbientActivity.class.getSimpleName(),
"Is ambient enabled: " + controller.isAmbient());
} catch (Exception e) {
Log.w(
AmbientActivity.class.getSimpleName(),
"Ambient mode unavailable on this device: " + e.getMessage());
}
// Obtain the MapFragment and set the async listener to be notified when the map is ready.
mapFragment = (SupportMapFragment) getSupportFragmentManager().findFragmentById(R.id.map);
}
@Override
public AmbientCallback getAmbientCallback() {
return new AmbientCallback() {
/**
* Starts ambient mode on the map. The API swaps to a non-interactive and low-color
* rendering of the map when the user is no longer actively using the app.
*/
@Override
public void onEnterAmbient(Bundle ambientDetails) {
super.onEnterAmbient(ambientDetails);
mapFragment.onEnterAmbient(ambientDetails);
}
/**
* Exits ambient mode on the map. The API swaps to the normal rendering of the map when
* the user starts actively using the app.
*/
@Override
public void onExitAmbient() {
super.onExitAmbient();
mapFragment.onExitAmbient();
}
};
}
}
```
You can update the screen while the app is in ambient mode. For more details
about updating content and about ambient mode in general, see the Android
training class on [keeping your app visible](https://developer.android.com/training/wearables/apps/always-on.html).
## Using Street View on Wear OS
[Street View](https://developers.google.com/maps/documentation/android-sdk/streetview.md.txt) is fully supported on wearable devices.
To allow users to exit from the app when viewing a Street View panorama, use the
[StreetViewPanorama.OnStreetViewPanoramaLongClickListener](https://developers.google.com/android/reference/com/google/android/gms/maps/StreetViewPanorama.OnStreetViewPanoramaClickListener.md.txt)
interface to listen for a long-click gesture. When a user long-clicks somewhere
on the Street View image, you will receive an
`onStreetViewPanoramaLongClick(StreetViewPanoramaOrientation)` event. Call
`DismissOverlayView.show()` to display an exit button.
## Sample code
A sample app is available on [GitHub](https://github.com/googlemaps-samples/android-samples/blob/main/WearOS/Wearable/src/main/java/com/example/wearosmap/MainActivity.java), which you can use as a
starting point for your app. The sample shows you how to set up
a basic Google Map on Wear OS.
## Supported functionality in the Maps API on Wear OS
This section outlines the differences in supported functionality for maps on
wearable devices when compared with handheld devices (phones and tablets).
All API features not mentioned below should work as documented for the full API.
| Functionality ||
|---|---|
| Fully interactive mode and lite mode | You can use the Maps SDK for Android in fully interactive mode or in lite mode. Consider lite mode if you want to optimize performance on the wearable device and your app doesn't need to support interaction such as gestures, or panning and zooming the map. In lite mode, the intent to start the Google Maps mobile app when the user taps the map is **disabled** and cannot be enabled on a wearable device. For a full list of differences between lite mode and fully interactive mode, see the [lite mode](https://developers.google.com/maps/documentation/android-sdk/lite.md.txt) documentation. |
| Map toolbar | The [map toolbar](https://developers.google.com/maps/documentation/android-sdk/controls.md.txt#toolbar) is **disabled** and cannot be enabled on a wearable device. |
| UI controls | The [UI controls](https://developers.google.com/maps/documentation/android-sdk/controls.md.txt#ui_controls) are disabled by default on wearable devices. This includes the zoom, compass, and my location controls. You can enable them using the [`UiSettings`](https://developers.google.com/android/reference/com/google/android/gms/maps/UiSettings.md.txt) class as usual. |
| Gestures | Single-touch [gestures](https://developers.google.com/maps/documentation/android-sdk/controls.md.txt#map_gestures) work as expected. Examples are touch and drag to pan the map, double-tap to zoom in, and two-finger tap to zoom out. Support varies for multi-touch gestures depending on the user's device. Examples of multi-touch gestures include two-finger push to tilt the map, pinch to zoom, and two-finger rotation. |
| Indoor maps and buildings | [Indoor maps](https://developers.google.com/maps/documentation/android-sdk/map.md.txt#indoor_maps) are disabled by default on a wearable device. You can enable them by calling [`GoogleMap.setIndoorEnabled(true)`](https://developers.google.com/android/reference/com/google/android/gms/maps/GoogleMap.md.txt#setIndoorEnabled(boolean)). If indoor maps are enabled, the map will show the default floor level. The [level picker](https://developers.google.com/maps/documentation/android-sdk/controls.md.txt#level_picker) UI element is not supported on wearable devices. |
| Tile overlays | [Tile overlays](https://developers.google.com/maps/documentation/android-sdk/tileoverlay.md.txt) are **not supported** on wearable devices. |
## Best practices for developing with the Maps API on Wear OS
[Video](https://www.youtube.com/watch?v=UEyvaILFBWk)
How to provide the best user experience in your app:
- The map should occupy a large proportion of the screen. This is necessary to optimize the usability of the map on the small form factor of a wearable device.
- When designing the user experience of your app, take into account the fact that a wearable device has low battery power. Keeping the screen active and the map visible will impact battery performance.