การจัดกลุ่มเครื่องหมายช่วยให้คุณวางเครื่องหมายจำนวนมากบนแผนที่ได้ โดยไม่ทำให้แผนที่อ่านยาก
เกริ่นนำ
วิดีโอนี้จะกล่าวถึงการใช้การจับกลุ่มเครื่องหมายเมื่อข้อมูลของคุณต้องใช้จุดข้อมูลจำนวนมากบนแผนที่
ยูทิลิตีการจัดกลุ่มเครื่องหมายจะช่วยคุณจัดการตัวทำเครื่องหมายหลายรายการที่ระดับการซูมต่างๆ กล่าวโดยละเอียดคือ ณ จุดนี้ "เครื่องหมาย" จะเป็น "รายการ" และจะกลายเป็น "เครื่องหมาย" เมื่อแสดงผลเท่านั้น แต่เพื่อความชัดเจน เอกสารนี้จะตั้งชื่อว่า "เครื่องหมาย" ตลอดทั้งปี
เมื่อผู้ใช้ดูแผนที่ที่ระดับการซูมสูง เครื่องหมายต่างๆ จะแสดงบนแผนที่ เมื่อผู้ใช้ซูมออก เครื่องหมายจะรวมกันเป็นกลุ่มเพื่อให้ดูแผนที่ได้ง่ายขึ้น ยูทิลิตีการคลัสเตอร์เครื่องหมายเป็นส่วนหนึ่งของ Maps SDK สำหรับ Android Utility Library หากยังไม่ได้ตั้งค่าไลบรารี ให้ทำตามคู่มือการตั้งค่าก่อนอ่านส่วนที่เหลือของหน้านี้

หากต้องการใช้ยูทิลิตีการจัดกลุ่มเครื่องหมาย คุณจะต้องเพิ่มตัวทำเครื่องหมายเป็นออบเจ็กต์ ClusterItem ใน ClusterManager ClusterManager จะส่งตัวทำเครื่องหมายไปยัง Algorithm ซึ่งเปลี่ยนตัวทำเครื่องหมายเป็นชุดคลัสเตอร์ ClusterRenderer จะดูแลการแสดงผลโดยการเพิ่มและนำคลัสเตอร์และตัวทำเครื่องหมายแต่ละรายการออก ClusterRenderer และ Algorithm เสียบปลั๊กได้และปรับแต่งได้
ไลบรารียูทิลิตีจะจัดส่งพร้อมกับแอปเดโมที่แสดงตัวอย่างการใช้งานยูทิลิตีการจัดกลุ่มเครื่องหมาย หากต้องการความช่วยเหลือในการเรียกใช้แอปเดโม โปรดดู คู่มือการตั้งค่า แอปเดโมมีตัวอย่างการคลัสเตอร์ตัวทำเครื่องหมายต่อไปนี้
ClusteringDemoActivity: กิจกรรมง่ายๆ ที่แสดงการจัดกลุ่มเครื่องหมายBigClusteringDemoActivity: คลัสเตอร์ที่มีตัวทำเครื่องหมาย 2,000 รายการCustomMarkerClusteringDemoActivity: การสร้างการออกแบบที่กำหนดเองสำหรับตัวทำเครื่องหมายคลัสเตอร์
เพิ่มคลัสเตอร์เครื่องหมายแบบง่าย
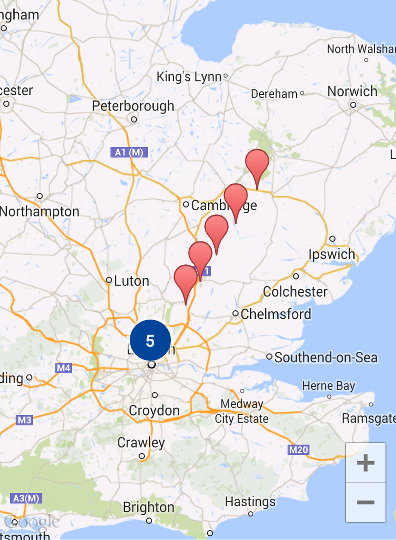
ทำตามขั้นตอนด้านล่างเพื่อสร้างกลุ่มเครื่องหมายอย่างง่ายที่ประกอบด้วยเครื่องหมาย 10 ตัว ผลลัพธ์จะมีลักษณะดังนี้ แต่จำนวนเครื่องหมายที่แสดง/คลัสเตอร์จะเปลี่ยนไปตามระดับการซูม
สรุปขั้นตอนที่ต้องทำมีดังนี้
- ใช้
ClusterItemเพื่อแสดงเครื่องหมายบนแผนที่ รายการคลัสเตอร์จะแสดงตำแหน่งของตัวทำเครื่องหมายเป็นออบเจ็กต์ LatLng และชื่อหรือตัวอย่างข้อมูลที่ไม่บังคับ - เพิ่ม
ClusterManagerใหม่เพื่อจัดกลุ่มรายการในคลัสเตอร์ (เครื่องหมาย) ตามระดับการซูม - ตั้งค่า
OnCameraIdleListener()ของแผนที่เป็นClusterManagerเนื่องจากClusterManagerใช้งาน Listener - หากคุณต้องการเพิ่มฟังก์ชันการทำงานที่เฉพาะเจาะจงเพื่อตอบสนองต่อเหตุการณ์การคลิกเครื่องหมาย ให้ตั้งค่า
OnMarkerClickListener()ของแผนที่เป็นClusterManagerเนื่องจากClusterManagerใช้งาน Listener - ป้อนเครื่องหมายลงใน
ClusterManager
มาดูรายละเอียดเพิ่มเติมของขั้นตอนกัน: หากต้องการสร้างคลัสเตอร์อย่างง่ายที่ประกอบด้วยตัวทำเครื่องหมาย 10 รายการ ให้สร้างคลาส MyItem ที่ใช้ ClusterItem ก่อน
Kotlin
inner class MyItem(
    lat: Double,
    lng: Double,
    title: String,
    snippet: String
) : ClusterItem {

    private val position: LatLng
    private val title: String
    private val snippet: String

    override fun getPosition(): LatLng {
        return position
    }

    override fun getTitle(): String {
        return title
    }

    override fun getSnippet(): String {
        return snippet
    }

    override fun getZIndex(): Float {
        return 0f
    }

    init {
        position = LatLng(lat, lng)
        this.title = title
        this.snippet = snippet
    }
}
Java
public class MyItem implements ClusterItem {
    private final LatLng position;
    private final String title;
    private final String snippet;

    public MyItem(double lat, double lng, String title, String snippet) {
        position = new LatLng(lat, lng);
        this.title = title;
        this.snippet = snippet;
    }

    @Override
    public LatLng getPosition() {
        return position;
    }

    @Override
    public String getTitle() {
        return title;
    }

    @Override
    public String getSnippet() {
        return snippet;
    }

    @Nullable
    @Override
    public Float getZIndex() {
        return 0f;
    }
}
ในกิจกรรมแผนที่ ให้เพิ่ม ClusterManager และป้อนรายการคลัสเตอร์ สังเกตอาร์กิวเมนต์ประเภท <MyItem> ซึ่งประกาศว่า ClusterManager เป็นประเภท MyItem
Kotlin
// Declare a variable for the cluster manager.
private lateinit var clusterManager: ClusterManager<MyItem>

private fun setUpClusterer() {
    // Position the map.
    map.moveCamera(CameraUpdateFactory.newLatLngZoom(LatLng(51.503186, -0.126446), 10f))

    // Initialize the manager with the context and the map.
    // (Activity extends context, so we can pass 'this' in the constructor.)
    clusterManager = ClusterManager(context, map)

    // Point the map's listeners at the listeners implemented by the cluster
    // manager.
    map.setOnCameraIdleListener(clusterManager)
    map.setOnMarkerClickListener(clusterManager)

    // Add cluster items (markers) to the cluster manager.
    addItems()
}

private fun addItems() {

    // Set some lat/lng coordinates to start with.
    var lat = 51.5145160
    var lng = -0.1270060

    // Add ten cluster items in close proximity, for purposes of this example.
    for (i in 0..9) {
        val offset = i / 60.0
        lat += offset
        lng += offset
        val offsetItem =
            MyItem(lat, lng, "Title $i", "Snippet $i")
        clusterManager.addItem(offsetItem)
    }
}
Java
// Declare a variable for the cluster manager.
private ClusterManager<MyItem> clusterManager;

private void setUpClusterer() {
    // Position the map.
    map.moveCamera(CameraUpdateFactory.newLatLngZoom(new LatLng(51.503186, -0.126446), 10));

    // Initialize the manager with the context and the map.
    // (Activity extends context, so we can pass 'this' in the constructor.)
    clusterManager = new ClusterManager<MyItem>(context, map);

    // Point the map's listeners at the listeners implemented by the cluster
    // manager.
    map.setOnCameraIdleListener(clusterManager);
    map.setOnMarkerClickListener(clusterManager);

    // Add cluster items (markers) to the cluster manager.
    addItems();
}

private void addItems() {

    // Set some lat/lng coordinates to start with.
    double lat = 51.5145160;
    double lng = -0.1270060;

    // Add ten cluster items in close proximity, for purposes of this example.
    for (int i = 0; i < 10; i++) {
        double offset = i / 60d;
        lat = lat + offset;
        lng = lng + offset;
        MyItem offsetItem = new MyItem(lat, lng, "Title " + i, "Snippet " + i);
        clusterManager.addItem(offsetItem);
    }
}
คุณยังเลือกปิดใช้ภาพเคลื่อนไหวที่สร้างคลัสเตอร์เมื่อซูมเข้าและออกได้ด้วย
หากภาพเคลื่อนไหวปิดอยู่ ตัวทำเครื่องหมายจะสแนปเข้าตำแหน่งแทนที่จะย้ายข้อมูลเข้าและออกจากคลัสเตอร์
หากต้องการปิดใช้ภาพเคลื่อนไหว ให้ใช้ setAnimation() ใน ClusterManager ดังที่แสดงด้านล่าง
Kotlin
clusterManager.setAnimation(false)
Java
clusterManager.setAnimation(false);
เพิ่มหน้าต่างข้อมูลสำหรับเครื่องหมายจัดคลัสเตอร์แต่ละรายการ
หากต้องการเพิ่มหน้าต่างข้อมูลสำหรับตัวทำเครื่องหมายคลัสเตอร์ที่เจาะจง ให้เพิ่มสตริงชื่อและตัวอย่างข้อมูลลงในตัวสร้างของการใช้งาน ClusterItem
ตัวอย่างต่อไปนี้เพิ่มเครื่องหมายพร้อมหน้าต่างข้อมูลในเมธอด addItems() โดยตั้งชื่อและตัวอย่างข้อมูล
Kotlin
// Set the lat/long coordinates for the marker.
val lat = 51.5009
val lng = -0.122

// Set the title and snippet strings.
val title = "This is the title"
val snippet = "and this is the snippet."

// Create a cluster item for the marker and set the title and snippet using the constructor.
val infoWindowItem = MyItem(lat, lng, title, snippet)

// Add the cluster item (marker) to the cluster manager.
clusterManager.addItem(infoWindowItem)
Java
// Set the lat/long coordinates for the marker.
double lat = 51.5009;
double lng = -0.122;

// Set the title and snippet strings.
String title = "This is the title";
String snippet = "and this is the snippet.";

// Create a cluster item for the marker and set the title and snippet using the constructor.
MyItem infoWindowItem = new MyItem(lat, lng, title, snippet);

// Add the cluster item (marker) to the cluster manager.
clusterManager.addItem(infoWindowItem);
ปรับแต่งคลัสเตอร์เครื่องหมาย
เครื่องมือสร้าง ClusterManager จะสร้าง DefaultClusterRenderer และ NonHierarchicalDistanceBasedAlgorithm คุณเปลี่ยน ClusterRenderer และ Algorithm ได้โดยใช้เมธอด setAlgorithm(Algorithm<T> algorithm) และ setRenderer(ClusterRenderer<T> view) ของ ClusterManager
คุณใช้ ClusterRenderer เพื่อปรับแต่งการแสดงผลของคลัสเตอร์ได้ DefaultClusterRenderer เป็นจุดเริ่มต้นที่ดี ด้วยคลาสย่อย DefaultClusterRenderer คุณจะลบล้างค่าเริ่มต้นได้
ดูตัวอย่างการปรับแต่งโดยละเอียดได้ที่ CustomMarkerClusteringDemoActivity ในแอปเดโมที่มาพร้อมกับไลบรารียูทิลิตี
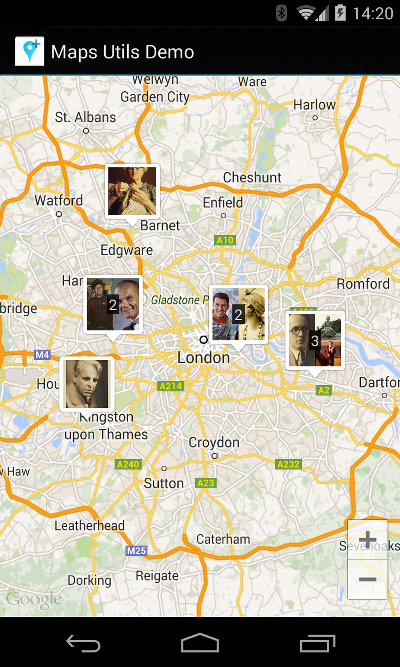
CustomMarkerClusteringDemoActivity กำหนดรายการคลัสเตอร์ของตัวเอง ซึ่งก็คือ Person และแสดงผลโดยการขยาย DefaultClusterRenderer เป็น PersonRenderer
การสาธิตนี้ยังแสดงวิธีใช้งานอินเทอร์เฟซ ClusterManager.OnClusterClickListener<Person> เพื่อแสดงข้อมูลเพิ่มเติมเกี่ยวกับบุคคลเมื่อมีการคลิกคลัสเตอร์ หรือจะใช้ ClusterManager.OnClusterItemClickListener<Person> ในลักษณะเดียวกันได้ด้วย
หากต้องการความช่วยเหลือในการเรียกใช้แอปเดโม โปรดดู คู่มือการตั้งค่า