## Overview
**web** **iOS** **API**
Google Maps Platform is available for web (JS, TS), Android, and iOS,
and also offers web services APIs for getting information about places, directions,
and distances. The samples in this guide are written for one platform, but
documentation links are provided for implementation on other platforms.
**Build it now!**
[Quick Builder](https://console.cloud.google.com/google/maps-apis/build/address-selection?utm_source=Docs_QB)
in the Google Cloud console lets you build address form autocompletion using an
interactive UI that generates JavaScript code for you.
Users have become accustomed to living and operating in a digital world
in which convenience, speed, and security are baseline expectations.
When they apply for something such as a credit card, bank account or loan,
they expect the process to be fast and easy.
The more users have to type or enter duplicate data, the less chance
you have at retaining them as customers. Creating a quick, easy and
verified sign-up experience will improve the user experience while
giving you a leg up in keeping users on your site.
Manually entered addresses can lead to lowered conversions, erroneous
CRM data, and costly delivery mistakes. Quick \& Verified Sign-up makes sign-up
faster, instantly suggesting nearby addresses with a few taps and
displaying the entered address for visual confirmation, helping the user
feel confident that they've entered the correct address. Verifying the
user's address using their current location also helps fraud prevention
and strengthens user confidence in your products and services.
Verification can also increase your confidence in providing virtual
bank and credit cards instantly.
This document provides implementation guidance for building a Quick \& Verified
Sign-up experience with Google Maps Platform. Because users will most
likely sign up on mobile devices, most implementation examples in this document
focus on Android. For the complete example, see the [sample source code](https://github.com/googlemaps-samples/android-places-demos/blob/main/demo-java/src/main/java/com/example/placesdemo/AutocompleteAddressActivity.java).
You can also use the iOS SDKs to accomplish the same goals.
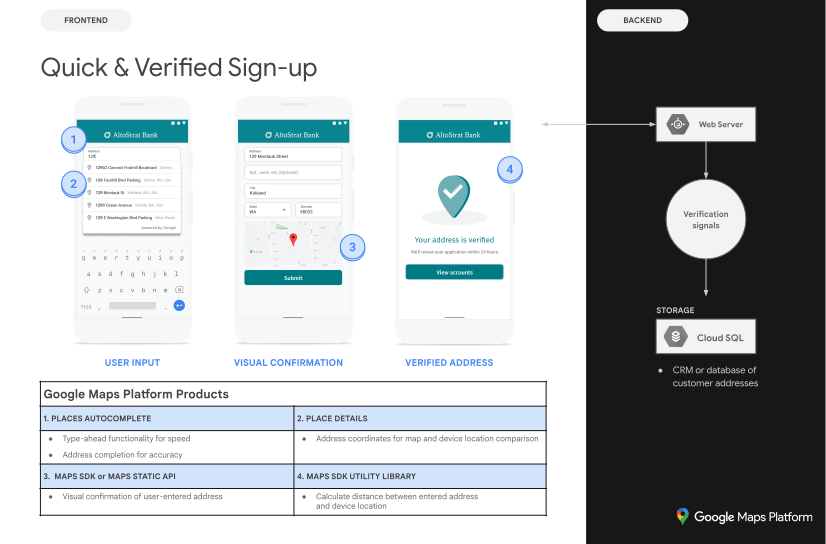
The following diagram shows the core APIs involved in building the solution
(click to enlarge).
[](https://developers.google.com/static/maps/architecture/quick-verified-signup/images/signup_arch_diagram.svg)
### Enabling APIs
To implement these recommendations, you must enable the following APIs in the
Google Cloud console:
- [Maps SDK for Android](https://console.cloud.google.com/apis/library/maps-android-backend.googleapis.com) (or the API for your platform of choice)
- [Places API (New)](https://console.cloud.google.com/apis/library/places.googleapis.com)
- [Geocoding API](https://console.cloud.google.com/apis/library/geocoding-backend.googleapis.com)
For more information about setup, see [Getting
started with Google Maps Platform](https://developers.google.com/maps/get-started).
### Best practices sections
This document covers the following practices and customizations.
- The check mark icon is a core best practice.
- The star icon is an optional but recommended customization to enhance the solution.
|---|---|---|
| | [Adding autocomplete to input fields](https://developers.google.com/maps/architecture/quick-verified-signup.md.txt#autocomplete) | Autofill an address form. Add type-as-you-go functionality to improve the user experience on all platforms and improve address accuracy with minimum keystrokes. |
| | [Providing visual confirmation of the address](https://developers.google.com/maps/architecture/quick-verified-signup.md.txt#visual) | Let users see their address on a map as a visual confirmation that they entered the correct address. |
| | [Comparing user-entered address to device location](https://developers.google.com/maps/architecture/quick-verified-signup.md.txt#checkaddress) | Compare the user's selected or entered address with their current device location to help determine that they are at the indicated address. (For this to work, users should be at home when they sign up.) |
| | [Tips to further enhance Quick \& Verified Sign-up](https://developers.google.com/maps/architecture/quick-verified-signup.md.txt#tips) | You can enhance address entry even further with additions such as customizing the look and feel of the Autocomplete widget or letting users select the name of a business or landmark as an address. |
## Adding autocomplete to input fields
|---|---|
| **This example uses:** [Places SDK for Android (New)](https://developers.google.com/maps/documentation/places/android-sdk/overview.md.txt) | **Also available:** [iOS](https://developers.google.com/maps/documentation/places/ios-sdk/place-autocomplete.md.txt) \| [JavaScript](https://developers.google.com/maps/documentation/javascript/place-autocomplete-new.md.txt) |
Place Autocomplete can simplify address entry in your application, leading
to higher conversion rates and a seamless experience for your customers.
Autocomplete provides a single, quick-entry field with "type-ahead" address
prediction that can be used to automatically populate a sign-up address form.
By incorporating the Place Autocomplete in your sign-up flow, you can:
- Reduce address entry errors.
- Decrease the number of steps in the sign-up process.
- Simplify the address entry experience on mobile or wearable devices.
- Significantly reduce keystrokes and total time required for a customer to sign up.
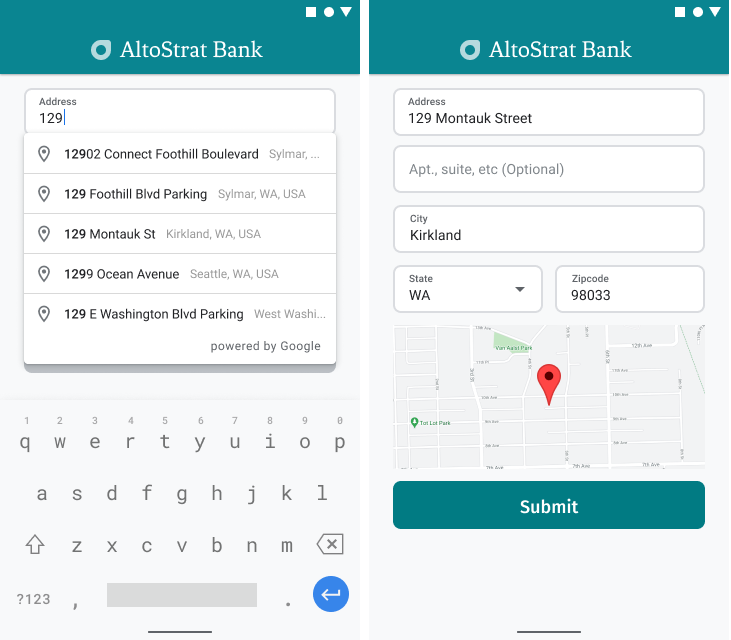
When the user selects the Autocomplete entry box and begins typing, a list
of address predictions appear.
When the user selects an address from the list of predictions, you can use
the response to verify the address and get the location. Your application
can then populate the correct fields of the address entry form, as shown in
the following figure.
#### Videos: Enhance address forms with Place Autocomplete
### Address forms
[Video](https://www.youtube.com/watch?v=cJjUALvnpCU)
### Android
[Video](https://www.youtube.com/watch?v=nDC-frkH_LA)
### iOS
[Video](https://www.youtube.com/watch?v=MEuqZQ-_WfQ)
### Web
[Video](https://www.youtube.com/watch?v=c3MjU9E9buQ)
Google Maps Platform provides a Place Autocomplete widget for mobile
platforms and web. The widget, shown in the previous figures, provides a
search dialog with built-in autocomplete functionality that you can even
optimize for location-scoped search.
This section describes how to implement Place Autocomplete for Quick \& Verified Sign-up.
### Adding the Place Autocomplete widget
In Android, you can add the autocomplete widget using an
[Autocomplete intent](https://developers.google.com/maps/documentation/places/android-sdk/place-autocomplete.md.txt#option_2_use_an_intent_to_launch_the_autocomplete_activity)
that launches Place Autocomplete from the Address Line 1 input field, where
the user will start entering their address. When they start typing, they'll
be able to select their address from the list of Autocomplete predictions.
First, prepare an activity launcher using
[`ActivityResultLauncher`](https://developer.android.com/reference/androidx/activity/result/ActivityResultLauncher)
to [listen for a result](https://developer.android.com/training/basics/intents/result#launch)
from the launched activity. The result callback extracts the selected
`AutocompletePrediction` and `AutocompleteSessionToken` and calls
`placesClient.fetchPlace()` with a
[`FetchPlaceRequest`](https://developers.google.com/maps/documentation/places/android-sdk/reference/com/google/android/libraries/places/api/net/FetchPlaceRequest.md.txt)
to retrieve the `Place` object:
```
private final ActivityResultLauncher startAutocomplete =
registerForActivityResult(
new ActivityResultContracts.StartActivityForResult(),
result -> {
if (result.getResultCode() == Activity.RESULT_OK) {
Intent intent = result.getData();
if (intent != null) {
AutocompletePrediction prediction =
PlaceAutocomplete.getPredictionFromIntent(intent);
AutocompleteSessionToken sessionToken =
PlaceAutocomplete.getSessionTokenFromIntent(intent);
if (prediction != null) {
List fields =
Arrays.asList(
Place.Field.ADDRESS_COMPONENTS,
Place.Field.LOCATION,
Place.Field.VIEWPORT);
FetchPlaceRequest request =
FetchPlaceRequest.builder(
prediction.getPlaceId(), fields)
.setSessionToken(sessionToken)
.build();
placesClient
.fetchPlace(request)
.addOnSuccessListener(
response -> {
Place place = response.getPlace();
// Write a method to read the address
// components from the Place
// and populate the form with the address
// components
Log.d(
TAG,
"Place: "
+ place
.getAddressComponents());
fillInAddress(place);
})
.addOnFailureListener(
exception -> {
Log.e(
TAG,
"Place not found: "
+ exception.getMessage());
});
}
}
} else if (result.getResultCode() == Activity.RESULT_CANCELED) {
// The user canceled the operation.
Log.i(TAG, "User canceled autocomplete");
}
});
```
Next, configure the country and type filters on the Place Autocomplete intent
and build it with
[`PlaceAutocomplete.IntentBuilder`](https://developers.google.com/maps/documentation/places/android-sdk/reference/com/google/android/libraries/places/widget/PlaceAutocomplete.IntentBuilder.md.txt).
Finally, launch the intent using the `ActivityResultLauncher` defined in the
preceding code sample:
```
private void startAutocompleteIntent() {
// Build the autocomplete intent with country and type filters applied
Intent intent =
new PlaceAutocomplete.IntentBuilder()
.setCountries(List.of("US"))
.setTypesFilter(List.of(PlaceTypes.ADDRESS))
.build(this);
startAutocomplete.launch(intent);
}
```
### Handling the address returned by Place Autocomplete
Defining the `ActivityResultLauncher` earlier also specifies how to handle the
activity result in the callback. Because the intent was built by
`PlaceAutocomplete.IntentBuilder`, call
[`PlaceAutocomplete.getPredictionFromIntent()`](https://developers.google.com/maps/documentation/places/android-sdk/reference/com/google/android/libraries/places/widget/PlaceAutocomplete.md.txt)
and `PlaceAutocomplete.getSessionTokenFromIntent()` to extract the selected
prediction and session token, and pass them to `placesClient.fetchPlace()` to
retrieve the `Place`:
```
private final ActivityResultLauncher startAutocomplete =
registerForActivityResult(
new ActivityResultContracts.StartActivityForResult(),
result -> {
if (result.getResultCode() == Activity.RESULT_OK) {
Intent intent = result.getData();
if (intent != null) {
AutocompletePrediction prediction =
PlaceAutocomplete.getPredictionFromIntent(intent);
AutocompleteSessionToken sessionToken =
PlaceAutocomplete.getSessionTokenFromIntent(intent);
if (prediction != null) {
List fields =
Arrays.asList(
Place.Field.ADDRESS_COMPONENTS,
Place.Field.LOCATION,
Place.Field.VIEWPORT);
FetchPlaceRequest request =
FetchPlaceRequest.builder(
prediction.getPlaceId(), fields)
.setSessionToken(sessionToken)
.build();
placesClient
.fetchPlace(request)
.addOnSuccessListener(
response -> {
Place place = response.getPlace();
// Write a method to read the address
// components from the Place
// and populate the form with the address
// components
Log.d(
TAG,
"Place: "
+ place
.getAddressComponents());
fillInAddress(place);
})
.addOnFailureListener(
exception -> {
Log.e(
TAG,
"Place not found: "
+ exception.getMessage());
});
}
}
} else if (result.getResultCode() == Activity.RESULT_CANCELED) {
// The user canceled the operation.
Log.i(TAG, "User canceled autocomplete");
}
});
```
From there, call `Place.getAddressComponents()` and match each address
component to its corresponding input field in the address form, populating the
field with the value from the user's selected `Place`.
Capturing address data from the prediction instead of a manually entered
address helps ensure address accuracy, confirms that the address is known and
deliverable, and reduces user keystrokes.
### Considerations when implementing Place Autocomplete
Place Autocomplete provides options to customize predictions for your address
entry flow:
- For an address form, pass `PlaceTypes.ADDRESS` to `setTypesFilter()`
(`setTypesFilter(List.of(PlaceTypes.ADDRESS))`) to restrict matches to full
street addresses. Learn more about
[place types in Places SDK for Android (New)](https://developers.google.com/maps/documentation/places/android-sdk/place-types.md.txt).
- Set appropriate
[location restrictions and biases](https://developers.google.com/maps/documentation/places/android-sdk/place-autocomplete.md.txt)
if you don't need to search worldwide:
- Use `RectangularBounds` with `setLocationRestriction()` to return only
addresses within a specific bounding box, or `setLocationBias()` to prefer
results near an area.
- Use `setCountries()` to restrict responses to specific ISO 3166-1 alpha-2
country codes.
- Leave fields editable in case certain fields are missed from the match,
and allow customers to update the address if required. Because most addresses
returned by Place Autocomplete don't contain subpremise numbers such as
apartment, suite, or unit numbers, you can move the focus to Address Line 2
to encourage the user to fill in that information if necessary.
## Providing visual confirmation of the address
|---|---|
| **This example uses:** [Maps SDK for Android](https://developers.google.com/maps/documentation/android-sdk/overview.md.txt) | **Also available:** [iOS](https://developers.google.com/maps/documentation/ios-sdk/overview.md.txt) \| [JavaScript](https://developers.google.com/maps/documentation/javascript/overview.md.txt) |
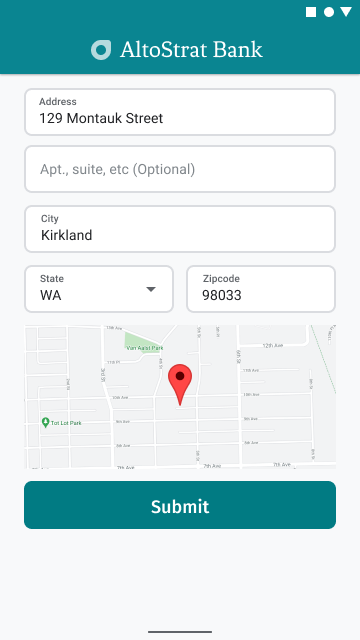
As part of address entry, provide users with visual confirmation of the
address on a map. This offers users additional assurance that the address
is correct.
The following figure shows a map below the address with a pin at the address
entered.
The following example follows the [basic steps for adding a map](https://developers.google.com/maps/documentation/android-sdk/map.md.txt)
in Android. Refer to the documentation for more details.
- [Adding `SupportMapFragment`](https://developers.google.com/maps/architecture/quick-verified-signup.md.txt#fragment) (in this case, adding a fragment dynamically)
- [Getting a handle to the fragment and registering the callback](https://developers.google.com/maps/architecture/quick-verified-signup.md.txt#callback)
- [Styling and adding a marker to the map](https://developers.google.com/maps/architecture/quick-verified-signup.md.txt#styling)
- [Disabling map controls](https://developers.google.com/maps/architecture/quick-verified-signup.md.txt#controls)
### Adding `SupportMapFragment`
First, add a `SupportMapFragment` fragment to the
[layout XML file](https://github.com/googlemaps-samples/android-places-demos/blob/main/demo-java/src/main/res/layout/autocomplete_address_map.xml).
```
```
Then, programmatically add the fragment if it doesn't exist yet.
```
private void showMap(Place place) {
coordinates = place.getLocation();
// It isn't possible to set a fragment's id programmatically so we set a tag instead and
// search for it using that.
mapFragment =
(SupportMapFragment)
getSupportFragmentManager().findFragmentByTag(MAP_FRAGMENT_TAG);
// We only create a fragment if it doesn't already exist.
if (mapFragment == null) {
mapPanel = ((ViewStub) findViewById(R.id.stub_map)).inflate();
GoogleMapOptions mapOptions = new GoogleMapOptions();
mapOptions.mapToolbarEnabled(false);
// To programmatically add the map, we first create a SupportMapFragment.
mapFragment = SupportMapFragment.newInstance(mapOptions);
// Then we add it using a FragmentTransaction.
getSupportFragmentManager()
.beginTransaction()
.add(R.id.confirmation_map, mapFragment, MAP_FRAGMENT_TAG)
.commit();
mapFragment.getMapAsync(this);
} else {
updateMap(coordinates);
}
}
```
### Getting a handle to the fragment and registering the callback
1. To get a handle to the fragment, call the
[`FragmentManager.findFragmentById`](https://developer.android.com/reference/android/app/FragmentManager.html#findFragmentById(int)) method and pass it
the resource ID of the fragment in your layout file. If you **added the fragment
dynamically**, skip this step because you already retrieved the handle.
2. Call the
[`getMapAsync`](https://developers.google.com/maps/documentation/android-sdk/reference/com/google/android/libraries/maps/MapFragment.md.txt#public-void-getmapasync-onmapreadycallback-callback)
method to set the callback on the fragment.
For example, if you added the fragment statically:
### Kotlin
```kotlin
val mapFragment = supportFragmentManager
.findFragmentById(R.id.map) as SupportMapFragment
mapFragment.getMapAsync(this)
```
### Java
```java
SupportMapFragment mapFragment =
(SupportMapFragment) getSupportFragmentManager().findFragmentById(R.id.map);
mapFragment.getMapAsync(this);
```
### Styling and adding a marker to the map
When the map is ready, set the style, center the camera, and add a marker at
the coordinates of the entered address. The following code uses styling
defined in a JSON object, or you can load a map ID configured with
[cloud-based maps styling](https://developers.google.com/maps/documentation/android-sdk/cloud-based-map-styling)
and render an [advanced marker](https://developers.google.com/maps/documentation/android-sdk/advanced-markers/overview.md.txt):
```
@Override
public void onMapReady(@NonNull GoogleMap googleMap) {
map = googleMap;
try {
// Customise the styling of the base map using a JSON object defined
// in a string resource.
boolean success =
map.setMapStyle(MapStyleOptions.loadRawResourceStyle(this, R.raw.style_json));
if (!success) {
Log.e(TAG, "Style parsing failed.");
}
} catch (Resources.NotFoundException e) {
Log.e(TAG, "Can't find style. Error: ", e);
}
map.moveCamera(CameraUpdateFactory.newLatLngZoom(coordinates, 15f));
marker = map.addMarker(new MarkerOptions().position(coordinates));
}
```
See the [complete `AutocompleteAddressActivity.java` sample](https://github.com/googlemaps-samples/android-places-demos/blob/main/demo-java/src/main/java/com/example/placesdemo/AutocompleteAddressActivity.java#L199).
### Disabling map controls
To keep the map clean by showing the location without additional map controls
like the compass or toolbar, consider disabling the
[controls](https://developers.google.com/maps/documentation/android-sdk/controls.md.txt) that you don't need. On
Android, another option is to enable
[lite mode](https://developers.google.com/maps/documentation/android-sdk/lite.md.txt) to provide limited
interactivity.
## Comparing user-entered address to device location
Obtaining proof of address---being confident that the user is at
the address they entered---can be complicated by factors such as remote
user location, users moving to a new address, or digital businesses
(such as digital banks) that don't have a physical location that users
can visit to provide proof of address with utility bills or other
documentation. Providing digital ways to verify user addresses lets
you provide a faster, frictionless sign-up experience.
Security is critical in obtaining a check of address, especially with a digital
sign-up process. This section provides guidance and samples for checking
whether a user's location during sign-up matches the address they enter as
their own.
> [!CAUTION]
> **Caution:** Because a user's location can be spoofed, or a bad actor could put themselves near a physical address in an attempt to sign up with someone else's identity, comparing a user's device location as discussed in this document with an entered address should be one of multiple data points you use in confirming an address.
The process for comparing an entered address to a device location involves the
following steps:
1. [Converting the user-entered address to geographic coordinates](https://developers.google.com/maps/architecture/quick-verified-signup.md.txt#convert).
2. [Prompting the user for permission to obtain their device's location](https://developers.google.com/maps/architecture/quick-verified-signup.md.txt#permission).
3. [Calculating the distance between the entered address and device location](https://developers.google.com/maps/architecture/quick-verified-signup.md.txt#calculate). You get to determine the maximum distance that counts for an address-location match.
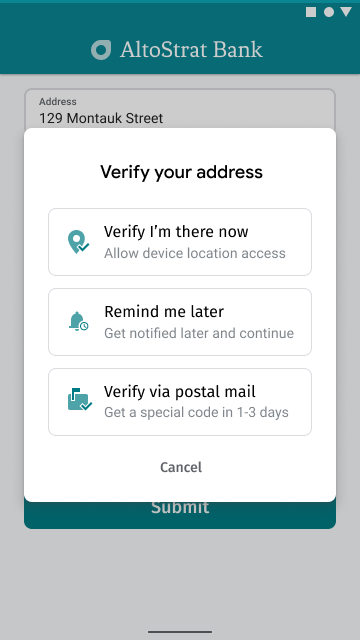
The following figure is an example of how you might prompt users to compare
the address they entered to their current location.
### Converting the user-entered address to geographic coordinates
|---|---|
| **This example uses:** [Places SDK for Android (New)](https://developers.google.com/maps/documentation/places/android-sdk/place-autocomplete.md.txt) | **Also available:** [iOS](https://developers.google.com/maps/documentation/places/ios-sdk/place-autocomplete.md.txt) \| [JavaScript](https://developers.google.com/maps/documentation/javascript/place-autocomplete-new.md.txt) \| [Geocoding API](https://developers.google.com/maps/documentation/geocoding) |
After users agree to address verification---for example, by tapping **Verify I'm
there now** in the preceding figure---the first step in comparing the address with
the current location is converting the entered address to geographic
coordinates.
If the user selected their address with Place Autocomplete, request
[`Place.Field.LOCATION`](https://developers.google.com/maps/documentation/places/android-sdk/reference/com/google/android/libraries/places/api/model/Place.Field.md.txt#LOCATION)
in the `FetchPlaceRequest` field list as shown in
[Handling the address returned by Place Autocomplete](https://developers.google.com/maps/architecture/quick-verified-signup.md.txt#handle-address), and call
[`Place.getLocation()`](https://developers.google.com/maps/documentation/places/android-sdk/reference/com/google/android/libraries/places/api/model/Place.md.txt#getLocation())
to obtain the coordinates of the selected address:
`coordinates = place.getLocation();`
If the user manually entered their address or made edits after Place
Autocomplete filled the fields, use the
[Android Geocoder service](https://developer.android.com/reference/android/location/Geocoder)
or the [Geocoding API](https://developers.google.com/maps/documentation/geocoding/overview#geocoding-lookup)
to look up the coordinates that correspond to that address.
**Example**
`https://maps.googleapis.com/maps/api/geocode/json?address=1600%20Amphitheatre%2BParkway%2C%20Mountain%20View%2C%20CA%2094043&key=YOUR_API_KEY`
Be sure to [URL encode](https://developers.google.com/maps/documentation/geocoding/web-service-best-practices.md.txt#BuildingURLs)
the call to the Geocoding API.
URL encoding quick reference: `%20` = space, `%2B` = + (plus), `%2C` = , (comma)
### Prompting the user for permission to obtain their device's location
To get the user's device location, you need to request user permission to
enable location services. Using the guidance in the Android documentation on
[building location-aware apps](https://developer.android.com/training/location),
implement the following flow:
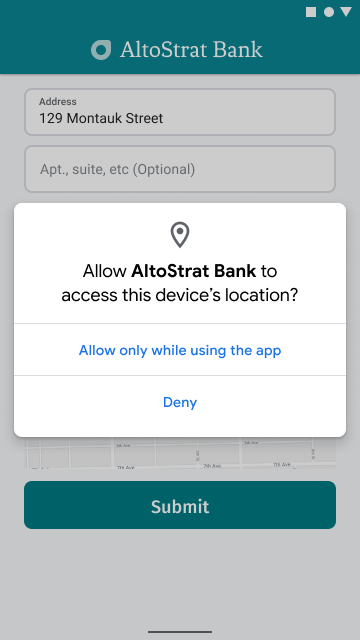
- Request location permission, as a one-time grant, at a precise level
(`ACCESS_FINE_LOCATION`).
- If the user grants location access, get the user location.
- If the user rejects location access, handle the rejection gracefully.
For example, you could present the following type of message (assuming
you're not storing the user's current location):
"If you don't let the app know your precise location, you'll need to
verify by mail to activate your account. \[OK\]"
The following figure shows an example prompt for users to allow permission to
obtain the device location.
To check for location permission, prepare an activity launcher that will
[listen for a result](https://developer.android.com/training/basics/intents/result#launch)
from the launched activity with
[`ActivityResultLauncher`](https://developer.android.com/reference/androidx/activity/result/ActivityResultLauncher).
The result callback will contain a String indicating whether the user granted
or denied the requested permission.
```
// Register the permissions callback, which handles the user's response to the
// system permissions dialog. Save the return value, an instance of
// ActivityResultLauncher, as an instance variable.
private final ActivityResultLauncher requestPermissionLauncher =
registerForActivityResult(
new ActivityResultContracts.RequestPermission(),
isGranted -> {
if (isGranted) {
// Since ACCESS_FINE_LOCATION is the only permission in this sample,
// run the location comparison task once permission is granted.
// Otherwise, check which permission is granted.
getAndCompareLocations();
} else {
// Fallback behavior if user denies permission
Log.d(TAG, "User denied permission");
}
});
```
Then, check if the app already has `ACCESS_FINE_LOCATION` permission.
If it doesn't, ask the user for it by launching the permission request
activity using the launcher defined in the preceding step.
```
private void checkLocationPermissions() {
if (ContextCompat.checkSelfPermission(this, ACCESS_FINE_LOCATION)
== PackageManager.PERMISSION_GRANTED) {
getAndCompareLocations();
} else {
requestPermissionLauncher.launch(ACCESS_FINE_LOCATION);
}
}
```
Once the `ACCESS_FINE_LOCATION` permission is granted, use the fused location
provider to [get the last known location](https://developer.android.com/training/location/retrieve-current.html)
of the device and create a `LatLng` object from it.
```
FusedLocationProviderClient fusedLocationClient =
LocationServices.getFusedLocationProviderClient(this);
fusedLocationClient
.getLastLocation()
.addOnSuccessListener(
this,
location -> {
// Got last known location. In some rare situations this can be null.
if (location == null) {
return;
}
deviceLocation =
new LatLng(location.getLatitude(), location.getLongitude());
// ...
});
}
```
### Calculating the distance between the entered address and device location
Use math to calculate the distance between two latitude and longitude coordinates
(entered address and device location). The open source
[Maps SDK for Android Utility Library](https://developers.google.com/maps/documentation/android-sdk/utility.md.txt)
has some handy methods to [calculate the spherical distance](https://developers.google.com/maps/documentation/android-sdk/utility.md.txt#spherical)
between two points on Earth.
First, install the Maps SDK for Android Utility Library by adding the following
dependency to your app's `build.gradle.kts` file:
```
dependencies {
// Utility Library for Maps SDK for Android
// You do not need to add a separate dependency for the Maps SDK for Android
// since this library builds in the compatible version of the Maps SDK.
implementation(libs.android.maps.utils)
}
```
Then, back in the activity file after getting the last known device location,
define a radius in meters to consider the two locations as "matched."
The radius must be large enough to account for variability in GPS accuracy
and the size of the place at the user's entered address:
`private static final double acceptedProximity = 150;`
Then, use the utility library method [`computeDistanceBetween()`](https://googlemaps.github.io/android-maps-utils/javadoc/com/google/maps/android/SphericalUtil.html#computeDistanceBetween-LatLng-LatLng-)
to calculate the distance between the device location and the user-entered
address location. If the distance falls within the defined radius,
consider the locations matched:
```
// Use the computeDistanceBetween function in the Maps SDK for Android
// Utility Library
// to use spherical geometry to compute the distance between two Lat/Lng
// points.
double distanceInMeters =
computeDistanceBetween(deviceLocation, enteredLocation);
if (distanceInMeters <= acceptedProximity) {
Log.d(TAG, "location matched");
// TODO: Display UI based on the locations matching
} else {
Log.d(TAG, "location not matched");
// TODO: Display UI based on the locations not matching
}
```
See the [complete `AutocompleteAddressActivity.java` sample](https://github.com/googlemaps-samples/android-places-demos/blob/main/demo-java/src/main/java/com/example/placesdemo/AutocompleteAddressActivity.java).
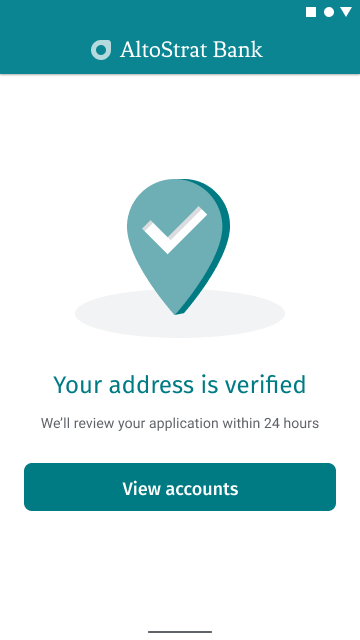
If the address and location match, display a confirmation in the app, as shown
in the following figure:
## Tips to further enhance Quick \& Verified Sign-up
**Allow users to enter an address based on a business or point-of-interest
name.** The type-ahead prediction service works for business and landmark names
as well as street addresses. To allow both street addresses and establishment
names, omit `setTypesFilter()` when building the intent with
`PlaceAutocomplete.IntentBuilder`.
**Customize the look and feel of Place Autocomplete to match your app style.**
If you prefer to control the UI rather than launch Google's full-screen widget,
request
[Place Autocomplete predictions programmatically](https://developers.google.com/maps/documentation/places/android-sdk/place-autocomplete.md.txt)
to power a custom input view.
**Validate deliverability and subpremise details on your backend.** Combine
Place Autocomplete with the
[Address Validation API](https://developers.google.com/maps/documentation/address-validation/overview.md.txt)
to verify unit numbers, standardize postal components, and flag unconfirmed
fields before completing account onboarding.