OpenID Connect

Конечная точка Google OpenID Connect сертифицирована OpenID.

API-интерфейсы Google OAuth 2.0 можно использовать как для аутентификации, так и для авторизации. В этом документе описывается наша реализация OAuth 2.0 для аутентификации, которая соответствует спецификации OpenID Connect и сертифицирована OpenID . Документация, приведенная в разделе «Использование OAuth 2.0 для доступа к API Google», также применима к этой службе. Если вы хотите изучить этот протокол в интерактивном режиме, мы рекомендуем Google OAuth 2.0 Playground . Чтобы получить помощь по Stack Overflow , пометьте свои вопросы тегом google-oauth.

Настройка OAuth 2.0

Прежде чем ваше приложение сможет использовать систему аутентификации Google OAuth 2.0 для входа в систему пользователей, вы должны настроить проект в Google API Console для получения учетных данных OAuth 2.0, установить URI перенаправления и (необязательно) настроить информацию о брендинге, которую ваши пользователи видят на странице экран согласия пользователя. Вы также можете использовать API Console для создания учетной записи службы, включения выставления счетов, настройки фильтрации и выполнения других задач. Более подробную информацию смотрите в справкеGoogle API Console .

Получите учетные данные OAuth 2.0.

Вам нужны учетные данные OAuth 2.0, включая идентификатор клиента и секрет клиента, для аутентификации пользователей и получения доступа к API Google.

Чтобы просмотреть идентификатор клиента и секрет клиента для заданных учетных данных OAuth 2.0, щелкните следующий текст: Выберите учетные данные . В открывшемся окне выберите свой проект и необходимые учетные данные, затем нажмите « Просмотр» .

Или просмотрите свой идентификатор клиента и секрет клиента со страницы учетных данных в API Console :

  1. Go to the Credentials page.
  2. Нажмите на имя вашего удостоверения или значок карандаша ( ). Ваш идентификатор клиента и секретные данные находятся вверху страницы.

Установите URI перенаправления

URI перенаправления, который вы установили в API Console определяет, куда Google отправляет ответы на ваши запросы аутентификации .

Чтобы создать, просмотреть или изменить URI перенаправления для заданных учетных данных OAuth 2.0, выполните следующие действия:

  1. Go to the Credentials page.
  2. В разделе идентификаторов клиентов OAuth 2.0 на странице щелкните учетные данные.
  3. Просмотр или редактирование URI перенаправления.

Если на странице «Учетные данные» нет раздела идентификаторов клиентов OAuth 2.0 , значит, у вашего проекта нет учетных данных OAuth. Чтобы создать его, нажмите « Создать учетные данные» .

Настройте экран согласия пользователя

Для ваших пользователей процесс аутентификации OAuth 2.0 включает экран согласия, на котором описывается информация, которую пользователь раскрывает, и применимые условия. Например, когда пользователь входит в систему, его могут попросить предоставить вашему приложению доступ к его адресу электронной почты и основной информации об учетной записи. Вы запрашиваете доступ к этой информации, используя параметр scope , который ваше приложение включает в свой запрос аутентификации . Вы также можете использовать области для запроса доступа к другим API Google.

На экране согласия пользователя также отображается информация о бренде, такая как название вашего продукта, логотип и URL-адрес домашней страницы. Вы управляете информацией о брендинге в API Console.

Чтобы включить экран согласия вашего проекта:

  1. Откройте Consent Screen page в Google API Console .
  2. If prompted, select a project, or create a new one.
  3. Заполните форму и нажмите Сохранить .

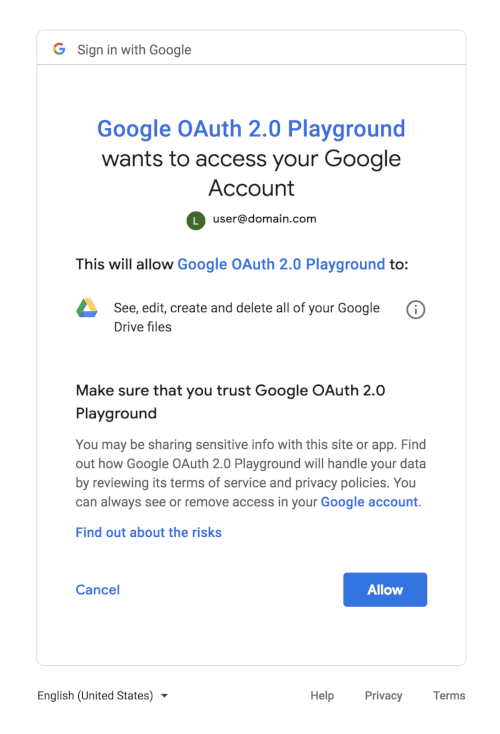
В следующем диалоговом окне согласия показано, что увидит пользователь, если в запросе присутствует комбинация областей OAuth 2.0 и Google Drive. (Это общее диалоговое окно было создано с использованием Google OAuth 2.0 Playground , поэтому оно не включает информацию о брендинге, которая была бы установлена ​​в API Console.)

Снимок экрана страницы согласия

Доступ к услуге

Google и третьи лица предоставляют библиотеки, которые вы можете использовать для решения многих деталей реализации аутентификации пользователей и получения доступа к API Google. Примеры включают Google Identity Services и клиентские библиотеки Google , которые доступны для различных платформ.

Если вы решите не использовать библиотеку, следуйте инструкциям в оставшейся части этого документа, где описаны потоки HTTP-запросов, лежащие в основе доступных библиотек.

Аутентификация пользователя

Аутентификация пользователя включает получение идентификационного токена и его проверку. Токены идентификатора — это стандартизированная функция OpenID Connect , предназначенная для использования при обмене утверждениями личности в Интернете.

Наиболее часто используемые подходы для аутентификации пользователя и получения идентификационного токена называются «серверным» потоком и «неявным» потоком. Серверный поток позволяет внутреннему серверу приложения проверять личность человека с помощью браузера или мобильного устройства. Неявный поток используется, когда клиентскому приложению (обычно приложению JavaScript, работающему в браузере) требуется доступ к API напрямую, а не через внутренний сервер.

В этом документе описывается, как выполнить серверный поток для аутентификации пользователя. Неявный поток значительно сложнее из-за рисков безопасности при обработке и использовании токенов на стороне клиента. Если вам необходимо реализовать неявный поток, мы настоятельно рекомендуем использовать Google Identity Services .

Процесс сервера

Обязательно настройте свое приложение в API Console , чтобы оно могло использовать эти протоколы и аутентифицировать ваших пользователей. Когда пользователь пытается войти в систему через Google, вам необходимо:

  1. Создайте токен состояния защиты от подделки
  2. Отправьте запрос на аутентификацию в Google
  3. Подтвердите токен состояния защиты от подделки
  4. code обмена для токена доступа и токена идентификатора
  5. Получить информацию о пользователе из токена идентификатора
  6. Аутентификация пользователя

1. Создайте государственный токен защиты от подделки.

Вы должны защитить безопасность своих пользователей, предотвращая атаки с подделкой запросов. Первым шагом является создание уникального токена сеанса, который хранит состояние между вашим приложением и клиентом пользователя. Позже вы сопоставляете этот уникальный токен сеанса с ответом аутентификации, возвращаемым службой входа в систему Google OAuth, чтобы убедиться, что запрос делает пользователь, а не злоумышленник. Эти токены часто называют токенами подделки межсайтовых запросов ( CSRF ).

Одним из хороших вариантов токена состояния является строка примерно из 30 символов, созданная с использованием высококачественного генератора случайных чисел. Другой вариант — это хэш, сгенерированный путем подписания некоторых переменных состояния вашего сеанса ключом, который хранится в секрете на вашем сервере.

Следующий код демонстрирует создание уникальных токенов сеанса.

PHP

Чтобы использовать этот пример, необходимо загрузить клиентскую библиотеку Google API для PHP .

// Create a state token to prevent request forgery.
// Store it in the session for later validation.
$state = bin2hex(random_bytes(128/8));
$app['session']->set('state', $state);
// Set the client ID, token state, and application name in the HTML while
// serving it.
return $app['twig']->render('index.html', array(
    'CLIENT_ID' => CLIENT_ID,
    'STATE' => $state,
    'APPLICATION_NAME' => APPLICATION_NAME
));

Джава

Чтобы использовать этот пример, необходимо загрузить клиентскую библиотеку API Google для Java .

// Create a state token to prevent request forgery.
// Store it in the session for later validation.
String state = new BigInteger(130, new SecureRandom()).toString(32);
request.session().attribute("state", state);
// Read index.html into memory, and set the client ID,
// token state, and application name in the HTML before serving it.
return new Scanner(new File("index.html"), "UTF-8")
    .useDelimiter("\\A").next()
    .replaceAll("[{]{2}\\s*CLIENT_ID\\s*[}]{2}", CLIENT_ID)
    .replaceAll("[{]{2}\\s*STATE\\s*[}]{2}", state)
    .replaceAll("[{]{2}\\s*APPLICATION_NAME\\s*[}]{2}",
    APPLICATION_NAME);

Питон

Чтобы использовать этот пример, вам необходимо загрузить клиентскую библиотеку API Google для Python .

# Create a state token to prevent request forgery.
# Store it in the session for later validation.
state = hashlib.sha256(os.urandom(1024)).hexdigest()
session['state'] = state
# Set the client ID, token state, and application name in the HTML while
# serving it.
response = make_response(
    render_template('index.html',
                    CLIENT_ID=CLIENT_ID,
                    STATE=state,
                    APPLICATION_NAME=APPLICATION_NAME))

2. Отправьте запрос на аутентификацию в Google.

Следующим шагом является формирование запроса HTTPS GET с соответствующими параметрами URI. Обратите внимание на использование HTTPS, а не HTTP на всех этапах этого процесса; HTTP-соединения отклоняются. Вам следует получить базовый URI из документа Discovery , используя значение authorization_endpoint . В следующем обсуждении предполагается, что базовым URI является https://accounts.google.com/o/oauth2/v2/auth .

Для базового запроса укажите следующие параметры:

  • client_id , который вы получаете из API ConsoleCredentials page.
  • response_type , который в базовом запросе потока кода авторизации должен быть code . (Подробнее читайте на response_type .)
  • scope , которая в базовом запросе должна быть openid email . (Подробнее читайте в scope .)
  • redirect_uri должен быть конечной точкой HTTP на вашем сервере, которая получит ответ от Google. Значение должно точно соответствовать одному из авторизованных URI перенаправления для клиента OAuth 2.0, который вы настроили в API ConsoleCredentials page. Если это значение не соответствует авторизованному URI, запрос завершится с ошибкой redirect_uri_mismatch .
  • state должно включать значение уникального токена сеанса защиты от подделки, а также любую другую информацию, необходимую для восстановления контекста, когда пользователь возвращается в ваше приложение, например, начальный URL-адрес. (Подробнее читайте на state .)
  • nonce — это случайное значение, генерируемое вашим приложением, которое включает защиту от повтора, если она присутствует.
  • login_hint может быть адресом электронной почты пользователя или sub , эквивалентной идентификатору Google ID пользователя. Если вы не предоставляете login_hint и пользователь в настоящее время вошел в систему, на экране согласия будет отображаться запрос на одобрение передачи адреса электронной почты пользователя в ваше приложение. (Подробнее читайте на login_hint .)
  • Используйте параметр hd , чтобы оптимизировать поток OpenID Connect для пользователей определенного домена, связанного с организацией Google Cloud. (Подробнее читайте на hd .)

Ниже приведен пример полного URI аутентификации OpenID Connect с разрывами строк и пробелами для удобства чтения:

https://accounts.google.com/o/oauth2/v2/auth?
 response_type=code&
 client_id=424911365001.apps.googleusercontent.com&
 scope=openid%20email&
 redirect_uri=https%3A//oauth2.example.com/code&
 state=security_token%3D138r5719ru3e1%26url%3Dhttps%3A%2F%2Foauth2-login-demo.example.com%2FmyHome&
 login_hint=jsmith@example.com&
 nonce=0394852-3190485-2490358&
 hd=example.com

Пользователи должны дать согласие, если ваше приложение запрашивает какую-либо новую информацию о них или если ваше приложение запрашивает доступ к учетной записи, который они ранее не одобрили.

3. Подтвердите токен состояния защиты от подделки.

Ответ отправляется на redirect_uri , который вы указали в запросе . Все ответы возвращаются в строке запроса, как показано ниже:

https://oauth2.example.com/code?state=security_token%3D138r5719ru3e1%26url%3Dhttps%3A%2F%2Foa2cb.example.com%2FmyHome&code=4/P7q7W91a-oMsCeLvIaQm6bTrgtp7&scope=openid%20email%20https://www.googleapis.com/auth/userinfo.email

На сервере вы должны подтвердить, что state , полученное от Google, соответствует токену сеанса, который вы создали на шаге 1 . Эта двусторонняя проверка помогает убедиться, что запрос делает пользователь, а не вредоносный сценарий.

Следующий код демонстрирует подтверждение токенов сеанса, созданных на шаге 1:

PHP

Чтобы использовать этот пример, необходимо загрузить клиентскую библиотеку Google API для PHP .

// Ensure that there is no request forgery going on, and that the user
// sending us this connect request is the user that was supposed to.
if ($request->get('state') != ($app['session']->get('state'))) {
  return new Response('Invalid state parameter', 401);
}

Джава

Чтобы использовать этот пример, необходимо загрузить клиентскую библиотеку Google API для Java .

// Ensure that there is no request forgery going on, and that the user
// sending us this connect request is the user that was supposed to.
if (!request.queryParams("state").equals(
    request.session().attribute("state"))) {
  response.status(401);
  return GSON.toJson("Invalid state parameter.");
}

Питон

Чтобы использовать этот пример, вам необходимо загрузить клиентскую библиотеку API Google для Python .

# Ensure that the request is not a forgery and that the user sending
# this connect request is the expected user.
if request.args.get('state', '') != session['state']:
  response = make_response(json.dumps('Invalid state parameter.'), 401)
  response.headers['Content-Type'] = 'application/json'
  return response

4. code обмена для токена доступа и токена идентификатора.

Ответ включает в себя параметр code — одноразовый код авторизации, который ваш сервер может обменять на токен доступа и токен идентификатора. Ваш сервер осуществляет этот обмен, отправляя запрос HTTPS POST . Запрос POST отправляется в конечную точку токена, которую вы должны получить из документа Discovery , используя значение метаданных token_endpoint . В следующем обсуждении предполагается, что конечной точкой является https://oauth2.googleapis.com/token . В теле POST запрос должен содержать следующие параметры:

Поля
code Код авторизации, возвращаемый из первоначального запроса .
client_id Идентификатор клиента, который вы получаете из API ConsoleCredentials page, как описано в разделе Получение учетных данных OAuth 2.0 .
client_secret Секрет клиента, который вы получаете из API ConsoleCredentials page, как описано в разделе Получение учетных данных OAuth 2.0 .
redirect_uri Авторизованный URI перенаправления для данного client_id , указанного в API ConsoleCredentials page, как описано в разделе Установка URI перенаправления .
grant_type Это поле должно содержать значение authorization_code , как определено в спецификации OAuth 2.0 .

Фактический запрос может выглядеть следующим образом:

POST /token HTTP/1.1
Host: oauth2.googleapis.com
Content-Type: application/x-www-form-urlencoded

code=4/P7q7W91a-oMsCeLvIaQm6bTrgtp7&
client_id=your-client-id&
client_secret=your-client-secret&
redirect_uri=https%3A//oauth2.example.com/code&
grant_type=authorization_code

Успешный ответ на этот запрос содержит следующие поля в массиве JSON:

Поля
access_token Токен, который можно отправить в Google API.
expires_in Оставшийся срок действия токена доступа в секундах.
id_token JWT , содержащий идентификационную информацию о пользователе, имеющую цифровую подпись Google.
scope Области доступа, предоставляемые access_token выражаются в виде списка строк, разделенных пробелами и чувствительных к регистру.
token_type Определяет тип возвращаемого токена. В настоящее время это поле всегда имеет значение Bearer .
refresh_token (необязательный)

Это поле присутствует только в том случае, если в запросе аутентификации для параметра access_type установлено значение offline . Подробности см. в разделе Токены обновления .

5. Получите информацию о пользователе из идентификационного токена.

Токен идентификатора — это JWT (веб-токен JSON), то есть объект JSON с криптографической подписью в кодировке Base64. Обычно очень важно проверить идентификационный токен перед его использованием, но поскольку вы напрямую общаетесь с Google по каналу HTTPS без посредников и используете секрет своего клиента для аутентификации в Google, вы можете быть уверены, что токен, который вы используете, Получение действительно исходит от Google и является действительным. Если ваш сервер передает токен идентификатора другим компонентам вашего приложения, чрезвычайно важно, чтобы другие компоненты проверили токен перед его использованием.

Поскольку большинство библиотек API совмещают проверку с работой по декодированию значений в кодировке base64url и анализу JSON внутри, вы, вероятно, в любом случае в конечном итоге будете проверять токен при доступе к утверждениям в токене идентификатора.

Полезная нагрузка токена идентификатора

Токен идентификатора — это объект JSON, содержащий набор пар имя/значение. Вот пример, отформатированный для удобства чтения:

{
  "iss": "https://accounts.google.com",
  "azp": "1234987819200.apps.googleusercontent.com",
  "aud": "1234987819200.apps.googleusercontent.com",
  "sub": "10769150350006150715113082367",
  "at_hash": "HK6E_P6Dh8Y93mRNtsDB1Q",
  "hd": "example.com",
  "email": "jsmith@example.com",
  "email_verified": "true",
  "iat": 1353601026,
  "exp": 1353604926,
  "nonce": "0394852-3190485-2490358"
}

Токены идентификатора Google могут содержать следующие поля (известные как претензии ):

Требовать Предоставил Описание
aud всегда Аудитория, для которой предназначен этот идентификационный токен. Это должен быть один из идентификаторов клиента OAuth 2.0 вашего приложения.
exp всегда Срок действия, по истечении которого идентификационный токен не может быть принят. Представлено во времени Unix (целое число секунд).
iat всегда Время выдачи идентификационного токена. Представлено во времени Unix (целое число секунд).
iss всегда Идентификатор эмитента эмитента ответа. Всегда https://accounts.google.com или accounts.google.com для токенов Google ID.
sub всегда Идентификатор пользователя, уникальный среди всех учетных записей Google и никогда не используемый повторно. Учетная запись Google может иметь несколько адресов электронной почты в разные моменты времени, но sub значение никогда не меняется. Используйте sub в своем приложении в качестве ключа уникального идентификатора пользователя. Максимальная длина — 255 символов ASCII с учетом регистра.
at_hash Хэш токена доступа. Обеспечивает проверку того, что токен доступа привязан к токену удостоверения. Если токен идентификатора выдается со значением access_token в потоке сервера, это утверждение всегда включается. Это утверждение можно использовать в качестве альтернативного механизма для защиты от атак с подделкой межсайтовых запросов, но если вы выполните шаги 1 и 3 , проверять токен доступа не обязательно.
azp client_id авторизованного докладчика. Это утверждение необходимо только в том случае, если сторона, запрашивающая токен идентификатора, не совпадает с аудиторией токена идентификатора. Это может иметь место в Google для гибридных приложений, где веб-приложение и приложение Android имеют разные OAuth 2.0 client_id , но используют один и тот же проект API Google.
email Адрес электронной почты пользователя. Это значение может быть не уникальным для этого пользователя и не подходит для использования в качестве первичного ключа. Предоставляется только в том случае, если ваша область действия включает значение области email .
email_verified True, если адрес электронной почты пользователя подтвержден; в противном случае ложь.
family_name Фамилия(и) или фамилия(я) пользователя. Может быть предоставлено при наличии заявки name .
given_name Имя(я) или имя(а) пользователя. Может быть предоставлено при наличии заявки name .
hd Домен, связанный с организацией Google Cloud пользователя. Предоставляется только в том случае, если пользователь принадлежит к организации Google Cloud.
locale Языковой стандарт пользователя, представленный языковым тегом BCP 47 . Может быть предоставлено при наличии заявки name .
name Полное имя пользователя в отображаемой форме. Может быть предоставлено, когда:
  • Область запроса включала строку «профиль».
  • Токен идентификатора возвращается после обновления токена.

Если присутствуют заявки name , вы можете использовать их для обновления записей пользователей вашего приложения. Обратите внимание, что наличие этого утверждения никогда не гарантируется.

nonce Значение nonce , предоставленное вашим приложением в запросе аутентификации. Вам следует обеспечить защиту от атак повторного воспроизведения, гарантируя, что оно представлено только один раз.
picture URL-адрес изображения профиля пользователя. Может быть предоставлено, когда:
  • Область запроса включала строку «профиль».
  • Токен идентификатора возвращается после обновления токена.

При наличии претензий picture вы можете использовать их для обновления записей пользователей вашего приложения. Обратите внимание, что наличие этого утверждения никогда не гарантируется.

profile URL-адрес страницы профиля пользователя. Может быть предоставлено, когда:
  • Область запроса включала строку «профиль».
  • Токен идентификатора возвращается после обновления токена.

Если имеются утверждения profile , вы можете использовать их для обновления записей пользователей вашего приложения. Обратите внимание, что наличие этого утверждения никогда не гарантируется.

6. Аутентификация пользователя

После получения информации о пользователе из токена идентификатора вам следует запросить базу данных пользователей вашего приложения. Если пользователь уже существует в вашей базе данных, вам следует запустить сеанс приложения для этого пользователя, если ответ Google API соответствует всем требованиям для входа в систему.

Если пользователь не существует в вашей базе данных пользователей, вам следует перенаправить его в процесс регистрации нового пользователя. Вы можете иметь возможность автоматически зарегистрировать пользователя на основе информации, которую вы получаете от Google, или, по крайней мере, вы можете предварительно заполнить многие поля, которые вам необходимы в вашей регистрационной форме. Помимо информации в идентификационном токене, вы можете получить дополнительную информацию о профиле пользователя на наших конечных точках профиля пользователя.

Расширенные темы

В следующих разделах API Google OAuth 2.0 описывается более подробно. Эта информация предназначена для разработчиков с расширенными требованиями к аутентификации и авторизации.

Доступ к другим API Google

Одним из преимуществ использования OAuth 2.0 для аутентификации является то, что ваше приложение может получить разрешение на использование других API Google от имени пользователя (например, YouTube, Google Диск, Календарь или Контакты) одновременно с аутентификацией пользователя. Для этого включите другие необходимые области в запрос аутентификации , который вы отправляете в Google. Например, чтобы добавить возрастную группу пользователя в запрос на аутентификацию, передайте параметр области openid email https://www.googleapis.com/auth/profile.agerange.read . Пользователю будет предложено соответствующее сообщение на экране согласия . Токен доступа, который вы получаете обратно от Google, позволяет вам получить доступ ко всем API, связанным с теми объемами доступа, которые вы запросили и получили.

Обновить токены

В своем запросе на доступ к API вы можете запросить токен обновления, который будет возвращен во время обмена code . Токен обновления обеспечивает вашему приложению постоянный доступ к API Google, пока пользователь отсутствует в вашем приложении. Чтобы запросить токен обновления, добавьте в запросе аутентификации значение offline для параметра access_type .

Соображения:

  • Обязательно сохраните токен обновления безопасно и навсегда, поскольку вы можете получить токен обновления только при первом выполнении потока обмена кодом.
  • Существуют ограничения на количество выдаваемых токенов обновления: одно ограничение на комбинацию клиент/пользователь и другое на пользователя для всех клиентов. Если ваше приложение запрашивает слишком много токенов обновления, оно может столкнуться с этими ограничениями, и в этом случае старые токены обновления перестанут работать.

Дополнительные сведения см. в разделе Обновление токена доступа (автономный доступ) .

Вы можете предложить пользователю повторно авторизовать ваше приложение, установив параметр prompt для consent в вашем запросе аутентификации . Если включен prompt=consent , экран согласия отображается каждый раз, когда ваше приложение запрашивает авторизацию областей доступа, даже если все области ранее были предоставлены вашему проекту API Google. По этой причине включайте prompt=consent только при необходимости.

Дополнительные сведения о параметре prompt см. в разделе prompt в таблице параметров URI аутентификации .

Параметры URI аутентификации

В следующей таблице приведены более полные описания параметров, принимаемых API аутентификации Google OAuth 2.0.

Параметр Необходимый Описание
client_id (Необходимый) Строка идентификатора клиента, полученная из API ConsoleCredentials page, как описано в разделе Получение учетных данных OAuth 2.0 .
nonce (Необходимый) Случайное значение, сгенерированное вашим приложением, которое включает защиту от повторного воспроизведения.
response_type (Необходимый) Если значение равно code , запускает поток кода базовой авторизации , требуя POST к конечной точке токена для получения токенов. Если значением является token id_token или id_token token , запускает неявный поток , требующий использования JavaScript в URI перенаправления для получения токенов из идентификатора URI #fragment .
redirect_uri (Необходимый) Определяет, куда отправляется ответ. Значение этого параметра должно точно соответствовать одному из разрешенных значений перенаправления, заданных вами в API ConsoleCredentials page (включая схему HTTP или HTTPS, регистр и завершающий символ «/», если таковой имеется).
scope (Необходимый)

Параметр области должен начинаться со значения openid , а затем включать значение profile , значение email или и то, и другое.

Если значение области profile присутствует, токен идентификатора может (но не обязательно) включать утверждения profile пользователя по умолчанию.

Если значение области email присутствует, токен идентификатора включает утверждения email и email_verified .

В дополнение к этим специфичным для OpenID областям ваш аргумент области может также включать другие значения области. Все значения области должны быть разделены пробелами. Например, если вам нужен пофайловый доступ к Google Диску пользователя, параметром области действия может быть openid profile email https://www.googleapis.com/auth/drive.file .

Информацию о доступных областях см. в разделе « Области действия OAuth 2.0 для API Google» или в документации API Google, который вы хотите использовать.

state (Необязательно, но настоятельно рекомендуется)

Непрозрачная строка, которая передается в протоколе; то есть он возвращается как параметр URI в базовом потоке и как идентификатор URI #fragment в неявном потоке.

state может быть полезно для корреляции запросов и ответов. Поскольку ваш redirect_uri можно угадать, использование значения state может повысить вашу уверенность в том, что входящее соединение является результатом запроса аутентификации, инициированного вашим приложением. Если вы генерируете случайную строку или кодируете хэш некоторого состояния клиента (например, файла cookie) в этой переменной state , вы можете проверить ответ, чтобы дополнительно убедиться, что запрос и ответ исходят из одного и того же браузера. Это обеспечивает защиту от таких атак, как подделка межсайтовых запросов.

access_type (Необязательный) Допустимые значения: offline и online . Эффект задокументирован в Offline Access ; если запрашивается токен доступа, клиент не получает токен обновления, если не указано значение « offline .
display (Необязательный) Строковое значение ASCII, определяющее, как сервер авторизации отображает страницы пользовательского интерфейса аутентификации и согласия. Следующие значения указаны и принимаются серверами Google, но не влияют на его поведение: page , popup , touch и wap .
hd (Необязательный)

Оптимизируйте процесс входа в систему для учетных записей, принадлежащих организации Google Cloud. Включив домен организации Google Cloud (например, mycollege.edu ), вы можете указать, что пользовательский интерфейс выбора учетной записи должен быть оптимизирован для учетных записей в этом домене. Чтобы оптимизировать учетные записи организаций Google Cloud вместо одного домена организации Google Cloud, установите значение звездочки ( * ): hd=* .

Не полагайтесь на эту оптимизацию пользовательского интерфейса для контроля доступа к вашему приложению, поскольку запросы на стороне клиента могут быть изменены. Обязательно убедитесь , что возвращаемый токен идентификатора имеет значение утверждения hd , соответствующее ожидаемому (например mycolledge.edu ). В отличие от параметра запроса, утверждение hd токена идентификатора содержится в токене безопасности от Google, поэтому этому значению можно доверять.

include_granted_scopes (Необязательный) Если этому параметру присвоено значение true и запрос на авторизацию предоставлен, авторизация будет включать в себя все предыдущие авторизации, предоставленные этой комбинации пользователя и приложения для других областей; см. Дополнительная авторизация .

Обратите внимание, что вы не можете выполнить дополнительную авторизацию с помощью потока установленного приложения.

login_hint (Необязательный) Когда ваше приложение знает, какого пользователя оно пытается аутентифицировать, оно может предоставить этот параметр в качестве подсказки серверу аутентификации. Передача этой подсказки подавляет выбор учетной записи и либо предварительно заполняет поле электронной почты в форме входа, либо выбирает правильный сеанс (если пользователь использует множественный вход ), что может помочь вам избежать проблем, которые могут возникнуть, если ваше приложение входит в неправильную учетную запись пользователя. Значением может быть адрес электронной почты или sub , эквивалентная идентификатору Google ID пользователя.
prompt (Необязательный) Список строковых значений, разделенных пробелами, который указывает, запрашивает ли сервер авторизации пользователя повторную аутентификацию и согласие. Возможные значения:
  • none

    Сервер авторизации не отображает экраны аутентификации или согласия пользователя; он вернет ошибку, если пользователь еще не прошел аутентификацию и не настроил предварительно согласие для запрошенных областей. Вы можете использовать none для проверки существующей аутентификации и/или согласия.

  • consent

    Сервер авторизации запрашивает у пользователя согласие перед возвратом информации клиенту.

  • select_account

    Сервер авторизации предлагает пользователю выбрать учетную запись пользователя. Это позволяет пользователю, имеющему несколько учетных записей на сервере авторизации, выбирать среди нескольких учетных записей, для которых у него могут быть текущие сеансы.

Если значение не указано и пользователь ранее не авторизовал доступ, пользователю отображается экран согласия.

Проверка идентификационного токена

Вам необходимо проверить все токены идентификатора на вашем сервере, если вы не уверены, что они получены непосредственно от Google. Например, ваш сервер должен проверять подлинность всех токенов идентификатора, которые он получает от ваших клиентских приложений.

Ниже приведены распространенные ситуации, когда вы можете отправить токены идентификатора на свой сервер:

  • Отправка токенов идентификатора с запросами, которые необходимо аутентифицировать. Токены идентификатора сообщают вам, какой именно пользователь сделал запрос, и для какого клиента был предоставлен этот токен идентификатора.

Идентификаторы конфиденциальны и могут быть использованы не по назначению в случае перехвата. Вы должны обеспечить безопасную обработку этих токенов, передавая их только через HTTPS и только через данные POST или в заголовках запросов. Если вы храните токены идентификатора на своем сервере, вы также должны хранить их безопасно.

Одна вещь, которая делает токены идентификаторов полезными, заключается в том, что вы можете передавать их различным компонентам вашего приложения. Эти компоненты могут использовать идентификационный токен в качестве упрощенного механизма аутентификации, проверяющего приложение и пользователя. Но прежде чем вы сможете использовать информацию в токене идентификатора или полагаться на нее как на подтверждение того, что пользователь прошел аутентификацию, вы должны проверить ее.

Проверка идентификационного токена требует нескольких шагов:

  1. Убедитесь, что токен идентификатора правильно подписан эмитентом. Токены, выпущенные Google, подписываются с использованием одного из сертификатов, найденных по URI, указанному в значении метаданных jwks_uri документа Discovery .
  2. Убедитесь, что значение утверждения iss в токене идентификатора равно https://accounts.google.com или accounts.google.com .
  3. Убедитесь, что значение утверждения aud в токене идентификатора равно идентификатору клиента вашего приложения.
  4. Убедитесь, что срок действия (утверждение exp ) токена идентификатора не истек.
  5. Если вы указали значение параметра hd в запросе, убедитесь, что токен идентификатора имеет утверждение hd , соответствующее обслуживаемому домену, связанному с организацией Google Cloud.

Шаги со 2 по 5 включают только сравнения строк и дат, которые довольно просты, поэтому мы не будем их здесь подробно описывать.

Первый шаг более сложен и включает проверку криптографической подписи. В целях отладки вы можете использовать конечную точку Google tokeninfo для сравнения с локальной обработкой, реализованной на вашем сервере или устройстве. Предположим, что значение вашего идентификатора токена — XYZ123 . Затем вы должны разыменовать URI https://oauth2.googleapis.com/tokeninfo?id_token= XYZ123 . Если подпись токена действительна, ответом будет полезная нагрузка JWT в декодированной форме объекта JSON.

Конечная точка tokeninfo полезна для отладки, но для производственных целей необходимо получить открытые ключи Google из конечной точки ключей и выполнить проверку локально. Вам следует получить URI ключей из документа Discovery , используя значение метаданных jwks_uri . Запросы к конечной точке отладки могут регулироваться или иным образом подвергаться периодическим ошибкам.

Поскольку Google меняет свои открытые ключи лишь нечасто, вы можете кэшировать их с помощью директив кэширования ответа HTTP и в подавляющем большинстве случаев выполнять локальную проверку гораздо эффективнее, чем с помощью конечной точки tokeninfo . Эта проверка требует получения и анализа сертификатов, а также выполнения соответствующих криптографических вызовов для проверки подписи. К счастью, для этого существуют хорошо отлаженные библиотеки на самых разных языках (см. jwt.io ).

Получение информации о профиле пользователя

Для получения дополнительной профильной информации о пользователе вы можете использовать токен доступа (который ваше приложение получает в процессе аутентификации ) и стандарт OpenID Connect :

  1. Чтобы обеспечить совместимость с OpenID, вы должны включить значения области openid profile в свой запрос на аутентификацию .

    Если вы хотите, чтобы адрес электронной почты пользователя был включен, вы можете указать дополнительное значение области email . Чтобы указать и profile , и email , вы можете включить следующий параметр в URI запроса аутентификации:

    scope=openid%20profile%20email
  2. Добавьте свой токен доступа в заголовок авторизации и выполните запрос HTTPS GET к конечной точке userinfo, который вы должны получить из документа Discovery, используя значение метаданных userinfo_endpoint . Ответ userinfo включает информацию о пользователе, как описано в OpenID Connect Standard Claims , и значении claims_supported документа Discovery. Пользователи или их организации могут решить предоставить или скрыть определенные поля, поэтому вы можете не получить информацию по каждому полю для разрешенных вами областей доступа.

Документ «Дискавери»

Протокол OpenID Connect требует использования нескольких конечных точек для аутентификации пользователей и для запроса ресурсов, включая токены, информацию о пользователе и открытые ключи.

Чтобы упростить реализацию и повысить гибкость, OpenID Connect позволяет использовать «документ Discovery», документ JSON, найденный в известном месте и содержащий пары ключ-значение, которые предоставляют подробную информацию о конфигурации провайдера OpenID Connect, включая URI авторизации. , токен, отзыв, информация о пользователе и конечные точки открытых ключей. Документ Discovery для службы Google OpenID Connect можно получить по адресу:

https://accounts.google.com/.well-known/openid-configuration

Чтобы использовать службы Google OpenID Connect, вам необходимо жестко закодировать URI документа Discovery ( https://accounts.google.com/.well-known/openid-configuration ) в своем приложении. Ваше приложение извлекает документ, применяет правила кэширования в ответе, а затем извлекает из него URI конечной точки по мере необходимости. Например, для аутентификации пользователя ваш код будет получать значение метаданных authorization_endpoint ( https://accounts.google.com/o/oauth2/v2/auth в примере ниже) в качестве базового URI для запросов аутентификации, которые отправляются на Google.

Вот пример такого документа; имена полей указаны в OpenID Connect Discovery 1.0 (их значения см. в этом документе). Значения являются чисто иллюстративными и могут измениться, хотя они скопированы из последней версии фактического документа Google Discovery:

{
  "issuer": "https://accounts.google.com",
  "authorization_endpoint": "https://accounts.google.com/o/oauth2/v2/auth",
  "device_authorization_endpoint": "https://oauth2.googleapis.com/device/code",
  "token_endpoint": "https://oauth2.googleapis.com/token",
  "userinfo_endpoint": "https://openidconnect.googleapis.com/v1/userinfo",
  "revocation_endpoint": "https://oauth2.googleapis.com/revoke",
  "jwks_uri": "https://www.googleapis.com/oauth2/v3/certs",
  "response_types_supported": [
    "code",
    "token",
    "id_token",
    "code token",
    "code id_token",
    "token id_token",
    "code token id_token",
    "none"
  ],
  "subject_types_supported": [
    "public"
  ],
  "id_token_signing_alg_values_supported": [
    "RS256"
  ],
  "scopes_supported": [
    "openid",
    "email",
    "profile"
  ],
  "token_endpoint_auth_methods_supported": [
    "client_secret_post",
    "client_secret_basic"
  ],
  "claims_supported": [
    "aud",
    "email",
    "email_verified",
    "exp",
    "family_name",
    "given_name",
    "iat",
    "iss",
    "locale",
    "name",
    "picture",
    "sub"
  ],
  "code_challenge_methods_supported": [
    "plain",
    "S256"
  ]
}

Возможно, вам удастся избежать двустороннего обмена HTTP, кэшируя значения из документа Discovery. Используются стандартные заголовки кэширования HTTP, и их следует соблюдать.

Клиентские библиотеки

Следующие клиентские библиотеки упрощают внедрение OAuth 2.0 за счет интеграции с популярными платформами:

Соответствие OpenID Connect

Система аутентификации Google OAuth 2.0 поддерживает необходимые функции спецификации OpenID Connect Core . Any client which is designed to work with OpenID Connect should interoperate with this service (with the exception of the OpenID Request Object ).

,
Google's OpenID Connect endpoint is OpenID Certified.

Google's OAuth 2.0 APIs can be used for both authentication and authorization. This document describes our OAuth 2.0 implementation for authentication, which conforms to the OpenID Connect specification, and is OpenID Certified . The documentation found in Using OAuth 2.0 to Access Google APIs also applies to this service. If you want to explore this protocol interactively, we recommend the Google OAuth 2.0 Playground . To get help on Stack Overflow , tag your questions with 'google-oauth'.

Setting up OAuth 2.0

Before your application can use Google's OAuth 2.0 authentication system for user login, you must set up a project in the Google API Console to obtain OAuth 2.0 credentials, set a redirect URI, and (optionally) customize the branding information that your users see on the user-consent screen. You can also use the API Console to create a service account, enable billing, set up filtering, and do other tasks. For more details, see the Google API ConsoleHelp .

Obtain OAuth 2.0 credentials

You need OAuth 2.0 credentials, including a client ID and client secret, to authenticate users and gain access to Google's APIs.

Чтобы просмотреть идентификатор клиента и секрет клиента для заданных учетных данных OAuth 2.0, щелкните следующий текст: Выберите учетные данные . В открывшемся окне выберите свой проект и необходимые учетные данные, затем нажмите « Просмотр» .

Или просмотрите свой идентификатор клиента и секрет клиента со страницы учетных данных в API Console :

  1. Go to the Credentials page.
  2. Нажмите на имя вашего удостоверения или значок карандаша ( ). Ваш идентификатор клиента и секретные данные находятся вверху страницы.

Set a redirect URI

The redirect URI that you set in the API Console determines where Google sends responses to your authentication requests .

Чтобы создать, просмотреть или изменить URI перенаправления для заданных учетных данных OAuth 2.0, выполните следующие действия:

  1. Go to the Credentials page.
  2. В разделе идентификаторов клиентов OAuth 2.0 на странице щелкните учетные данные.
  3. Просмотр или редактирование URI перенаправления.

Если на странице «Учетные данные» нет раздела идентификаторов клиентов OAuth 2.0 , значит, у вашего проекта нет учетных данных OAuth. Чтобы создать его, нажмите « Создать учетные данные» .

Customize the user consent screen

For your users, the OAuth 2.0 authentication experience includes a consent screen that describes the information that the user is releasing and the terms that apply. For example, when the user logs in, they might be asked to give your app access to their email address and basic account information. You request access to this information using the scope parameter, which your app includes in its authentication request . You can also use scopes to request access to other Google APIs.

The user consent screen also presents branding information such as your product name, logo, and a homepage URL. You control the branding information in the API Console.

Чтобы включить экран согласия вашего проекта:

  1. Откройте Consent Screen page в Google API Console .
  2. If prompted, select a project, or create a new one.
  3. Заполните форму и нажмите Сохранить .

The following consent dialog shows what a user would see when a combination of OAuth 2.0 and Google Drive scopes are present in the request. (This generic dialog was generated using the Google OAuth 2.0 Playground , so it does not include branding information that would be set in the API Console.)

Consent page screen shot

Accessing the service

Google and third parties provide libraries that you can use to take care of many of the implementation details of authenticating users and gaining access to Google APIs. Examples include Google Identity Services and the Google client libraries , which are available for a variety of platforms.

If you choose not to use a library, follow the instructions in the remainder of this document, which describes the HTTP request flows that underly the available libraries.

Authenticating the user

Authenticating the user involves obtaining an ID token and validating it. ID tokens are a standardized feature of OpenID Connect designed for use in sharing identity assertions on the Internet.

The most commonly used approaches for authenticating a user and obtaining an ID token are called the "server" flow and the "implicit" flow. The server flow allows the back-end server of an application to verify the identity of the person using a browser or mobile device. The implicit flow is used when a client-side application (typically a JavaScript app running in the browser) needs to access APIs directly instead of via its back-end server.

This document describes how to perform the server flow for authenticating the user. The implicit flow is significantly more complicated because of security risks in handling and using tokens on the client side. If you need to implement an implicit flow, we highly recommend using Google Identity Services .

Server flow

Make sure you set up your app in the API Console to enable it to use these protocols and authenticate your users. When a user tries to log in with Google, you need to:

  1. Create an anti-forgery state token
  2. Send an authentication request to Google
  3. Confirm the anti-forgery state token
  4. Exchange code for access token and ID token
  5. Obtain user information from the ID token
  6. Authenticate the user

1. Create an anti-forgery state token

You must protect the security of your users by preventing request forgery attacks. The first step is creating a unique session token that holds state between your app and the user's client. You later match this unique session token with the authentication response returned by the Google OAuth Login service to verify that the user is making the request and not a malicious attacker. These tokens are often referred to as cross-site request forgery ( CSRF ) tokens.

One good choice for a state token is a string of 30 or so characters constructed using a high-quality random-number generator. Another is a hash generated by signing some of your session state variables with a key that is kept secret on your back-end.

The following code demonstrates generating unique session tokens.

PHP

You must download the Google APIs client library for PHP to use this sample.

// Create a state token to prevent request forgery.
// Store it in the session for later validation.
$state = bin2hex(random_bytes(128/8));
$app['session']->set('state', $state);
// Set the client ID, token state, and application name in the HTML while
// serving it.
return $app['twig']->render('index.html', array(
    'CLIENT_ID' => CLIENT_ID,
    'STATE' => $state,
    'APPLICATION_NAME' => APPLICATION_NAME
));

Джава

You must download the Google APIs client library for Java to use this sample.

// Create a state token to prevent request forgery.
// Store it in the session for later validation.
String state = new BigInteger(130, new SecureRandom()).toString(32);
request.session().attribute("state", state);
// Read index.html into memory, and set the client ID,
// token state, and application name in the HTML before serving it.
return new Scanner(new File("index.html"), "UTF-8")
    .useDelimiter("\\A").next()
    .replaceAll("[{]{2}\\s*CLIENT_ID\\s*[}]{2}", CLIENT_ID)
    .replaceAll("[{]{2}\\s*STATE\\s*[}]{2}", state)
    .replaceAll("[{]{2}\\s*APPLICATION_NAME\\s*[}]{2}",
    APPLICATION_NAME);

Питон

You must download the Google APIs client library for Python to use this sample.

# Create a state token to prevent request forgery.
# Store it in the session for later validation.
state = hashlib.sha256(os.urandom(1024)).hexdigest()
session['state'] = state
# Set the client ID, token state, and application name in the HTML while
# serving it.
response = make_response(
    render_template('index.html',
                    CLIENT_ID=CLIENT_ID,
                    STATE=state,
                    APPLICATION_NAME=APPLICATION_NAME))

2. Send an authentication request to Google

The next step is forming an HTTPS GET request with the appropriate URI parameters. Note the use of HTTPS rather than HTTP in all the steps of this process; HTTP connections are refused. You should retrieve the base URI from the Discovery document using the authorization_endpoint metadata value. The following discussion assumes the base URI is https://accounts.google.com/o/oauth2/v2/auth .

For a basic request, specify the following parameters:

  • client_id , which you obtain from the API ConsoleCredentials page.
  • response_type , which in a basic authorization code flow request should be code . (Read more at response_type .)
  • scope , which in a basic request should be openid email . (Read more at scope .)
  • redirect_uri should be the HTTP endpoint on your server that will receive the response from Google. The value must exactly match one of the authorized redirect URIs for the OAuth 2.0 client, which you configured in the API ConsoleCredentials page. If this value doesn't match an authorized URI, the request will fail with a redirect_uri_mismatch error.
  • state should include the value of the anti-forgery unique session token, as well as any other information needed to recover the context when the user returns to your application, eg, the starting URL. (Read more at state .)
  • nonce is a random value generated by your app that enables replay protection when present.
  • login_hint can be the user's email address or the sub string, which is equivalent to the user's Google ID. If you do not provide a login_hint and the user is currently logged in, the consent screen includes a request for approval to release the user's email address to your app. (Read more at login_hint .)
  • Use the hd parameter to optimize the OpenID Connect flow for users of a particular domain associated with a Google Cloud organization. (Read more at hd .)

Here is an example of a complete OpenID Connect authentication URI, with line breaks and spaces for readability:

https://accounts.google.com/o/oauth2/v2/auth?
 response_type=code&
 client_id=424911365001.apps.googleusercontent.com&
 scope=openid%20email&
 redirect_uri=https%3A//oauth2.example.com/code&
 state=security_token%3D138r5719ru3e1%26url%3Dhttps%3A%2F%2Foauth2-login-demo.example.com%2FmyHome&
 login_hint=jsmith@example.com&
 nonce=0394852-3190485-2490358&
 hd=example.com

Users are required to give consent if your app requests any new information about them, or if your app requests account access that they have not previously approved.

3. Confirm anti-forgery state token

The response is sent to the redirect_uri that you specified in the request . All responses are returned in the query string, as shown below:

https://oauth2.example.com/code?state=security_token%3D138r5719ru3e1%26url%3Dhttps%3A%2F%2Foa2cb.example.com%2FmyHome&code=4/P7q7W91a-oMsCeLvIaQm6bTrgtp7&scope=openid%20email%20https://www.googleapis.com/auth/userinfo.email

On the server, you must confirm that the state received from Google matches the session token you created in Step 1 . This round-trip verification helps to ensure that the user, not a malicious script, is making the request.

The following code demonstrates confirming the session tokens that you created in Step 1:

PHP

You must download the Google APIs client library for PHP to use this sample.

// Ensure that there is no request forgery going on, and that the user
// sending us this connect request is the user that was supposed to.
if ($request->get('state') != ($app['session']->get('state'))) {
  return new Response('Invalid state parameter', 401);
}

Джава

You must download the Google APIs client library for Java to use this sample.

// Ensure that there is no request forgery going on, and that the user
// sending us this connect request is the user that was supposed to.
if (!request.queryParams("state").equals(
    request.session().attribute("state"))) {
  response.status(401);
  return GSON.toJson("Invalid state parameter.");
}

Питон

You must download the Google APIs client library for Python to use this sample.

# Ensure that the request is not a forgery and that the user sending
# this connect request is the expected user.
if request.args.get('state', '') != session['state']:
  response = make_response(json.dumps('Invalid state parameter.'), 401)
  response.headers['Content-Type'] = 'application/json'
  return response

4. Exchange code for access token and ID token

The response includes a code parameter, a one-time authorization code that your server can exchange for an access token and ID token. Your server makes this exchange by sending an HTTPS POST request. The POST request is sent to the token endpoint, which you should retrieve from the Discovery document using the token_endpoint metadata value. The following discussion assumes the endpoint is https://oauth2.googleapis.com/token . The request must include the following parameters in the POST body:

Поля
code The authorization code that is returned from the initial request .
client_id The client ID that you obtain from the API ConsoleCredentials page, as described in Obtain OAuth 2.0 credentials .
client_secret The client secret that you obtain from the API ConsoleCredentials page, as described in Obtain OAuth 2.0 credentials .
redirect_uri An authorized redirect URI for the given client_id specified in the API ConsoleCredentials page, as described in Set a redirect URI .
grant_type This field must contain a value of authorization_code , as defined in the OAuth 2.0 specification .

The actual request might look like the following example:

POST /token HTTP/1.1
Host: oauth2.googleapis.com
Content-Type: application/x-www-form-urlencoded

code=4/P7q7W91a-oMsCeLvIaQm6bTrgtp7&
client_id=your-client-id&
client_secret=your-client-secret&
redirect_uri=https%3A//oauth2.example.com/code&
grant_type=authorization_code

A successful response to this request contains the following fields in a JSON array:

Поля
access_token A token that can be sent to a Google API.
expires_in The remaining lifetime of the access token in seconds.
id_token A JWT that contains identity information about the user that is digitally signed by Google.
scope The scopes of access granted by the access_token expressed as a list of space-delimited, case-sensitive strings.
token_type Identifies the type of token returned. At this time, this field always has the value Bearer .
refresh_token (optional)

This field is only present if the access_type parameter was set to offline in the authentication request . For details, see Refresh tokens .

5. Obtain user information from the ID token

An ID Token is a JWT (JSON Web Token), that is, a cryptographically signed Base64-encoded JSON object. Normally, it is critical that you validate an ID token before you use it, but since you are communicating directly with Google over an intermediary-free HTTPS channel and using your client secret to authenticate yourself to Google, you can be confident that the token you receive really comes from Google and is valid. If your server passes the ID token to other components of your app, it is extremely important that the other components validate the token before using it.

Since most API libraries combine the validation with the work of decoding the base64url-encoded values and parsing the JSON within, you will probably end up validating the token anyway as you access the claims in the ID token.

An ID token's payload

An ID token is a JSON object containing a set of name/value pairs. Here's an example, formatted for readability:

{
  "iss": "https://accounts.google.com",
  "azp": "1234987819200.apps.googleusercontent.com",
  "aud": "1234987819200.apps.googleusercontent.com",
  "sub": "10769150350006150715113082367",
  "at_hash": "HK6E_P6Dh8Y93mRNtsDB1Q",
  "hd": "example.com",
  "email": "jsmith@example.com",
  "email_verified": "true",
  "iat": 1353601026,
  "exp": 1353604926,
  "nonce": "0394852-3190485-2490358"
}

Google ID Tokens may contain the following fields (known as claims ):

Claim Provided Description
aud always The audience that this ID token is intended for. It must be one of the OAuth 2.0 client IDs of your application.
exp always Expiration time on or after which the ID token must not be accepted. Represented in Unix time (integer seconds).
iat always The time the ID token was issued. Represented in Unix time (integer seconds).
iss always The Issuer Identifier for the Issuer of the response. Always https://accounts.google.com or accounts.google.com for Google ID tokens.
sub always An identifier for the user, unique among all Google accounts and never reused. A Google account can have multiple email addresses at different points in time, but the sub value is never changed. Use sub within your application as the unique-identifier key for the user. Maximum length of 255 case-sensitive ASCII characters.
at_hash Access token hash. Provides validation that the access token is tied to the identity token. If the ID token is issued with an access_token value in the server flow, this claim is always included. This claim can be used as an alternate mechanism to protect against cross-site request forgery attacks, but if you follow Step 1 and Step 3 it is not necessary to verify the access token.
azp The client_id of the authorized presenter. This claim is only needed when the party requesting the ID token is not the same as the audience of the ID token. This may be the case at Google for hybrid apps where a web application and Android app have a different OAuth 2.0 client_id but share the same Google APIs project.
email The user's email address. This value may not be unique to this user and is not suitable for use as a primary key. Provided only if your scope included the email scope value.
email_verified True if the user's e-mail address has been verified; otherwise false.
family_name The user's surname(s) or last name(s). Might be provided when a name claim is present.
given_name The user's given name(s) or first name(s). Might be provided when a name claim is present.
hd The domain associated with the Google Cloud organization of the user. Provided only if the user belongs to a Google Cloud organization.
locale The user's locale, represented by a BCP 47 language tag. Might be provided when a name claim is present.
name The user's full name, in a displayable form. Might be provided when:
  • The request scope included the string "profile"
  • The ID token is returned from a token refresh

When name claims are present, you can use them to update your app's user records. Note that this claim is never guaranteed to be present.

nonce The value of the nonce supplied by your app in the authentication request. You should enforce protection against replay attacks by ensuring it is presented only once.
picture The URL of the user's profile picture. Might be provided when:
  • The request scope included the string "profile"
  • The ID token is returned from a token refresh

When picture claims are present, you can use them to update your app's user records. Note that this claim is never guaranteed to be present.

profile The URL of the user's profile page. Might be provided when:
  • The request scope included the string "profile"
  • The ID token is returned from a token refresh

When profile claims are present, you can use them to update your app's user records. Note that this claim is never guaranteed to be present.

6. Authenticate the user

After obtaining user information from the ID token, you should query your app's user database. If the user already exists in your database, you should start an application session for that user if all login requirements are met by the Google API response.

If the user does not exist in your user database, you should redirect the user to your new-user sign-up flow. You may be able to auto-register the user based on the information you receive from Google, or at the very least you may be able to pre-populate many of the fields that you require on your registration form. In addition to the information in the ID token, you can get additional user profile information at our user profile endpoints.

Advanced topics

The following sections describe the Google OAuth 2.0 API in greater detail. This information is intended for developers with advanced requirements around authentication and authorization.

Access to other Google APIs

One of the advantages of using OAuth 2.0 for authentication is that your application can get permission to use other Google APIs on behalf of the user (such as YouTube, Google Drive, Calendar, or Contacts) at the same time as you authenticate the user. To do this, include the other scopes that you need in the authentication request that you send to Google. For example, to add user's age group to your authentication request, pass a scope parameter of openid email https://www.googleapis.com/auth/profile.agerange.read . The user is prompted appropriately on the consent screen . The access token that you receive back from Google allows you to access all the APIs related to the scopes of access you requested and were granted.

Refresh tokens

In your request for API access you can request a refresh token to be returned during the code exchange . A refresh token provides your app continuous access to Google APIs while the user is not present in your application. To request a refresh token, add set the access_type parameter to offline in your authentication request .

Considerations:

  • Be sure to store the refresh token safely and permanently, because you can only obtain a refresh token the first time that you perform the code exchange flow.
  • There are limits on the number of refresh tokens that are issued: one limit per client/user combination, and another per user across all clients. If your application requests too many refresh tokens, it may run into these limits, in which case older refresh tokens stop working.

For more information, see Refreshing an access token (offline access) .

You can prompt the user to re-authorize your app by setting the prompt parameter to consent in your authentication request . When prompt=consent is included, the consent screen is displayed every time your app requests authorization of scopes of access, even if all scopes were previously granted to your Google APIs project. For this reason, include prompt=consent only when necessary.

For more about the prompt parameter, see prompt in the Authentication URI parameters table.

Authentication URI parameters

The following table gives more complete descriptions of the parameters accepted by Google's OAuth 2.0 authentication API.

Параметр Required Description
client_id (Required) The client ID string that you obtain from the API ConsoleCredentials page, as described in Obtain OAuth 2.0 credentials .
nonce (Required) A random value generated by your app that enables replay protection.
response_type (Required) If the value is code , launches a Basic authorization code flow , requiring a POST to the token endpoint to obtain the tokens. If the value is token id_token or id_token token , launches an Implicit flow , requiring the use of JavaScript at the redirect URI to retrieve tokens from the URI #fragment identifier .
redirect_uri (Required) Determines where the response is sent. The value of this parameter must exactly match one of the authorized redirect values that you set in the API ConsoleCredentials page (including the HTTP or HTTPS scheme, case, and trailing '/', if any).
scope (Required)

The scope parameter must begin with the openid value and then include the profile value, the email value, or both.

If the profile scope value is present, the ID token might (but is not guaranteed to) include the user's default profile claims.

If the email scope value is present, the ID token includes email and email_verified claims.

In addition to these OpenID-specific scopes, your scope argument can also include other scope values. All scope values must be space-separated. For example, if you wanted per-file access to a user's Google Drive, your scope parameter might be openid profile email https://www.googleapis.com/auth/drive.file .

For information about available scopes, see OAuth 2.0 Scopes for Google APIs or the documentation for the Google API you would like to use.

state (Optional, but strongly recommended)

An opaque string that is round-tripped in the protocol; that is to say, it is returned as a URI parameter in the Basic flow, and in the URI #fragment identifier in the Implicit flow.

The state can be useful for correlating requests and responses. Because your redirect_uri can be guessed, using a state value can increase your assurance that an incoming connection is the result of an authentication request initiated by your app. If you generate a random string or encode the hash of some client state (eg, a cookie) in this state variable, you can validate the response to additionally ensure that the request and response originated in the same browser. This provides protection against attacks such as cross-site request forgery.

access_type (Optional) The allowed values are offline and online . The effect is documented in Offline Access ; if an access token is being requested, the client does not receive a refresh token unless a value of offline is specified.
display (Optional) An ASCII string value for specifying how the authorization server displays the authentication and consent user interface pages. The following values are specified, and accepted by the Google servers, but do not have any effect on its behavior: page , popup , touch , and wap .
hd (Optional)

Streamline the login process for accounts owned by a Google Cloud organization. By including the Google Cloud organization domain (for example, mycollege.edu ), you can indicate that the account selection UI should be optimized for accounts at that domain. To optimize for Google Cloud organization accounts generally instead of just one Google Cloud organization domain, set a value of an asterisk ( * ): hd=* .

Don't rely on this UI optimization to control who can access your app, as client-side requests can be modified. Be sure to validate that the returned ID token has an hd claim value that matches what you expect (eg mycolledge.edu ). Unlike the request parameter, the ID token hd claim is contained within a security token from Google, so the value can be trusted.

include_granted_scopes (Optional) If this parameter is provided with the value true , and the authorization request is granted, the authorization will include any previous authorizations granted to this user/application combination for other scopes; see Incremental authorization .

Note that you cannot do incremental authorization with the Installed App flow.

login_hint (Optional) When your app knows which user it is trying to authenticate, it can provide this parameter as a hint to the authentication server. Passing this hint suppresses the account chooser and either pre-fills the email box on the sign-in form, or selects the proper session (if the user is using multiple sign-in ), which can help you avoid problems that occur if your app logs in the wrong user account. The value can be either an email address or the sub string, which is equivalent to the user's Google ID.
prompt (Optional) A space-delimited list of string values that specifies whether the authorization server prompts the user for reauthentication and consent. The possible values are:
  • none

    The authorization server does not display any authentication or user consent screens; it will return an error if the user is not already authenticated and has not pre-configured consent for the requested scopes. You can use none to check for existing authentication and/or consent.

  • consent

    The authorization server prompts the user for consent before returning information to the client.

  • select_account

    The authorization server prompts the user to select a user account. This allows a user who has multiple accounts at the authorization server to select amongst the multiple accounts that they may have current sessions for.

If no value is specified and the user has not previously authorized access, then the user is shown a consent screen.

Validating an ID token

You need to validate all ID tokens on your server unless you know that they came directly from Google. For example, your server must verify as authentic any ID tokens it receives from your client apps.

The following are common situations where you might send ID tokens to your server:

  • Sending ID tokens with requests that need to be authenticated. The ID tokens tell you the particular user making the request and for which client that ID token was granted.

ID tokens are sensitive and can be misused if intercepted. You must ensure that these tokens are handled securely by transmitting them only over HTTPS and only via POST data or within request headers. If you store ID tokens on your server, you must also store them securely.

One thing that makes ID tokens useful is that fact that you can pass them around different components of your app. These components can use an ID token as a lightweight authentication mechanism authenticating the app and the user. But before you can use the information in the ID token or rely on it as an assertion that the user has authenticated, you must validate it.

Validation of an ID token requires several steps:

  1. Verify that the ID token is properly signed by the issuer. Google-issued tokens are signed using one of the certificates found at the URI specified in the jwks_uri metadata value of the Discovery document .
  2. Verify that the value of the iss claim in the ID token is equal to https://accounts.google.com or accounts.google.com .
  3. Verify that the value of the aud claim in the ID token is equal to your app's client ID.
  4. Verify that the expiry time ( exp claim) of the ID token has not passed.
  5. If you specified a hd parameter value in the request, verify that the ID token has a hd claim that matches an accepted domain associated with a Google Cloud organization.

Steps 2 to 5 involve only string and date comparisons which are quite straightforward, so we won't detail them here.

The first step is more complex, and involves cryptographic signature checking. For debugging purposes, you can use Google's tokeninfo endpoint to compare against local processing implemented on your server or device. Suppose your ID token's value is XYZ123 . Then you would dereference the URI https://oauth2.googleapis.com/tokeninfo?id_token= XYZ123 . If the token signature is valid, the response would be the JWT payload in its decoded JSON object form.

The tokeninfo endpoint is useful for debugging but for production purposes, retrieve Google's public keys from the keys endpoint and perform the validation locally. You should retrieve the keys URI from the Discovery document using the jwks_uri metadata value. Requests to the debugging endpoint may be throttled or otherwise subject to intermittent errors.

Since Google changes its public keys only infrequently, you can cache them using the cache directives of the HTTP response and, in the vast majority of cases, perform local validation much more efficiently than by using the tokeninfo endpoint. This validation requires retrieving and parsing certificates, and making the appropriate cryptographic calls to check the signature. Fortunately, there are well-debugged libraries available in a wide variety of languages to accomplish this (see jwt.io ).

Obtaining user profile information

To obtain additional profile information about the user, you can use the access token (which your application receives during the authentication flow ) and the OpenID Connect standard:

  1. To be OpenID-compliant, you must include the openid profile scope values in your authentication request .

    If you want the user's email address to be included, you can specify an additional scope value of email . To specify both profile and email , you can include the following parameter in your authentication request URI:

    scope=openid%20profile%20email
  2. Add your access token to the authorization header and make an HTTPS GET request to the userinfo endpoint, which you should retrieve from the Discovery document using the userinfo_endpoint metadata value. The userinfo response includes information about the user, as described in OpenID Connect Standard Claims and the claims_supported metadata value of the Discovery document. Users or their organizations may choose to supply or withhold certain fields, so you might not get information for every field for your authorized scopes of access.

The Discovery document

The OpenID Connect protocol requires the use of multiple endpoints for authenticating users, and for requesting resources including tokens, user information, and public keys.

To simplify implementations and increase flexibility, OpenID Connect allows the use of a "Discovery document," a JSON document found at a well-known location containing key-value pairs which provide details about the OpenID Connect provider's configuration, including the URIs of the authorization, token, revocation, userinfo, and public-keys endpoints. The Discovery document for Google's OpenID Connect service may be retrieved from:

https://accounts.google.com/.well-known/openid-configuration

To use Google's OpenID Connect services, you should hard-code the Discovery-document URI ( https://accounts.google.com/.well-known/openid-configuration ) into your application. Your application fetches the document, applies caching rules in the response, then retrieves endpoint URIs from it as needed. For example, to authenticate a user, your code would retrieve the authorization_endpoint metadata value ( https://accounts.google.com/o/oauth2/v2/auth in the example below) as the base URI for authentication requests that are sent to Google.

Here is an example of such a document; the field names are those specified in OpenID Connect Discovery 1.0 (refer to that document for their meanings). The values are purely illustrative and might change, although they are copied from a recent version of the actual Google Discovery document:

{
  "issuer": "https://accounts.google.com",
  "authorization_endpoint": "https://accounts.google.com/o/oauth2/v2/auth",
  "device_authorization_endpoint": "https://oauth2.googleapis.com/device/code",
  "token_endpoint": "https://oauth2.googleapis.com/token",
  "userinfo_endpoint": "https://openidconnect.googleapis.com/v1/userinfo",
  "revocation_endpoint": "https://oauth2.googleapis.com/revoke",
  "jwks_uri": "https://www.googleapis.com/oauth2/v3/certs",
  "response_types_supported": [
    "code",
    "token",
    "id_token",
    "code token",
    "code id_token",
    "token id_token",
    "code token id_token",
    "none"
  ],
  "subject_types_supported": [
    "public"
  ],
  "id_token_signing_alg_values_supported": [
    "RS256"
  ],
  "scopes_supported": [
    "openid",
    "email",
    "profile"
  ],
  "token_endpoint_auth_methods_supported": [
    "client_secret_post",
    "client_secret_basic"
  ],
  "claims_supported": [
    "aud",
    "email",
    "email_verified",
    "exp",
    "family_name",
    "given_name",
    "iat",
    "iss",
    "locale",
    "name",
    "picture",
    "sub"
  ],
  "code_challenge_methods_supported": [
    "plain",
    "S256"
  ]
}

You may be able to avoid an HTTP round-trip by caching the values from the Discovery document. Standard HTTP caching headers are used and should be respected.

Client libraries

The following client libraries make implementing OAuth 2.0 simpler by integrating with popular frameworks:

OpenID Connect compliance

Google's OAuth 2.0 authentication system supports the required features of the OpenID Connect Core specification. Any client which is designed to work with OpenID Connect should interoperate with this service (with the exception of the OpenID Request Object ).