
APIهای OAuth 2.0 Google را می توان هم برای احراز هویت و هم برای مجوز استفاده کرد. این سند پیادهسازی OAuth 2.0 ما را برای احراز هویت توصیف میکند که با مشخصات OpenID Connect مطابقت دارد و دارای گواهی OpenID است. اسناد موجود در استفاده از OAuth 2.0 برای دسترسی به APIهای Google در این سرویس نیز اعمال می شود. اگر میخواهید این پروتکل را به صورت تعاملی کاوش کنید، Google OAuth 2.0 Playground را توصیه میکنیم. برای دریافت راهنمایی در مورد Stack Overflow ، سؤالات خود را با «google-oauth» تگ کنید.
راه اندازی OAuth 2.0
قبل از اینکه برنامه شما بتواند از سیستم احراز هویت Google OAuth 2.0 برای ورود به سیستم کاربر استفاده کند، باید پروژه ای را در Google API Console راه اندازی کنید تا اعتبار OAuth 2.0 را دریافت کنید، یک URI تغییر مسیر تنظیم کنید، و (به صورت اختیاری) اطلاعات نام تجاری را که کاربران شما در آن می بینند سفارشی کنید. صفحه رضایت کاربر همچنین می توانید از API Console برای ایجاد یک حساب سرویس، فعال کردن صورتحساب، تنظیم فیلتر و انجام کارهای دیگر استفاده کنید. برای جزئیات بیشتر، به راهنمایGoogle API Console مراجعه کنید.
اعتبارنامه OAuth 2.0 را دریافت کنید
برای احراز هویت کاربران و دسترسی به APIهای Google، به اعتبارنامه OAuth 2.0، از جمله شناسه مشتری و راز سرویس گیرنده نیاز دارید.
To view the client ID and client secret for a given OAuth 2.0 credential, click the following text: Select credential. In the window that opens, choose your project and the credential you want, then click View.
Or, view your client ID and client secret from the Credentials page in API Console:
- Go to the Credentials page.
- Click the name of your credential or the pencil (create) icon. Your client ID and secret are at the top of the page.
یک URI تغییر مسیر را تنظیم کنید
URI تغییر مسیری که در API Console تنظیم میکنید، تعیین میکند که Google پاسخها را به درخواستهای احراز هویت شما کجا ارسال میکند.
برای ایجاد ، مشاهده و یا ویرایش URI های تغییر مسیر برای اعتبار OAuth 2.0 داده شده ، موارد زیر را انجام دهید:
- Go to the Credentials page.
- در بخش شناسه های مشتری OAuth 2.0 از صفحه ، روی اعتبار نامه کلیک کنید.
- URI های تغییر مسیر را مشاهده یا ویرایش کنید.
اگر در صفحه شناسنامه ها هیچ بخش شناسه مشتری OAuth 2.0 وجود ندارد ، پروژه شما هیچ اعتبار OAuth ندارد. برای ایجاد یک ، روی ایجاد اعتبارنامه کلیک کنید.
صفحه رضایت کاربر را سفارشی کنید
برای کاربران شما، تجربه احراز هویت OAuth 2.0 شامل یک صفحه رضایت است که اطلاعاتی را که کاربر منتشر می کند و شرایط اعمال شده را توضیح می دهد. برای مثال، زمانی که کاربر وارد سیستم میشود، ممکن است از او خواسته شود به برنامه شما اجازه دسترسی به آدرس ایمیل و اطلاعات اولیه حساب خود را بدهد. شما درخواست دسترسی به این اطلاعات را با استفاده از پارامتر scope ، که برنامه شما در درخواست احراز هویت خود دارد، دریافت میکنید. همچنین میتوانید از scope برای درخواست دسترسی به سایر APIهای Google استفاده کنید.
صفحه رضایت کاربر همچنین اطلاعات برند مانند نام محصول، لوگو و URL صفحه اصلی را نشان می دهد. شما اطلاعات نام تجاری را در API Consoleکنترل می کنید.
برای فعال کردن صفحه رضایت پروژه خود:
- Consent Screen page در Google API Console .
- If prompted, select a project, or create a new one.
- فرم را پر کنید و روی ذخیره کلیک کنید.
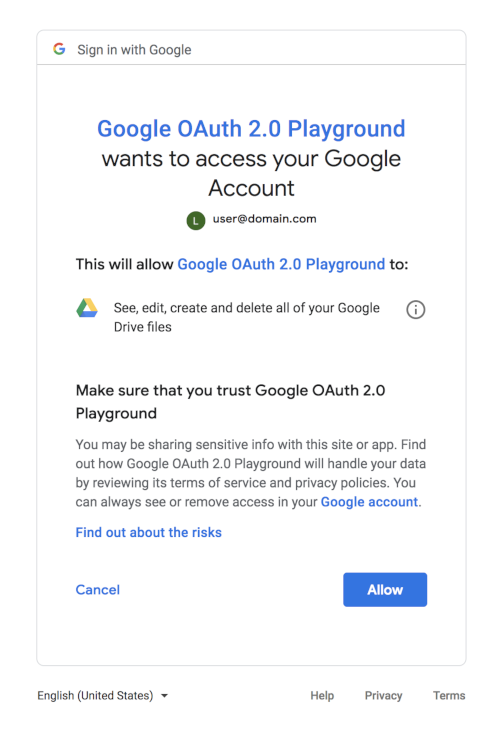
گفتگوی رضایت زیر نشان میدهد که وقتی ترکیبی از دامنههای OAuth 2.0 و Google Drive در درخواست وجود دارد، کاربر چه چیزی را میبیند. (این گفتگوی عمومی با استفاده از Google OAuth 2.0 Playground ایجاد شده است، بنابراین شامل اطلاعات نام تجاری نمی شود که در API Consoleتنظیم شود.)
دسترسی به سرویس
Google و اشخاص ثالث کتابخانههایی را ارائه میکنند که میتوانید از آنها برای مراقبت از بسیاری از جزئیات پیادهسازی احراز هویت کاربران و دسترسی به APIهای Google استفاده کنید. به عنوان مثال میتوان به سرویسهای هویت Google و کتابخانههای مشتری Google اشاره کرد که برای پلتفرمهای مختلف در دسترس هستند.
اگر تصمیم گرفتید از کتابخانه استفاده نکنید، دستورالعملهای باقیمانده این سند را دنبال کنید، که جریانهای درخواست HTTP را که زیربنای کتابخانههای موجود است، توضیح میدهد.
احراز هویت کاربر
احراز هویت کاربر مستلزم دریافت رمز شناسه و اعتبارسنجی آن است. نشانههای ID یک ویژگی استاندارد OpenID Connect هستند که برای استفاده در اشتراکگذاری ادعاهای هویت در اینترنت طراحی شدهاند.
متداولترین روشهای مورد استفاده برای احراز هویت یک کاربر و بهدست آوردن یک شناسه رمز، جریان «سرور» و جریان «ضمنی» نامیده میشوند. جریان سرور به سرور پشتیبان یک برنامه اجازه می دهد تا هویت شخص را با استفاده از مرورگر یا دستگاه تلفن همراه تأیید کند. جریان ضمنی زمانی استفاده میشود که یک برنامه سمت سرویس گیرنده (معمولاً یک برنامه جاوا اسکریپت که در مرورگر اجرا میشود) نیاز به دسترسی مستقیم به APIها به جای سرور بکاند خود داشته باشد.
این سند نحوه اجرای جریان سرور برای احراز هویت کاربر را شرح می دهد. جریان ضمنی به دلیل خطرات امنیتی در مدیریت و استفاده از توکن ها در سمت مشتری، به طور قابل توجهی پیچیده تر است. اگر نیاز به پیادهسازی یک جریان ضمنی دارید، به شدت توصیه میکنیم از سرویسهای هویت Google استفاده کنید.
جریان سرور
مطمئن شوید که برنامه خود را در API Consoleراه اندازی کرده اید تا بتواند از این پروتکل ها استفاده کند و کاربران شما را احراز هویت کند. وقتی کاربری سعی می کند با گوگل وارد شود، باید:
- یک نشانه حالت ضد جعل ایجاد کنید
- یک درخواست احراز هویت به Google ارسال کنید
- رمز حالت ضد جعل را تأیید کنید
- تبادل
codeبرای توکن دسترسی و شناسه - اطلاعات کاربر را از توکن ID دریافت کنید
- احراز هویت کاربر
1. یک توکن حالت ضد جعل ایجاد کنید
شما باید با جلوگیری از حملات جعل درخواست از امنیت کاربران خود محافظت کنید. اولین مرحله ایجاد یک نشانه جلسه منحصر به فرد است که بین برنامه شما و مشتری کاربر حالت نگه می دارد. بعداً این نشانه جلسه منحصر به فرد را با پاسخ احراز هویتی که توسط سرویس ورود به سیستم Google OAuth برگردانده شده است مطابقت می دهید تا تأیید کنید که کاربر درخواست را ارائه می دهد و نه یک مهاجم مخرب. این توکنها اغلب به عنوان توکنهای جعل درخواست متقابل ( CSRF ) شناخته میشوند.
یک انتخاب خوب برای یک نشانه وضعیت، رشته ای از 30 کاراکتر یا بیشتر است که با استفاده از یک تولید کننده اعداد تصادفی با کیفیت بالا ساخته شده است. دیگری هش است که با امضای برخی از متغیرهای وضعیت جلسه شما با کلیدی که در بکاند مخفی نگه داشته میشود، ایجاد میشود.
کد زیر تولید نشانه های جلسه منحصر به فرد را نشان می دهد.
PHP
برای استفاده از این نمونه باید کتابخانه سرویس گیرنده Google APIs را برای PHP دانلود کنید.
// Create a state token to prevent request forgery.
// Store it in the session for later validation.
$state = bin2hex(random_bytes(128/8));
$app['session']->set('state', $state);
// Set the client ID, token state, and application name in the HTML while
// serving it.
return $app['twig']->render('index.html', array(
    'CLIENT_ID' => CLIENT_ID,
    'STATE' => $state,
    'APPLICATION_NAME' => APPLICATION_NAME
));
جاوا
برای استفاده از این نمونه باید کتابخانه سرویس گیرنده Google APIs را برای جاوا دانلود کنید.
// Create a state token to prevent request forgery.
// Store it in the session for later validation.
String state = new BigInteger(130, new SecureRandom()).toString(32);
request.session().attribute("state", state);
// Read index.html into memory, and set the client ID,
// token state, and application name in the HTML before serving it.
return new Scanner(new File("index.html"), "UTF-8")
    .useDelimiter("\\A").next()
    .replaceAll("[{]{2}\\s*CLIENT_ID\\s*[}]{2}", CLIENT_ID)
    .replaceAll("[{]{2}\\s*STATE\\s*[}]{2}", state)
    .replaceAll("[{]{2}\\s*APPLICATION_NAME\\s*[}]{2}",
    APPLICATION_NAME);
پایتون
برای استفاده از این نمونه باید کتابخانه سرویس گیرنده Google APIs را برای پایتون دانلود کنید.
# Create a state token to prevent request forgery.
# Store it in the session for later validation.
state = hashlib.sha256(os.urandom(1024)).hexdigest()
session['state'] = state
# Set the client ID, token state, and application name in the HTML while
# serving it.
response = make_response(
    render_template('index.html',
                    CLIENT_ID=CLIENT_ID,
                    STATE=state,
                    APPLICATION_NAME=APPLICATION_NAME))
2. یک درخواست احراز هویت به Google ارسال کنید
مرحله بعدی تشکیل یک درخواست HTTPS GET با پارامترهای URI مناسب است. به استفاده از HTTPS به جای HTTP در تمام مراحل این فرآیند توجه داشته باشید. اتصالات HTTP رد می شود. شما باید URI پایه را از سند Discovery با استفاده از مقدار فراداده authorization_endpoint بازیابی کنید. در بحث زیر فرض میشود که URI پایه https://accounts.google.com/o/oauth2/v2/auth است.
برای درخواست اولیه، پارامترهای زیر را مشخص کنید:
-
client_id، که از API ConsoleCredentials pageبه دست می آورید. -
response_typeکه در یک درخواست جریان کد مجوز اولیه بایدcodeباشد. (بیشتر درresponse_typeبخوانید.) -
scopeکه در یک درخواست اولیه بایدopenid emailباشد. (درscopeبیشتر بخوانید.) -
redirect_uriباید نقطه پایانی HTTP در سرور شما باشد که پاسخ را از Google دریافت می کند. مقدار باید دقیقاً با یکی از URI های مجاز تغییر مسیر برای مشتری OAuth 2.0 مطابقت داشته باشد که در API ConsoleCredentials pageپیکربندی کرده اید. اگر این مقدار با یک URI مجاز مطابقت نداشته باشد، درخواست با خطایredirect_uri_mismatchناموفق خواهد بود. -
stateباید شامل مقدار نشانه جلسه منحصربفرد ضد جعل، و همچنین هر اطلاعات دیگری که برای بازیابی زمینه زمانی که کاربر به برنامه شما بازمی گردد، باشد، به عنوان مثال، URL شروع. (ادامه مطلب را درstateبخوانید.) -
nonceیک مقدار تصادفی است که توسط برنامه شما ایجاد می شود و در صورت وجود، محافظت از پخش مجدد را فعال می کند. -
login_hintمی تواند آدرس ایمیل کاربر یا رشتهsubباشد که معادل شناسه گوگل کاربر است. اگر یکlogin_hintارائه نکنید و کاربر در حال حاضر وارد سیستم شده است، صفحه رضایت شامل درخواستی برای تایید برای انتشار آدرس ایمیل کاربر در برنامه شما است. (درlogin_hintبیشتر بخوانید.) - از پارامتر
hdبرای بهینهسازی جریان OpenID Connect برای کاربران یک دامنه خاص مرتبط با یک سازمان Google Workspace یا Cloud استفاده کنید (بیشتر درhdبخوانید).
در اینجا یک نمونه از یک URI احراز هویت OpenID Connect کامل، با خطوط شکسته و فاصله برای خوانایی آورده شده است:
https://accounts.google.com/o/oauth2/v2/auth?
 response_type=code&
 client_id=424911365001.apps.googleusercontent.com&
 scope=openid%20email&
 redirect_uri=https%3A//oauth2.example.com/code&
 state=security_token%3D138r5719ru3e1%26url%3Dhttps%3A%2F%2Foauth2-login-demo.example.com%2FmyHome&
 login_hint=jsmith@example.com&
 nonce=0394852-3190485-2490358&
 hd=example.com
اگر برنامه شما اطلاعات جدیدی در مورد آنها درخواست می کند یا اگر برنامه شما درخواست دسترسی به حسابی که قبلاً تأیید نکرده اند، از کاربران خواسته می شود رضایت خود را اعلام کنند.
3. رمز حالت ضد جعل را تأیید کنید
پاسخ به redirect_uri که در درخواست مشخص کرده اید ارسال می شود. تمام پاسخ ها در رشته query برگردانده می شوند، همانطور که در زیر نشان داده شده است:
https://oauth2.example.com/code?state=security_token%3D138r5719ru3e1%26url%3Dhttps%3A%2F%2Foa2cb.example.com%2FmyHome&code=4/P7q7W91a-oMsCeLvIaQm6bTrgtp7&scope=openid%20email%20https://www.googleapis.com/auth/userinfo.email
در سرور، باید تأیید کنید که state دریافتی از Google با نشانه جلسه ای که در مرحله 1 ایجاد کرده اید مطابقت دارد. این تأیید رفت و برگشت کمک می کند تا اطمینان حاصل شود که کاربر، نه یک اسکریپت مخرب، درخواست را ارسال می کند.
کد زیر نشان دهنده تایید توکن های جلسه ای است که در مرحله 1 ایجاد کرده اید:
PHP
برای استفاده از این نمونه باید کتابخانه سرویس گیرنده Google APIs را برای PHP دانلود کنید.
// Ensure that there is no request forgery going on, and that the user
// sending us this connect request is the user that was supposed to.
if ($request->get('state') != ($app['session']->get('state'))) {
  return new Response('Invalid state parameter', 401);
}
جاوا
برای استفاده از این نمونه باید کتابخانه سرویس گیرنده Google APIs را برای جاوا دانلود کنید.
// Ensure that there is no request forgery going on, and that the user
// sending us this connect request is the user that was supposed to.
if (!request.queryParams("state").equals(
    request.session().attribute("state"))) {
  response.status(401);
  return GSON.toJson("Invalid state parameter.");
}
پایتون
برای استفاده از این نمونه باید کتابخانه سرویس گیرنده Google APIs را برای پایتون دانلود کنید.
# Ensure that the request is not a forgery and that the user sending
# this connect request is the expected user.
if request.args.get('state', '') != session['state']:
  response = make_response(json.dumps('Invalid state parameter.'), 401)
  response.headers['Content-Type'] = 'application/json'
  return response
4. تبادل code برای توکن دسترسی و شناسه
پاسخ شامل یک پارامتر code ، یک کد مجوز یک بار مصرف است که سرور شما می تواند با یک نشانه دسترسی و شناسه مبادله کند. سرور شما این تبادل را با ارسال یک درخواست HTTPS POST انجام می دهد. درخواست POST به نقطه پایانی نشانه ارسال می شود که باید آن را از سند Discovery با استفاده از مقدار فراداده token_endpoint بازیابی کنید. بحث زیر فرض میکند که نقطه پایانی https://oauth2.googleapis.com/token است. درخواست باید شامل پارامترهای زیر در بدنه POST باشد:
| زمینه های | |
|---|---|
code | کد مجوزی که از درخواست اولیه بازگردانده می شود. |
client_id | شناسه سرویس گیرنده ای که از API ConsoleCredentials pageدریافت می کنید، همانطور که در دریافت اعتبارنامه OAuth 2.0 توضیح داده شده است. |
client_secret | راز مشتری که از API ConsoleCredentials pageبه دست می آورید، همانطور که در دریافت اعتبارنامه OAuth 2.0 توضیح داده شده است. |
redirect_uri | یک URI تغییر مسیر مجاز برای client_id مشخص شده در API ConsoleCredentials page، همانطور که در Set a Redirect URI توضیح داده شده است. |
grant_type | این فیلد باید حاوی مقدار authorization_code باشد که در مشخصات OAuth 2.0 تعریف شده است . |
درخواست واقعی ممکن است مانند مثال زیر باشد:
POST /token HTTP/1.1
Host: oauth2.googleapis.com
Content-Type: application/x-www-form-urlencoded

code=4/P7q7W91a-oMsCeLvIaQm6bTrgtp7&
client_id=your-client-id&
client_secret=your-client-secret&
redirect_uri=https%3A//oauth2.example.com/code&
grant_type=authorization_code
پاسخ موفقیت آمیز به این درخواست شامل فیلدهای زیر در آرایه JSON است:
| زمینه های | |
|---|---|
access_token | نشانه ای که می تواند به یک API Google ارسال شود. |
expires_in | طول عمر باقیمانده رمز دسترسی در ثانیه. |
id_token | JWT که حاوی اطلاعات هویتی کاربر است که به صورت دیجیتالی توسط Google امضا شده است. |
scope | دامنه دسترسی اعطا شده توسط access_token به صورت لیستی از رشته های حساس به حروف کوچک و کوچک با فاصله بیان می شود. |
token_type | نوع توکن برگشتی را مشخص می کند. در این زمان، این فیلد همیشه دارای مقدار Bearer است. |
refresh_token | (اختیاری) این فیلد فقط در صورتی وجود دارد که پارامتر |
5. اطلاعات کاربر را از توکن ID بدست آورید
رمز شناسه یک JWT (JSON Web Token) است، یعنی یک شیء JSON کدگذاری شده با Base64 رمزگذاری شده است. به طور معمول، مهم است که قبل از استفاده از یک کد شناسه اعتبارسنجی کنید ، اما از آنجایی که شما مستقیماً از طریق یک کانال HTTPS بدون واسطه با Google ارتباط برقرار میکنید و از رمز مشتری خود برای تأیید اعتبار خود در Google استفاده میکنید، میتوانید مطمئن باشید که توکن شما دریافت واقعاً از Google می آید و معتبر است. اگر سرور شما کد ID را به سایر اجزای برنامه شما ارسال می کند، بسیار مهم است که سایر مؤلفه ها قبل از استفاده از توکن آن را تأیید کنند .
از آنجایی که اکثر کتابخانههای API اعتبار سنجی را با کار رمزگشایی مقادیر کدگذاری شده با base64url و تجزیه JSON در داخل ترکیب میکنند، احتمالاً با دسترسی به ادعاهای موجود در شناسه شناسه، به اعتبار توکن پایان میدهید.
محموله یک رمز شناسه
یک نشانه ID یک شی JSON است که شامل مجموعه ای از جفت نام/مقدار است. در اینجا یک مثال برای خوانایی فرمت شده است:
{
  "iss": "https://accounts.google.com",
  "azp": "1234987819200.apps.googleusercontent.com",
  "aud": "1234987819200.apps.googleusercontent.com",
  "sub": "10769150350006150715113082367",
  "at_hash": "HK6E_P6Dh8Y93mRNtsDB1Q",
  "hd": "example.com",
  "email": "jsmith@example.com",
  "email_verified": "true",
  "iat": 1353601026,
  "exp": 1353604926,
  "nonce": "0394852-3190485-2490358"
}توکنهای Google ID ممکن است حاوی فیلدهای زیر باشند (که به عنوان ادعا شناخته میشوند):
| مطالبه | ارائه شده است | شرح |
|---|---|---|
aud | همیشه | مخاطبی که این کد شناسه برای آنها در نظر گرفته شده است. این باید یکی از شناسه های مشتری OAuth 2.0 برنامه شما باشد. |
exp | همیشه | زمان انقضا در تاریخ یا پس از آن رمز ID نباید پذیرفته شود. نشان داده شده در زمان یونیکس (ثانیه عدد صحیح). |
iat | همیشه | زمان صدور شناسنامه نشان داده شده در زمان یونیکس (ثانیه عدد صحیح). |
iss | همیشه | شناسه صادرکننده برای صادرکننده پاسخ. همیشه https://accounts.google.com یا accounts.google.com برای کدهای Google ID. |
sub | همیشه | یک شناسه برای کاربر، منحصر به فرد در بین تمام حساب های Google و هرگز استفاده مجدد نشده است. یک حساب Google می تواند چندین آدرس ایمیل در مقاطع زمانی مختلف داشته باشد، اما مقدار sub آن هرگز تغییر نمی کند. از sub در برنامه خود به عنوان کلید شناسه یکتا برای کاربر استفاده کنید. حداکثر طول 255 نویسه ASCII حساس به حروف کوچک و بزرگ. |
at_hash | دسترسی به هش رمز. اعتبار سنجی را ارائه می دهد که نشانه دسترسی به نشانه هویت گره خورده است. اگر توکن ID با یک مقدار access_token در جریان سرور صادر شود، این ادعا همیشه شامل می شود. این ادعا می تواند به عنوان یک مکانیسم جایگزین برای محافظت در برابر حملات جعل درخواست های متقابل استفاده شود، اما اگر مراحل 1 و گام 3 را دنبال کنید، لازم نیست رمز دسترسی را تأیید کنید. | |
azp | client_id ارائه دهنده مجاز. این ادعا تنها زمانی مورد نیاز است که طرف درخواست کننده شناسه توکن با مخاطبان شناسه یکسان نباشد. ممکن است این مورد در Google برای برنامههای ترکیبی باشد که در آن یک برنامه وب و برنامه Android دارای یک OAuth 2.0 client_id متفاوت هستند اما پروژه Google APIs یکسانی دارند. | |
email | آدرس ایمیل کاربر. تنها در صورتی ارائه می شود که دامنه email را در درخواست خود لحاظ کرده باشید. ارزش این ادعا ممکن است منحصر به این حساب نباشد و در طول زمان تغییر کند، بنابراین شما نباید از این مقدار به عنوان شناسه اصلی برای پیوند به سابقه کاربری خود استفاده کنید. همچنین نمیتوانید برای شناسایی کاربران Google Workspace یا سازمانهای Cloud به دامنه ادعای email اعتماد کنید. به جای آن از ادعای hd استفاده کنید. | |
email_verified | درست است اگر آدرس ایمیل کاربر تأیید شده باشد. در غیر این صورت نادرست | |
family_name | نام یا نام خانوادگی یا نام خانوادگی کاربر. ممکن است در صورت وجود ادعای name ارائه شود. | |
given_name | نام (های) یا نام (های) کوچک کاربر. ممکن است در صورت وجود ادعای name ارائه شود. | |
hd | دامنه مرتبط با Google Workspace یا سازمان Cloud کاربر. تنها در صورتی ارائه می شود که کاربر متعلق به یک سازمان Google Cloud باشد. هنگام محدود کردن دسترسی به یک منبع فقط به اعضای دامنه های خاص، باید این ادعا را بررسی کنید. عدم وجود این ادعا نشان می دهد که این حساب متعلق به دامنه میزبان گوگل نیست. | |
locale | محل کاربر، که توسط یک برچسب زبان BCP 47 نشان داده شده است. ممکن است در صورت وجود ادعای name ارائه شود. | |
name | نام کامل کاربر، به صورت قابل نمایش. ممکن است زمانی ارائه شود که:
وقتی ادعاهای | |
nonce | مقدار nonce ارائه شده توسط برنامه شما در درخواست احراز هویت. شما باید با اطمینان از اینکه فقط یک بار ارائه می شود، محافظت در برابر حملات تکراری را اعمال کنید. | |
picture | آدرس عکس پروفایل کاربر. ممکن است زمانی ارائه شود که:
وقتی ادعاهای | |
profile | آدرس صفحه نمایه کاربر. ممکن است زمانی ارائه شود که:
هنگامی که ادعاهای |
6. احراز هویت کاربر
پس از به دست آوردن اطلاعات کاربر از رمز شناسه، باید پایگاه داده کاربر برنامه خود را پرس و جو کنید. اگر کاربر از قبل در پایگاه داده شما وجود دارد، اگر پاسخ Google API همه الزامات ورود به سیستم را برآورده کند، باید یک جلسه برنامه را برای آن کاربر شروع کنید.
اگر کاربر در پایگاه داده کاربر شما وجود ندارد، باید کاربر را به جریان ثبت نام کاربر جدید خود هدایت کنید. ممکن است بتوانید کاربر را بر اساس اطلاعاتی که از Google دریافت میکنید بهطور خودکار ثبت کنید، یا حداقل ممکن است بتوانید بسیاری از فیلدهای مورد نیاز خود را در فرم ثبت نام خود از قبل پر کنید. علاوه بر اطلاعات موجود در کد شناسه، میتوانید اطلاعات اضافی نمایه کاربر را در نقاط پایانی نمایه کاربر ما دریافت کنید.
موضوعات پیشرفته
بخشهای زیر Google OAuth 2.0 API را با جزئیات بیشتری توضیح میدهند. این اطلاعات برای توسعه دهندگان با الزامات پیشرفته در مورد احراز هویت و مجوز در نظر گرفته شده است.
دسترسی به سایر API های Google
یکی از مزایای استفاده از OAuth 2.0 برای احراز هویت این است که برنامه شما می تواند همزمان با احراز هویت کاربر، مجوز استفاده از سایر API های Google (مانند YouTube، Google Drive، Calendar یا Contacts) را از طرف کاربر دریافت کند. برای انجام این کار، سایر حوزههای مورد نیاز خود را در درخواست احراز هویتی که به Google ارسال میکنید، وارد کنید. به عنوان مثال، برای افزودن گروه سنی کاربر به درخواست احراز هویت، یک پارامتر scope از openid email https://www.googleapis.com/auth/profile.agerange.read ارسال کنید. در صفحه رضایت به طور مناسب از کاربر خواسته می شود. رمز دسترسی که از Google دریافت میکنید به شما امکان میدهد به تمام APIهای مرتبط با دامنه دسترسیای که درخواست کردهاید و به آنها اعطا شده است دسترسی داشته باشید.
بازخوانی نشانه ها
در درخواست خود برای دسترسی به API میتوانید درخواست کنید که یک نشانه تازهسازی در طول تبادل code بازگردانده شود. یک نشانه رفرش دسترسی مداوم برنامه شما به APIهای Google را در حالی که کاربر در برنامه شما حضور ندارد، فراهم می کند. برای درخواست رمز بهروزرسانی، پارامتر access_type را به offline در درخواست احراز هویت خود اضافه کنید.
ملاحظات:
- مطمئن شوید که توکن تازهسازی را بهطور ایمن و دائمی ذخیره کنید، زیرا تنها در اولین باری که جریان تبادل کد را انجام میدهید، میتوانید توکن تازهسازی را دریافت کنید.
- محدودیتهایی برای تعداد نشانههای تازهسازی صادر شده وجود دارد: یک محدودیت برای ترکیب مشتری/کاربر، و محدودیت دیگر برای هر کاربر در همه کلاینتها. اگر برنامه شما توکنهای بهروزرسانی بیش از حد درخواست کند، ممکن است با این محدودیتها مواجه شود، در این صورت توکنهای تازهسازی قدیمیتر کار نمیکنند.
برای اطلاعات بیشتر، به بازخوانی نشانه دسترسی (دسترسی آفلاین) مراجعه کنید.
درخواست رضایت مجدد
میتوانید با تنظیم پارامتر prompt برای consent در درخواست احراز هویت، از کاربر بخواهید که برنامه شما را مجدداً مجوز دهد. وقتی prompt=consent گنجانده شده باشد، هر بار که برنامه شما مجوز دامنه دسترسی را درخواست میکند، صفحه رضایت نمایش داده میشود، حتی اگر همه دامنهها قبلاً به پروژه Google APIs شما اعطا شده باشد. به همین دلیل، prompt=consent فقط در صورت لزوم درج کنید.
برای اطلاعات بیشتر در مورد پارامتر prompt ، prompt در جدول پارامترهای Authentication URI مراجعه کنید.
پارامترهای URI احراز هویت
جدول زیر توضیحات کامل تری از پارامترهای پذیرفته شده توسط API احراز هویت OAuth 2.0 گوگل ارائه می دهد.
| پارامتر | ضروری | شرح |
|---|---|---|
client_id | (ضروری) | رشته شناسه مشتری که از API ConsoleCredentials pageبه دست می آورید، همانطور که در دریافت اعتبارنامه OAuth 2.0 توضیح داده شده است. |
nonce | (ضروری) | یک مقدار تصادفی ایجاد شده توسط برنامه شما که محافظت از پخش مجدد را فعال می کند. |
response_type | (ضروری) | اگر مقدار code باشد، یک جریان کد مجوز پایه راهاندازی میکند که برای به دست آوردن نشانهها، به یک POST به نقطه پایانی نشانه نیاز دارد. اگر مقدار token id_token یا id_token token باشد، یک جریان ضمنی راهاندازی میکند که نیاز به استفاده از جاوا اسکریپت در URI تغییر مسیر برای بازیابی نشانهها از شناسه #fragment URI دارد. |
redirect_uri | (ضروری) | محل ارسال پاسخ را مشخص می کند. مقدار این پارامتر باید دقیقاً با یکی از مقادیر تغییر مسیر مجاز که در API ConsoleCredentials page تنظیم کردهاید مطابقت داشته باشد (شامل طرح HTTP یا HTTPS، مورد، و دنباله '/'، در صورت وجود). |
scope | (ضروری) | پارامتر scope باید با مقدار اگر مقدار دامنه اگر مقدار دامنه علاوه بر این محدوده های خاص OpenID، آرگومان scope شما می تواند مقادیر دامنه دیگری را نیز شامل شود. همه مقادیر محدوده باید با فاصله از هم جدا شوند. برای مثال، اگر میخواهید به ازای هر فایل به Google Drive کاربر دسترسی داشته باشد، پارامتر دامنه شما ممکن است برای کسب اطلاعات در مورد دامنه های موجود، به OAuth 2.0 Scopes برای Google API یا اسناد مربوط به Google API که می خواهید استفاده کنید، مراجعه کنید. |
state | (اختیاری، اما به شدت توصیه می شود) | یک رشته مات که در پروتکل رفت و برگشت می شود. یعنی به عنوان پارامتر URI در جریان پایه و در شناسه |
access_type | (اختیاری) | مقادیر مجاز offline و online هستند. این اثر در دسترسی آفلاین مستند شده است. اگر یک نشانه دسترسی درخواست شود، مشتری یک توکن تازهسازی دریافت نمیکند مگر اینکه مقدار offline مشخص شده باشد. |
display | (اختیاری) | یک مقدار رشته ASCII برای تعیین اینکه سرور مجوز چگونه صفحات رابط کاربری تایید و رضایت را نمایش می دهد. مقادیر زیر مشخص شده و توسط سرورهای Google پذیرفته شده است، اما هیچ تاثیری بر رفتار آن ندارند: page ، popup ، touch و wap . |
hd | (اختیاری) | فرآیند ورود به حساب های متعلق به یک سازمان Google Cloud را ساده کنید. با اضافه کردن دامنه سازمانی Google Cloud (به عنوان مثال، mycollege.edu )، میتوانید نشان دهید که رابط کاربری انتخاب حساب باید برای حسابهای موجود در آن دامنه بهینه شود. برای بهینهسازی حسابهای سازمانی Google Cloud بهجای تنها یک دامنه سازمانی Google Cloud، مقدار یک ستاره ( برای کنترل افرادی که میتوانند به برنامه شما دسترسی داشته باشند، به این بهینهسازی UI تکیه نکنید، زیرا درخواستهای سمت کلاینت قابل تغییر هستند. مطمئن شوید که اعتبار شناسه بازگردانده شده دارای یک مقدار ادعای |
include_granted_scopes | (اختیاری) | اگر این پارامتر با مقدار true ارائه شود و درخواست مجوز اعطا شود، مجوز شامل هر مجوز قبلی اعطا شده به این ترکیب کاربر/برنامه برای سایر حوزه ها می شود. مجوز افزایشی را ببینید.توجه داشته باشید که نمی توانید مجوز افزایشی را با جریان برنامه نصب شده انجام دهید. |
login_hint | (اختیاری) | هنگامی که برنامه شما می داند که کدام کاربری را می خواهد احراز هویت کند، می تواند این پارامتر را به عنوان یک اشاره به سرور احراز هویت ارائه دهد. ارسال این راهنمایی، انتخابگر حساب را سرکوب میکند و کادر ایمیل را از قبل در فرم ورود به سیستم پر میکند، یا جلسه مناسب را انتخاب میکند (اگر کاربر از ورود چندگانه استفاده میکند)، که میتواند به شما کمک کند از مشکلاتی که در برنامه شما رخ میدهد جلوگیری کنید. وارد حساب کاربری اشتباه می شود. مقدار می تواند یک آدرس ایمیل یا رشته sub باشد که معادل شناسه گوگل کاربر است. |
prompt | (اختیاری) | فهرستی از مقادیر رشته با فاصله محدود که مشخص می کند آیا سرور مجوز از کاربر برای احراز هویت و رضایت مجدد درخواست می کند یا خیر. مقادیر ممکن عبارتند از:
اگر مقداری مشخص نشده باشد و کاربر قبلاً مجوز دسترسی نداشته باشد، صفحه رضایت به کاربر نشان داده می شود. |
اعتبار سنجی یک رمز شناسه
باید تمام نشانههای شناسه روی سرور خود را تأیید کنید، مگر اینکه بدانید که آنها مستقیماً از Google آمدهاند. به عنوان مثال، سرور شما باید هر کد شناسه ای را که از برنامه های سرویس گیرنده شما دریافت می کند، معتبر بودن تأیید کند.
موارد زیر موارد متداولی هستند که در آن شما ممکن است شناسه های شناسه را به سرور خود ارسال کنید:
- ارسال نشانه های شناسه با درخواست هایی که باید احراز هویت شوند. توکنهای شناسه به کاربر خاصی که درخواست میکند و برای کدام کلاینت آن رمز شناسه داده شده است، میگوید.
توکن های ID حساس هستند و در صورت رهگیری می توان از آنها سوء استفاده کرد. باید اطمینان حاصل کنید که این نشانهها تنها با انتقال آنها از طریق HTTPS و فقط از طریق دادههای POST یا درون هدرهای درخواست، به طور ایمن مدیریت میشوند. اگر توکن های ID را روی سرور خود ذخیره می کنید، باید آنها را نیز به صورت ایمن ذخیره کنید.
یکی از مواردی که توکنهای ID را مفید میکند این است که میتوانید آنها را در قسمتهای مختلف برنامهتان ارسال کنید. این اجزا می توانند از یک نشانه شناسه به عنوان مکانیزم احراز هویت سبک وزن برای احراز هویت برنامه و کاربر استفاده کنند. اما قبل از اینکه بتوانید از اطلاعات موجود در شناسه شناسه استفاده کنید یا به عنوان ادعایی که کاربر احراز هویت کرده است به آن تکیه کنید، باید آن را تأیید کنید.
اعتبارسنجی یک نشانه ID به چندین مرحله نیاز دارد:
- بررسی کنید که کد شناسه به درستی توسط صادرکننده امضا شده باشد. توکنهای صادر شده توسط Google با استفاده از یکی از گواهیهای موجود در URI مشخص شده در مقدار فراداده
jwks_uriسند Discovery امضا میشوند. - بررسی کنید که ارزش ادعای
issدر کد شناسه برابر باhttps://accounts.google.comیاaccounts.google.comباشد. - بررسی کنید که ارزش ادعای
audدر کد ID با شناسه مشتری برنامه شما برابر است. - بررسی کنید که زمان انقضا (ادعای
exp) نشانه شناسه نگذشته باشد. - اگر مقدار پارامتر hd را در درخواست مشخص کردهاید، بررسی کنید که کد ID دارای ادعای
hdاست که با دامنه مورد قبول مرتبط با سازمان Google Cloud مطابقت دارد.
مراحل 2 تا 5 فقط شامل مقایسه رشته و تاریخ است که کاملاً ساده است، بنابراین در اینجا جزئیات آنها را توضیح نمی دهیم.
مرحله اول پیچیده تر است و شامل بررسی امضای رمزنگاری می شود. برای اهداف اشکالزدایی ، میتوانید از نقطه پایانی tokeninfo Google برای مقایسه با پردازش محلی اجرا شده در سرور یا دستگاه خود استفاده کنید. فرض کنید مقدار کد شناسه شما XYZ123 است. سپس URI https://oauth2.googleapis.com/tokeninfo?id_token= XYZ123 را حذف کنید. اگر امضای رمز معتبر باشد، پاسخ، بار JWT در شکل شی JSON رمزگشایی شده آن خواهد بود.
نقطه پایانی tokeninfo برای اشکالزدایی مفید است، اما برای اهداف تولید، کلیدهای عمومی Google را از نقطه پایانی کلیدها بازیابی کنید و اعتبارسنجی را به صورت محلی انجام دهید. شما باید URI کلیدها را از سند Discovery با استفاده از مقدار فراداده jwks_uri بازیابی کنید. درخواستها به نقطه پایانی اشکالزدایی ممکن است نادیده گرفته شوند یا در غیر این صورت دچار خطاهای متناوب شوند.
از آنجایی که Google کلیدهای عمومی خود را به ندرت تغییر می دهد، می توانید آنها را با استفاده از دستورالعمل های حافظه پنهان پاسخ HTTP ذخیره کنید و در اکثر موارد، اعتبار سنجی محلی را بسیار کارآمدتر از استفاده از نقطه پایانی tokeninfo انجام دهید. این اعتبار به بازیابی و تجزیه گواهی ها و برقراری تماس های رمزنگاری مناسب برای بررسی امضا نیاز دارد. خوشبختانه، کتابخانههای با اشکال زدایی خوبی در زبانهای مختلف برای انجام این کار وجود دارد (به jwt.io مراجعه کنید).
دریافت اطلاعات پروفایل کاربری
برای به دست آوردن اطلاعات نمایه اضافی در مورد کاربر، می توانید از نشانه دسترسی (که برنامه شما در جریان احراز هویت دریافت می کند) و استاندارد OpenID Connect استفاده کنید:
برای سازگاری با OpenID، باید مقادیر محدوده
openid profileرا در درخواست احراز هویت خود وارد کنید.اگر میخواهید آدرس ایمیل کاربر درج شود، میتوانید مقدار دامنه اضافی
emailمشخص کنید. برای تعیینprofileوemail، می توانید پارامتر زیر را در URI درخواست احراز هویت خود وارد کنید:scope=openid%20profile%20email
- رمز دسترسی خود را به هدر مجوز اضافه کنید و یک درخواست HTTPS
GETبه نقطه پایانی اطلاعات کاربر ارسال کنید، که باید آن را از سند Discovery با استفاده از مقدار فوق دادهuserinfo_endpointبازیابی کنید. پاسخ اطلاعات کاربر شامل اطلاعاتی در مورد کاربر است، همانطور که درOpenID Connect Standard Claimsو مقدار ابردادهclaims_supportedسند Discovery توضیح داده شده است. کاربران یا سازمانهای آنها ممکن است انتخاب کنند که فیلدهای خاصی را عرضه کنند یا از آن خودداری کنند، بنابراین ممکن است اطلاعاتی برای هر زمینه برای محدوده دسترسی مجاز خود دریافت نکنید.
سند کشف
پروتکل OpenID Connect نیاز به استفاده از چندین نقطه پایانی برای احراز هویت کاربران و درخواست منابع از جمله نشانهها، اطلاعات کاربر و کلیدهای عمومی دارد.
برای سادهسازی پیادهسازیها و افزایش انعطافپذیری، OpenID Connect اجازه استفاده از «سند کشف» را میدهد، یک سند JSON که در یک مکان شناختهشده یافت میشود که حاوی جفتهای کلید-مقدار است که جزئیاتی را درباره پیکربندی ارائهدهنده OpenID Connect، از جمله URIهای مجوز ارائه میکند. ، نشانه، ابطال، اطلاعات کاربری و نقاط پایانی کلیدهای عمومی. سند Discovery برای سرویس OpenID Connect Google ممکن است از این موارد بازیابی شود:
https://accounts.google.com/.well-known/openid-configuration
برای استفاده از سرویسهای OpenID Connect Google، باید URI Discovery-document ( https://accounts.google.com/.well-known/openid-configuration ) را در برنامه خود کدگذاری کنید. برنامه شما سند را واکشی می کند، قوانین کش را در پاسخ اعمال می کند، سپس URI های نقطه پایانی را در صورت نیاز از آن بازیابی می کند. برای مثال، برای احراز هویت یک کاربر، کد شما مقدار فراداده authorization_endpoint ( https://accounts.google.com/o/oauth2/v2/auth در مثال زیر) را به عنوان URI پایه برای درخواستهای احراز هویت که به گوگل.
در اینجا نمونه ای از چنین سندی وجود دارد. نام فیلدها همانهایی هستند که در OpenID Connect Discovery 1.0 مشخص شده اند (برای معانی آنها به آن سند مراجعه کنید). مقادیر صرفاً گویا هستند و ممکن است تغییر کنند، اگرچه از نسخه اخیر سند واقعی Google Discovery کپی شده اند:
{
  "issuer": "https://accounts.google.com",
  "authorization_endpoint": "https://accounts.google.com/o/oauth2/v2/auth",
  "device_authorization_endpoint": "https://oauth2.googleapis.com/device/code",
  "token_endpoint": "https://oauth2.googleapis.com/token",
  "userinfo_endpoint": "https://openidconnect.googleapis.com/v1/userinfo",
  "revocation_endpoint": "https://oauth2.googleapis.com/revoke",
  "jwks_uri": "https://www.googleapis.com/oauth2/v3/certs",
  "response_types_supported": [
    "code",
    "token",
    "id_token",
    "code token",
    "code id_token",
    "token id_token",
    "code token id_token",
    "none"
  ],
  "subject_types_supported": [
    "public"
  ],
  "id_token_signing_alg_values_supported": [
    "RS256"
  ],
  "scopes_supported": [
    "openid",
    "email",
    "profile"
  ],
  "token_endpoint_auth_methods_supported": [
    "client_secret_post",
    "client_secret_basic"
  ],
  "claims_supported": [
    "aud",
    "email",
    "email_verified",
    "exp",
    "family_name",
    "given_name",
    "iat",
    "iss",
    "locale",
    "name",
    "picture",
    "sub"
  ],
  "code_challenge_methods_supported": [
    "plain",
    "S256"
  ]
}
ممکن است بتوانید با ذخیره مقادیر از سند Discovery از HTTP رفت و برگشت اجتناب کنید. هدرهای ذخیره استاندارد HTTP استفاده می شوند و باید رعایت شوند.
کتابخانه های مشتری
کتابخانه های سرویس گیرنده زیر با ادغام با فریمورک های محبوب، اجرای OAuth 2.0 را ساده تر می کنند:
انطباق OpenID Connect
سیستم احراز هویت OAUTH 2.0 Google از ویژگی های مورد نیاز مشخصات هسته OpenID Connect پشتیبانی می کند. هر مشتری که برای کار با OpenID Connect طراحی شده باشد باید با این سرویس ارتباط برقرار کند (به استثنای شیء درخواست OpenID ).