[](https://openid.net/certification/)
Google's OAuth 2.0 APIs can be used for both authentication and authorization.
This document describes our OAuth 2.0 implementation for authentication, which
conforms to the [OpenID Connect](https://openid.net/connect/) specification, and
is [OpenID Certified](https://openid.net/certification/). The documentation
found in [Using OAuth 2.0 to Access Google APIs](https://developers.google.com/identity/protocols/oauth2)
also applies to this service. If you want to explore this protocol
interactively, we recommend the
[Google OAuth 2.0 Playground](https://developers.google.com/oauthplayground/).
To get help on
[Stack Overflow](https://stackoverflow.com/questions/tagged/google-oauth "Stack Overflow: google-oauth tag"),
tag your questions with 'google-oauth'.
> [!NOTE]
> **Note:** [](https://developers.google.com/identity/gsi/web) To provide a "Sign-in with Google" button for your website, use [Google Identity Services](https://developers.google.com/identity/gsi/web), our sign-in client library built on the OpenID Connect protocol. This library provides OpenID Connect formatted ID Tokens. Android apps should use the [Credential Manager API](https://developer.android.com/training/sign-in/credential-manager) to implement the Sign in with Google flow.
## Setting up OAuth 2.0
Before your application can use Google's OAuth 2.0 authentication system for
user login, you must set up a project in the
[Google Cloud Console](https://console.developers.google.com/auth/overview) to obtain OAuth
2.0 credentials, set a redirect URI, and (optionally) customize the branding
information that your users see on the user-consent screen. You can also use the
Cloud Console to create a service account, enable billing, set
up filtering, and do other tasks. For more details, see the
[Google Cloud Console Help](https://developers.google.com/console/help).
### Obtain OAuth 2.0 credentials
You need OAuth 2.0 credentials, including a client ID and client secret, to
authenticate users and gain access to Google's APIs.
To view the client ID and client secret for a given OAuth 2.0 credential, click the following
text: Select credential. In the window that opens, choose your project and the credential you want, then
click **View**.
Or, view your client ID and client secret from the **[Clients page](https://console.developers.google.com/auth/clients)** in
Cloud Console:
1. Go to the [Clients page](https://console.developers.google.com/auth/clients).
2. Click the name of your client or the edit () icon. Your client ID and secret are at the top of the page.
### Set a redirect URI
The redirect URI that you set in the Cloud Console determines
where Google sends responses to your
[authentication requests](https://developers.google.com/identity/openid-connect/openid-connect#sendauthrequest).
To create, view, or edit the redirect URIs for a given OAuth 2.0 credential, do the
following:
1. Go to the [Clients page](https://console.developers.google.com/auth/clients).
2. Click on the client.
3. View or edit the redirect URIs.
If there is no listed client in the Clients page, then your project has
no OAuth credentials. To create one, click **Create client**.
### Customize the user consent screen
For your users, the OAuth 2.0 authentication experience includes a consent
screen that describes the information that the user is releasing and the terms
that apply. For example, when the user logs in, they might be asked to give your
app access to their email address and basic account information. You request
access to this information using the [`scope`](https://developers.google.com/identity/openid-connect/openid-connect#scope-param) parameter, which
your app includes in its [authentication request](https://developers.google.com/identity/openid-connect/openid-connect#sendauthrequest). You can
also use scopes to request access to other Google APIs.
The user consent screen also presents branding information such as your product
name, logo, and a homepage URL. You control the branding information in the Cloud Console.
To enable your project's consent screen:
1. Open the [Branding page](https://console.developers.google.com/auth/branding) in the Google Cloud Console.
2. If prompted, select a project, or create a new one.
3. Fill out the form and click **Save**.
The following consent dialog shows what a user would see when a combination of
OAuth 2.0 and Google Drive scopes are present in the request. (This generic
dialog was generated using the
[Google OAuth 2.0 Playground](https://developers.google.com/oauthplayground/),
so it does not include branding information that would be set in the Cloud Console.)
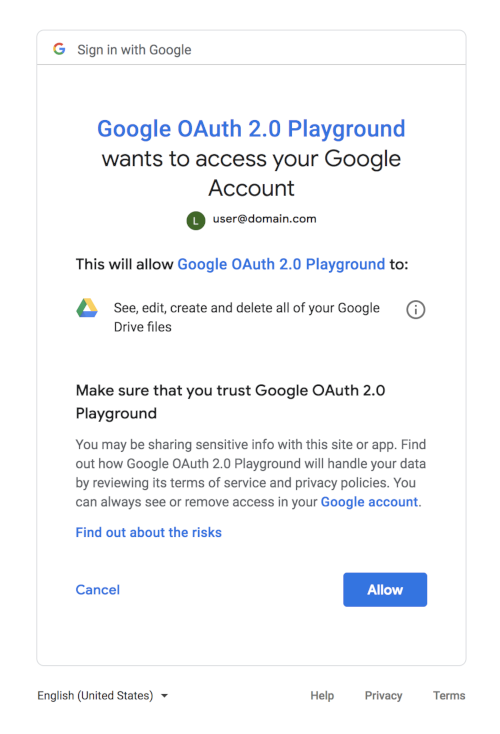 **Figure 1.** Consent page screenshot
## Accessing the service
Google and third parties provide libraries that you can use to take care of many
of the implementation details of authenticating users and gaining access to
Google APIs. Examples include [Google Identity Services](https://developers.google.com/identity/gsi/web) and
the [Google client libraries](https://developers.google.com/identity/openid-connect/openid-connect#libraries), which are available for a variety of
platforms.
> [!NOTE]
> **Note:** Given the security implications of getting the implementation correct, we strongly encourage you to take advantage of a pre-written library or service. Authenticating users properly is important to their and your safety and security, and using well-debugged code written by others is generally a best practice. For more information, see [Client libraries](https://developers.google.com/identity/openid-connect/openid-connect#libraries).
If you choose not to use a library, follow the instructions in the remainder of
this document, which describes the HTTP request flows that underlie the
available libraries.
## Authenticating the user
Authenticating the user involves obtaining an ID token and validating it.
[ID tokens](https://openid.net/specs/openid-connect-core-1_0.html#IDToken) are a
standardized feature of [OpenID Connect](https://openid.net/connect/) designed
for use in sharing identity assertions on the Internet.
The most commonly used approaches for authenticating a user and obtaining an ID
token are called the "server" flow and the "implicit" flow. The server flow
allows the backend server of an application to verify the identity of the person
using a browser or mobile device. The implicit flow is used when a client-side
application (typically a JavaScript app running in the browser) needs to access
APIs directly instead of using its backend server.
This document describes how to perform the server flow for authenticating the
user. The implicit flow is significantly more complicated because of security
risks in handling and using tokens on the client side. If you need to implement
an implicit flow, we highly recommend using
[Google Identity Services](https://developers.google.com/identity/gsi/web).
### Server flow
Make sure you [set up your app in the Cloud Console](https://developers.google.com/identity/openid-connect/openid-connect#appsetup)
to enable it to use these protocols and authenticate your users. When a user
tries to sign in with Google, you need to:
1. [Create an anti-forgery state token](https://developers.google.com/identity/openid-connect/openid-connect#createxsrftoken)
2. [Send an authentication request to Google](https://developers.google.com/identity/openid-connect/openid-connect#sendauthrequest)
3. [Confirm the anti-forgery state token](https://developers.google.com/identity/openid-connect/openid-connect#confirmxsrftoken)
4. [Exchange `code` for access token and ID token](https://developers.google.com/identity/openid-connect/openid-connect#exchangecode)
5. [Obtain user information from the ID token](https://developers.google.com/identity/openid-connect/openid-connect#obtainuserinfo)
6. [Authenticate the user](https://developers.google.com/identity/openid-connect/openid-connect#authuser)
#### 1. Create an anti-forgery state token
You must protect the security of your users by preventing request forgery
attacks. The first step is creating a unique session token that holds state
between your app and the user's client. You later match this unique session
token with the authentication response returned by the Google OAuth Login
service to verify that the user is making the request and not a malicious
attacker. These tokens are often referred to as cross-site request forgery
([CSRF](https://en.wikipedia.org/wiki/Cross-site_request_forgery)) tokens.
One good choice for a state token is a string of 30 or so characters constructed
using a high-quality random-number generator. Another is a hash generated by
signing some of your session state variables with a key that is kept secret on
your backend.
The following code demonstrates generating unique session tokens.
### PHP
You must download the
[Google APIs client library for PHP](https://github.com/googleapis/google-api-php-client)
to use this sample.
// Create a state token to prevent request forgery.
// Store it in the session for later validation.
$state = bin2hex(random_bytes(128/8));
$app['session']->set('state', $state);
// Set the client ID, token state, and application name in the HTML while
// serving it.
return $app['twig']->render('index.html', array(
'CLIENT_ID' => CLIENT_ID,
'STATE' => $state,
'APPLICATION_NAME' => APPLICATION_NAME
));
### Java
You must download the
[Google APIs client library for Java](https://github.com/googleapis/google-api-java-client)
to use this sample.
// Create a state token to prevent request forgery.
// Store it in the session for later validation.
String state = new BigInteger(130, new SecureRandom()).toString(32);
request.session().attribute("state", state);
// Read index.html into memory, and set the client ID,
// token state, and application name in the HTML before serving it.
return new Scanner(new File("index.html"), "UTF-8")
.useDelimiter("\\A").next()
.replaceAll("[{]{2}\\s*CLIENT_ID\\s*[}]{2}", CLIENT_ID)
.replaceAll("[{]{2}\\s*STATE\\s*[}]{2}", state)
.replaceAll("[{]{2}\\s*APPLICATION_NAME\\s*[}]{2}",
APPLICATION_NAME);
### Python
You must download the
[Google APIs client library for Python](https://github.com/googleapis/google-api-python-client)
to use this sample.
# Create a state token to prevent request forgery.
# Store it in the session for later validation.
state = hashlib.sha256(os.urandom(1024)).hexdigest()
session['state'] = state
# Set the client ID, token state, and application name in the HTML while
# serving it.
response = make_response(
render_template('index.html',
CLIENT_ID=CLIENT_ID,
STATE=state,
APPLICATION_NAME=APPLICATION_NAME))
#### 2. Send an authentication request to Google
The next step is forming an HTTPS `GET` request with the appropriate URI
parameters. Note the use of HTTPS rather than HTTP in all the steps of this
process; HTTP connections are refused. You should retrieve the base URI from the
[Discovery document](https://developers.google.com/identity/openid-connect/openid-connect#discovery) using the `authorization_endpoint` metadata
value. The following discussion assumes the base URI is
`https://accounts.google.com/o/oauth2/v2/auth`.
For a basic request, specify the following parameters:
- `client_id`, which you obtain from the Cloud Console [Clients page](https://console.developers.google.com/auth/clients).
- `response_type`, which in a basic authorization code flow request should be `code`. (Read more at [`response_type`](https://developers.google.com/identity/openid-connect/openid-connect#response-type).)
- `scope`, which in a basic request should be `openid email`. (Read more at [`scope`](https://developers.google.com/identity/openid-connect/openid-connect#scope-param).)
- `redirect_uri` should be the HTTP endpoint on your server that will receive the response from Google. The value must exactly match one of the authorized redirect URIs for the OAuth 2.0 client, which you configured in the Cloud Console Credentials page. If this value doesn't match an authorized URI, the request will fail with a `redirect_uri_mismatch` error.
- `state` should include the value of the anti-forgery unique session token, as well as any other information needed to recover the context when the user returns to your application, e.g., the starting URL. (Read more at [`state`](https://developers.google.com/identity/openid-connect/openid-connect#state-param).)
- `nonce` is a random value generated by your app that enables replay protection when present.
- `login_hint` can be the user's email address or the `sub` string, which is equivalent to the user's Google ID. If you don't provide a `login_hint` and the user is logged in, the consent screen includes a request for approval to release the user's email address to your app. (Read more at [`login_hint`](https://developers.google.com/identity/openid-connect/openid-connect#login-hint).)
- Use the `hd` parameter to optimize the OpenID Connect flow for users of a particular domain associated with a Google Workspace or Cloud organization (read more at [`hd`](https://developers.google.com/identity/openid-connect/openid-connect#hd-param)).
> [!NOTE]
> **Note:** These are some of the most commonly used parameters. For a complete list, plus more details about all the parameters, see [Authentication URI parameters](https://developers.google.com/identity/openid-connect/openid-connect#authenticationuriparameters).
Here is an example of a complete OpenID Connect authentication URI, with line
breaks and spaces for readability:
```
https://accounts.google.com/o/oauth2/v2/auth?
response_type=code&
client_id=424911365001.apps.googleusercontent.com&
scope=openid%20email&
redirect_uri=https%3A//developers.google.com/oauthplayground&
state=security_token%3D138r5719ru3e1%26url%3Dhttps%3A%2F%2Foauth2-login-demo.example.com%2FmyHome&
login_hint=jsmith@example.com&
nonce=0394852-3190485-2490358&
hd=example.com
```
Users are required to give consent if your app requests any new information
about them, or if your app requests account access that they have not previously
approved.
#### 3. Confirm anti-forgery state token
The response is sent to the `redirect_uri` that you specified in the
[request](https://developers.google.com/identity/openid-connect/openid-connect#sendauthrequest). All responses are returned in the query string:
```
https://developers.google.com/oauthplayground?state=security_token%3D138r5719ru3e1%26url%3Dhttps%3A%2F%2Foa2cb.example.com%2FmyHome&code=4/P7q7W91a-oMsCeLvIaQm6bTrgtp7&scope=openid%20email%20https://www.googleapis.com/auth/userinfo.email
```
Per RFC 6749, clients MUST ignore unrecognized response parameters. On the
server, you must confirm that the `state` received from Google matches the
session token you created in [Step 1](https://developers.google.com/identity/openid-connect/openid-connect#createxsrftoken). This round-trip
verification helps to verify that the user, not a malicious script, is making
the request.
The following code demonstrates confirming the session tokens that you created
in Step 1:
### PHP
You must download the
[Google APIs client library for PHP](https://github.com/googleapis/google-api-php-client)
to use this sample.
// Ensure that there is no request forgery going on, and that the user
// sending us this connect request is the user that was supposed to.
if ($request->get('state') != ($app['session']->get('state'))) {
return new Response('Invalid state parameter', 401);
}
### Java
You must download the
[Google APIs client library for Java](https://github.com/googleapis/google-api-java-client)
to use this sample.
// Ensure that there is no request forgery going on, and that the user
// sending us this connect request is the user that was supposed to.
if (!request.queryParams("state").equals(
request.session().attribute("state"))) {
response.status(401);
return GSON.toJson("Invalid state parameter.");
}
### Python
You must download the
[Google APIs client library for Python](https://github.com/googleapis/google-api-python-client)
to use this sample.
# Ensure that the request is not a forgery and that the user sending
# this connect request is the expected user.
if request.args.get('state', '') != session['state']:
response = make_response(json.dumps('Invalid state parameter.'), 401)
response.headers['Content-Type'] = 'application/json'
return response
#### 4. Exchange `code` for access token and ID token
The response includes a `code` parameter, a one-time authorization code that
your server can exchange for an access token and ID token. Your server makes
this exchange by sending an HTTPS `POST` request. The `POST` request is sent to
the token endpoint, which you should retrieve from the
[Discovery document](https://developers.google.com/identity/openid-connect/openid-connect#discovery) using the `token_endpoint` metadata value. The
following discussion assumes the endpoint is `https://oauth2.googleapis.com/token`. The
request must include the following parameters in the `POST` body:
| Fields ||
|---|---|
| `code` | The authorization code that is returned from [the initial request](https://developers.google.com/identity/openid-connect/openid-connect#sendauthrequest). |
| `client_id` | The client ID that you obtain from the Cloud Console [Clients page](https://console.developers.google.com/auth/clients), as described in [Obtain OAuth 2.0 credentials](https://developers.google.com/identity/openid-connect/openid-connect#getcredentials). |
| `client_secret` | The client secret that you obtain from the Cloud Console [Clients page](https://console.developers.google.com/auth/clients), as described in [Obtain OAuth 2.0 credentials](https://developers.google.com/identity/openid-connect/openid-connect#getcredentials). |
| `redirect_uri` | An authorized redirect URI for the given `client_id` specified in the Cloud Console [Clients page](https://console.developers.google.com/auth/clients), as described in [Set a redirect URI](https://developers.google.com/identity/openid-connect/openid-connect#setredirecturi). |
| `grant_type` | This field must contain a value of `authorization_code`, [as defined in the OAuth 2.0 specification](https://tools.ietf.org/html/rfc6749#section-4.1.3). |
The actual request might look like the following example:
```
POST /token HTTP/1.1
Host: oauth2.googleapis.com
Content-Type: application/x-www-form-urlencoded
code=4/P7q7W91a-oMsCeLvIaQm6bTrgtp7&
client_id=your-client-id&
client_secret=your-client-secret&
redirect_uri=https%3A//developers.google.com/oauthplayground&
grant_type=authorization_code
```
A successful response to this request contains the following fields in a JSON
array:
| Fields ||
|---|---|
| `access_token` | A token that can be sent to a Google API. |
| `expires_in` | The remaining lifetime of the access token in seconds. |
| `id_token` | A [JWT](https://tools.ietf.org/html/rfc7519) that contains identity information about the user that is digitally signed by Google. |
| `scope` | The scopes of access granted by the `access_token` expressed as a list of space-delimited, case-sensitive strings. |
| `token_type` | Identifies the type of token returned. At this time, this field always has the value [`Bearer`](https://tools.ietf.org/html/rfc6750). |
| `refresh_token` | (optional) This field is only present if the [`access_type`](https://developers.google.com/identity/openid-connect/openid-connect#access-type-param) parameter was set to `offline` in the [authentication request](https://developers.google.com/identity/openid-connect/openid-connect#sendauthrequest). For details, see [Refresh tokens](https://developers.google.com/identity/openid-connect/openid-connect#refresh-tokens). |
> [!NOTE]
> **Note:** There is a limit to the number of tokens per Google user account, and any authentication request exceeding this limit might quietly invalidate an outstanding refresh token. For details, see [Token expiration](https://developers.google.com/identity/protocols/oauth2#expiration).
#### 5. Obtain user information from the ID token
An ID Token is a [JWT](https://tools.ietf.org/html/rfc7519) (JSON Web Token),
that is, a cryptographically signed Base64-encoded JSON object. Normally, it is
critical that you [validate an ID token](https://developers.google.com/identity/openid-connect/openid-connect#validatinganidtoken) before you use
it, but since you are communicating directly with Google over an
intermediary-free HTTPS channel and using your client secret to authenticate
yourself to Google, you can be confident that the token you receive really comes
from Google and is valid. If your server passes the ID token to other components
of your app, it is extremely important that the other components
[validate the token](https://developers.google.com/identity/openid-connect/openid-connect#validatinganidtoken) before using it.
Since most API libraries combine the validation with the work of decoding the
base64url-encoded values and parsing the JSON within, you will probably end up
validating the token anyway as you access the claims in the ID token.
##### An ID token's payload
An ID token is a JSON object containing a set of name/value pairs. Here's an
example, formatted for readability:
{
"iss": "https://accounts.google.com",
"azp": "1234987819200.apps.googleusercontent.com",
"aud": "1234987819200.apps.googleusercontent.com",
"sub": "10769150350006150715113082367",
"at_hash": "HK6E_P6Dh8Y93mRNtsDB1Q",
"hd": "example.com",
"email": "jsmith@example.com",
"email_verified": "true",
"iat": 1353601026,
"exp": 1353604926,
"nonce": "0394852-3190485-2490358"
}
> [!WARNING]
> **Warning:** When implementing your account management system, you **shouldn't** use the `email` field in the ID token as a unique identifier for a user. Always use the `sub` field as it is unique to a Google Account even if the user changes their email address.
Google ID Tokens may contain the following fields (known as *claims*):
| Claim | Provided | Description |
|---|---|---|
| `aud` | always | The audience that this ID token is intended for. It must be one of the OAuth 2.0 client IDs of your application. |
| `exp` | always | Expiration time on or after which the ID token must not be accepted. Represented in Unix epoch time (integer seconds). |
| `iat` | always | The time the ID token was issued. Represented in Unix epoch time (integer seconds). |
| `iss` | always | The Issuer Identifier for the Issuer of the response. Always `https://accounts.google.com` or `accounts.google.com` for Google ID tokens. |
| `sub` | always | An identifier for the user, unique among all Google Accounts and never reused. A Google Account can have multiple email addresses at different points in time, but the `sub` value is never changed. Use `sub` within your application as the unique-identifier key for the user. Maximum length of 255 case-sensitive ASCII characters. |
| `amr` | | A JSON array of strings that identify the authentication methods used to sign in to a Google Account. If present, includes one or more of these possible [\[IANA.AMR\]](https://www.iana.org/assignments/authentication-method-reference-values/authentication-method-reference-values.xhtml) values: - `hwk` a hardware key was used - `mfa` Multi-factor authentication was completed - `pwd` a Password was used - `sms` an SMS message was used for verification - `swk` a Software key such as a Passkey was used - `tel` a phone call was used for verification Present only when the [`amr`](https://developers.google.com/identity/openid-connect/openid-connect#amr-param) claim is included in the authentication request and enabled in [settings](https://developers.google.com/identity/siwg/security-bundle#setup). |
| `auth_time` | | The time user authentication took place, a JSON number representing the number of seconds that have elapsed since the Unix epoch (January 1, 1970, 00:00:00 UTC). Provided when the [`auth_time`](https://developers.google.com/identity/openid-connect/openid-connect#auth-time-param) claim is included in the authentication request and enabled in [settings](https://developers.google.com/identity/siwg/security-bundle#setup). |
| `at_hash` | | Access token hash. Provides validation that the access token is tied to the identity token. If the ID token is issued with an `access_token` value in the server flow, this claim is always included. This claim can be used as an alternate mechanism to protect against cross-site request forgery attacks, but if you follow [Step 1](https://developers.google.com/identity/openid-connect/openid-connect#createxsrftoken) and [Step 3](https://developers.google.com/identity/openid-connect/openid-connect#confirmxsrftoken) it is not necessary to verify the access token. |
| `azp` | | The `client_id` of the authorized presenter. This claim is only needed when the party requesting the ID token is not the same as the audience of the ID token. This may be the case at Google for hybrid apps where a web application and Android app have a different OAuth 2.0 `client_id` but share the same Google APIs project. |
| `email` | | The user's email address. Provided only if you included the `email` scope in your request. The value of this claim may not be unique to this account and could change over time, therefore you shouldn't use this value as the primary identifier to link to your user record. You also can't rely on the domain of the `email` claim to identify users of Google Workspace or Cloud organizations; use the `hd` claim instead. > [!WARNING] > **Warning:** Don't use the `email` field as a unique identifier for a user. Always use the `sub` field. |
| `email_verified` | | True if the user's email address has been verified; otherwise false. |
| `family_name` | | The user's surname(s) or last name(s). Might be provided when a [`name`](https://developers.google.com/identity/openid-connect/openid-connect#id_token-name) claim is present. |
| `given_name` | | The user's given name(s) or first name(s). Might be provided when a [`name`](https://developers.google.com/identity/openid-connect/openid-connect#id_token-name) claim is present. |
| `hd` | | The domain associated with the Google Workspace or Cloud organization of the user. Provided only if the user belongs to a Google Cloud organization. You must check this claim when restricting access to a resource to only members of certain domains. The absence of this claim indicates that the account does not belong to a Google hosted domain. |
| `locale` | | The user's locale, represented by a [BCP 47](https://tools.ietf.org/html/bcp47) language tag. Might be provided when a [`name`](https://developers.google.com/identity/openid-connect/openid-connect#id_token-name) claim is present. |
| `name` | | The user's full name, in a displayable form. Might be provided when: - The request scope included the string "profile" - The ID token is returned from a token refresh When `name` claims are present, you can use them to update your app's user records. Note that this claim is never guaranteed to be present. |
| `nonce` | | The value of the `nonce` supplied by your app in the authentication request. You should protect against replay attacks by presenting this value only once. |
| `picture` | | The URL of the user's profile picture. Might be provided when: - The request scope included the string "profile" - The ID token is returned from a token refresh When `picture` claims are present, you can use them to update your app's user records. Note that this claim is never guaranteed to be present. |
| `profile` | | The URL of the user's profile page. Might be provided when: - The request scope included the string "profile" - The ID token is returned from a token refresh When `profile` claims are present, you can use them to update your app's user records. Note that this claim is never guaranteed to be present. |
#### 6. Authenticate the user
After obtaining user information from the ID token, you should query your app's
user database. If the user already exists in your database, you should start an
application session for that user if all login requirements are met by the
Google API response.
If the user does not exist in your user database, you should redirect the user
to your new-user sign-up flow. You may be able to auto-register the user based
on the information you receive from Google, or at the very least you may be able
to pre-populate many of the fields that you require on your registration form.
In addition to the information in the ID token, you can get additional
[user profile information](https://developers.google.com/identity/openid-connect/openid-connect#obtaininguserprofileinformation) at our user profile
endpoints.
## Advanced topics
The following sections describe the Google OAuth 2.0 API in greater detail. This
information is intended for developers with advanced requirements around
authentication and authorization.
### Access to other Google APIs
One of the advantages of using OAuth 2.0 for authentication is that your
application can get permission to use other Google APIs on behalf of the user
(such as YouTube, Google Drive, Calendar, or Contacts) at the same time as you
authenticate the user. To do this, include the other scopes that you need in the
[authentication request](https://developers.google.com/identity/openid-connect/openid-connect#sendauthrequest) that you send to Google. For example,
to add user's age group to your authentication request, pass a scope parameter
of `openid email https://www.googleapis.com/auth/profile.agerange.read`. The
user is prompted appropriately on the [consent screen](https://developers.google.com/identity/openid-connect/openid-connect#consentpageexperience).
The access token that you receive back from Google will let your application
access all the APIs related to the scopes of access you requested and were
granted.
> [!NOTE]
> **Note:** If your application is asking for many scopes, the consent screen contains many lines of text. The more scopes your application requests, the less likely it is that the user will consent, so your application should ask only for the scopes it needs.
### Refresh tokens
In your request for API access you can request a refresh token to be returned
during the [`code` exchange](https://developers.google.com/identity/openid-connect/openid-connect#exchangecode). A refresh token provides your app
continuous access to Google APIs while the user is not present in your
application. To request a refresh token, add set the
[`access_type`](https://developers.google.com/identity/openid-connect/openid-connect#access-type-param) parameter to `offline` in your
[authentication request](https://developers.google.com/identity/openid-connect/openid-connect#sendauthrequest).
Considerations:
- Be sure to store the refresh token safely and permanently, because you can only obtain a refresh token the first time that you perform the code exchange flow.
- There are limits on the number of refresh tokens that are issued: one limit per client/user combination, and another per user across all clients. If your application requests too many refresh tokens, it may run into these limits, in which case older refresh tokens stop working.
For more information, see
[Refreshing an access token (offline access)](https://developers.google.com/identity/protocols/oauth2/web-server#offline).
### Prompting re-consent
You can prompt the user to re-authorize your app by setting the
[`prompt`](https://developers.google.com/identity/openid-connect/openid-connect#prompt) parameter to `consent` in your
[authentication request](https://developers.google.com/identity/openid-connect/openid-connect#sendauthrequest). When `prompt=consent` is included,
the consent screen is displayed every time your app requests authorization of
scopes of access, even if all scopes were previously granted to your Google APIs
project. For this reason, include `prompt=consent` only when necessary.
For more about the `prompt` parameter, see [`prompt`](https://developers.google.com/identity/openid-connect/openid-connect#prompt) in the
[Authentication URI parameters](https://developers.google.com/identity/openid-connect/openid-connect#authenticationuriparameters) table.
### Authentication URI parameters
The following table gives more complete descriptions of the parameters accepted
by Google's OAuth 2.0 authentication API.
Parameter Required Description `client_id` (Required) The client ID string that you obtain from the Cloud Console [Clients page](https://console.developers.google.com/auth/clients), as described in [Obtain OAuth 2.0 credentials](https://developers.google.com/identity/openid-connect/openid-connect#getcredentials). `nonce` (Required) A random value generated by your app that enables replay protection. `response_type` (Required) If the value is `code`, launches a [Basic authorization code flow](https://openid.net/specs/openid-connect-basic-1_0.html), requiring a `POST` to the token endpoint to obtain the tokens. If the value is `token id_token` or `id_token token`, launches an [Implicit flow](https://openid.net/specs/openid-connect-implicit-1_0.html), requiring the use of JavaScript at the redirect URI to retrieve tokens from the [URI `#fragment` identifier](https://datatracker.ietf.org/doc/html/rfc3986#section-3). `redirect_uri` (Required) Determines where the response is sent. The value of this parameter must exactly match one of the authorized redirect values that you set in the Cloud Console [Clients page](https://console.developers.google.com/auth/clients) (including the HTTP or HTTPS scheme, case, and trailing '/', if any). `scope` (Required) The scope parameter must begin with the `openid` value and then include
the `profile` value, the `email` value, or both.
If the `profile` scope value is present, the ID token might (but is not
guaranteed to) include the user's default `profile` claims.
If the `email` scope value is present, the ID token includes
`email` and `email_verified` claims.
In addition to these OpenID-specific scopes, your scope argument can also include other
scope values. All scope values must be space-separated. For example, if you wanted
per-file access to a user's Google Drive, your scope parameter might be
`openid profile email https://www.googleapis.com/auth/drive.file`.
For information about available scopes, see
[OAuth 2.0 Scopes for Google APIs](https://developers.google.com/identity/protocols/oauth2/scopes) or the
documentation for the Google API you would like to use.
`state` (Optional, but strongly recommended) An opaque string that is round-tripped in the protocol; that is to say, it is
returned as a URI parameter in the Basic flow, and in the URI `#fragment`
identifier in the Implicit flow.
The `state` can be useful for correlating requests and responses.
Because your `redirect_uri` can be guessed, using a `state` value
can increase your assurance that an incoming connection is the result of an
authentication request initiated by your app. If you
[generate a random string](https://developers.google.com/identity/openid-connect/openid-connect#createxsrftoken) or encode the hash of some
client state (e.g., a cookie) in this `state` variable, you can validate
the response to verify that the request and response originated in the same browser. This
provides protection against attacks such as cross-site request forgery.
`access_type` (Optional) The allowed values are `offline` and `online`. The effect is documented in [Offline Access](https://developers.google.com/identity/protocols/oauth2/web-server#offline); if an access token is being requested, the client does not receive a refresh token unless a value of `offline` is specified. `claims` (Optional) The [claims parameter](https://openid.net/specs/openid-connect-core-1_0.html#ClaimsParameter) is used to specify one or more optional fields to include in the userinfo endpoint or authentication request ID token response types. The value is a JSON object containing the response type and requested claims. The following claim requests are accepted by Google servers: Claim requests `amr` Request the method used when the user was last authenticated. To return `amr` as a field in the ID token response, include the `claims` request parameter: `claims={"id_token":{"amr":{"essential":true}}}` Must be enabled in [settings](https://developers.google.com/identity/siwg/security-bundle#setup). `auth_time` Request the time when the user was last authenticated. To return `auth_time` as a field in the ID token response, include the `claims` request parameter: `claims={"id_token":{"auth_time":{"essential":true}}}` Must be enabled in [settings](https://developers.google.com/identity/siwg/security-bundle#setup). `display` (Optional) An ASCII string value for specifying how the authorization server displays the authentication and consent user interface pages. The following values are specified, and accepted by the Google servers, but don't have any effect on protocol flow behavior: `page`, `popup`, `touch`, and `wap`. `hd` (Optional) Streamline the login process for accounts owned by a Google Cloud organization. By
including the Google Cloud organization domain (for example, mycollege.edu),
you can indicate that the account selection UI should be optimized for accounts at that
domain. To optimize for Google Cloud organization accounts generally instead of just one
Google Cloud organization domain, set a value of an asterisk (`*`):
`hd=*`.
Don't rely on this UI optimization to control who can access your app, as client-side
requests can be modified. Be sure to [validate](https://developers.google.com/identity/openid-connect/openid-connect#validatinganidtoken) that
the [returned ID token](https://developers.google.com/identity/openid-connect/openid-connect#obtainuserinfo) has an `hd` claim value
that matches what you expect (e.g. mycolledge.edu). Unlike the request
parameter, the ID token `hd` claim is contained within a security token from
Google, so the value can be trusted.
`include_granted_scopes` (Optional) If this parameter is provided with the value `true`, and the authorization request is granted, the authorization will include any previous authorizations granted to this user/application combination for other scopes; see [Incremental authorization](https://developers.google.com/identity/protocols/oauth2/web-server#incrementalAuth).
Note that you cannot do incremental authorization with the
Installed App flow.
`login_hint` (Optional) When your app knows which user it is trying to authenticate, it can provide this parameter as a hint to the authentication server. Passing this hint suppresses the account chooser and either pre-fills the email box on the sign-in form, or selects the proper session (if the user is using [multiple sign-in](https://support.google.com/accounts/answer/1721977)), which can help you avoid problems that occur if your app logs in the wrong user account. The value can be either an email address or the `sub` string, which is equivalent to the user's Google ID. `prompt` (Optional) A space-delimited list of string values that specifies whether the authorization server prompts the user for reauthentication and consent. The possible values are:
- `none`
The authorization server does not display any authentication or user consent
screens; it will return an error if the user is not already authenticated and has
not pre-configured consent for the requested scopes. You can use `none`
to check for existing authentication and/or consent.
- `consent`
The authorization server prompts the user for consent before returning information
to the client.
- `select_account`
The authorization server prompts the user to select a user account. This allows a
user who has multiple accounts at the authorization server to select amongst the
multiple accounts that they may have current sessions for.
If no value is specified and the user has not previously authorized access, then the
user is shown a consent screen.
`hl` (Optional) A [BCP 47](https://tools.ietf.org/html/bcp47) language tag used to specify the display language for the sign-in, account chooser, and consent screens. If this parameter is not provided, the language defaults to the user's Google Account or browser settings. For example, to request the UI in British English, set the parameter to `en-GB`.
### Validating an ID token
You need to validate all ID tokens on your server unless you know that they came
directly from Google. For example, your server must verify as authentic any ID
tokens it receives from your client apps.
The following are common situations where you might send ID tokens to your
server:
- Sending ID tokens with requests that need to be authenticated. The ID tokens tell you the particular user making the request and for which client that ID token was granted.
ID tokens are sensitive and can be misused if intercepted. You must ensure that
these tokens are handled securely by transmitting them only over HTTPS and only
using POST data or within request headers. If you store ID tokens on your
server, you must also store them securely.
One thing that makes ID tokens useful is that fact that you can pass them around
different components of your app. These components can use an ID token as a
lightweight authentication mechanism authenticating the app and the user. But
before you can use the information in the ID token or rely on it as an assertion
that the user has authenticated, you **must** validate it.
Validation of an ID token requires several steps:
1. Verify that the ID token is properly signed by the issuer. Google-issued tokens are signed using one of the certificates found at the URI specified in the `jwks_uri` metadata value of the [Discovery document](https://developers.google.com/identity/openid-connect/openid-connect#discovery).
2. Verify that the value of the `iss` claim in the ID token is equal to `https://accounts.google.com` or `accounts.google.com`.
3. Verify that the value of the `aud` claim in the ID token is equal to your app's client ID.
4. Verify that the expiry time (`exp` claim) of the ID token has not passed.
5. If you specified a [hd parameter](https://developers.google.com/identity/openid-connect/openid-connect#hd-param) value in the request, verify that the ID token has a `hd` claim that matches an accepted domain associated with a Google Cloud organization.
Steps 2 to 5 involve only string and date comparisons which are quite
straightforward, so we won't detail them here.
The first step is more complex, and involves cryptographic signature checking.
For *debugging* purposes, you can use Google's `tokeninfo` endpoint to compare
against local processing implemented on your server or device. Suppose your ID
token's value is `XYZ123`. Then you would dereference the URI
`https://oauth2.googleapis.com/tokeninfo?id_token=XYZ123`.
If the token signature is valid, the response would be the JWT payload in its
decoded JSON object form.
The `tokeninfo` endpoint is useful for debugging but for production purposes,
retrieve Google's public keys from the keys endpoint and perform the validation
locally. You should retrieve the keys URI from the
[Discovery document](https://developers.google.com/identity/openid-connect/openid-connect#discovery) using the `jwks_uri` metadata value. Requests
to the debugging endpoint may be throttled or otherwise subject to intermittent
errors.
Since Google changes its public keys only infrequently, you can cache them using
the cache directives of the HTTP response and, in the vast majority of cases,
perform local validation much more efficiently than by using the `tokeninfo`
endpoint. This validation requires retrieving and parsing certificates, and
making the appropriate cryptographic calls to check the signature. Fortunately,
there are well-debugged libraries available in a wide variety of languages to
accomplish this (see [jwt.io](https://jwt.io/)).
### Obtaining user profile information
To obtain additional profile information about the user, you can use the access
token (which your application receives during the
[authentication flow](https://developers.google.com/identity/openid-connect/openid-connect#authenticatingtheuser)) and the
[OpenID Connect](https://openid.net/specs/openid-connect-core-1_0.html)
standard:
1. To be OpenID-compliant, you must include the
[`openid profile`](https://developers.google.com/identity/protocols/oauth2/scopes#openid_connect) scope
values in your [authentication request](https://developers.google.com/identity/openid-connect/openid-connect#sendauthrequest).
If you want the user's email address to be included, you can specify an
additional scope value of
[`email`](https://developers.google.com/identity/protocols/oauth2/scopes#openid-connect). To specify both
`profile` and `email`, you can include the following parameter in your
authentication request URI:
scope=openid%20profile%20email
2. Add your access token to the authorization header and make an HTTPS `GET`
request to the userinfo endpoint, which you should retrieve from the
[Discovery document](https://developers.google.com/identity/openid-connect/openid-connect#discovery) using the `userinfo_endpoint` metadata
value. The userinfo response includes information about the user, as
described in
[`OpenID Connect Standard Claims`](https://openid.net/specs/openid-connect-core-1_0.html#StandardClaims)
and the `claims_supported` metadata value of the Discovery document. Users
or their organizations may choose to supply or withhold certain fields, so
you might not get information for every field for your authorized scopes of
access.
## The Discovery document
The OpenID Connect protocol requires the use of multiple endpoints for authenticating users,
and for requesting resources including tokens, user information, and public keys.
To simplify implementations and increase flexibility, OpenID Connect allows the use of a
"Discovery document," a JSON document found at a well-known location containing key-value pairs
which provide details about the OpenID Connect provider's configuration, including the URIs of the
authorization, token, revocation, userinfo, and public-keys endpoints.
The Discovery document for Google's OpenID Connect service may be retrieved from:
```
https://accounts.google.com/.well-known/openid-configuration
```
To use Google's OpenID Connect services, you should hard-code the Discovery-document URI
(`https://accounts.google.com/.well-known/openid-configuration`) into your application.
Your application fetches the document, applies caching rules in the response, then retrieves
endpoint URIs from it as needed. For example, to authenticate a user, your code would retrieve the
`authorization_endpoint` metadata value
(`https://accounts.google.com/o/oauth2/v2/auth` in the example below)
as the base URI for authentication requests that are sent to Google.
Here is an example of such a document; the field names are those specified in
[OpenID Connect Discovery 1.0](https://openid.net/specs/openid-connect-discovery-1_0.html#ProviderMetadata)
(refer to that document for their meanings).
The values are purely illustrative and might change, although they are copied from a recent
version of the actual Google Discovery document:
```javascript
{
"issuer": "https://accounts.google.com",
"authorization_endpoint": "https://accounts.google.com/o/oauth2/v2/auth",
"device_authorization_endpoint": "https://oauth2.googleapis.com/device/code",
"token_endpoint": "https://oauth2.googleapis.com/token",
"userinfo_endpoint": "https://openidconnect.googleapis.com/v1/userinfo",
"revocation_endpoint": "https://oauth2.googleapis.com/revoke",
"jwks_uri": "https://www.googleapis.com/oauth2/v3/certs",
"response_types_supported": [
"code",
"token",
"id_token",
"code token",
"code id_token",
"token id_token",
"code token id_token",
"none"
],
"subject_types_supported": [
"public"
],
"id_token_signing_alg_values_supported": [
"RS256"
],
"scopes_supported": [
"openid",
"email",
"profile"
],
"token_endpoint_auth_methods_supported": [
"client_secret_post",
"client_secret_basic"
],
"claims_supported": [
"aud",
"email",
"email_verified",
"exp",
"family_name",
"given_name",
"iat",
"iss",
"locale",
"name",
"picture",
"sub"
],
"code_challenge_methods_supported": [
"plain",
"S256"
]
}
```
You may be able to avoid an HTTP round-trip by caching the values from the Discovery document.
Standard HTTP caching headers are used and should be respected.
## Client libraries
The following client libraries make implementing OAuth 2.0 simpler by
integrating with popular frameworks:
- [Google APIs Client Library for Java](https://github.com/googleapis/google-api-java-client)
- [Google APIs Client Library for Python](https://github.com/googleapis/google-api-python-client)
- [Google APIs Client Library for .NET](https://developers.google.com/api-client-library/dotnet/guide/aaa_oauth)
- [Google APIs Client Library for Ruby](https://github.com/googleapis/google-api-ruby-client)
- [Google APIs Client Library for PHP](https://github.com/googleapis/google-api-php-client)
- [OAuth 2.0 Library for Google Web Toolkit](https://code.google.com/archive/p/gwt-oauth2/)
- [Google Toolbox for Mac OAuth 2.0 Controllers](https://github.com/google/gtm-oauth2)
## OpenID Connect compliance
Google's OAuth 2.0 authentication system supports the
[required features](https://openid.net/specs/openid-connect-core-1_0.html#ServerMTI)
of the
[OpenID Connect Core](https://openid.net/specs/openid-connect-core-1_0.html)
specification. Any client which is designed to work with OpenID Connect should
interoperate with this service (with the exception of the
[OpenID Request Object](https://openid.net/specs/openid-connect-core-1_0.html#RequestObject)).