Descripción general
La vinculación optimizada de Acceder con Google basada en OAuth agrega Acceder con Google sobre la vinculación de OAuth. Esto proporciona una experiencia de vinculación fluida para los usuarios de Google y también permite la creación de cuentas, lo que permite que el usuario cree una cuenta nueva en tu servicio con su Cuenta de Google.
Para realizar la vinculación de cuentas con OAuth y Acceder con Google, sigue estos pasos generales:
- Primero, pídele al usuario que dé su consentimiento para acceder a su perfil de Google.
- Usa la información de su perfil para verificar si existe la cuenta de usuario.
- Para los usuarios existentes, vincula las cuentas.
- Si no encuentras una coincidencia para el usuario de Google en tu sistema de autenticación, valida el token de ID que recibiste de Google. Luego, puedes crear un usuario en función de la información del perfil que contiene el token de ID.
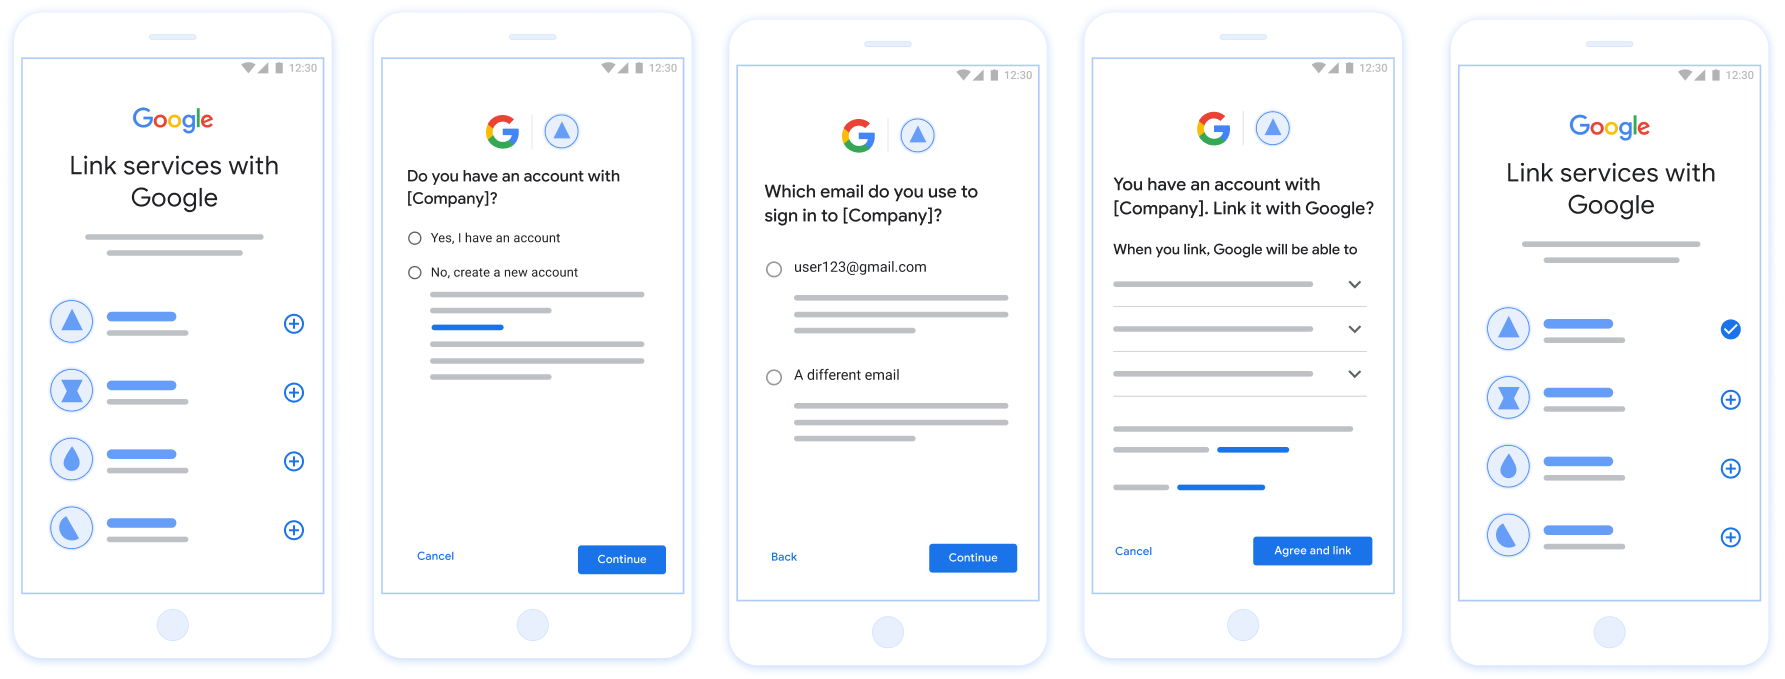
Figura 1. Vinculación de cuentas en el teléfono de un usuario con la vinculación optimizada
Vinculación optimizada: Flujo de OAuth + Acceder con Google
En el siguiente diagrama de secuencia, se detallan las interacciones entre el usuario, Google y tu extremo de intercambio de tokens para la vinculación optimizada.
Funciones y responsabilidades
En la siguiente tabla, se definen las funciones y responsabilidades de los actores en el flujo de vinculación optimizada.
| Actor o componente | Función de GAL | Responsabilidades |
|---|---|---|
| App o servidor de Google | Cliente de OAuth | Obtiene el consentimiento del usuario para Acceder con Google, pasa las aserciones de identidad (JWT) a tu servidor y almacena de forma segura los tokens resultantes. |
| Tu extremo de intercambio de tokens | Proveedor de identidad o servidor de autorización | Valida las aserciones de identidad, verifica si existen cuentas, controla
los intents de vinculación de cuentas (check, get,
create) y emite tokens en función de los intents solicitados. |
| Tu API de servicio | Servidor de recursos | Proporciona acceso a los datos del usuario cuando se presenta un token de acceso válido. |
Requisitos para la vinculación optimizada
- Implementa el flujo básico de vinculación de OAuth. Tu servicio debe admitir extremos de autorización y de intercambio de tokens compatibles con OAuth 2.0.
- Tu extremo de intercambio de tokens debe admitir
aserciones de JSON Web Token (JWT)
y debe implementar los intents
check,create, yget.
Lógica de decisión para la vinculación optimizada
La siguiente lógica determina cómo se llaman los intents durante el flujo de vinculación optimizada:
- ¿El usuario tiene una cuenta en tu sistema de autenticación? (El usuario decide seleccionando SÍ o NO).
- SÍ: ¿El usuario usa el correo electrónico asociado con su Cuenta de Google para acceder a tu plataforma? (El usuario decide seleccionando SÍ o NO).
- SÍ: ¿El usuario tiene una cuenta coincidente en tu sistema de autenticación? (
check intentse llama para confirmar)- SÍ : Se llama a
get intenty la cuenta se vincula si get intent se muestra correctamente. - NO: ¿Crear una cuenta nueva? (El usuario decide seleccionando SÍ o NO).
- SÍ : Se llama a
create intenty la cuenta se vincula si create intent se muestra correctamente. - NO : Se activa el flujo de vinculación de OAuth, se dirige al usuario a su navegador y se le da la opción de vincularse con un correo electrónico diferente.
- SÍ : Se llama a
- SÍ : Se llama a
- NO : Se activa el flujo de vinculación de OAuth, se dirige al usuario a su navegador y se le da la opción de vincularse con un correo electrónico diferente.
- SÍ: ¿El usuario tiene una cuenta coincidente en tu sistema de autenticación? (
- NO: ¿El usuario tiene una cuenta coincidente en tu sistema de autenticación? (
check intentse llama para confirmar)- SÍ : Se llama a
get intenty la cuenta se vincula si get intent se muestra correctamente. - NO :
create intentse llama y la cuenta se vincula si create intent se muestra correctamente.
- SÍ : Se llama a
- SÍ: ¿El usuario usa el correo electrónico asociado con su Cuenta de Google para acceder a tu plataforma? (El usuario decide seleccionando SÍ o NO).
Receta de implementación
Tu extremo de intercambio de tokens debe implementar los intents check, get y create para admitir la vinculación optimizada.
Sigue estos pasos para controlar los diferentes intents:
Verifica si existe una cuenta de usuario (intent de verificación)
Google llama a tu extremo de intercambio de tokens para verificar si el usuario de Google existe en tu sistema. Para obtener detalles de los parámetros, consulta Intents de vinculación optimizada.
Receta de implementación
Para controlar el intent check, realiza las siguientes acciones:
Valida la solicitud:
- Verifica
client_id,client_secretygrant_type(debe serurn:ietf:params:oauth:grant-type:jwt-bearer). - Valida el
assertion(JWT) con los criterios de Validación de JWT.
- Verifica
Busca al usuario:
- Verifica si el ID de cuenta de Google (
sub) o la dirección de correo electrónico en el JWT coinciden con un usuario de tu base de datos.
- Verifica si el ID de cuenta de Google (
Responder:
- Si se encuentra: Muestra el HTTP
200 OKcon{"account_found": "true"}. - Si no se encuentra: Muestra el HTTP
404 Not Foundcon{"account_found": "false"}.
- Si se encuentra: Muestra el HTTP
Cómo controlar la vinculación automática (obtener intent)
Si la cuenta existe, Google llama a tu extremo con intent=get para recuperar tokens. Para obtener detalles de los parámetros, consulta Intents de vinculación optimizada.
Receta de implementación
Para controlar el intent get, realiza las siguientes acciones:
Validar la solicitud:
- Verifica
client_id,client_secretygrant_type. - Valida la
assertion(JWT).
- Verifica
Buscar usuario:
- Verifica que el usuario exista con la declaración
suboemail.
- Verifica que el usuario exista con la declaración
Responder:
- Si la operación se realiza correctamente, genera y muestra
access_token,refresh_tokenyexpires_inen una respuesta JSON (HTTP200 OK). - Si falla la vinculación, muestra HTTP
401 Unauthorizedcon{"error": "linking_error"}y unlogin_hintopcional para volver a la vinculación estándar de OAuth.
- Si la operación se realiza correctamente, genera y muestra
Controla la creación de cuentas con Acceder con Google (intención de creación)
Si no existe ninguna cuenta, Google llamará a tu endpoint con intent=create para crear un usuario nuevo. Para obtener detalles sobre los parámetros, consulta Intenciones de vinculación optimizadas.
Receta de implementación
Para controlar el intent create, realiza las siguientes acciones:
Valida la solicitud:
- Verifica
client_id,client_secretygrant_type. - Valida el objeto
assertion(JWT).
- Verifica
Verifica que el usuario no exista:
- Comprueba si el
subo elemailya están en tu base de datos. - Si el usuario existe, devuelve HTTP
401 Unauthorizedcon{"error": "linking_error", "login_hint": "USER_EMAIL"}para forzar la resguardo a la vinculación de OAuth.
- Comprueba si el
Crear cuenta:
- Usa las reclamaciones
sub,email,nameypicturedel JWT para crear un nuevo registro de usuario.
- Usa las reclamaciones
Responder:
- Genera y devuelve tokens en una respuesta JSON (HTTP
200 OK).
- Genera y devuelve tokens en una respuesta JSON (HTTP
Obtén tu ID de cliente de la API de Google
Deberás proporcionar tu ID de cliente de la API de Google durante el proceso de registro de vinculación de cuentas. Para obtener tu ID de cliente de la API con el proyecto que creaste mientras completabas los pasos de vinculación de OAuth. Para ello, completa los siguientes pasos:
- Ve a la página Clientes.
Crea o selecciona un proyecto de las APIs de Google.
Si tu proyecto no tiene un ID de cliente para el tipo de aplicación web, haz clic en Crear cliente para crear uno. Asegúrate de incluir el dominio de tu sitio en el cuadro Orígenes autorizados de JavaScript. Cuando realices pruebas o desarrollo locales, debes agregar
http://localhostyhttp://localhost:<port_number>al campo Orígenes autorizados de JavaScript.
Valida la implementación
Puedes validar tu implementación con la herramienta OAuth 2.0 Playground.
En la herramienta, sigue estos pasos:
- Haz clic en Configuración para abrir la ventana Configuración de OAuth 2.0.
- En el campo Flujo de OAuth, selecciona Del cliente.
- En el campo Extremos de OAuth, selecciona Personalizado.
- Especifica tu extremo de OAuth 2.0 y el ID de cliente que le asignaste a Google en los campos correspondientes.
- En la sección Paso 1, no selecciones ningún alcance de Google. En su lugar, deja este campo en blanco o escribe un alcance válido para tu servidor (o una cadena arbitraria si no usas alcances de OAuth). Cuando termines, haz clic en Autorizar APIs.
- En las secciones Paso 2 y Paso 3, sigue el flujo de OAuth 2.0 y verifica que cada paso funcione según lo previsto.
Puedes validar tu implementación con la herramienta de demostración de vinculación de Cuentas de Google.
En la herramienta, sigue estos pasos:
- Haz clic en el botón Acceder con Google.
- Elige la cuenta que quieras vincular.
- Ingresa el ID de servicio.
- De manera opcional, ingresa uno o más alcances para los que solicitarás acceso.
- Haz clic en Iniciar demostración.
- Cuando se te solicite, confirma que puedes dar tu consentimiento y rechazar la solicitud de vinculación.
- Confirma que se te redirecciona a tu plataforma.