アカウントは、業界標準の OAuth 2.0 の暗黙的フローと認証コードフローを使用してリンクされます。サービスが OAuth 2.0 準拠の承認とトークン交換のエンドポイントをサポートしている必要があります。
In the implicit flow, Google opens your authorization endpoint in the user's browser. After successful sign in, you return a long-lived access token to Google. This access token is now included in every request sent from Google.
In the authorization code flow, you need two endpoints:
The authorization endpoint, which presents the sign-in UI to your users that aren't already signed in. The authorization endpoint also creates a short-lived authorization code to record users' consent to the requested access.
The token exchange endpoint, which is responsible for two types of exchanges:
- Exchanges an authorization code for a long-lived refresh token and a short-lived access token. This exchange happens when the user goes through the account linking flow.
- Exchanges a long-lived refresh token for a short-lived access token. This exchange happens when Google needs a new access token because the one it had expired.
Choose an OAuth 2.0 flow
Although the implicit flow is simpler to implement, Google recommends that access tokens issued by the implicit flow never expire. This is because the user is forced to link their account again after a token expires with the implicit flow. If you need token expiration for security reasons, we strongly recommend that you use the authorization code flow instead.
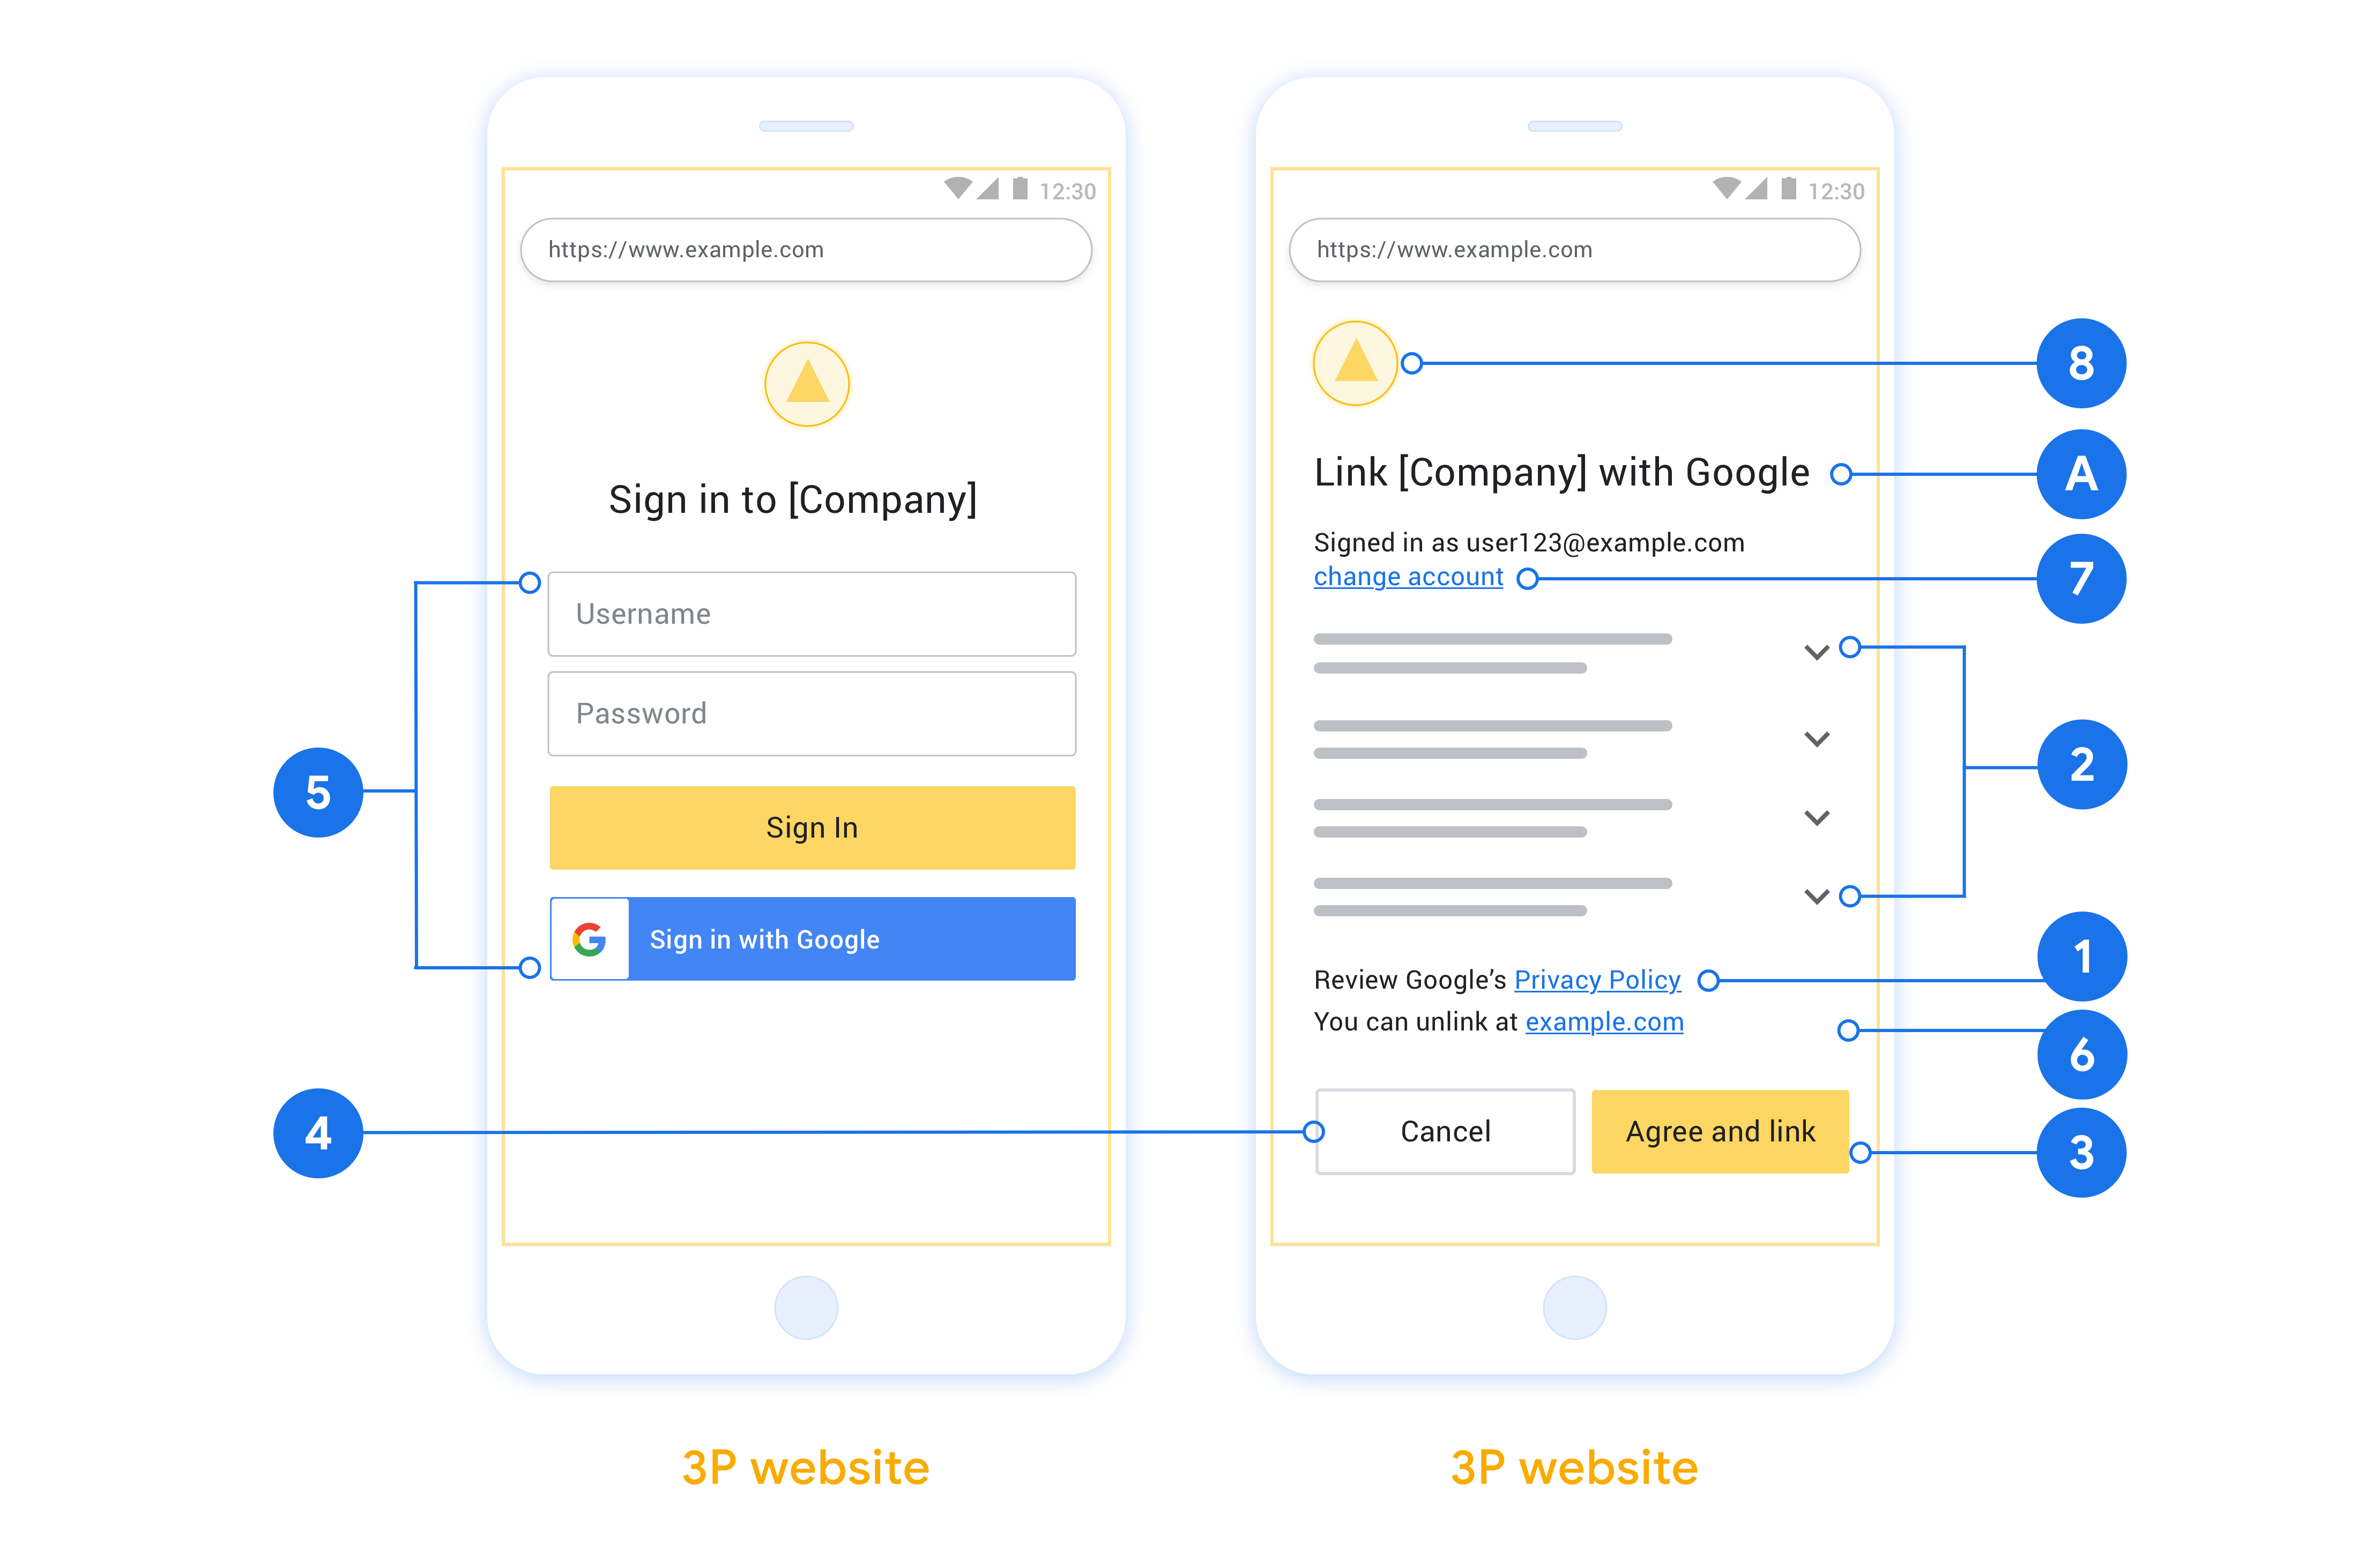
Design guidelines
This section describes the design requirements and recommendations for the user screen that you host for OAuth linking flows. After it's called by Google's app, your platform displays a sign in to Google page and account linking consent screen to the user. The user is directed back to Google's app after giving their consent to link accounts.
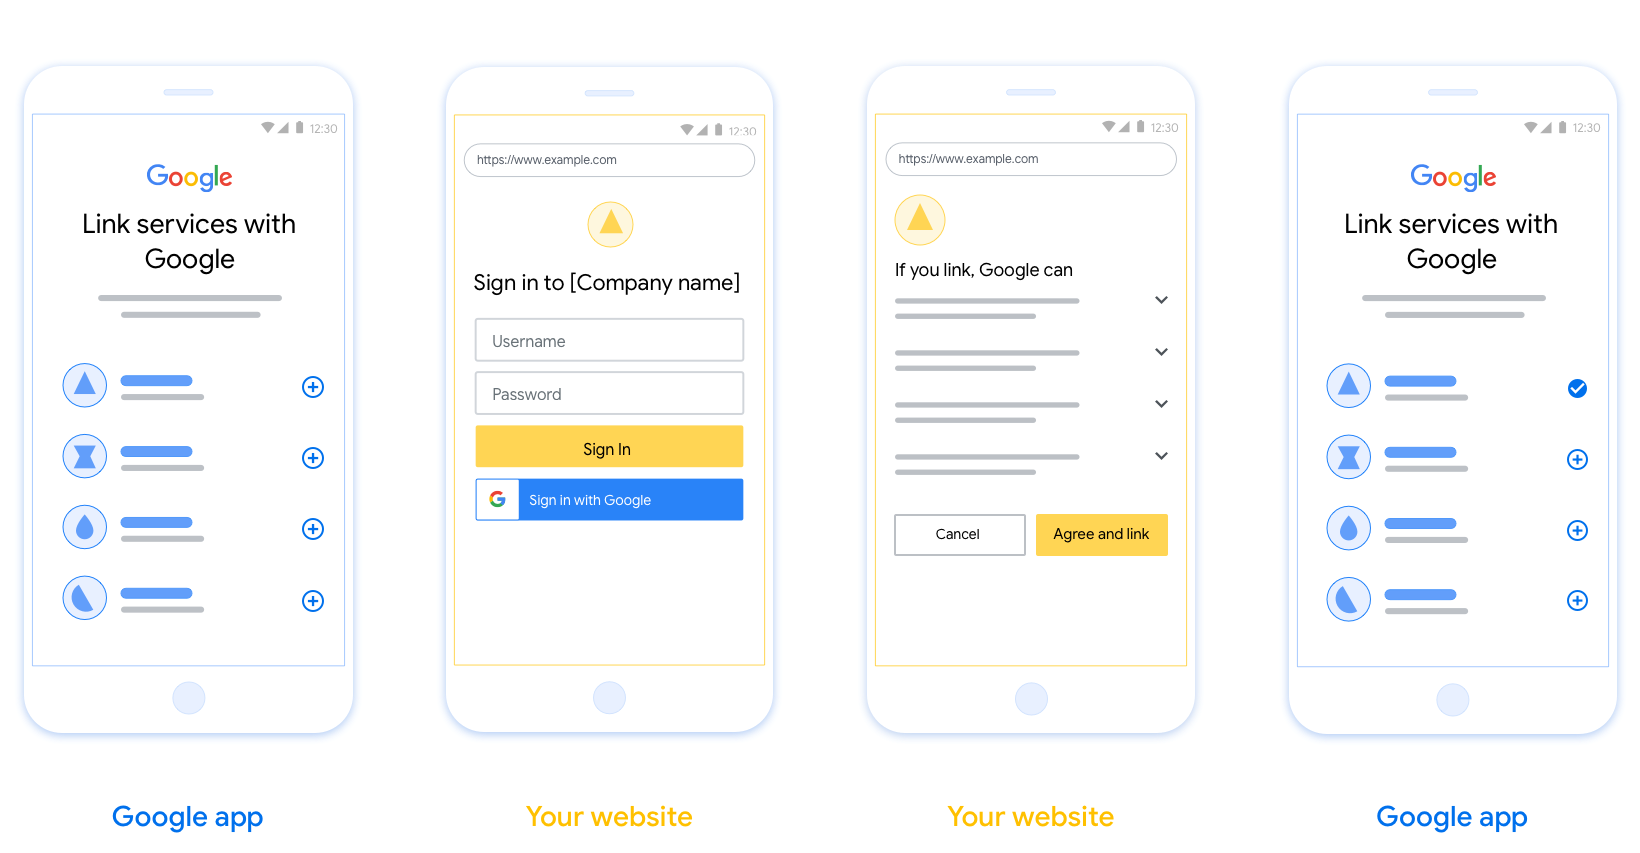
Requirements
- You must communicate that the user’s account will be linked to Google, not a specific Google product like Google Home or Google Assistant.
Recommendations
We recommend that you do the following:
Display Google's Privacy Policy. Include a link to Google’s Privacy Policy on the consent screen.
Data to be shared. Use clear and concise language to tell the user what data of theirs Google requires and why.
Clear call-to-action. State a clear call-to-action on your consent screen, such as “Agree and link.” This is because users need to understand what data they're required to share with Google to link their accounts.
Ability to cancel. Provide a way for users to go back or cancel, if they choose not to link.
Clear sign-in process. Ensure that users have clear method for signing in to their Google account, such as fields for their username and password or Sign in with Google.
Ability to unlink. Offer a mechanism for users to unlink, such as a URL to their account settings on your platform. Alternatively, you can include a link to Google Account where users can manage their linked account.
Ability to change user account. Suggest a method for users to switch their account(s). This is especially beneficial if users tend to have multiple accounts.
- If a user must close the consent screen to switch accounts, send a recoverable error to Google so the user can sign in to the desired account with OAuth linking and the implicit flow.
Include your logo. Display your company logo on the consent screen. Use your style guidelines to place your logo. If you wish to also display Google's logo, see Logos and trademarks.
プロジェクトを作成する
プロジェクトを作成してアカウント リンクを使用するには:
- Go to the Google API Console.
- [ プロジェクトを作成]をクリックします 。
- 名前を入力するか、生成された提案を受け入れます。
- 残りのフィールドを確認または編集します。
- 作成をクリックします 。
プロジェクトIDを表示するには:
- Go to the Google API Console.
- ランディングページの表でプロジェクトを見つけます。 ID列にプロジェクトIDが表示されます。
OAuth 同意画面を設定する
Google アカウント リンクのプロセスには同意画面が含まれます。この画面では、データへのアクセスをリクエストしているユーザーのアプリケーション、リクエストしているデータの種類、適用される規約を確認できます。Google API クライアント ID を生成する前に、OAuth 同意画面を設定する必要があります。
- Google API コンソールの OAuth 同意画面ページを開きます。
- プロンプトが表示されたら、作成したプロジェクトを選択します。
[OAuth 同意画面] ページでフォームに記入し、[保存] ボタンをクリックします。
アプリケーション名: 同意を求めるアプリケーションの名前。この名前は、アプリケーションを正確に反映し、ユーザーが他の部分で目にするアプリケーション名と一致する必要があります。アプリ名は、アカウント リンクの同意画面に表示されます。
アプリケーションのロゴ: ユーザーがアプリを認識できるよう、同意画面に表示する画像です。ロゴは、アカウントのリンクの同意画面とアカウント設定に表示されます。
サポートメール: ユーザーからの同意に関する問い合わせ先です。
Google API のスコープ: スコープを使用すると、アプリケーションがユーザーの限定公開の Google データにアクセスできるようになります。Google アカウント リンクのユースケースでは、デフォルトのスコープ(メール、プロファイル、openid)で十分です。機密性の高いスコープを追加する必要はありません。通常は、事前にアクセスするのではなく、アクセスが必要になったときに段階的にスコープをリクエストすることをおすすめします。詳しくはこちらをご覧ください。
承認済みドメイン: 管理者とユーザーを保護するため、Google では、OAuth を使用して認証を行うアプリケーションのみに承認済みドメインの使用を許可します。アプリケーションのリンクは承認済みドメインでホストする必要があります。詳しくはこちらをご覧ください。
Application Homepage リンク: アプリケーションのホームページ。承認済みドメインでホストされている必要があります。
アプリのプライバシー ポリシーへのリンク: Google アカウント リンクの同意画面に表示されます。承認済みドメインでホストされている必要があります。
お申し込みの利用規約へのリンク(省略可): 承認済みドメインでホストされている必要があります。
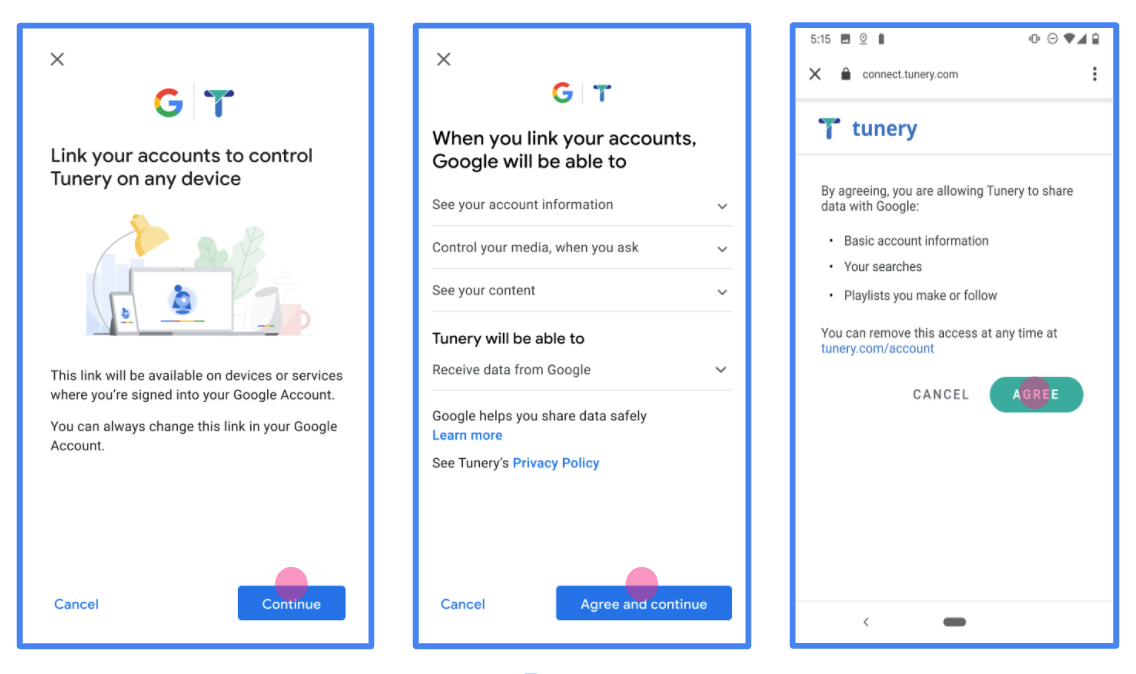
図 1. 架空のアプリケーション(Tunery)の Google アカウント リンクの同意画面
[Verification Status] をオンにします。申請に確認が必要な場合は、[Submit For Verification] ボタンをクリックして、確認の申請を送信します。詳しくは、OAuth 検証の要件をご覧ください。
OAuth サーバーを実装する
OAuth 2.0の暗黙の流れをサポートするために、あなたのサービスは、HTTPSで使用可能認可エンドポイントになります。このエンドポイントは、データアクセスの認証とユーザーからの同意の取得を担当します。承認エンドポイントは、まだサインインしていないユーザーにサインインUIを提示し、要求されたアクセスへの同意を記録します。
Googleアプリケーションがサービスの承認済みAPIの1つを呼び出す必要がある場合、Googleはこのエンドポイントを使用して、ユーザーに代わってこれらのAPIを呼び出す許可をユーザーから取得します。
Googleによって開始される一般的なOAuth2.0の暗黙的なフローセッションには、次のフローがあります。
- Googleは、ユーザーのブラウザで認証エンドポイントを開きます。ユーザーは、まだサインインしていない場合はサインインし、まだアクセス許可を付与していない場合は、APIを使用してデータにアクセスするためのGoogleアクセス許可を付与します。
- あなたのサービスでは、アクセストークンとGoogleに戻り、それを作成します。これを行うには、リクエストにアクセストークンを添付して、ユーザーのブラウザをGoogleにリダイレクトします。
- GoogleはサービスのAPIを呼び出し、リクエストごとにアクセストークンを添付します。サービスは、アクセストークンがGoogleにAPIへのアクセスを許可することを確認してから、API呼び出しを完了します。
承認リクエストを処理する
GoogleアプリケーションがOAuth2.0の暗黙的なフローを介してアカウントのリンクを実行する必要がある場合、Googleは、次のパラメーターを含むリクエストを使用して、ユーザーを承認エンドポイントに送信します。
| 承認エンドポイントパラメータ | |
|---|---|
client_id | Googleに割り当てたクライアントID。 |
redirect_uri | このリクエストへの応答を送信するURL。 |
state | リダイレクトURIで変更されずにGoogleに返される簿記の値。 |
response_type | 応答で返す値のタイプ。 OAuth 2.0の暗黙の流れについては、応答タイプは、常にtoken 。 |
user_locale | でGoogleアカウントの言語設定RFC5646の形式は、ユーザーの好みの言語でコンテンツをローカライズするために使用しました。 |
あなたの認可エンドポイントがで利用可能である場合たとえば、 https://myservice.example.com/auth 、要求は次のようになります。
GET https://myservice.example.com/auth?client_id=GOOGLE_CLIENT_ID&redirect_uri=REDIRECT_URI&state=STATE_STRING&response_type=token&user_locale=LOCALE
承認エンドポイントがサインイン要求を処理するには、次の手順を実行します。
確認
client_idとredirect_uri意図しないまたは誤って設定クライアントアプリケーションへのアクセスを許可防ぐために、値を:- ことを確認し
client_idGoogleに割り当てられたクライアントIDと一致します。 - URLがで指定されていることを確認
redirect_uriパラメータは次の形式を持っている:https://oauth-redirect.googleusercontent.com/r/YOUR_PROJECT_ID https://oauth-redirect-sandbox.googleusercontent.com/r/YOUR_PROJECT_ID
- ことを確認し
ユーザーがサービスにサインインしているかどうかを確認します。ユーザーがサインインしていない場合は、サービスのサインインまたはサインアップフローを完了します。
GoogleがAPIへのアクセスに使用するアクセストークンを生成します。アクセストークンには任意の文字列値を指定できますが、トークンの対象となるユーザーとクライアントを一意に表す必要があり、推測できないようにする必要があります。
で指定されたURLにユーザーのブラウザをリダイレクトするHTTPレスポンスを送信
redirect_uriパラメータを。次のすべてのパラメータをURLフラグメントに含めます。-
access_token:あなたアクセストークンだけの生成 token_type:文字列bearer-
state:元の要求から修飾されていない状態値
以下は、得られたURLの例です:
https://oauth-redirect.googleusercontent.com/r/YOUR_PROJECT_ID#access_token=ACCESS_TOKEN&token_type=bearer&state=STATE_STRING
-
GoogleのOAuth 2.0リダイレクトハンドラは、そのアクセストークンと確認を受けたstate値が変更されていません。 Googleがサービスのアクセストークンを取得した後、GoogleはそのトークンをサービスAPIへの後続の呼び出しに添付します。
userinfoリクエストを処理する
ユーザー情報エンドポイントは、リンクされたユーザについての戻り主張OAuth 2.0の保護されたリソースです。次のユースケースを除いて、userinfoエンドポイントの実装とホスティングはオプションです。
- リンクされたアカウントサインイングーグルワンタップで。
- 摩擦のサブスクリプションAndroidTVに。
トークンエンドポイントからアクセストークンが正常に取得されると、Googleはuserinfoエンドポイントにリクエストを送信して、リンクされたユーザーに関する基本的なプロファイル情報を取得します。
| userinfoエンドポイントリクエストヘッダー | |
|---|---|
Authorization header | タイプBearerのアクセストークン。 |
たとえば、あなたのuserinfoエンドポイントがで利用可能な場合https://myservice.example.com/userinfo 、要求は次のようになります。
GET /userinfo HTTP/1.1
Host: myservice.example.com
Authorization: Bearer ACCESS_TOKEN
userinfoエンドポイントでリクエストを処理するには、次の手順を実行します。
- Authorizationヘッダーからアクセストークンを抽出し、アクセストークンに関連付けられているユーザーの情報を返します。
- アクセストークンが無効である場合は、使用してHTTP 401不正なエラーを返す
WWW-Authenticate応答ヘッダを。以下のユーザー情報のエラー応答の例である:HTTP/1.1 401 Unauthorized WWW-Authenticate: error="invalid_token", error_description="The Access Token expired"
401不正な、または他の任意の失敗エラー応答をリンク処理中に返された場合、エラーが回復不能、検索されたトークンは廃棄されることになり、ユーザが持っているであろうリンクプロセスを再開します。 アクセストークンが有効であれば、リターンおよびHTTPS応答の本文に以下のJSONオブジェクトとHTTP 200応答:
{
"sub": "USER_UUID",
"email": "EMAIL_ADDRESS",
"given_name": "FIRST_NAME",
"family_name": "LAST_NAME",
"name": "FULL_NAME",
"picture": "PROFILE_PICTURE",
}
あなたのuserinfoエンドポイントがHTTP 200の成功応答を返した場合、トークン取得し、クレームはユーザーのGoogleに対して登録されていますアカウント。userinfoエンドポイント応答 subシステム内のユーザーを識別する一意のID。 emailユーザーのメールアドレス。 given_nameオプション:ユーザーのファーストネーム。 family_nameオプション:ユーザーの姓。 nameオプション:ユーザーのフルネーム。 pictureオプション:ユーザーのプロフィール画像。
実装の検証
あなたは使用して実装を検証することができOAuth 2.0の遊び場のツールを。
ツールで、次の手順を実行します。
- 設定をクリックし OAuth 2.0の設定]ウィンドウを開きます。
- OAuthの流れ場では、クライアント側を選択します。
- OAuthのエンドポイント]フィールドで、[カスタム]を選択します。
- OAuth2.0エンドポイントとGoogleに割り当てたクライアントIDを対応するフィールドに指定します。
- ステップ1セクションでは、すべてのGoogleサービスのスコープを選択しないでください。代わりに、このフィールドを空白のままにするか、サーバーに有効なスコープ(または、OAuthスコープを使用しない場合は任意の文字列)を入力してください。設定が完了したら、承認のAPIをクリックします。
- ステップ2とステップ3のセクションでは、OAuth 2.0のフローを通過し、意図したように各ステップが動作することを確認。
あなたは使用して実装を検証することができ、Googleアカウントのリンクデモツールを。
ツールで、次の手順を実行します。
- Googleのボタンでサインインしをクリックしてください。
- リンクするアカウントを選択してください。
- サービスIDを入力します。
- オプションで、アクセスを要求する1つ以上のスコープを入力します。
- スタートデモをクリックしてください。
- プロンプトが表示されたら、リンク要求に同意して拒否できることを確認します。
- プラットフォームにリダイレクトされていることを確認します。