帳戶連結使用業界標準 OAuth 2.0 隱含與授權碼流程。您的服務必須支援符合 OAuth 2.0 規定的授權和憑證交換端點。
在「暗示」流程中,Google 會在使用者的瀏覽器中開啟您的授權端點。成功登入後,會將長期存取憑證傳回 Google。目前從 Google 發出的每個要求都會包含這個存取憑證。
在「授權碼」流程中,您需要兩個端點:
Authorization 端點,可為尚未登入的使用者顯示登入 UI。授權端點也會建立短期的授權碼來記錄使用者。同意要求的存取權。
憑證交換端點,該端點負責兩種交換類型:
- 將授權碼提供給長期使用憑證和短期存取憑證。當使用者完成帳戶連結流程時,系統就會執行這個交換作業。
- 針對短期存取權杖交換長期更新權杖。 如果 Google 需要這個存取憑證過期,因此需要進行這個交換作業。
選擇 OAuth 2.0 流程
雖然隱含流程比較簡單,但 Google 建議採用隱含流程所核發的存取憑證永遠不會過期。這是因為憑證在隱含流程到期後,必須強制重新連結帳戶。如果您需要基於安全考量而要求憑證過期,強烈建議您改用授權碼流程。
設計指南
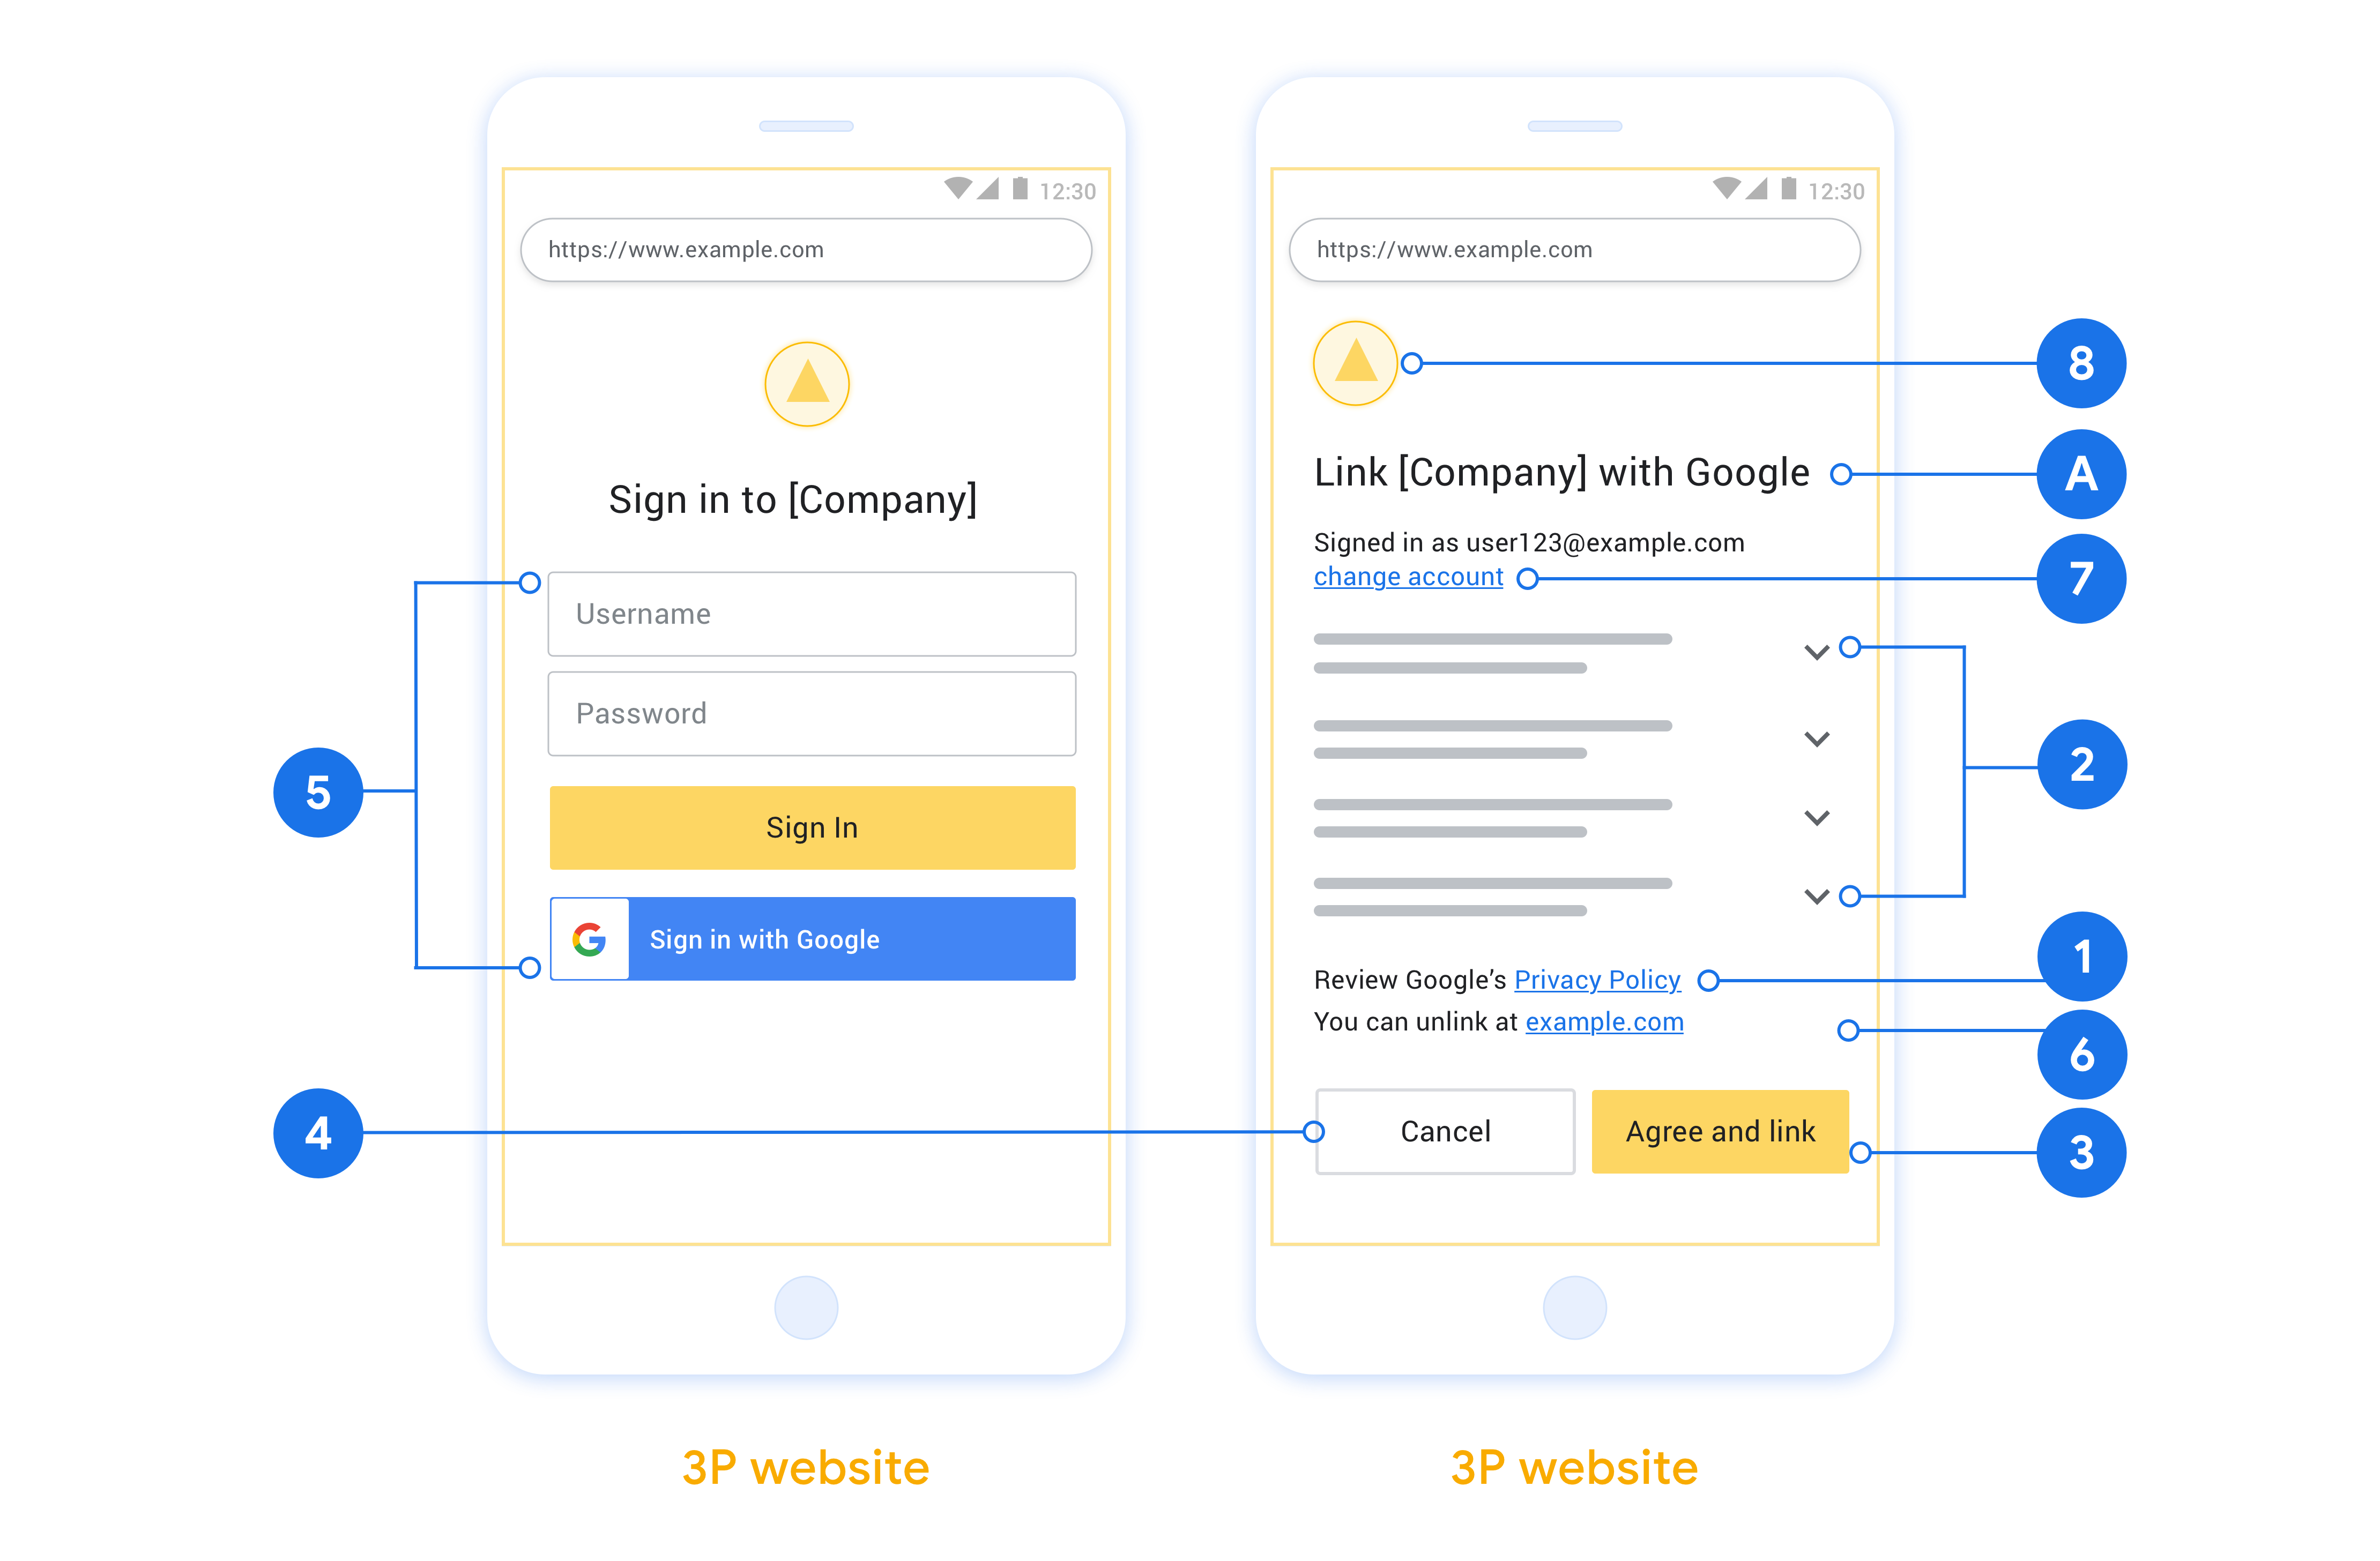
本節說明您針對 OAuth 連結流程託管的使用者畫面設計要求和建議。在 Google 應用程式呼叫 API 後,您的平台會向使用者顯示登入 Google 頁面和帳戶連結同意畫面。使用者同意連結帳戶之後,系統就會將他們重新導向 Google 的應用程式。

必要條件
- 您必須通知使用者的帳戶將連結至 Google,而不是特定的 Google 產品,例如 Google Home 或 Google 助理。
建議
建議您採取下列做法:
顯示 Google 的隱私權政策。在同意畫面中加入 Google 隱私權政策連結。
要分享的資料。使用簡明扼要的用詞告訴使用者 Google 需要哪些資料,以及收集這些資料的原因。
加入明確的行動號召。在同意畫面上註明明確的行動號召 (例如「同意和連結」)。這是因為使用者必須瞭解需要與 Google 分享哪些資料,才能連結自己的帳戶。
取消功能:如果使用者選擇不要進行連結,可以提供取消或取消訂閱的方式。
清除登入程序。確保使用者明確能登入 Google 帳戶,例如使用者名稱和密碼欄位或使用 Google 帳戶登入欄位。
取消連結。提供機制,讓使用者能取消連結,例如 您平台中帳戶設定的網址。您也可以加入 Google 帳戶連結,方便使用者管理已連結帳戶。
可變更使用者帳戶。建議使用者切換帳戶的方法。如果使用者經常擁有多個帳戶,這項功能就特別實用。
- 如果使用者必須先關閉同意畫面才能切換帳戶,請將可復原的錯誤傳送給 Google,讓使用者可透過 OAuth 連結和隱含流程登入所需帳戶。
加入您的標誌。在同意畫面中顯示公司標誌。 請善用樣式指南來放置標誌。如果您希望一併顯示 Google 的標誌,請參閱標誌和商標一文。
Create the project
To create your project to use account linking:
- Go to the Google API Console.
- 單擊創建項目 。
- 輸入名稱或接受生成的建議。
- 確認或編輯所有剩餘字段。
- 點擊創建 。
要查看您的項目ID:
- Go to the Google API Console.
- 在登錄頁面的表格中找到您的項目。項目ID出現在ID列中。
Configure your OAuth Consent Screen
The Google Account Linking process includes a consent screen which tells users the application requesting access to their data, what kind of data they are asking for and the terms that apply. You will need to configure your OAuth consent screen before generating a Google API client ID.
- Open the OAuth consent screen page of the Google APIs console.
- If prompted, select the project you just created.
On the "OAuth consent screen" page, fill out the form and click the “Save” button.
Application name: The name of the application asking for consent. The name should accurately reflect your application and be consistent with the application name users see elsewhere. The application name will be shown on the Account Linking consent screen.
Application logo: An image on the consent screen that will help users recognize your app. The logo is shown on Account linking consent screen and on account settings
Support email: For users to contact you with questions about their consent.
Scopes for Google APIs: Scopes allow your application to access your user's private Google data. For the Google Account Linking use case, default scope (email, profile, openid) is sufficient, you don’t need to add any sensitive scopes. It is generally a best practice to request scopes incrementally, at the time access is required, rather than up front. Learn more.
Authorized domains: To protect you and your users, Google only allows applications that authenticate using OAuth to use Authorized Domains. Your applications' links must be hosted on Authorized Domains. Learn more.
Application Homepage link: Home page for your application. Must be hosted on an Authorized Domain.
Application Privacy Policy link: Shown on Google Account Linking consent screen. Must be hosted on an Authorized Domain.
Application Terms of Service link (Optional): Must be hosted on an Authorized Domain.

Figure 1. Google Account Linking Consent Screen for a fictitious Application, Tunery
Check "Verification Status", if your application needs verification then click the "Submit For Verification" button to submit your application for verification. Refer to OAuth verification requirements for details.
實作 OAuth 伺服器
為了支持OAuth 2.0已隱含流,你的服務使可通過HTTPS授權端點。此端點負責身份驗證並獲得用戶對數據訪問的同意。授權端點向尚未登錄的用戶顯示登錄 UI,並記錄對請求訪問的同意。
當 Google 應用程序需要調用您的服務的授權 API 之一時,Google 會使用此端點來獲得您的用戶的許可,以代表他們調用這些 API。
一個典型的由 Google 發起的 OAuth 2.0 隱式流會話具有以下流程:
- Google 在用戶的瀏覽器中打開您的授權端點。用戶登錄(如果尚未登錄)並授予 Google 使用您的 API 訪問其數據的權限(如果他們尚未授予權限)。
- 您的服務創建的訪問令牌並將其返回給谷歌。為此,請使用附加到請求的訪問令牌將用戶的瀏覽器重定向回 Google。
- Google 會調用您服務的 API 並在每個請求中附加訪問令牌。您的服務會驗證訪問令牌授予 Google 訪問 API 的授權,然後完成 API 調用。
處理授權請求
當 Google 應用程序需要通過 OAuth 2.0 隱式流程執行帳戶鏈接時,Google 會將用戶發送到您的授權端點,並包含以下參數的請求:
| 授權端點參數 | |
|---|---|
client_id | 您分配給 Google 的客戶端 ID。 |
redirect_uri | 您向其發送對此請求的響應的 URL。 |
state | 傳遞回 Google 的簿記值在重定向 URI 中保持不變。 |
response_type | 要在響應中返回的值的類型。對於的OAuth 2.0隱式流程中,響應類型總是token 。 |
user_locale | 在谷歌帳戶語言設置RFC5646格式用於本地化用戶的首選語言內容。 |
例如,如果您的授權端點可在https://myservice.example.com/auth ,請求看起來像下面這樣:
GET https://myservice.example.com/auth?client_id=GOOGLE_CLIENT_ID&redirect_uri=REDIRECT_URI&state=STATE_STRING&response_type=token&user_locale=LOCALE
對於處理登錄請求的授權端點,請執行以下步驟:
驗證
client_id和redirect_uri值,以防止授權訪問意外或錯誤配置的客戶端應用程序:- 確認該
client_id你分配給谷歌的客戶ID相匹配。 - 確認URL指定由
redirect_uri參數有以下形式:https://oauth-redirect.googleusercontent.com/r/YOUR_PROJECT_ID https://oauth-redirect-sandbox.googleusercontent.com/r/YOUR_PROJECT_ID
- 確認該
檢查用戶是否已登錄您的服務。如果用戶未登錄,請完成服務的登錄或註冊流程。
生成供 Google 用來訪問您的 API 的訪問令牌。訪問令牌可以是任何字符串值,但它必須唯一地代表該令牌所針對的用戶和客戶端,並且不能被猜測。
發送用戶的瀏覽器重定向到被指定的URL的HTTP響應
redirect_uri參數。在 URL 片段中包含以下所有參數:-
access_token:剛才生成的令牌,你的訪問 token_type:字符串bearer-
state:從原始請求的未修改的狀態值
以下是所得的URL的一個示例:
https://oauth-redirect.googleusercontent.com/r/YOUR_PROJECT_ID#access_token=ACCESS_TOKEN&token_type=bearer&state=STATE_STRING
-
谷歌的OAuth 2.0重定向處理接收的令牌的訪問並確認state的值並沒有改變。在 Google 為您的服務獲取訪問令牌後,Google 會將令牌附加到對您的服務 API 的後續調用中。
Handle userinfo requests
The userinfo endpoint is an OAuth 2.0 protected resource that return claims about the linked user. Implementing and hosting the userinfo endpoint is optional, except for the following use cases:
- Linked Account Sign-In with Google One Tap.
- Frictionless subscription on AndroidTV.
After the access token has been successfully retrieved from your token endpoint, Google sends a request to your userinfo endpoint to retrieve basic profile information about the linked user.
| userinfo endpoint request headers | |
|---|---|
Authorization header |
The access token of type Bearer. |
For example, if your userinfo endpoint is available at
https://myservice.example.com/userinfo, a request might look like the following:
GET /userinfo HTTP/1.1
Host: myservice.example.com
Authorization: Bearer ACCESS_TOKEN
For your userinfo endpoint to handle requests, do the following steps:
- Extract access token from the Authorization header and return information for the user associated with the access token.
- If the access token is invalid, return an HTTP 401 Unauthorized error with using the
WWW-AuthenticateResponse Header. Below is an example of a userinfo error response:HTTP/1.1 401 Unauthorized WWW-Authenticate: error="invalid_token", error_description="The Access Token expired"
If a 401 Unauthorized, or any other unsuccessful error response is returned during the linking process, the error will be non-recoverable, the retrieved token will be discarded and the user will have to initiate the linking process again. If the access token is valid, return and HTTP 200 response with the following JSON object in the body of the HTTPS response:
{
"sub": "USER_UUID",
"email": "EMAIL_ADDRESS",
"given_name": "FIRST_NAME",
"family_name": "LAST_NAME",
"name": "FULL_NAME",
"picture": "PROFILE_PICTURE",
}
If your userinfo endpoint returns an HTTP 200 success response, the retrieved token and claims are registered against the user's Google account.userinfo endpoint response subA unique ID that identifies the user in your system. emailEmail address of the user. given_nameOptional: First name of the user. family_nameOptional: Last name of the user. nameOptional: Full name of the user. pictureOptional: Profile picture of the user.
驗證實作
您可以通過使用驗證實現的OAuth 2.0遊樂場工具。
在工具中,執行以下步驟:
- 單擊配置打開的OAuth 2.0配置窗口。
- 在OAuth流場中,選擇客戶端。
- 在OAuth端點字段中,選擇自定義。
- 在相應字段中指定您的 OAuth 2.0 端點和您分配給 Google 的客戶端 ID。
- 在步驟1部分,不要選擇任何谷歌範圍。相反,將此字段留空或鍵入對您的服務器有效的範圍(如果不使用 OAuth 範圍,則輸入任意字符串)。當您完成後,單擊授權的API。
- 在步驟2和步驟3段,完成OAuth 2.0流程和驗證每個步驟按預期工作。
您可以通過驗證您的實現谷歌帳戶鏈接演示工具。
在工具中,執行以下步驟:
- 點擊登錄在與谷歌按鈕。
- 選擇您要關聯的帳戶。
- 輸入服務標識。
- (可選)輸入您將請求訪問的一個或多個範圍。
- 單擊開始演示。
- 出現提示時,確認您可以同意並拒絕鏈接請求。
- 確認您被重定向到您的平台。