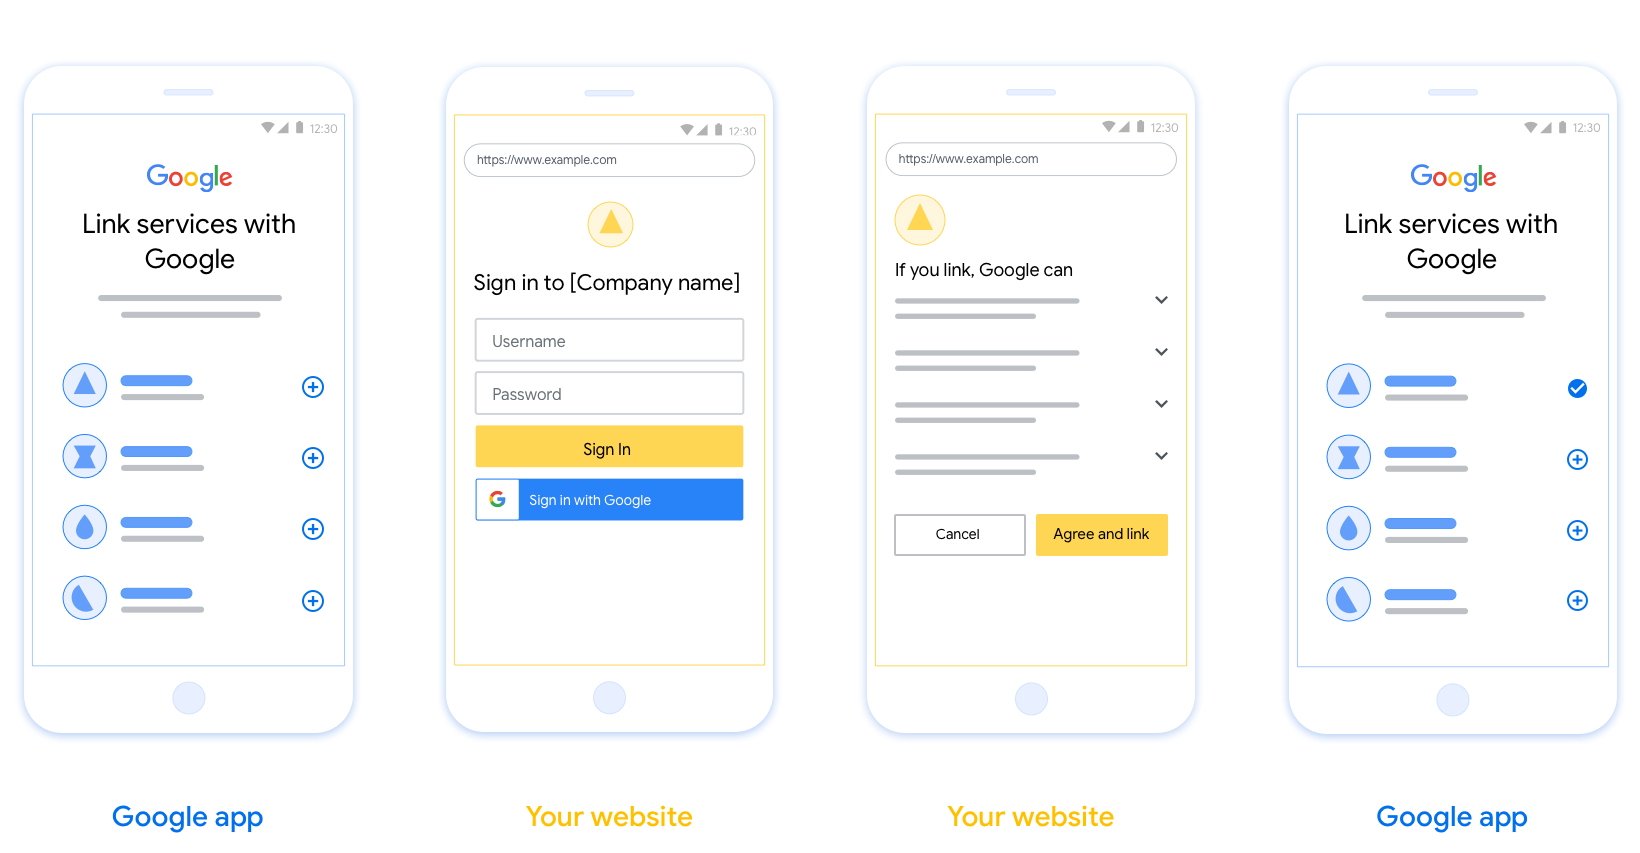
Akun ditautkan menggunakan alur implisit dan kode otorisasi OAuth 2.0 standar industri. Layanan Anda harus mendukung endpoint otorisasi dan pertukaran token yang mematuhi OAuth 2.0.
Dalam alur implisit, Google akan membuka endpoint otorisasi Anda di browser pengguna. Setelah berhasil login, Anda akan menampilkan token akses dengan masa berlaku lama ke Google. Token akses ini kini disertakan dalam setiap permintaan yang dikirim dari Google.
Dalam alur kode otorisasi, Anda memerlukan dua endpoint:
Endpoint Authorization, yang menampilkan UI login kepada pengguna Anda yang belum login. Endpoint otorisasi juga membuat kode otorisasi berumur pendek untuk mencatat izin pengguna ke akses yang diminta.
Endpoint pertukaran token, yang bertanggung jawab atas dua jenis pertukaran:
- Menukar kode otorisasi dengan token refresh yang berumur panjang dan token akses yang berumur singkat. Pertukaran ini terjadi saat pengguna melalui alur penautan akun.
- Menukar token refresh yang memiliki masa aktif lama dengan token akses yang memiliki masa aktif singkat. Pertukaran ini terjadi saat Google memerlukan token akses baru karena token yang ada sudah tidak berlaku lagi.
Pilih alur OAuth 2.0
Meskipun alur implisit lebih mudah diterapkan, Google merekomendasikan agar token akses yang dikeluarkan oleh alur implisit tidak pernah berakhir masa berlakunya. Hal ini karena pengguna dipaksa untuk menautkan akunnya lagi setelah token berakhir masa berlakunya dengan alur implisit. Jika Anda memerlukan masa berlaku token karena alasan keamanan, sebaiknya gunakan alur kode otorisasi.
Panduan desain
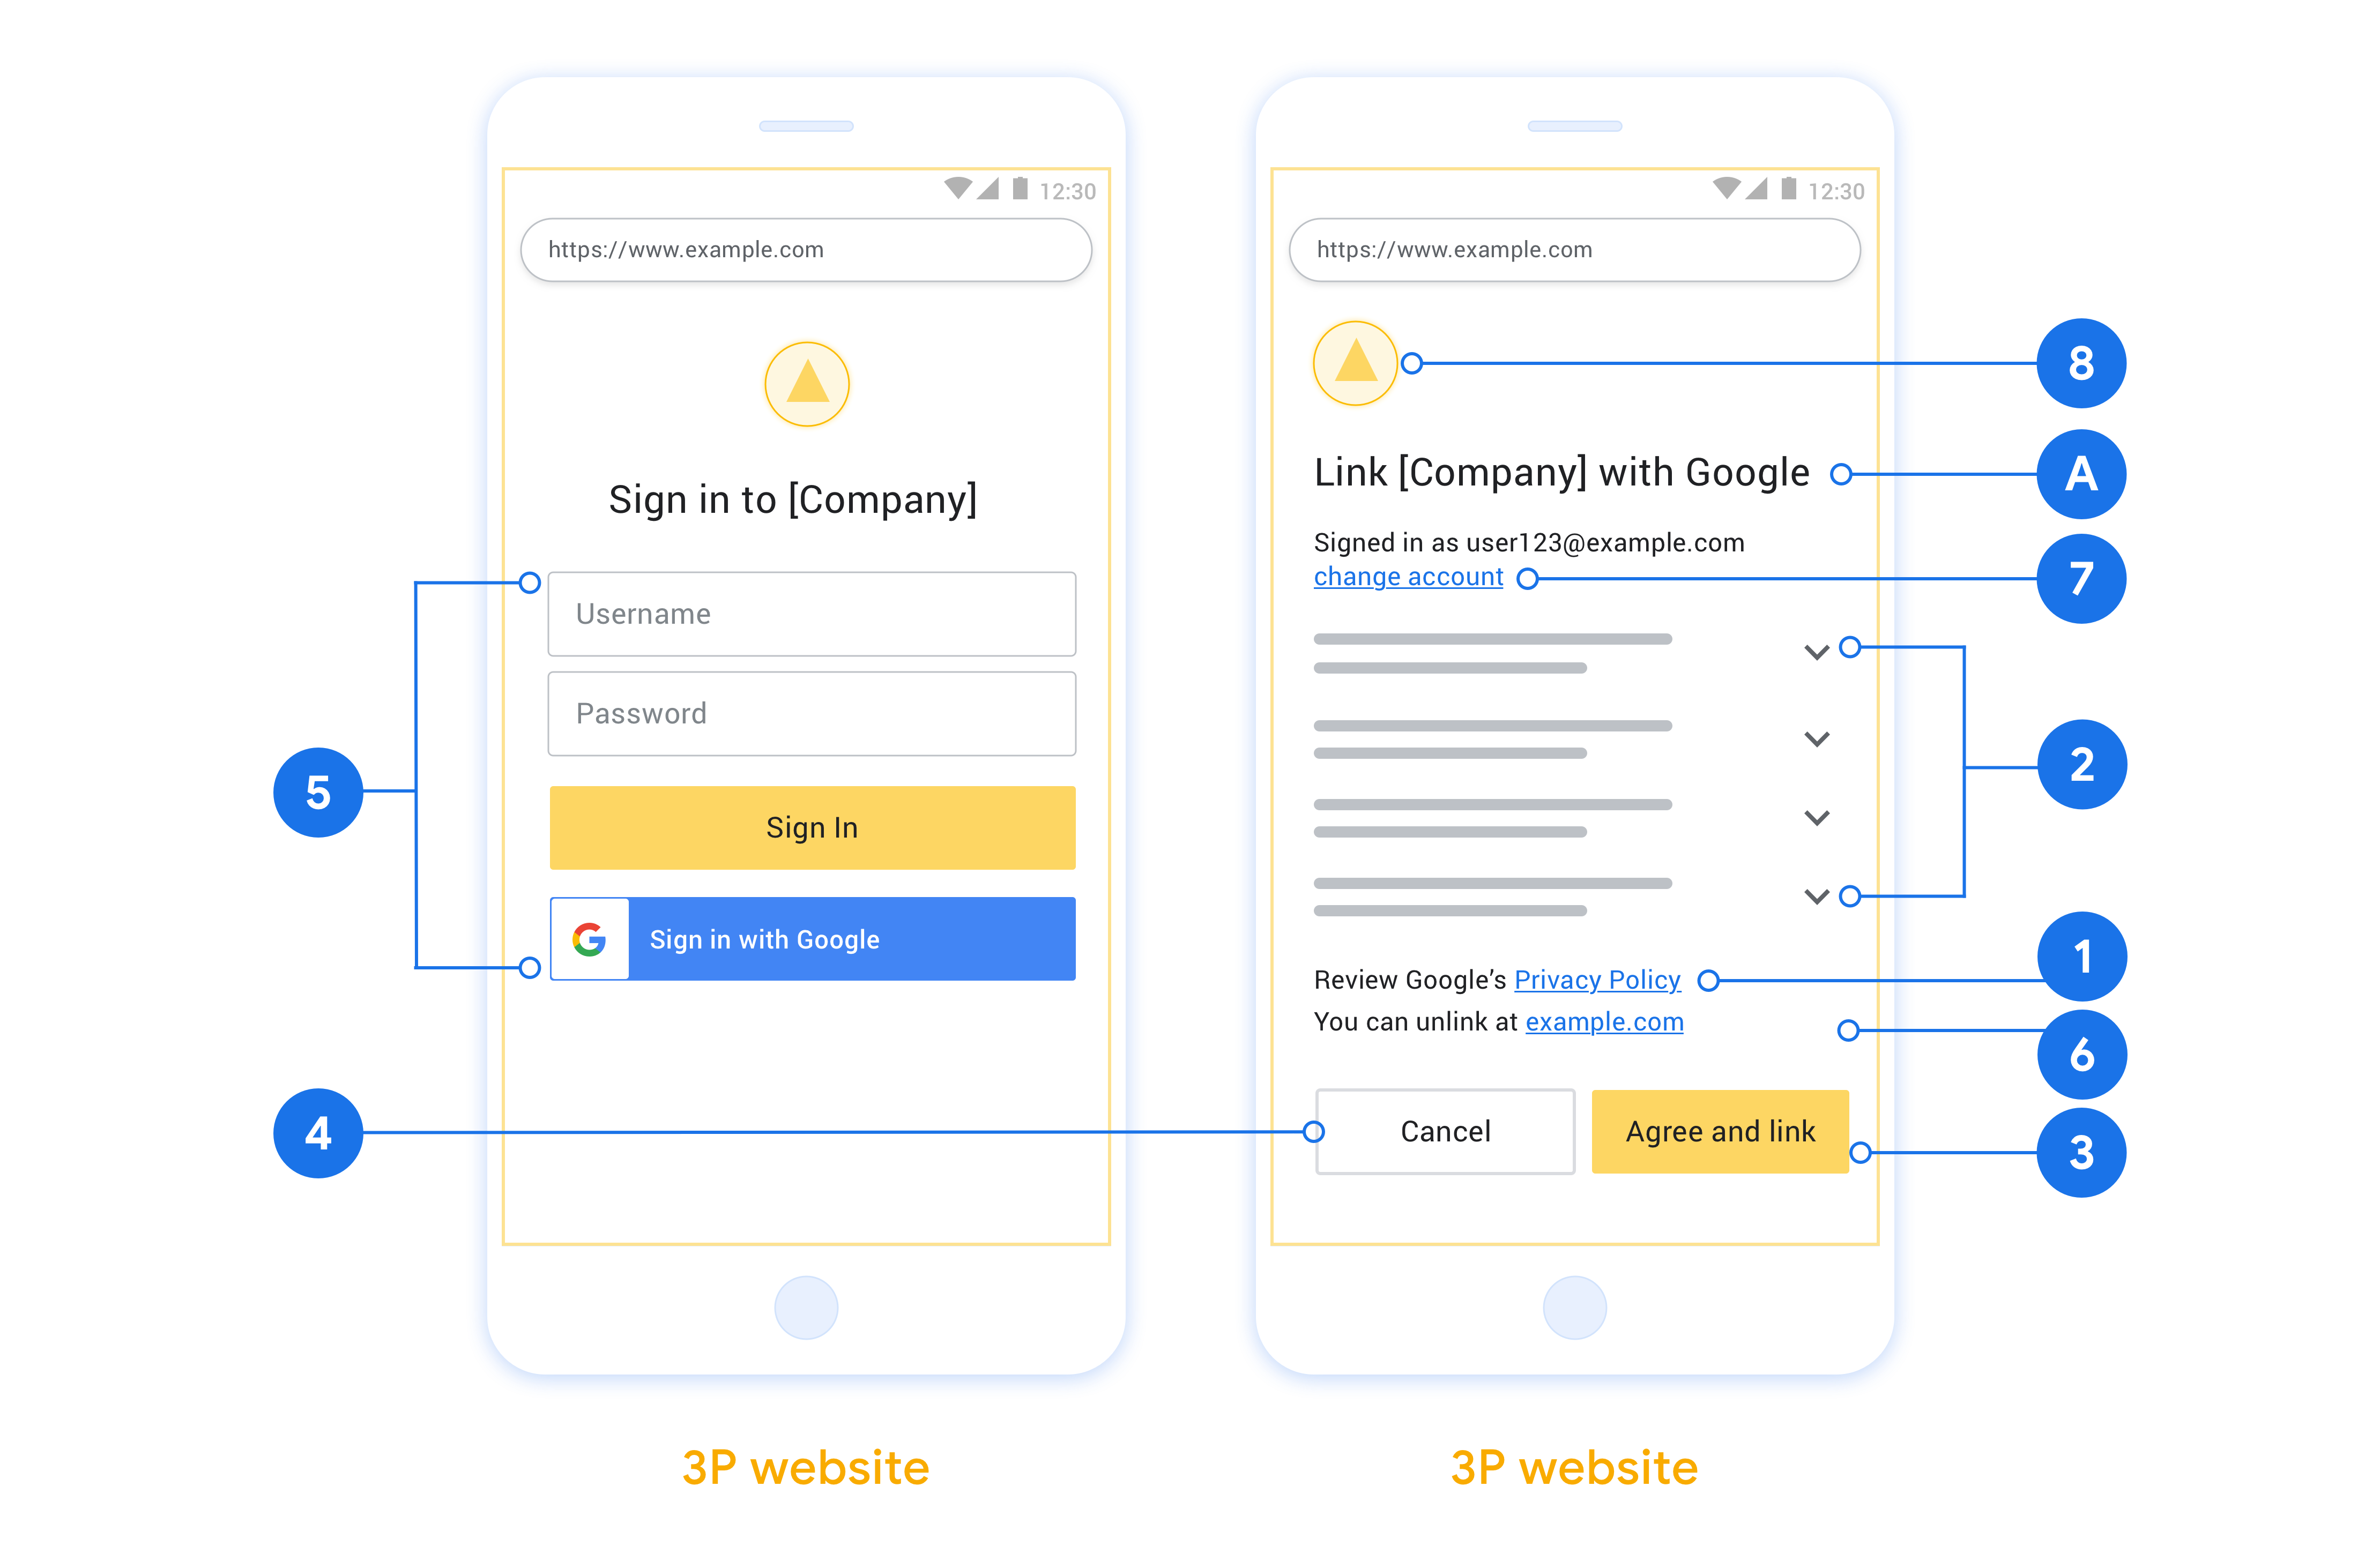
Bagian ini menjelaskan persyaratan dan rekomendasi desain untuk layar pengguna yang Anda host untuk alur penautan OAuth. Setelah dipanggil oleh aplikasi Google, platform Anda akan menampilkan halaman login ke Google dan layar izin penautan akun ke pengguna. Pengguna akan diarahkan kembali ke aplikasi Google setelah memberikan izin untuk menautkan akun.

Persyaratan
- Anda harus menyampaikan bahwa akun pengguna akan ditautkan ke Google, bukan produk Google tertentu seperti Google Home atau Asisten Google.
Rekomendasi
Sebaiknya Anda melakukan hal berikut:
Menampilkan Kebijakan Privasi Google. Sertakan link ke Kebijakan Privasi Google di layar izin.
Data yang akan dibagikan. Gunakan bahasa yang jelas dan ringkas untuk memberi tahu pengguna data apa saja yang diperlukan Google dan alasannya.
Pesan ajakan (CTA) yang jelas. Nyatakan pesan ajakan yang jelas di layar izin, seperti “Setuju dan tautkan”. Hal ini karena pengguna perlu memahami data apa yang harus mereka bagikan kepada Google untuk menautkan akun mereka.
Kemampuan untuk membatalkan. Berikan cara bagi pengguna untuk kembali atau membatalkan, jika mereka memilih untuk tidak menautkan.
Proses login yang jelas. Pastikan pengguna memiliki metode yang jelas untuk login ke Akun Google mereka, seperti kolom untuk nama pengguna dan sandi mereka atau Login dengan Google.
Kemampuan untuk membatalkan tautan. Tawarkan mekanisme bagi pengguna untuk membatalkan tautan, seperti URL ke setelan akun mereka di platform Anda. Atau, Anda dapat menyertakan link ke Akun Google tempat pengguna dapat mengelola akun tertaut mereka.
Kemampuan untuk mengubah akun pengguna. Sarankan metode bagi pengguna untuk beralih akun. Hal ini sangat bermanfaat jika pengguna cenderung memiliki beberapa akun.
- Jika pengguna harus menutup layar izin untuk beralih akun, kirim error yang dapat dipulihkan ke Google sehingga pengguna dapat login ke akun yang diinginkan dengan penautan OAuth dan alur implisit.
Sertakan logo Anda. Menampilkan logo perusahaan Anda di layar izin. Gunakan panduan gaya untuk menempatkan logo. Jika Anda juga ingin menampilkan logo Google, lihat Logo dan merek dagang.

Membuat project
Untuk membuat project Anda agar dapat menggunakan penautan akun:
- Klik Buat proyek.
- Masukkan nama atau terima saran yang dibuat.
- Konfirmasi atau edit kolom yang tersisa.
- Klik Buat.
Untuk melihat project ID Anda:
- Cari project Anda di tabel pada halaman landing. Project ID muncul di kolom ID.
Mengonfigurasi Layar Izin OAuth Anda
Proses Penautan Akun Google mencakup layar izin yang memberi tahu pengguna aplikasi yang meminta akses ke data mereka, jenis data yang diminta, dan persyaratan yang berlaku. Anda harus mengonfigurasi layar izin OAuth sebelum membuat ID klien Google API.
- Buka halaman Layar izin OAuth di konsol API Google.
- Jika diminta, pilih project yang baru saja Anda buat.
Di halaman "Layar izin OAuth", isi formulir, lalu klik tombol “Simpan”.
Nama aplikasi: Nama aplikasi yang meminta izin. Nama harus mencerminkan aplikasi Anda secara akurat dan konsisten dengan nama aplikasi yang dilihat pengguna di tempat lain. Nama aplikasi akan ditampilkan di layar izin Penautan Akun.
Logo aplikasi: Gambar di layar izin yang akan membantu pengguna mengenali aplikasi Anda. Logo ditampilkan di layar izin Penautan akun dan di setelan akun
Email dukungan: Agar pengguna dapat menghubungi Anda untuk mengajukan pertanyaan tentang izin mereka.
Cakupan untuk Google API: Cakupan memungkinkan aplikasi Anda mengakses data Google pribadi pengguna Anda. Untuk kasus penggunaan Penautan Akun Google, cakupan default (email, profil, openid) sudah cukup, Anda tidak perlu menambahkan cakupan sensitif. Secara umum, praktik terbaiknya adalah meminta cakupan secara bertahap, pada saat akses diperlukan, bukan di awal. Pelajari lebih lanjut.
Domain yang diizinkan: Guna melindungi Anda dan pengguna Anda, Google hanya mengizinkan aplikasi yang melakukan autentikasi menggunakan OAuth untuk menggunakan Domain yang Diizinkan. Link aplikasi Anda harus dihosting di Domain yang Diotorisasi. Pelajari lebih lanjut.
Link Halaman Beranda Aplikasi: Halaman beranda untuk aplikasi Anda. Harus dihosting di Domain yang Diotorisasi.
Link Kebijakan Privasi Aplikasi: Ditampilkan di layar izin Penautan Akun Google. Harus dihosting di Domain yang Diotorisasi.
Link Persyaratan Layanan Aplikasi (Opsional): Harus dihosting di Domain yang Diotorisasi.

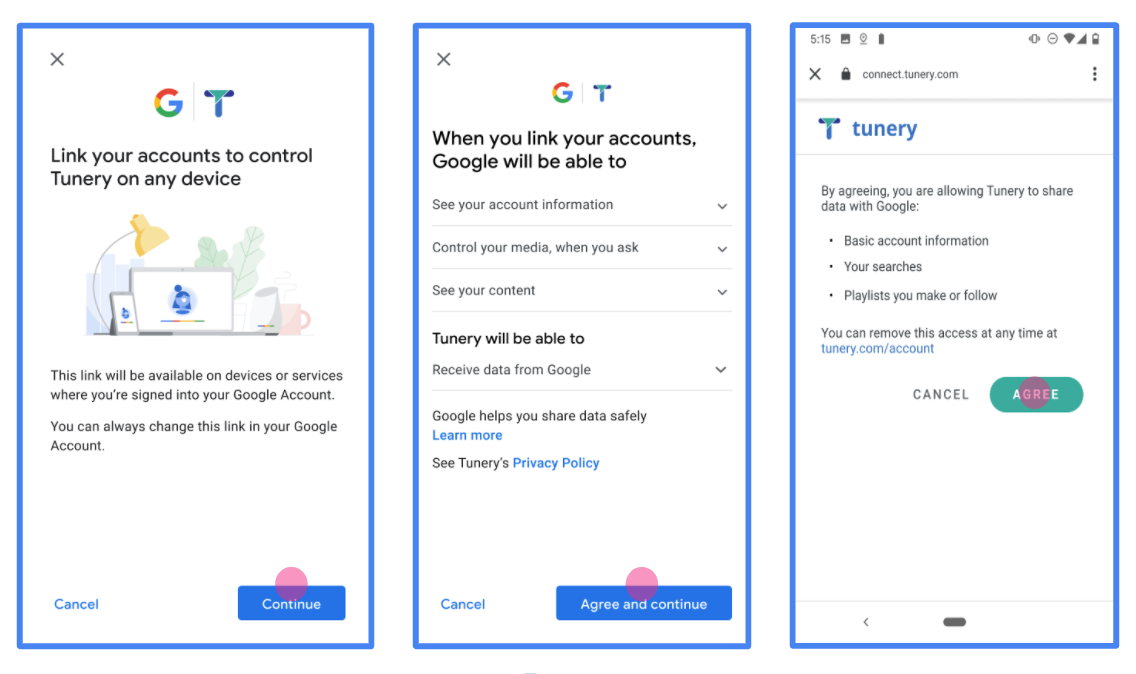
Gambar 1. Layar Izin Penautan Akun Google untuk Aplikasi fiktif, Tunery
Periksa "Status Verifikasi", jika aplikasi Anda memerlukan verifikasi, klik tombol "Kirim untuk Verifikasi" untuk mengirimkan aplikasi Anda untuk diverifikasi. Lihat persyaratan verifikasi OAuth untuk mengetahui detailnya.
Menerapkan server OAuth
Implementasi server OAuth 2.0 dari alur kode otorisasi terdiri dari dua endpoint, yang disediakan oleh layanan Anda melalui HTTPS. Endpoint pertama adalah endpoint otorisasi, yang bertanggung jawab untuk menemukan atau mendapatkan persetujuan dari pengguna untuk akses data. Endpoint otorisasi menampilkan UI login ke pengguna yang belum login dan mencatat izin akses yang diminta. Endpoint kedua adalah endpoint pertukaran token, yang digunakan untuk memperoleh string terenkripsi, yang disebut token, yang mengotorisasi pengguna untuk mengakses layanan Anda.
Bila aplikasi Google perlu memanggil salah satu API layanan Anda, Google akan menggunakan kedua endpoint tersebut untuk mendapatkan izin dari pengguna memanggil API ini atas nama mereka.
Sesi alur kode otorisasi OAuth 2.0 yang dimulai oleh Google memiliki alur berikut:
- Google akan membuka endpoint otorisasi Anda di browser pengguna. Jika alur dimulai di perangkat khusus suara untuk Action, Google mentransfer dieksekusi ke ponsel.
- Pengguna akan login, jika belum login, dan memberikan izin kepada Google untuk mengakses data mereka dengan API Anda, jika mereka belum memberikan izin.
- Layanan Anda membuat kode otorisasi dan mengembalikannya ke Google. Yang akan dilakukan jadi, alihkan browser pengguna kembali ke Google dengan kode otorisasi dilampirkan pada permintaan.
- Google mengirimkan kode otorisasi ke endpoint pertukaran token Anda, yang akan memverifikasi keaslian kode dan menampilkan token akses serta token refresh. Token akses adalah token berumur pendek yang dibutuhkan layanan Anda diterima sebagai kredensial untuk mengakses API. Token refresh berumur panjang yang dapat disimpan dan digunakan Google untuk mendapatkan token akses baru ketika berakhir.
- Setelah pengguna menyelesaikan alur penautan akun, setiap langkah yang dikirim dari Google berisi token akses.
Menangani permintaan otorisasi
Saat Anda perlu melakukan penautan akun menggunakan kode otorisasi OAuth 2.0 , Google mengirim pengguna ke endpoint otorisasi Anda dengan permintaan yang mencakup parameter berikut:
| Parameter endpoint otorisasi | |
|---|---|
client_id |
Client-ID yang Anda tetapkan ke Google. |
redirect_uri |
URL tempat Anda mengirim respons atas permintaan ini. |
state |
Nilai pembukuan yang diteruskan kembali ke Google tanpa berubah dalam URI pengalihan. |
scope |
Opsional: Serangkaian string cakupan yang dipisahkan spasi yang menentukan data yang otorisasinya diminta oleh Google. |
response_type |
Jenis nilai yang akan ditampilkan dalam respons. Untuk OAuth 2.0
alur kode otorisasi, jenis responsnya selalu code.
|
user_locale |
Setelan bahasa Akun Google di RFC5646 , digunakan untuk melokalkan konten Anda ke bahasa pilihan pengguna. |
Misalnya, jika endpoint otorisasi Anda tersedia di
https://myservice.example.com/auth, permintaan mungkin akan terlihat seperti berikut:
GET https://myservice.example.com/auth?client_id=GOOGLE_CLIENT_ID&redirect_uri=REDIRECT_URI&state=STATE_STRING&scope=REQUESTED_SCOPES&response_type=code&user_locale=LOCALE
Agar endpoint otorisasi Anda dapat menangani permintaan login, lakukan hal berikut langkah:
- Pastikan bahwa
client_idcocok dengan Client-ID yang Anda tetapkan ke Google, danredirect_uricocok dengan URL alihan yang diberikan oleh Google untuk layanan Anda. Pemeriksaan ini penting untuk mencegah pemberian akses ke aplikasi klien yang tidak diinginkan atau salah dikonfigurasi. Jika Anda mendukung beberapa OAuth 2.0 flow, juga mengonfirmasi bahwaresponse_typeadalahcode. - Periksa apakah pengguna sudah login ke layanan Anda. Jika pengguna tidak {i>login<i}, menyelesaikan alur login atau pendaftaran layanan Anda.
- Buat kode otorisasi untuk digunakan Google guna mengakses API Anda. Kode otorisasi dapat berupa nilai string apa pun, tetapi harus secara unik mewakili pengguna, klien yang menjadi tujuan token, dan masa berlaku kode waktu, dan itu tidak boleh ditebak. Anda biasanya memberikan otorisasi kode yang berakhir masa berlakunya setelah sekitar 10 menit.
- Konfirmasi bahwa URL yang ditentukan oleh parameter
redirect_urimemiliki formulir berikut:https://oauth-redirect.googleusercontent.com/r/YOUR_PROJECT_ID https://oauth-redirect-sandbox.googleusercontent.com/r/YOUR_PROJECT_ID
- Alihkan browser pengguna ke URL yang ditentukan oleh
Parameter
redirect_uri. Sertakan kode otorisasi yang baru saja dibuat dan nilai status asli yang tidak dimodifikasi saat Anda mengalihkan dengan menambahkan parametercodedanstate. Berikut adalah contoh URL yang dihasilkan:https://oauth-redirect.googleusercontent.com/r/YOUR_PROJECT_ID?code=AUTHORIZATION_CODE&state=STATE_STRING
Menangani permintaan pertukaran token
Endpoint pertukaran token layanan Anda bertanggung jawab atas dua jenis token pertukaran:
- Tukar kode otorisasi dengan token akses dan token refresh
- Menukarkan token refresh dengan token akses
Permintaan pertukaran token mencakup parameter berikut:
| Parameter endpoint pertukaran token | |
|---|---|
client_id |
String yang mengidentifikasi asal permintaan sebagai Google. String ini harus terdaftar dalam sistem Anda sebagai pengenal unik Google. |
client_secret |
String rahasia yang Anda daftarkan ke Google untuk layanan Anda. |
grant_type |
Jenis token yang dipertukarkan. Bisa
authorization_code atau refresh_token. |
code |
Jika grant_type=authorization_code, parameter ini adalah
kode yang diterima Google dari proses login atau pertukaran token Anda
endpoint. |
redirect_uri |
Jika grant_type=authorization_code, parameter ini adalah
URL yang digunakan dalam permintaan otorisasi awal. |
refresh_token |
Jika grant_type=refresh_token, parameter ini adalah
token refresh yang diterima Google dari endpoint pertukaran token Anda. |
Tukar kode otorisasi dengan token akses dan token refresh
Setelah pengguna login dan endpoint otorisasi Anda menampilkan histori kode otorisasi ke Google, Google mengirimkan permintaan ke pertukaran token endpoint untuk menukar kode otorisasi dengan token akses, sebelumnya yang benar.
Untuk permintaan ini, nilai grant_type adalah authorization_code, dan
nilai code adalah nilai kode otorisasi yang sebelumnya Anda berikan
ke Google. Berikut ini contoh permintaan untuk menukar
kode otorisasi untuk token akses dan token refresh:
POST /token HTTP/1.1
Host: oauth2.example.com
Content-Type: application/x-www-form-urlencoded

client_id=GOOGLE_CLIENT_ID&client_secret=GOOGLE_CLIENT_SECRET&grant_type=authorization_code&code=AUTHORIZATION_CODE&redirect_uri=REDIRECT_URI
Untuk menukar kode otorisasi dengan token akses dan token refresh,
endpoint pertukaran token merespons permintaan POST dengan menjalankan
langkah:
- Pastikan bahwa
client_idmengidentifikasi asal permintaan sebagai asal origin, dan bahwaclient_secretcocok dengan nilai yang diharapkan. - Verifikasi bahwa kode otorisasi valid dan masih berlaku, serta bahwa ID klien yang ditentukan dalam permintaan cocok dengan ID klien yang terkait dengan kode otorisasi Anda.
- Pastikan URL yang ditentukan oleh parameter
redirect_urisama dengan nilai yang digunakan dalam permintaan otorisasi awal. - Jika Anda tidak dapat memverifikasi semua kriteria di atas, tampilkan permintaan HTTP
Error 400 Bad Request dengan
{"error": "invalid_grant"}sebagai isi. - Jika tidak, gunakan ID pengguna dari kode otorisasi untuk membuat pembaruan dan token akses. Token ini dapat berupa nilai string apa pun, tetapi harus secara unik mewakili pengguna dan klien yang menjadi tujuan token, dan mereka harus tidak dapat ditebak. Untuk token akses, catat juga waktu kedaluwarsa token, yang biasanya satu jam setelah Anda menerbitkan token. Token refresh tidak memiliki tanggal habis masa berlaku.
- Tampilkan objek JSON berikut dalam isi respons HTTPS:
{
"token_type": "Bearer",
"access_token": "ACCESS_TOKEN",
"refresh_token": "REFRESH_TOKEN",
"expires_in": SECONDS_TO_EXPIRATION
}
Google menyimpan token akses dan token refresh untuk pengguna dan data akhir masa berlaku token akses. Saat token akses kedaluwarsa, Google akan menggunakan token refresh untuk mendapatkan token akses baru dari endpoint pertukaran token Anda.
Menukarkan token refresh dengan token akses
Saat masa berlaku token akses habis, Google akan mengirimkan permintaan ke pertukaran token Anda untuk menukar token refresh dengan token akses baru.
Untuk permintaan ini, nilai grant_type adalah refresh_token, dan nilai
dari refresh_token adalah nilai token refresh yang sebelumnya Anda berikan
Google. Berikut adalah contoh permintaan untuk menukar token refresh
untuk token akses:
POST /token HTTP/1.1
Host: oauth2.example.com
Content-Type: application/x-www-form-urlencoded

client_id=GOOGLE_CLIENT_ID&client_secret=GOOGLE_CLIENT_SECRET&grant_type=refresh_token&refresh_token=REFRESH_TOKEN
Guna menukar token refresh dengan token akses, endpoint pertukaran token Anda
merespons permintaan POST dengan menjalankan langkah-langkah berikut:
- Verifikasi bahwa
client_idmengidentifikasi asal permintaan sebagai Google, dan bahwaclient_secretcocok dengan nilai yang diharapkan. - Pastikan token refresh valid, dan client ID yang ditentukan di permintaan cocok dengan client ID yang terkait dengan token refresh.
- Jika Anda tidak dapat memverifikasi semua kriteria di atas, tampilkan HTTP 400
Error Permintaan Buruk dengan
{"error": "invalid_grant"}sebagai isi. - Jika tidak, gunakan ID pengguna dari token refresh untuk membuat akses sebelumnya yang benar. Token ini dapat berupa nilai string apa pun, tetapi harus secara unik mewakili pengguna dan klien yang menjadi tujuan token, dan mereka tidak boleh dapat ditebak. Untuk token akses, catat juga waktu kedaluwarsa token, biasanya satu jam setelah Anda menerbitkan token.
- Tampilkan objek JSON berikut dalam isi HTTPS
respons:
{
"token_type": "Bearer",
"access_token": "ACCESS_TOKEN",
"expiration_in": SECONDS_TO_EXPIRATION
}
Menangani permintaan info pengguna
Endpoint userinfo adalah resource yang dilindungi OAuth 2.0 yang menampilkan klaim tentang pengguna yang ditautkan. Menerapkan dan menghosting endpoint userinfo bersifat opsional, kecuali untuk kasus penggunaan berikut:
- Login dengan Akun Tertaut dengan Google One Ketuk.
- Langganan tanpa hambatan di Android TV.
Setelah token akses berhasil diambil dari endpoint token Anda, Google akan mengirimkan permintaan ke endpoint userinfo Anda untuk mengambil informasi profil dasar tentang pengguna yang ditautkan.
| header permintaan endpoint userinfo | |
|---|---|
Authorization header |
Token akses jenis Bearer. |
Misalnya, jika endpoint userinfo Anda tersedia di
https://myservice.example.com/userinfo, permintaan mungkin akan terlihat seperti berikut:
GET /userinfo HTTP/1.1
Host: myservice.example.com
Authorization: Bearer ACCESS_TOKEN
Agar endpoint userinfo Anda dapat menangani permintaan, lakukan langkah-langkah berikut:
- Ekstrak token akses dari header Otorisasi dan tampilkan informasi untuk pengguna yang terkait dengan token akses.
- Jika token akses tidak valid, tampilkan error HTTP 401 Tidak Sah dengan menggunakan Header Respons
WWW-Authenticate. Berikut adalah contoh respons error userinfo:HTTP/1.1 401 Unauthorized WWW-Authenticate: error="invalid_token", error_description="The Access Token expired"
Jika token akses valid, tampilkan dan respons HTTP 200 dengan objek JSON berikut dalam isi HTTPS respons:
{ "sub": "USER_UUID", "email": "EMAIL_ADDRESS", "given_name": "FIRST_NAME", "family_name": "LAST_NAME", "name": "FULL_NAME", "picture": "PROFILE_PICTURE", }respons endpoint userinfo subID unik yang mengidentifikasi pengguna di sistem Anda. emailAlamat email pengguna. given_nameOpsional: Nama depan pengguna. family_nameOpsional: Nama belakang pengguna. nameOpsional: Nama lengkap pengguna. pictureOpsional: Foto profil pengguna.
Memvalidasi implementasi
Anda dapat memvalidasi penerapan menggunakan alat OAuth 2.0 Playground.
Di alat ini, lakukan langkah-langkah berikut:
- Klik Configuration untuk membuka jendela OAuth 2.0 Configuration.
- Di kolom OAuth flow, pilih Client-side.
- Di kolom OAuth Endpoints, pilih Custom.
- Tentukan endpoint OAuth 2.0 dan client ID yang Anda tetapkan ke Google di kolom yang sesuai.
- Di bagian Langkah 1, jangan pilih cakupan Google apa pun. Sebagai gantinya, biarkan kolom ini kosong atau ketik cakupan yang valid untuk server Anda (atau string arbitrer jika Anda tidak menggunakan cakupan OAuth). Setelah selesai, klik Otorisasi API.
- Di bagian Langkah 2 dan Langkah 3, ikuti alur OAuth 2.0 dan verifikasi bahwa setiap langkah berfungsi sebagaimana mestinya.
Anda dapat memvalidasi penerapan menggunakan alat Demo Penautan Akun Google.
Di alat tersebut, lakukan langkah-langkah berikut:
- Klik tombol Login dengan Google.
- Pilih akun yang ingin ditautkan.
- Masukkan ID layanan.
- Secara opsional, masukkan satu atau beberapa cakupan yang akan Anda minta aksesnya.
- Klik Mulai Demo.
- Jika diminta, konfirmasi bahwa Anda dapat mengizinkan dan menolak permintaan penautan.
- Pastikan Anda dialihkan ke platform Anda.