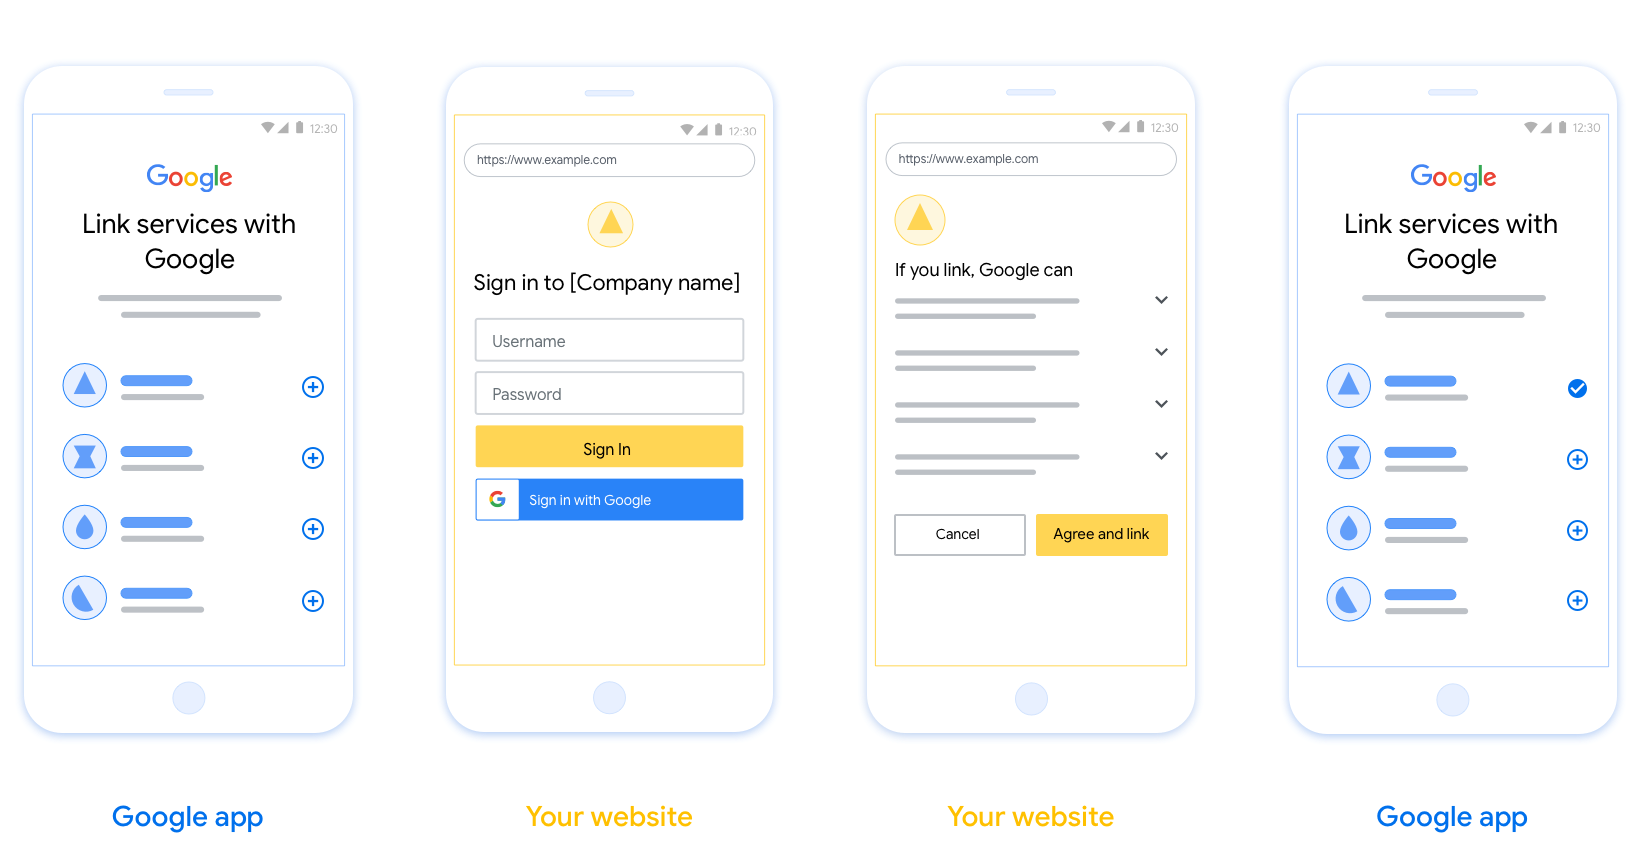
アカウントは、業界標準の OAuth 2.0 インプリシット フローと認可コードフローを使用してリンクされます。サービスは、OAuth 2.0 準拠の認可エンドポイントとトークン交換エンドポイントをサポートする必要があります。
In the implicit flow, Google opens your authorization endpoint in the user's browser. After successful sign in, you return a long-lived access token to Google. This access token is now included in every request sent from Google.
In the authorization code flow, you need two endpoints:
The authorization endpoint, which presents the sign-in UI to your users that aren't already signed in. The authorization endpoint also creates a short-lived authorization code to record users' consent to the requested access.
The token exchange endpoint, which is responsible for two types of exchanges:
- Exchanges an authorization code for a long-lived refresh token and a short-lived access token. This exchange happens when the user goes through the account linking flow.
- Exchanges a long-lived refresh token for a short-lived access token. This exchange happens when Google needs a new access token because the one it had expired.
Choose an OAuth 2.0 flow
Although the implicit flow is simpler to implement, Google recommends that access tokens issued by the implicit flow never expire. This is because the user is forced to link their account again after a token expires with the implicit flow. If you need token expiration for security reasons, we strongly recommend that you use the authorization code flow instead.
Design guidelines
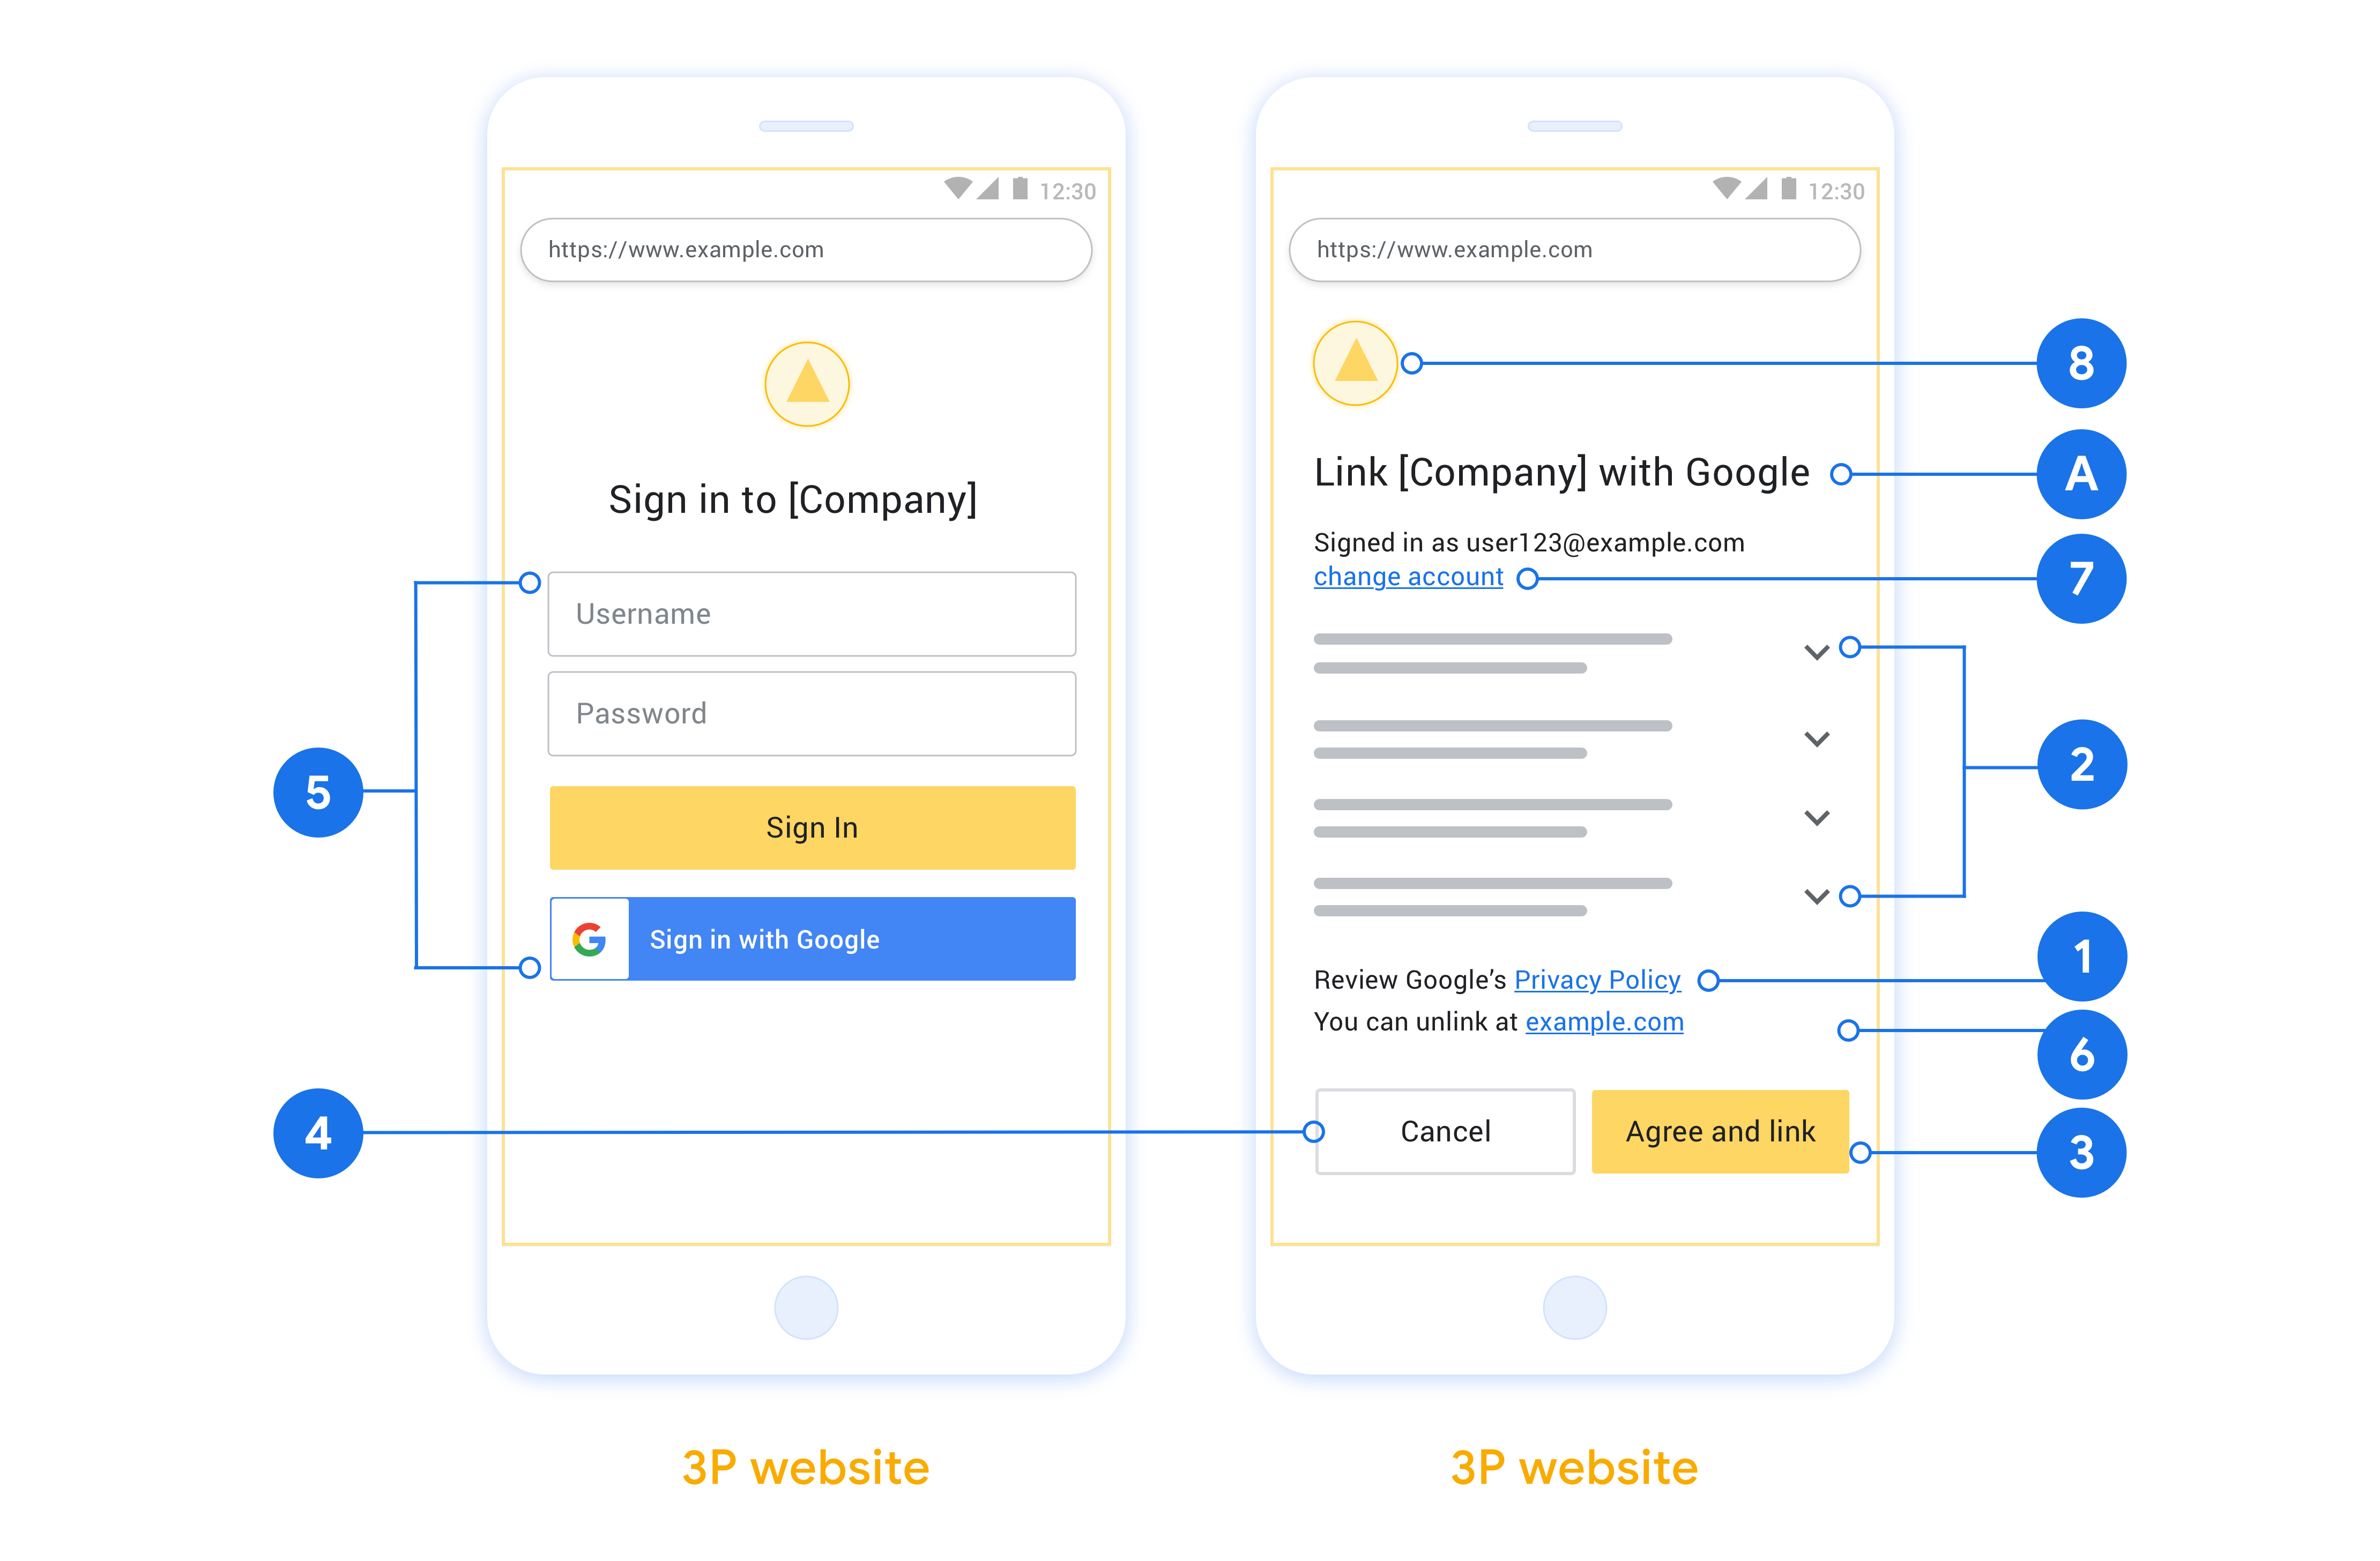
This section describes the design requirements and recommendations for the user screen that you host for OAuth linking flows. After it's called by Google's app, your platform displays a sign in to Google page and account linking consent screen to the user. The user is directed back to Google's app after giving their consent to link accounts.

Requirements
- You must communicate that the user’s account will be linked to Google, not a specific Google product like Google Home or Google Assistant.
Recommendations
We recommend that you do the following:
Display Google's Privacy Policy. Include a link to Google’s Privacy Policy on the consent screen.
Data to be shared. Use clear and concise language to tell the user what data of theirs Google requires and why.
Clear call-to-action. State a clear call-to-action on your consent screen, such as “Agree and link.” This is because users need to understand what data they're required to share with Google to link their accounts.
Ability to cancel. Provide a way for users to go back or cancel, if they choose not to link.
Clear sign-in process. Ensure that users have clear method for signing in to their Google account, such as fields for their username and password or Sign in with Google.
Ability to unlink. Offer a mechanism for users to unlink, such as a URL to their account settings on your platform. Alternatively, you can include a link to Google Account where users can manage their linked account.
Ability to change user account. Suggest a method for users to switch their account(s). This is especially beneficial if users tend to have multiple accounts.
- If a user must close the consent screen to switch accounts, send a recoverable error to Google so the user can sign in to the desired account with OAuth linking and the implicit flow.
Include your logo. Display your company logo on the consent screen. Use your style guidelines to place your logo. If you wish to also display Google's logo, see Logos and trademarks.

プロジェクトを作成する
アカウント リンクを使用するプロジェクトを作成するには:
- [プロジェクトの作成] をクリックします。
- 名前を入力するか、生成された候補をそのまま使用します。
- 残りのフィールドを確認または編集します。
- [作成] をクリックします。
プロジェクト ID を表示するには:
- ランディング ページの表でプロジェクトを見つけます。プロジェクト ID は [ID] 列に表示されています。
OAuth 同意画面を構成する
Google アカウントのリンク プロセスには、ユーザーのデータへのアクセスをリクエストしているアプリケーション、リクエストしているデータの種類、適用される条件をユーザーに知らせる同意画面が含まれます。Google API クライアント ID を生成する前に、OAuth 同意画面を構成する必要があります。
- Google API Console の [OAuth 同意画面] ページを開きます。
- プロンプトが表示されたら、作成したプロジェクトを選択します。
[OAuth 同意画面] ページで、フォームに記入して [保存] ボタンをクリックします。
アプリケーション名: 同意を求めるアプリケーションの名前。名前はアプリを正確に反映し、ユーザーが他の場所で見るアプリ名と一致している必要があります。アプリケーション名は、アカウント リンクの同意画面に表示されます。
アプリケーションのロゴ: 同意画面に表示される画像で、ユーザーがアプリを認識するのに役立ちます。ロゴは、アカウントのリンクの同意画面とアカウント設定に表示されます。
サポートのメールアドレス: ユーザーが同意について問い合わせる際に使用します。
Google API のスコープ: スコープを使用すると、アプリケーションはユーザーの非公開の Google データにアクセスできます。Google アカウントのリンクのユースケースでは、デフォルトのスコープ(email、profile、openid)で十分です。機密性の高いスコープを追加する必要はありません。一般的に、スコープは事前にリクエストするのではなく、アクセスが必要になったときに段階的にリクエストすることがベスト プラクティスです。詳細
承認済みドメイン: デベロッパーとユーザーを保護するために、Google では、OAuth を使用して認証するアプリケーションのみに承認済みドメインの使用を許可しています。アプリケーションのリンクは、承認済みドメインでホストする必要があります。詳細
アプリケーションのホームページへのリンク: アプリケーションのホームページ。承認済みドメインでホストされている必要があります。
アプリケーション プライバシー ポリシーへのリンク: Google アカウントのリンクの同意画面に表示されます。承認済みドメインでホストされている必要があります。
アプリケーション利用規約のリンク(省略可): 承認済みドメインでホストされている必要があります。

図 1. 架空のアプリケーション Tunery の Google アカウントのリンクの同意画面
[Verification Status](確認ステータス)を確認します。アプリケーションの確認が必要な場合は、[Submit For Verification](確認のために送信)ボタンをクリックして、確認のためにアプリケーションを送信します。詳しくは、OAuth の確認要件をご覧ください。
OAuth サーバーを実装する
認可コード フローの OAuth 2.0 サーバー実装は、 2 つのエンドポイント(サービスから HTTPS で利用可能)最初のエンドポイント 認可エンドポイントであり、サービス アカウントの検索、 ユーザーの同意を得る。認可エンドポイントは、 まだログインしていないユーザーにログイン UI を表示し、 アクセス権を取得します。2 つ目のエンドポイントはトークン交換エンドポイントです。 トークンと呼ばれる暗号化された文字列を取得し、ユーザーが サービスにアクセスします。
Google アプリケーションがサービスの API を呼び出す必要がある場合、Google は これらの API を呼び出す権限をユーザーから取得できます。 委任できます。
Google が開始した OAuth 2.0 認可コードフロー セッションには、 できます。
- Google がユーザーのブラウザで認可エンドポイントを開きます。フローが 音声のみのデバイスで開始された場合、Google は ダウンロードします
- ユーザーがログインし(まだログインしていない場合)、Google に次の権限を与える API を使用してデータにアクセスする必要があります(まだ権限を付与していない場合)。
- サービスによって認証コードが作成され、Google に返されます。タスク そのため、認証コードを使用してユーザーのブラウザを Google にリダイレクトします。 リクエストに添付されます
- Google がトークン交換エンドポイントに認証コードを送信します。 コードの真正性を検証し、アクセス トークンと 更新トークン。アクセス トークンは有効期間の短いトークンであり、サービス を受け入れて、API にアクセスするための認証情報です。更新トークンは有効期間が長い トークンを保存し、新しいアクセス トークンを取得するために Google が使用 期限が切れます。
- ユーザーがアカウントのリンクのフローを完了すると、それ以降は リクエストにはアクセス トークンが含まれています。
認可リクエストの処理
OAuth 2.0 認証コードを使用してアカウント リンクを行う必要がある場合 リクエストが送信されると、Google はユーザーを認可エンドポイントに送信します。 次のパラメータが含まれます。
| 認可エンドポイントのパラメータ | |
|---|---|
client_id |
Google に割り当てたクライアント ID。 |
redirect_uri |
このリクエストに対するレスポンスを送信する宛先 URL。 |
state |
リダイレクト URL で変更されずに Google に返される会計上の値。 |
scope |
省略可: スコープ文字列をスペースで区切って指定します。 許可を求めているデータです。 |
response_type |
レスポンスで返される値のタイプ。OAuth 2.0 では、
認可コードフローでは、レスポンス タイプは常に code です。
|
user_locale |
Google アカウントの言語設定 RFC5646 形式を使用して、コンテンツをユーザーの好みの言語にローカライズできます。 |
たとえば、認可エンドポイントが
https://myservice.example.com/auth の場合、リクエストは次のようになります。
GET https://myservice.example.com/auth?client_id=GOOGLE_CLIENT_ID&redirect_uri=REDIRECT_URI&state=STATE_STRING&scope=REQUESTED_SCOPES&response_type=code&user_locale=LOCALE
認可エンドポイントでログイン リクエストを処理するには、次の操作を行います。 手順:
client_idが、Google に割り当てたクライアント ID と一致することと、redirect_uriが、Google からサービスに提供されたリダイレクト URL と一致していることを確認します。これらのチェックは、権限の付与を防ぐために 意図しないクライアント アプリへのアクセスを防止できます。複数の OAuth 2.0 フローの場合、response_typeがcodeであることも確認します。- ユーザーがサービスにログインしているかどうか確認します。ユーザーがログインしていない場合は、サービスのログインまたは登録フローを完了します。
- Google が API にアクセスするために使用する認証コードを生成します。 認証コードには任意の文字列値を使用できますが、一意である必要があります。 は、ユーザー、トークンの対象となるクライアント、コードの有効期限を表します。 推測できないようにします。通常、約 10 分後に期限切れになる認可コードを発行します。
redirect_uriパラメータで指定された URL が フォーム:https://oauth-redirect.googleusercontent.com/r/YOUR_PROJECT_ID https://oauth-redirect-sandbox.googleusercontent.com/r/YOUR_PROJECT_ID
- ユーザーのブラウザを
redirect_uriパラメータ。その際、認証コードを リダイレクトしたときに、変更されていない元の状態値がcodeパラメータとstateパラメータを追加します。以下は、 次のようになります。https://oauth-redirect.googleusercontent.com/r/YOUR_PROJECT_ID?code=AUTHORIZATION_CODE&state=STATE_STRING
トークン交換リクエストの処理
サービスのトークン交換エンドポイントは、次の 2 種類のトークン交換を処理します。
- 認可コードとアクセス トークンおよび更新トークンとの交換
- 更新トークンとアクセス トークンの交換
トークン交換リクエストには、次のパラメータを使用します。
| トークン交換エンドポイントのパラメータ | |
|---|---|
client_id |
リクエスト元を Google として識別する文字列。この文字列は、Google の一意の識別子としてシステムに登録されている必要があります。 |
client_secret |
Google に登録したサービスのシークレット文字列。 |
grant_type |
交換されるトークンの種類。次のいずれか
authorization_code または refresh_token。 |
code |
grant_type=authorization_code の場合、このパラメータは
ログインまたはトークン交換から Google が受け取ったコード
提供します |
redirect_uri |
grant_type=authorization_code の場合、このパラメータは
最初の承認リクエストで使用される URL。 |
refresh_token |
grant_type=refresh_token の場合、このパラメータは
Google がトークン交換エンドポイントから受け取った更新トークン。 |
認可コードとアクセス トークンおよび更新トークンとの交換
ユーザーがログインすると、認可エンドポイントから一時的な 認証コードを Google に送信すると、Google がトークン交換にリクエストを送信し、 認証コードをアクセス トークンと交換して更新し、 あります。
これらのリクエストでは、grant_type の値は authorization_code、
code の値は、以前に付与した認証コードの値です。
Google に送信されます。以下は、
認証コードの例を以下に示します。
POST /token HTTP/1.1
Host: oauth2.example.com
Content-Type: application/x-www-form-urlencoded

client_id=GOOGLE_CLIENT_ID&client_secret=GOOGLE_CLIENT_SECRET&grant_type=authorization_code&code=AUTHORIZATION_CODE&redirect_uri=REDIRECT_URI
アクセス トークンと更新トークンの認証コードを交換するには、
トークン交換エンドポイントは、次の処理を実行して POST リクエストに応答します。
手順:
client_idでリクエストの送信元が承認済みであることを確認するclient_secretが期待値と一致することを確認します。- 認証コードが有効で有効期限が切れていないこと、認証コードが リクエストで指定されたクライアント ID が、リクエストに関連付けられたクライアント ID と 認証コード。
redirect_uriパラメータで指定された URL が同一であることを確認する 初期承認リクエストで使用されている値に設定します。- 上記の条件をすべて満たせない場合は HTTP を
本文が
{"error": "invalid_grant"}の 400 Bad Request エラー。 - それ以外の場合は、認証コードのユーザー ID を使用して更新を生成する アクセス トークンが含まれます。トークンには任意の文字列値を指定できますが、 トークンを使用するユーザーとクライアントを一意に表し、 推測できないようにしてください。アクセス トークンについては、トークンの有効期限も トークン。これは通常、トークンを発行してから 1 時間です。 更新トークンに有効期限はありません。
- HTTPS レスポンスの本文で次の JSON オブジェクトを返します。
{
"token_type": "Bearer",
"access_token": "ACCESS_TOKEN",
"refresh_token": "REFRESH_TOKEN",
"expires_in": SECONDS_TO_EXPIRATION
}
Google がユーザーのアクセス トークンと更新トークンを保存し、 アクセス トークンの有効期限。アクセス トークンの有効期限が切れると、Google は 更新トークンを送信して、トークン交換エンドポイントから新しいアクセス トークンを取得します。
更新トークンとアクセス トークンの交換
アクセス トークンの有効期限が切れると、Google はトークン交換にリクエストを送信します 更新トークンを新しいアクセス トークンと交換します。
これらのリクエストでは、grant_type の値は refresh_token、値は
refresh_token は、以前に付与した更新トークンの値です。
Google更新トークンを交換するリクエストの例を次に示します。
アクセス トークンの場合:
POST /token HTTP/1.1
Host: oauth2.example.com
Content-Type: application/x-www-form-urlencoded

client_id=GOOGLE_CLIENT_ID&client_secret=GOOGLE_CLIENT_SECRET&grant_type=refresh_token&refresh_token=REFRESH_TOKEN
更新トークンをアクセス トークンと交換するには、トークン交換エンドポイント
次の手順に従って、POST リクエストに応答します。
client_idがリクエスト元を Google として識別していることを確認します。client_secretが期待値と一致することを確認します。- 更新トークンが有効で、リクエストで指定されたクライアント ID が更新に関連付けられたクライアント ID と一致していることを確認します。
- 上記の条件をすべて満たせない場合は、HTTP 400 を返します。
{"error": "invalid_grant"}を本文とする不正なリクエスト エラー。 - それ以外の場合は、更新トークンのユーザー ID を使用してアクセス トークンを生成します。これらのトークンは任意の文字列値にできますが、一意である必要があります。 は、トークンの対象となるユーザーとクライアントを表します。これらは、 あります。アクセス トークンの場合は、トークンの有効期限、 トークンを発行してから通常 1 時間後です。
- HTTPS レスポンスの本文で次の JSON オブジェクトを返します。
{
"token_type": "Bearer",
"access_token": "ACCESS_TOKEN",
"expires_in": SECONDS_TO_EXPIRATION
}
userinfo リクエストを処理する
userinfo エンドポイントは、OAuth 2.0 で保護されたリソースで、リンクされたユーザーに関するクレームを返します。userinfo エンドポイントの実装とホストは任意ですが、以下のユースケースを除きます。
- Google One タップによるリンクされたアカウントへのログイン。
- Android TV のスムーズな定期購入。
トークン エンドポイントからアクセス トークンが正常に取得されると、Google は、リンクされたユーザーに関する基本的なプロフィール情報を取得するためのリクエストを userinfo エンドポイントに送信します。
| userinfo エンドポイント リクエスト ヘッダー | |
|---|---|
Authorization header |
Bearer タイプのアクセス トークン。 |
たとえば、userinfo エンドポイントが
https://myservice.example.com/userinfo の場合、リクエストは次のようになります。
GET /userinfo HTTP/1.1
Host: myservice.example.com
Authorization: Bearer ACCESS_TOKEN
userinfo エンドポイントでリクエストを処理するには、次の手順を行います。
- Authorization ヘッダーからアクセス トークンを抽出し、そのアクセス トークンに関連付けられたユーザーの情報を返します。
- アクセス トークンが無効な場合は、
WWW-Authenticateレスポンス ヘッダーを使用して HTTP 401 Unauthorized エラーを返します。userinfo エラー レスポンスの例を次に示します。HTTP/1.1 401 Unauthorized WWW-Authenticate: error="invalid_token", error_description="The Access Token expired"
アクセス トークンが有効な場合は、HTTPS の本文に次の JSON オブジェクトを含む HTTP 200 レスポンスを返します。 レスポンス:
{
"sub": "USER_UUID",
"email": "EMAIL_ADDRESS",
"given_name": "FIRST_NAME",
"family_name": "LAST_NAME",
"name": "FULL_NAME",
"picture": "PROFILE_PICTURE",
}
userinfo エンドポイント レスポンス subシステム内でユーザーを識別する一意の ID。 emailユーザーのメールアドレス。 given_name省略可: ユーザーの名。 family_name省略可: ユーザーの姓。 name省略可: ユーザーの氏名。 picture省略可: ユーザーのプロフィール写真。
実装の検証
実装を検証するには、OAuth 2.0 Playground ツールを使用します。
ツールで、次の操作を行います。
- [Configuration] をクリックして [OAuth 2.0 Configuration] ウィンドウを開きます。
- [OAuth flow] フィールドで、[Client-side] を選択します。
- [OAuth Endpoints](OAuth エンドポイント)で、[Custom](カスタム)を選択します。
- 対応するフィールドに、OAuth 2.0 エンドポイントと Google に割り当てたクライアント ID を指定します。
- [ステップ 1] セクションで、Google スコープは選択しないでください。代わりに、このフィールドを空白のままにするか、サーバーで有効なスコープを入力します(OAuth スコープを使用しない場合は任意の文字列を入力します)。完了したら、[API を承認] をクリックします。
- ステップ 2 とステップ 3 のセクションで OAuth 2.0 フローを実行し、各ステップが意図したとおりに機能することを確認します。
実装を検証するには、Google アカウント リンクのデモツールを使用します。
ツールで次の操作を行います。
- [Google でログイン] ボタンをクリックします。
- リンクするアカウントを選択します。
- サービス ID を入力します。
- 必要に応じて、アクセスをリクエストするスコープを 1 つ以上入力します。
- [デモを開始] をクリックします。
- リンク リクエストに同意できることを確認して、リクエストを拒否します。
- プラットフォームにリダイレクトされることを確認します。