Les comptes sont associés à l'aide du flux de code d'autorisation OAuth 2.0, qui est une norme du secteur.
OAuth 2.1 et PKCE pour les agents
Pour les agents d'IA sans état et les pipelines multimodaux, l'application d'OAuth 2.1 est recommandée.
- PKCE (Proof Key for Code Exchange) : doit être utilisé pour sécuriser le flux avec code d'autorisation et éviter les attaques par interception.
- Pas de flux implicite : le flux implicite expose les jetons d'accès dans l'URL, ce qui constitue un risque de sécurité pour les environnements d'agent.
Votre service doit être compatible avec les points de terminaison d'autorisation et d'échange de jetons conformes à OAuth 2.0/2.1.
Créer le projet
Pour créer votre projet afin d'associer des comptes :
- Accédez à la console Google APIs.
- Cliquez sur Create Project (Créer un projet).
- Saisissez un nom ou acceptez la suggestion générée.
- Confirmez ou modifiez les champs restants.
- Cliquez sur Create (Créer).
Pour afficher l'ID de votre projet :
- Accédez à la console Google APIs.
- Recherchez votre projet dans le tableau de la page de destination. L'ID du projet s'affiche dans la colonne ID.
Configurer votre écran de consentement OAuth
Le processus d'association de comptes Google inclut un écran de consentement qui indique aux utilisateurs l'application qui demande l'accès à leurs données, le type de données demandé et les conditions applicables. Vous devez configurer votre écran de consentement OAuth avant de générer un ID client Google API.
- Ouvrez la page Écran de consentement OAuth de la console Google APIs.
- Si vous y êtes invité, sélectionnez le projet que vous venez de créer.
Sur la page "Écran de consentement OAuth", remplissez le formulaire, puis cliquez sur le bouton "Enregistrer".
Nom de l'application : nom de l'application qui demande le consentement. Le nom doit refléter précisément votre application et être cohérent avec le nom de l'application que les utilisateurs voient ailleurs. Le nom de l'application s'affiche sur l'écran de consentement pour l'association de comptes.
Logo de l'application : image sur l'écran de consentement qui aide les utilisateurs à reconnaître votre application. Le logo s'affiche sur l'écran de consentement pour l'association de comptes et dans les paramètres du compte.
Adresse e-mail d'assistance : permet aux utilisateurs de vous contacter s'ils ont des questions sur leur consentement.
Niveaux d'accès pour les API Google : les niveaux d'accès permettent à votre application d'accéder aux données Google privées de vos utilisateurs. Pour le cas d'utilisation de l'association de comptes Google, le niveau d'accès par défaut (e-mail, profil, OpenID) suffit. Vous n'avez pas besoin d'ajouter de niveaux d'accès sensibles. En règle générale, il est préférable de demander les niveaux d'accès de manière incrémentale, au moment où l'accès est requis, plutôt qu'à l'avance. En savoir plus.
Domaines autorisés : pour garantir votre protection et celle de vos utilisateurs, Google limite l'utilisation de domaines autorisés aux applications qui s'authentifient à l'aide d'OAuth. Les liens de vos applications doivent être hébergés sur des domaines autorisés. En savoir plus.
Lien vers la page d'accueil de l'application : page d'accueil de votre application. Doit être hébergée sur un domaine autorisé.
Lien vers les règles de confidentialité de l'application : s'affiche sur l'écran de consentement pour l'association de comptes Google. Doit être hébergé sur un domaine autorisé.
Lien vers les conditions d'utilisation de l'application (facultatif) : doit être hébergé sur un domaine autorisé.
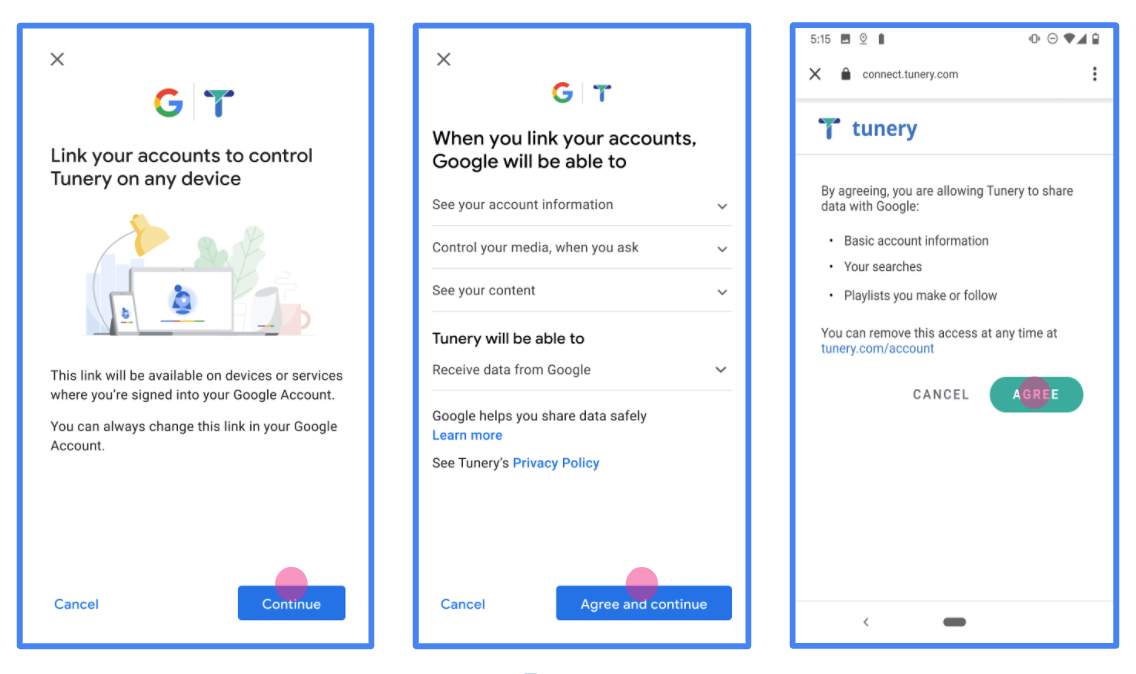
Figure 1 : Écran de consentement pour l'association de comptes Google pour une application fictive, Tunery
Vérifiez l'état de validation. Si votre application doit être validée, cliquez sur le bouton "Envoyer pour validation" pour l'envoyer. Pour en savoir plus, consultez les conditions de validation OAuth.
Implémenter votre serveur OAuth
Une implémentation de serveur OAuth 2.0 du flux de code d'autorisation se compose de deux points de terminaison que votre service met à disposition par HTTPS. Le premier point de terminaison est le point de terminaison d'autorisation, qui est chargé de trouver ou d'obtenir le consentement des utilisateurs pour l'accès aux données. Le point de terminaison d'autorisation présente une interface utilisateur de connexion à vos utilisateurs qui ne sont pas encore connectés et enregistre le consentement à l'accès demandé. Le deuxième point de terminaison est le point de terminaison d'échange de jetons, qui est utilisé pour obtenir des chaînes chiffrées, appelées jetons, qui autorisent un utilisateur à accéder à votre service.
Lorsqu'une application Google doit appeler l'une des API de votre service, Google utilise ces points de terminaison ensemble pour obtenir l'autorisation de vos utilisateurs d'appeler ces API en leur nom.
Association de compte Google : flux avec code d'autorisation OAuth
Le diagramme de séquence suivant détaille les interactions entre l'utilisateur, Google et les points de terminaison de votre service.
Rôles et responsabilités
Le tableau suivant définit les rôles et les responsabilités des acteurs du flux OAuth d'association de compte Google (GAL). Notez que dans GAL, Google agit en tant que client OAuth, tandis que votre service agit en tant que fournisseur d'identité/de services.
| Acteur / Composant | Rôle dans la LAG | Responsabilités |
|---|---|---|
| Application / Serveur Google | Client OAuth | Lance le flux, reçoit le code d'autorisation, l'échange contre des jetons et les stocke de manière sécurisée pour accéder aux API de votre service. |
| Votre point de terminaison d'autorisation | Serveur d'autorisation | Authentifie vos utilisateurs et obtient leur consentement pour partager l'accès à leurs données avec Google. |
| Votre point de terminaison d'échange de jetons | Serveur d'autorisation | Valide les codes d'autorisation et les jetons d'actualisation, et émet des jetons d'accès au serveur Google. |
| URI de redirection Google | Point de terminaison de rappel | Reçoit la redirection de l'utilisateur depuis votre service d'autorisation avec les valeurs code et state. |
Une session de flux avec code d'autorisation OAuth 2.0 initiée par Google se déroule comme suit :
- Google ouvre votre point de terminaison d'autorisation dans le navigateur de l'utilisateur. Si le flux a commencé sur un appareil vocal uniquement pour une Action, Google transfère l'exécution vers un téléphone.
- L'utilisateur se connecte, s'il ne l'a pas déjà fait, et autorise Google à accéder à ses données avec votre API, s'il ne l'a pas déjà fait.
- Votre service crée un code d'autorisation et le renvoie à Google. Pour ce faire, redirigez le navigateur de l'utilisateur vers Google en joignant le code d'autorisation à la requête.
- Google envoie le code d'autorisation à votre point de terminaison d'échange de jetons, qui vérifie l'authenticité du code et renvoie un jeton d'accès et un jeton d'actualisation. Le jeton d'accès est un jeton de courte durée que votre service accepte comme identifiant pour accéder aux API. Le jeton d'actualisation est un jeton à longue durée de vie que Google peut stocker et utiliser pour acquérir de nouveaux jetons d'accès lorsqu'ils expirent.
- Une fois que l'utilisateur a terminé le parcours d'association de compte, chaque requête ultérieure envoyée par Google contient un jeton d'accès.
Recette d'implémentation
Suivez ces étapes pour implémenter le flux avec code d'autorisation.
Étape 1 : Gérez les demandes d'autorisation
Lorsque Google lance l'association de compte, il redirige l'utilisateur vers votre point de terminaison d'autorisation. Pour en savoir plus sur les contrats de protocole et les exigences concernant les paramètres, consultez Point de terminaison d'autorisation.
Pour traiter la demande, procédez comme suit :
Validez la demande :
- Vérifiez que
client_idcorrespond à l'ID client attribué à Google. - Vérifiez que
redirect_uricorrespond à l'URL de redirection Google attendue :none https://oauth-redirect.googleusercontent.com/r/YOUR_PROJECT_ID https://oauth-redirect-sandbox.googleusercontent.com/r/YOUR_PROJECT_ID - Vérifiez que
response_typeest défini surcode.
- Vérifiez que
Authentifiez l'utilisateur :
- Vérifiez si l'utilisateur est connecté à votre service.
- Si l'utilisateur n'est pas connecté, invitez-le à suivre votre procédure de connexion ou d'inscription.
Générez un code d'autorisation :
- Créez un code d'autorisation unique et difficile à deviner, associé à l'utilisateur et au client.
- Définissez le code pour qu'il expire dans environ 10 minutes.
Rediriger vers Google :
- Redirigez le navigateur vers l'URL fournie dans
redirect_uri. - Ajoutez les paramètres de requête suivants :
code: code d'autorisation que vous avez généré.state: valeur d'état non modifiée reçue de Google.
- Redirigez le navigateur vers l'URL fournie dans
Étape 2 : Gérez les demandes d'échange de jetons
Votre point de terminaison d'échange de jetons traite deux types de requêtes : l'échange de codes contre des jetons et l'actualisation des jetons d'accès expirés. Pour connaître les contrats de protocole détaillés et les exigences concernant les paramètres, consultez Point de terminaison d'échange de jetons.
A. Échanger des codes d'autorisation contre des jetons
Lorsque Google reçoit le code d'autorisation, il appelle votre point de terminaison d'échange de jetons (POST) pour récupérer les jetons.
Validez la demande :
- Validez
client_idetclient_secret. - Vérifiez que le code d'autorisation est valide et qu'il n'a pas expiré.
- Vérifiez que
redirect_uricorrespond à la valeur utilisée à l'étape 1. - Si la validation échoue, renvoyez un code HTTP
400 Bad Requestavec{"error": "invalid_grant"}.
- Validez
Émettre des jetons :
- Générez un
refresh_tokenà longue durée de vie et unaccess_tokenà courte durée de vie (généralement une heure). - Renvoyez un HTTP
200 OKavec la réponse standard du jeton JSON.
- Générez un
B. Actualiser les jetons d'accès
Lorsque le jeton d'accès expire, Google en demande un nouveau à l'aide du jeton d'actualisation.
Validez la demande :
- Validez
client_id,client_secretetrefresh_token. - Si la validation échoue, renvoyez un code HTTP
400 Bad Requestavec{"error": "invalid_grant"}.
- Validez
Émettre un jeton d'accès :
- Générez un
access_tokenéphémère. - Renvoyez un
200 OKHTTP avec la réponse du jeton JSON (en incluant éventuellement un nouveau jeton d'actualisation).
- Générez un
Gérer les requêtes userinfo
Le point de terminaison userinfo est une ressource protégée par OAuth 2.0 qui renvoie les revendications concernant l'utilisateur associé. L'implémentation et l'hébergement du point de terminaison userinfo sont facultatifs, sauf dans les cas d'utilisation suivants:
- Connexion à un compte associé avec Google One Tap.
- Abonnement simplifié sur Android TV.
Une fois que le jeton d'accès a été récupéré avec succès à partir du point de terminaison de votre jeton, Google envoie une demande à ce point de terminaison pour récupérer les informations de base du profil sur l'utilisateur associé.
| En-têtes de requête du point de terminaison userinfo | |
|---|---|
Authorization header |
Jeton d'accès de type Bearer. |
Par exemple, si votre point de terminaison userinfo est disponible à l'adresse
https://myservice.example.com/userinfo, une requête peut se présenter comme suit:
GET /userinfo HTTP/1.1
Host: myservice.example.com
Authorization: Bearer ACCESS_TOKEN
Pour que votre point de terminaison userinfo traite les requêtes, procédez comme suit:
- Extrayez le jeton d'accès de l'en-tête "Authorization" et renvoyez les informations concernant l'utilisateur associé au jeton d'accès.
- Si le jeton d'accès n'est pas valide, renvoyez une erreur HTTP 401 Opération non autorisée à l'aide de l'en-tête de réponse
WWW-Authenticate. Voici un exemple de réponse d'erreur userinfo:HTTP/1.1 401 Unauthorized WWW-Authenticate: error="invalid_token", error_description="The Access Token expired"
Si le jeton d'accès est valide, renvoyez une réponse HTTP 200 avec l'objet JSON suivant dans le corps de la requête réponse:
{ "sub": "USER_UUID", "email": "EMAIL_ADDRESS", "given_name": "FIRST_NAME", "family_name": "LAST_NAME", "name": "FULL_NAME", "picture": "PROFILE_PICTURE", }Réponse du point de terminaison userinfo subIdentifiant unique qui identifie l'utilisateur dans votre système. emailAdresse e-mail de l'utilisateur. given_nameFacultatif:prénom de l'utilisateur. family_nameFacultatif:nom de l'utilisateur. nameFacultatif:nom complet de l'utilisateur. pictureFacultatif:photo de profil de l'utilisateur.
Valider votre implémentation
Vous pouvez valider votre implémentation à l'aide de l' outil OAuth 2.0 Playground.
Dans l'outil, procédez comme suit :
- Cliquez sur Configuration pour ouvrir la fenêtre de configuration OAuth 2.0.
- Dans le champ OAuth flow (Flux OAuth), sélectionnez Client-side (Côté client).
- Dans le champ OAuth Endpoints (Points de terminaison OAuth), sélectionnez Custom (Personnalisé).
- Spécifiez votre point de terminaison OAuth 2.0 et l'ID client que vous avez attribué à Google dans les champs correspondants.
- Dans la section Step 1 (Étape 1), ne sélectionnez aucun champ d'application Google. Laissez plutôt ce champ vide ou saisissez un champ d'application valide pour votre serveur (ou une chaîne arbitraire si vous n'utilisez pas de champs d'application OAuth). Lorsque vous avez terminé, cliquez sur Authorize APIs (Autoriser les API).
- Dans les sections Step 2 (Étape 2) et Step 3 (Étape 3), parcourez le flux OAuth 2.0 et vérifiez que chaque étape fonctionne comme prévu.
Vous pouvez valider votre implémentation à l'aide de l'outil de démonstration de l'association de comptes Google .
Dans l'outil, procédez comme suit :
- Cliquez sur le bouton Se connecter avec Google.
- Sélectionnez le compte que vous souhaitez associer.
- Saisissez l'ID de service.
- Vous pouvez également saisir un ou plusieurs champs d'application pour lesquels vous demanderez l'accès.
- Cliquez sur Start Demo (Démarrer la démonstration).
- Lorsque vous y êtes invité, confirmez que vous pouvez donner votre consentement et refuser la demande d'association.
- Vérifiez que vous êtes redirigé vers votre plate-forme.