I collegamenti degli account vengono eseguiti utilizzando il flusso del codice di autorizzazione OAuth 2.0, standard di settore.
OAuth 2.1 e PKCE per gli agenti
Per gli agenti AI senza stato e le pipeline multimodali, è consigliabile applicare OAuth 2.1.
- PKCE (Proof Key for Code Exchange): deve essere utilizzato per proteggere il flusso del codice di autorizzazione, impedendo attacchi di intercettazione.
- Nessun flusso implicito: il flusso implicito espone i token di accesso nell'URL, il che rappresenta un rischio per la sicurezza degli ambienti degli agenti.
Il tuo servizio deve supportare gli endpoint di autorizzazione e scambio di token conformi a OAuth 2.0/2.1.
Creare il progetto
Per creare il progetto da utilizzare per il collegamento dell'account:
- Vai alla console dell'API di Google.
- Fai clic su Crea progetto.
- Inserisci un nome o accetta il suggerimento generato.
- Conferma o modifica i campi rimanenti.
- Fai clic su Crea.
Per visualizzare l'ID progetto:
- Vai alla console dell'API di Google.
- Trova il tuo progetto nella tabella della pagina di destinazione. L'ID progetto viene visualizzato nella ID colonna.
Configurare la schermata per il consenso OAuth
La procedura di collegamento dell'Account Google include una schermata per il consenso che indica agli utenti l'applicazione che richiede l'accesso ai loro dati, il tipo di dati richiesti e i termini applicabili. Prima di generare un ID client dell'API Google, devi configurare la schermata per il consenso OAuth.
- Apri la pagina della schermata per il consenso OAuth della console API di Google.
- Se ti viene richiesto, seleziona il progetto che hai appena creato.
Nella pagina "Schermata per il consenso OAuth", compila il modulo e fai clic sul pulsante "Salva".
Nome dell'applicazione: il nome dell'applicazione che richiede il consenso. Il nome deve riflettere con precisione l'applicazione ed essere coerente con il nome dell'applicazione visualizzato dagli utenti altrove. Il nome dell'applicazione verrà mostrato nella schermata per il consenso del collegamento dell'account.
Logo dell'applicazione: un'immagine nella schermata per il consenso che aiuterà gli utenti a riconoscere la tua app. Il logo viene mostrato nella schermata per il consenso del collegamento dell'account e nelle impostazioni dell'account.
Email di assistenza: gli utenti possono contattarti per domande sul loro consenso.
Ambiti per le API Google: gli ambiti consentono alla tua applicazione di accedere ai dati privati di Google dell'utente. Per il caso d'uso del collegamento dell'Account Google, l'ambito predefinito (email, profilo, openid) è sufficiente, non devi aggiungere ambiti sensibili. In genere, è una best practice richiedere gli ambiti in modo incrementale, nel momento in cui è necessario l'accesso, anziché in anticipo. Scopri di più.
Domini autorizzati: per proteggere te e i tuoi utenti, Google consente l'utilizzo dei domini autorizzati alle sole applicazioni che eseguono l'autenticazione tramite OAuth. I link delle tue applicazioni devono essere ospitati su domini autorizzati. Scopri di più.
Link alla home page dell'applicazione: la home page della tua applicazione. Deve essere ospitata su un dominio autorizzato.
Link alle norme sulla privacy dell'applicazione: viene mostrato nella schermata per il consenso del collegamento dell'Account Google. Deve essere ospitata su un dominio autorizzato.
(Facoltativo) Link ai Termini di servizio dell'applicazione: deve essere ospitato su un dominio autorizzato.
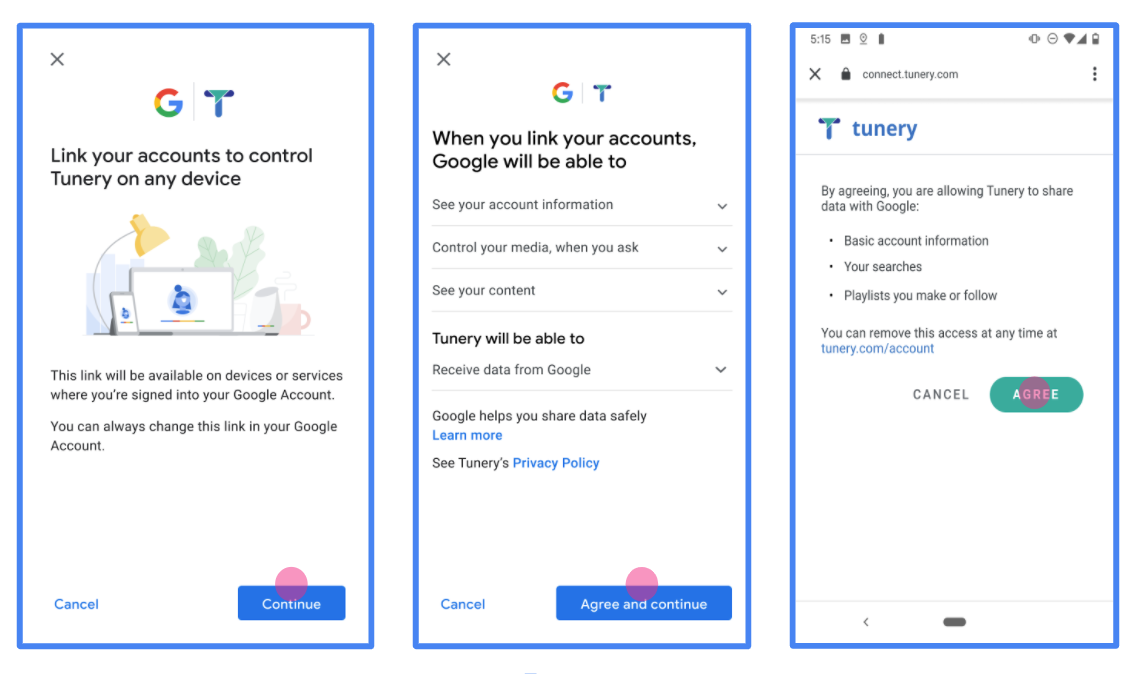
Figura 1. Schermata per il consenso del collegamento dell'Account Google per un'applicazione fittizia, Tunery
Controlla lo "Stato della verifica". Se la tua applicazione richiede la verifica, fai clic sul pulsante "Invia per la verifica" per inviarla. Per i dettagli, consulta i requisiti di verifica OAuth.
Implementare il server OAuth
An OAuth 2.0 server implementation of the authorization code flow consists of two endpoints, which your service makes available by HTTPS. The first endpoint is the authorization endpoint, which is responsible for finding or obtaining consent from users for data access. The authorization endpoint presents a sign-in UI to your users that aren't already signed in and records consent to the requested access. The second endpoint is the token exchange endpoint, which is used to obtain encrypted strings, called tokens, that authorize a user to access your service.
When a Google application needs to call one of your service's APIs, Google uses these endpoints together to get permission from your users to call these APIs on their behalf.
Google Account Linking: OAuth Authorization Code Flow
The following sequence diagram details interactions between the User, Google, and your service's endpoints.
Roles and responsibilities
The following table defines the roles and responsibilities of the actors in the Google Account Linking (GAL) OAuth flow. Note that in GAL, Google acts as the OAuth Client, while your service acts as the Identity/Service Provider.
| Actor / Component | GAL Role | Responsibilities |
|---|---|---|
| Google App / Server | OAuth Client | Initiates the flow, receives the authorization code, exchanges it for tokens, and securely stores them to access your service's APIs. |
| Your Authorization Endpoint | Authorization Server | Authenticates your users and obtains their consent to share access to their data with Google. |
| Your Token Exchange Endpoint | Authorization Server | Validates authorization codes and refresh tokens, and issues access tokens to the Google Server. |
| Google Redirect URI | Callback Endpoint | Receives the user redirect from your authorization service with the
code and state values. |
An OAuth 2.0 authorization code flow session initiated by Google has the following flow:
- Google opens your authorization endpoint in the user's browser. If the flow started on a voice-only device for an Action, Google transfers the execution to a phone.
- The user signs in, if not signed in already, and grants Google permission to access their data with your API, if they haven't already granted permission.
- Your service creates an authorization code and returns it to Google. To do so, redirect the user's browser back to Google with the authorization code attached to the request.
- Google sends the authorization code to your token exchange endpoint, which verifies the authenticity of the code and returns an access token and a refresh token. The access token is a short-lived token that your service accepts as credentials to access APIs. The refresh token is a long-lived token that Google can store and use to acquire new access tokens when they expire.
- After the user has completed the account linking flow, every subsequent request sent from Google contains an access token.
Implementation Recipe
Follow these steps to implement the Authorization Code flow.
Step 1: Handle authorization requests
When Google initiates account linking, it redirects the user to your authorization endpoint. For detailed protocol contracts and parameter requirements, see the Authorization Endpoint.
To handle the request, perform the following actions:
Validate the request:
- Confirm that the
client_idmatches the Client ID assigned to Google. - Confirm that the
redirect_urimatches the expected Google redirect URL:none https://oauth-redirect.googleusercontent.com/r/YOUR_PROJECT_ID https://oauth-redirect-sandbox.googleusercontent.com/r/YOUR_PROJECT_ID - Verify that
response_typeiscode.
- Confirm that the
Authenticate the user:
- Check if the user is signed in to your service.
- If the user is not signed in, prompt them to complete your sign-in or sign-up flow.
Generate authorization code:
- Create a unique, non-guessable authorization code associated with the user and client.
- Set the code to expire in approximately 10 minutes.
Redirect back to Google:
- Redirect the browser to the URL provided in
redirect_uri. - Append the following query parameters:
code: The authorization code you generated.state: The unmodified state value received from Google.
- Redirect the browser to the URL provided in
Step 2: Handle token exchange requests
Your token exchange endpoint processes two types of requests: exchanging codes for tokens, and refreshing expired access tokens. For detailed protocol contracts and parameter requirements, see the Token Exchange Endpoint.
A. Exchange authorization codes for tokens
When Google receives the authorization code, it calls your token exchange endpoint (POST) to retrieve tokens.
Validate the request:
- Verify
client_idandclient_secret. - Verify the authorization code is valid and not expired.
- Confirm
redirect_urimatches the value used in Step 1. - If validation fails, return an HTTP
400 Bad Requestwith{"error": "invalid_grant"}.
- Verify
Issue tokens:
- Generate a long-lived
refresh_tokenand a short-livedaccess_token(typically 1 hour). - Return an HTTP
200 OKwith the standard JSON token response.
- Generate a long-lived
B. Refresh access tokens
When the access token expires, Google requests a new one using the refresh token.
Validate the request:
- Verify
client_id,client_secret, andrefresh_token. - If validation fails, return an HTTP
400 Bad Requestwith{"error": "invalid_grant"}.
- Verify
Issue new access token:
- Generate a new short-lived
access_token. - Return an HTTP
200 OKwith the JSON token response (optionally including a new refresh token).
- Generate a new short-lived
Gestire le richieste di informazioni utente
L'endpoint userinfo è una risorsa protetta da OAuth 2.0 che restituisce attestazioni sull'utente collegato. L'implementazione e l'hosting dell'endpoint userinfo sono facoltative, ad eccezione dei seguenti casi d'uso:
- Accesso a un account collegato con Google One Tap.
- Abbonamento senza problemi su AndroidTV.
Dopo che il token di accesso è stato recuperato correttamente dall'endpoint del token, Google invia una richiesta all'endpoint userinfo per recuperare le informazioni di base del profilo dell'utente collegato.
| intestazioni delle richieste endpoint userinfo | |
|---|---|
Authorization header |
Il token di accesso di tipo Bearer. |
Ad esempio, se l'endpoint userinfo è disponibile su
https://myservice.example.com/userinfo, una richiesta potrebbe avere il seguente aspetto:
GET /userinfo HTTP/1.1
Host: myservice.example.com
Authorization: Bearer ACCESS_TOKEN
Affinché l'endpoint userinfo possa gestire le richieste, segui questi passaggi:
- Estrai il token di accesso dall'intestazione Autorizzazione e restituisci le informazioni per l'utente associato al token di accesso.
- Se il token di accesso non è valido, restituisce un errore HTTP 401 Autorizzazione non autorizzata utilizzando l'intestazione della risposta
WWW-Authenticate. Di seguito è riportato un esempio di risposta di errore userinfo:HTTP/1.1 401 Unauthorized WWW-Authenticate: error="invalid_token", error_description="The Access Token expired"
Se il token di accesso è valido, restituisce e invia una risposta HTTP 200 con il seguente oggetto JSON nel corpo dell'HTTPS risposta:
{ "sub": "USER_UUID", "email": "EMAIL_ADDRESS", "given_name": "FIRST_NAME", "family_name": "LAST_NAME", "name": "FULL_NAME", "picture": "PROFILE_PICTURE", }risposta endpoint userinfo subUn ID univoco che identifica l'utente nel sistema. emailIndirizzo email dell'utente. given_nameFacoltativo:nome dell'utente. family_nameFacoltativo:il cognome dell'utente. nameFacoltativo:nome completo dell'utente. picture(Facoltativo) Immagine del profilo dell'utente.
Convalidare l'implementazione
Puoi convalidare l'implementazione utilizzando lo strumento OAuth 2.0 Playground.
Nello strumento, segui questi passaggi:
- Fai clic su Configurazione per aprire la finestra di configurazione di OAuth 2.0.
- Nel campo Flusso OAuth, seleziona Lato client.
- Nel campo Endpoint OAuth, seleziona Personalizzato.
- Specifica l'endpoint OAuth 2.0 e l'ID client che hai assegnato a Google nei campi corrispondenti.
- Nella sezione Passaggio 1, non selezionare alcun ambito Google. Lascia invece questo campo vuoto o digita un ambito valido per il tuo server (o una stringa arbitraria se non utilizzi gli ambiti OAuth). Quando hai finito, fai clic su Autorizza API.
- Nelle sezioni Passaggio 2 e Passaggio 3, segui il flusso OAuth 2.0 e verifica che ogni passaggio funzioni come previsto.
Puoi convalidare l'implementazione utilizzando lo strumento Demo di collegamento dell'Account Google.
Nello strumento, segui questi passaggi:
- Fai clic sul pulsante Accedi con Google.
- Scegli l'account che vuoi collegare.
- Inserisci l'ID servizio.
- (Facoltativo) Inserisci uno o più ambiti per i quali richiederai l'accesso.
- Fai clic su Avvia demo.
- Quando richiesto, conferma che puoi dare il consenso e rifiutare la richiesta di collegamento.
- Verifica di essere reindirizzato alla tua piattaforma.