# Card Design
This document goes over how to follow Glass style
and implement common UI best practices when using the GDK.
## Glass theme
Glass applies a standard theme to your Glassware, so it
stays consistent with the rest of the user interface. The
theme has the following characteristics:
- Uses Roboto typeface
- Displays activities full-screen with no status bar or action bar
- Applies solid, black background
To apply the Glass theme, don't declare a theme in your Android Manifest.
> [!NOTE]
> **Note:** ADT and Android Studio usually assign a theme automatically, even if you specify no theme, so remove the `android:theme` property from your manifest after creating a project.
If you have a custom style for parts of your Glassware
and want the default Glass theme for everything else,
inherit from `Theme.DeviceDefault` with the `parent` attribute:
See the Android developer guide on
[Styles and Themes](http://developer.android.com/guide/topics/ui/themes.html)
for more information about creating themes.
## Glass-styled cards
The [`CardBuilder`](https://developers.google.com/glass/develop/gdk/reference/com/google/android/glass/widget/CardBuilder)
class creates well-formed cards given a set of properties. Use the layouts
provided by [`CardBuilder.Layout`](https://developers.google.com/glass/develop/gdk/reference/com/google/android/glass/widget/CardBuilder.Layout)
whenever possible so that your content looks and feels like other content on
Glass.
To use `CardBuilder`:
1. Create an instance of `CardBuilder`, giving it your desired layout from [`CardBuilder.Layout`](https://developers.google.com/glass/develop/gdk/reference/com/google/android/glass/widget/CardBuilder.Layout).
2. Set properties of the card, such as the text, footnote, and timestamp.
3. Call [`CardBuilder.getView()`](https://developers.google.com/glass/develop/gdk/reference/com/google/android/glass/widget/CardBuilder#getView()) to convert the card to an Android [`View`](http://developer.android.com/reference/android/view/View.html), or [`CardBuilder.getRemoteViews()`](https://developers.google.com/glass/develop/gdk/reference/com/google/android/glass/widget/CardBuilder#getRemoteViews()) to convert it to a [`RemoteViews`](http://developer.android.com/reference/android/widget/RemoteViews.html) object.
4. Use the `View` in your activities, layouts, or in a [`CardScrollView`](https://developers.google.com/glass/develop/gdk/card-design#creating_scrolling_cards_in_activities), or use the `RemoteViews` in a [`LiveCard`](https://developers.google.com/glass/develop/gdk/reference/com/google/android/glass/timeline/LiveCard).
### Common UI features
Many of the layouts provided by `CardBuilder` support the common user interface
features described below. See the documentation of the individual layouts in
[`CardBuilder.Layout`](https://developers.google.com/glass/develop/gdk/reference/com/google/android/glass/widget/CardBuilder.Layout)
for a list of the features supported by each type of card.
#### Attribution icon
The attribution icon is an optional 36 × 36 pixel icon that appears on
the bottom-right corner of a card and to the right of the timestamp. Set this
icon by calling
[`CardBuilder.setAttributionIcon()`](https://developers.google.com/glass/develop/gdk/reference/com/google/android/glass/widget/CardBuilder#setAttributionIcon(int))
to identify your application, especially on live cards so a user can quickly
glance and see the source of the information on that card.
#### Stack indicator
The stack indicator, controlled by
[`CardBuilder.showStackIndicator()`](https://developers.google.com/glass/develop/gdk/reference/com/google/android/glass/widget/CardBuilder#showStackIndicator(boolean)),
is a corner fold that appears on the top-right corner of a card. Use this as
a visual indicator that your card represents a bundle of other cards that the
user can tap directly into.

View view = new CardBuilder(context, CardBuilder.Layout.TEXT)
.setText("A stack indicator can be added to the corner of a card...")
.setAttributionIcon(R.drawable.ic_smile)
.showStackIndicator(true)
.getView();
### Layouts
The following examples show the layouts that are available using the
`CardBuilder`.
> [!NOTE]
> **Note:** Layouts with full-bleed images can have up to eight images in the mosaic, while column layouts can only have up to five.
#### `TEXT` and `TEXT_FIXED`
The [`CardBuilder.Layout.TEXT`](https://developers.google.com/glass/develop/gdk/reference/com/google/android/glass/widget/CardBuilder.Layout#TEXT)
layout shows full-bleed text with an optional
image mosaic in the background. The text dynamically resizes to best fit the
available space.
[`CardBuilder.Layout.TEXT_FIXED`](https://developers.google.com/glass/develop/gdk/reference/com/google/android/glass/widget/CardBuilder.Layout#TEXT_FIXED)
is similar but fixes its text to a smaller size.
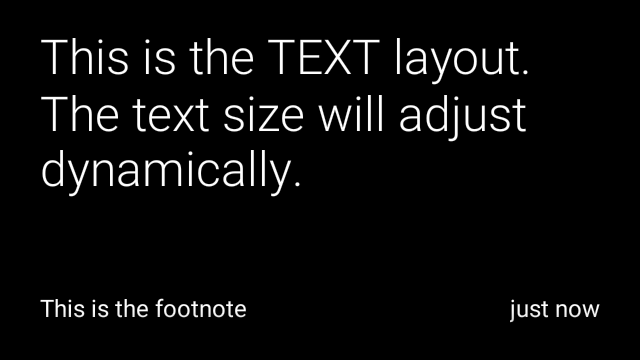


View view1 = new CardBuilder(context, CardBuilder.Layout.TEXT)
.setText("This is the TEXT layout. The text size will adjust dynamically.")
.setFootnote("This is the footnote")
.setTimestamp("just now")
.getView();
View view2 = new CardBuilder(context, CardBuilder.Layout.TEXT)
.setText("You can also add images to the background of a TEXT card.")
.setFootnote("This is the footnote")
.setTimestamp("just now")
.addImage(R.drawable.image1)
.addImage(R.drawable.image2)
.addImage(R.drawable.image3)
.addImage(R.drawable.image4)
.addImage(R.drawable.image5)
.getView();
View view3 = new CardBuilder(context, CardBuilder.Layout.TEXT_FIXED)
.setText("This is the TEXT_FIXED layout. The text size is always the same.")
.setFootnote("This is the footnote")
.setTimestamp("just now")
.getView();
#### `COLUMNS` and `COLUMNS_FIXED`
The
[`CardBuilder.Layout.COLUMNS`](https://developers.google.com/glass/develop/gdk/reference/com/google/android/glass/widget/CardBuilder.Layout#COLUMNS)
layout shows an image mosaic or icon on the
left side of the card and text on the right side. The text is dynamically sized
to best fit the available space. To keep the text size fixed, use
[`CardBuilder.Layout.COLUMNS_FIXED`](https://developers.google.com/glass/develop/gdk/reference/com/google/android/glass/widget/CardBuilder.Layout#COLUMNS_FIXED).
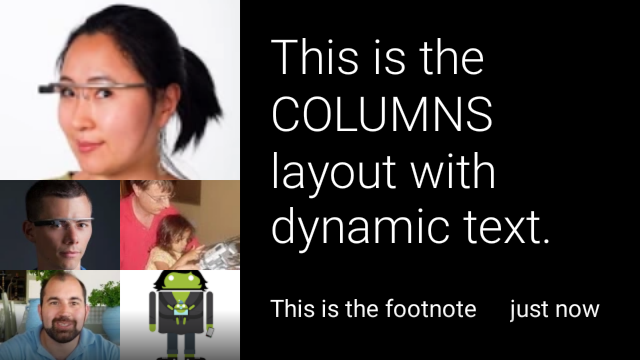

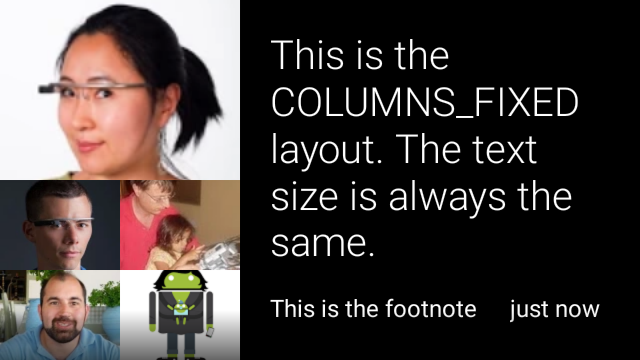
View view1 = new CardBuilder(context, CardBuilder.Layout.COLUMNS)
.setText("This is the COLUMNS layout with dynamic text.")
.setFootnote("This is the footnote")
.setTimestamp("just now")
.addImage(R.drawable.image1)
.addImage(R.drawable.image2)
.addImage(R.drawable.image3)
.addImage(R.drawable.image4)
.addImage(R.drawable.image5)
.getView();
View view2 = new CardBuilder(context, CardBuilder.Layout.COLUMNS)
.setText("You can even put a centered icon on a COLUMNS card instead of a mosaic.")
.setFootnote("This is the footnote")
.setTimestamp("just now")
.setIcon(R.drawable.ic_wifi)
.getView();
View view3 = new CardBuilder(context, CardBuilder.Layout.COLUMNS_FIXED)
.setText("This is the COLUMNS_FIXED layout. The text size is always the same.")
.setFootnote("This is the footnote")
.setTimestamp("just now")
.addImage(R.drawable.image1)
.addImage(R.drawable.image2)
.addImage(R.drawable.image3)
.addImage(R.drawable.image4)
.addImage(R.drawable.image5)
.getView();
#### `CAPTION`
The
[`CardBuilder.Layout.CAPTION`](https://developers.google.com/glass/develop/gdk/reference/com/google/android/glass/widget/CardBuilder.Layout#CAPTION)
layout has an image mosaic in the background
and brief caption text aligned at the bottom of the card. An icon can also be
placed next to the caption to represent, for example, the identity of a person
associated with the card's content.
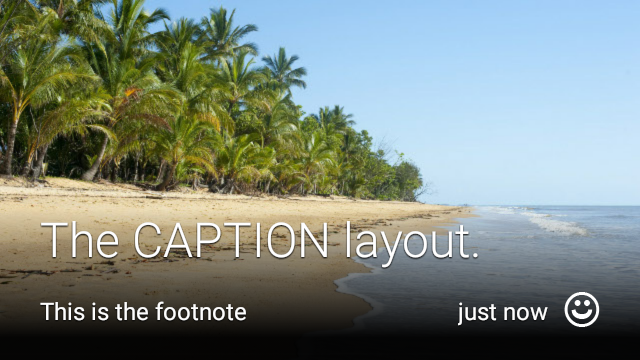  **Figure 1** : (background image by [photoeverywhere.co.uk](http://www.photoeverywhere.co.uk/), cropped)
View view1 = new CardBuilder(context, CardBuilder.Layout.CAPTION)
.setText("The caption layout.")
.setFootnote("This is the footnote")
.setTimestamp("just now")
.addImage(R.drawable.beach)
.setAttributionIcon(R.drawable.ic_smile)
.getView();
View view2 = new CardBuilder(context, CardBuilder.Layout.CAPTION)
.setText("The caption layout with an icon.")
.setFootnote("This is the footnote")
.setTimestamp("just now")
.addImage(R.drawable.beach)
.setIcon(R.drawable.ic_avatar)
.setAttributionIcon(R.drawable.ic_smile)
.getView();
#### `TITLE`
The
[`CardBuilder.Layout.TITLE`](https://developers.google.com/glass/develop/gdk/reference/com/google/android/glass/widget/CardBuilder.Layout#TITLE)
layout has an image mosaic in the background
with a centered title and optional icon on the bottom of the card. This layout
is often used to represent contacts or share targets. Footnote and timestamp are
not supported on this layout.

View view = new CardBuilder(context, CardBuilder.Layout.TITLE)
.setText("TITLE Card")
.setIcon(R.drawable.ic_phone)
.addImage(R.drawable.beach)
.getView();
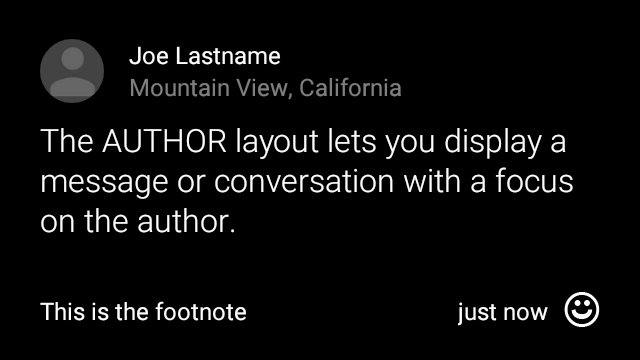
#### `AUTHOR`
Use the
[`CardBuilder.Layout.AUTHOR`](https://developers.google.com/glass/develop/gdk/reference/com/google/android/glass/widget/CardBuilder.Layout#AUTHOR)
layout to display a message or conversation
where the focus is on the author. It supports an image mosaic in the background,
an icon used as the author's avatar, and a heading and subheading where you can
list identifying information.
View view = new CardBuilder(context, CardBuilder.Layout.AUTHOR)
.setText("The AUTHOR layout lets you display a message or conversation "
+ " with a focus on the author.")
.setIcon(R.drawable.ic_avatar)
.setHeading("Joe Lastname")
.setSubheading("Mountain View, California")
.setFootnote("This is the footnote")
.setTimestamp("just now")
.getView();
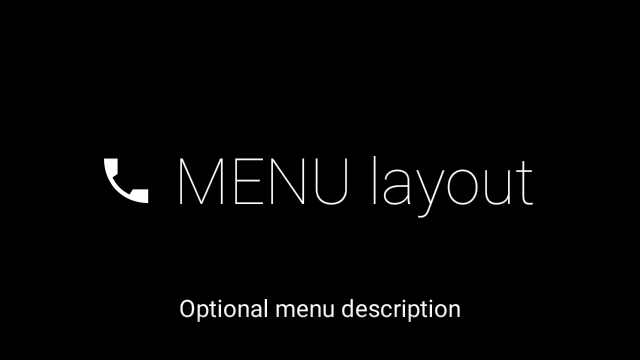
#### `MENU`
The
[`CardBuilder.Layout.MENU`](https://developers.google.com/glass/develop/gdk/reference/com/google/android/glass/widget/CardBuilder.Layout#MENU)
layout looks like a standard Glass menu. It has a
centered icon and title and an optional footnote. Use this layout for
confirmation screens (transitioning from "Deleting" to "Deleted" after the user
selects a menu item, for example). If you need a real menu, you should use a
standard options menu instead.
View view = new CardBuilder(context, CardBuilder.Layout.MENU)
.setText("MENU layout")
.setIcon(R.drawable.ic_phone)
.setFootnote("Optional menu description")
.getView();
#### `EMBED_INSIDE`
The
[`CardBuilder.Layout.EMBED_INSIDE`](https://developers.google.com/glass/develop/gdk/reference/com/google/android/glass/widget/CardBuilder.Layout#EMBED_INSIDE)
layout embeds a custom layout XML of your own design into the standard Glass
card template. This lets you design a custom UI for your application but still
have correct placement of a card's footnote, timestamp, attribution icon, and
stack indicator if they are needed.
After calling
[`CardBuilder.getView()`](https://developers.google.com/glass/develop/gdk/reference/com/google/android/glass/widget/CardBuilder#getView()),
use
[`findViewById()`](http://developer.android.com/reference/android/view/View.html#findViewById(int))
on the result to access the views inside your embedded layout. Likewise, if you
call
[`CardBuilder.getRemoteViews()`](https://developers.google.com/glass/develop/gdk/reference/com/google/android/glass/widget/CardBuilder#getRemoteViews()),
you can manipulate your embedded layout's views by passing their IDs directly
into the
[`RemoteViews`](http://developer.android.com/reference/android/widget/RemoteViews.html)
setter methods.

View view = new CardBuilder(context, CardBuilder.Layout.EMBED_INSIDE)
.setEmbeddedLayout(R.layout.food_table)
.setFootnote("Foods you tracked")
.setTimestamp("today")
.getView();
TextView textView1 = (TextView) view.findViewById(R.id.text_view_1);
textView1.setText("Water");
// ...and so on
For a more detailed example, see the GitHub
[ApiDemo project](https://github.com/googleglass/gdk-apidemo-sample).
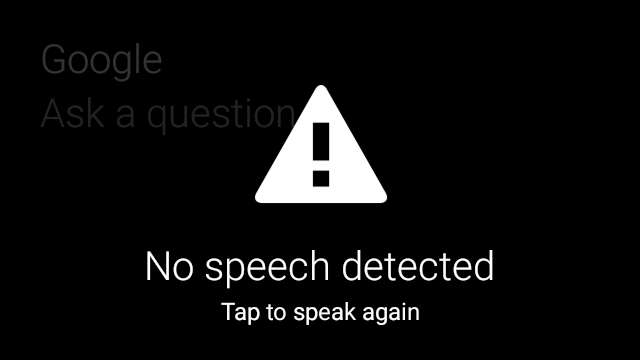
#### `ALERT`
The
[`CardBuilder.Layout.ALERT`](https://developers.google.com/glass/develop/gdk/reference/com/google/android/glass/widget/CardBuilder.Layout#ALERT)
layout contains a large centered icon with a
primary message and footnote. Use this layout in a
[`Dialog`](https://developer.android.com/reference/android/app/Dialog.html) to
show an important informational message, warning, or error in your Glassware.
> [!NOTE]
> **Note:** Use `ic_cloud_sad_150.png` for network connectivity alerts and `ic_warning_150.png` for generic warnings. Download these assets from [Glass menu icons](https://developers.google.com/glass/tools-downloads/downloads#glass_menu_icons).

The following example shows an implementation of `AlertDialog` and dismisses the
card and opens the WiFi settings when the user taps on the card:
1. Create a class that extends `Dialog`.
2. Create the card using [`CardBuilder`](https://developers.google.com/glass/develop/gdk/reference/com/google/android/glass/widget/CardBuilder) with the `CardBuilder.Layout.ALERT` layout and then set the content view with this card.
3. (Optional) Create a [`GestureDetector`](https://developers.google.com/glass/develop/gdk/reference/com/google/android/glass/touchpad/GestureDetector) to handle user gestures on this card.
> [!NOTE]
> **Note:** The swipe down gesture on [`Dialog`](https://developer.android.com/reference/android/app/Dialog.html) objects automatically plays the appropriate sound: [`Sounds.DISMISSED`](https://developers.google.com/glass/develop/gdk/reference/com/google/android/glass/media/Sounds#DISMISSED) if the dialog is cancelable, or [`Sounds.DISALLOWED`](https://developers.google.com/glass/develop/gdk/reference/com/google/android/glass/media/Sounds#DISALLOWED) if it is not.
public class AlertDialog extends Dialog {
private final DialogInterface.OnClickListener mOnClickListener;
private final AudioManager mAudioManager;
private final GestureDetector mGestureDetector;
/**
* Handles the tap gesture to call the dialog's
* onClickListener if one is provided.
*/
private final GestureDetector.BaseListener mBaseListener =
new GestureDetector.BaseListener() {
@Override
public boolean onGesture(Gesture gesture) {
if (gesture == Gesture.TAP) {
mAudioManager.playSoundEffect(Sounds.TAP);
if (mOnClickListener != null) {
// Since Glass dialogs do not have buttons,
// the index passed to onClick is always 0.
mOnClickListener.onClick(AlertDialog.this, 0);
}
return true;
}
return false;
}
};
public AlertDialog(Context context, int iconResId,
int textResId, int footnoteResId,
DialogInterface.OnClickListener onClickListener) {
super(context);
mOnClickListener = onClickListener;
mAudioManager =
(AudioManager) context.getSystemService(Context.AUDIO_SERVICE);
mGestureDetector =
new GestureDetector(context).setBaseListener(mBaseListener);
setContentView(new CardBuilder(context, CardBuilder.Layout.ALERT)
.setIcon(iconResId)
.setText(textResId)
.setFootnote(footnoteResId)
.getView());
}
/** Overridden to let the gesture detector handle a possible tap event. */
@Override
public boolean onGenericMotionEvent(MotionEvent event) {
return mGestureDetector.onMotionEvent(event)
|| super.onGenericMotionEvent(event);
}
}
4. (Optional) In your activity, implement an
[`OnClickListener`](https://developer.android.com/reference/android/content/DialogInterface.OnClickListener.html)
to handle any additional flows when the user taps. For more information on
starting settings activities like WiFi, see
[Starting settings](https://developers.google.com/glass/develop/gdk/starting-glassware#starting_settings).
5. Call the `AlertDialog` constructor to display the alert card.
public class MyActivity extends Activity {
...
private final DialogInterface.OnClickListener mOnClickListener =
new DialogInterface.OnClickListener() {
@Override
public void onClick(DialogInterface dialog, int button) {
// Open WiFi Settings
startActivity(new Intent(Settings.ACTION_WIFI_SETTINGS));
}
};
@Override
protected void onCreate(Bundle bundle) {
...
new AlertDialog(context, R.drawable.ic_cloud_sad_150, R.string.alert_text,
R.string.alert_footnote_text, mOnClickListener).show();
...
}
}
## XML layouts
Here are two basic card layouts that you can use if the CardBuilder class does
not meet your needs.
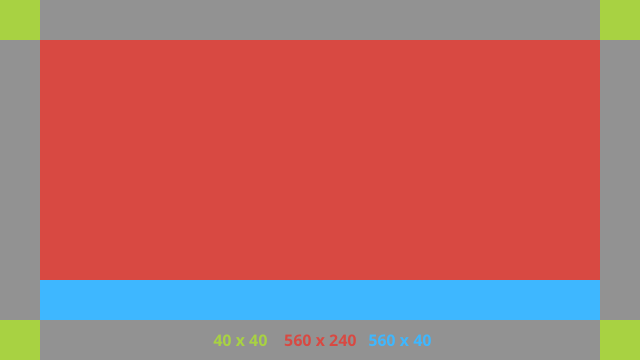
### Main layout
This layout defines the standard padding and footer for a card. Put your own
views in the empty `RelativeLayout`.
### Left column layout
This defines a 240px left column and 400px right column in the form of two `RelativeLayout`s
that you can put your views into.
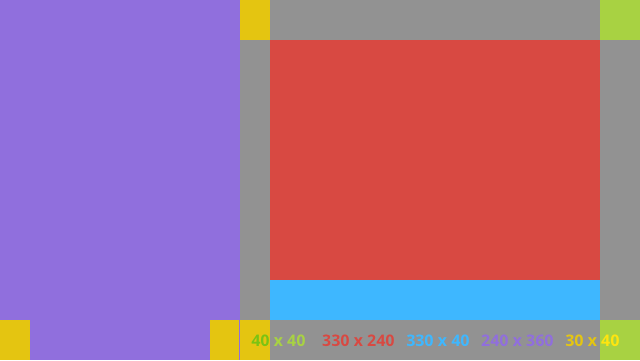
### Standard dimensions
Use this file in conjunction with the previous layouts or your own layouts to
to adhere to standard Glass style. Create this file as
`res/values/dimens.xml` in your Android project.
40px
33px
30px
240px
240px