Introduction to Programming and C++
This online tutorial continues with more advanced concepts - please read Part III. Our focus in this module will be on using pointers, and getting started with objects.
Learn by Example #2
Our focus in this module is on obtaining more practice with decomposition, understanding pointers, and getting started with objects and classes. Work through the following examples. Write the programs yourself when asked, or do the experiments. We can't emphasize enough that the key to becoming a good programmer is practice, practice, practice!
Example #1: More Decomposition Practice
Consider the following output from a simple game:
Welcome to Artillery.
You are in the middle of a war and being charged by thousands of enemies.
You have one cannon, which you can shoot at any angle.
You only have 10 cannonballs for this target..
Let's begin...

The enemy is 507 feet away!!!
What angle? 25<
You over shot by 445
What angle? 15
You over shot by 114
What angle? 10
You under shot by 82
What angle? 12
You under shot by 2
What angle? 12.01
You hit him!!!
It took you 4 shots.
You have killed 1 enemy.
I see another one, are you ready? (Y/N) n

You killed 1 of the enemy.
The first observation is the introductory text which is displayed once per program execution. We need a random number generator to define the enemy distance for each round. We need a mechanism for getting the angle input from the player and this is obviously in a loop structure since it repeats until we hit the enemy. We also need a function for calculating the distance and angle. Finally, we must keep track of how many shots it took to hit the enemy, as well as how many enemies we have hit during the program execution. Here is a possible outline for the main program.
StartUp(); // This displays the introductory script.
killed = 0;
do {
  killed = Fire(); // Fire() contains the main loop of each round.
  cout << "I see another one, care to shoot again? (Y/N) " << endl;
  cin >> done;
} while (done != 'n');
cout << "You killed " << killed << " of the enemy." << endl;
The Fire procedure handles the playing of the game. In that function, we call a random number generator to get the enemy distance, and then set up the loop to get the player's input and calculate whether or not they have hit the enemy. The guard condition on the loop is how close we have gotten to hitting the enemy.
In case you are a little rusty on physics, here are the calculations:
Velocity = 200.0; // initial velocity of 200 ft/sec
Gravity = 32.2; // gravity for distance calculation

// in_angle is the angle the player has entered, converted to radians.
time_in_air = (2.0 * Velocity * sin(in_angle)) / Gravity;
distance = round((Velocity * cos(in_angle)) * time_in_air);
Because of the calls to cos() and sin(), you will need to include math.h. Try writing this program - it's great practice in problem decomposition and a good review of basic C++. Remember to only do one task in each function. This is the most sophisticated program we have written thus far, so it may take you a little time to do it. Here is our solution.
Example #2: Practice with Pointers
There are four things to remember when working with pointers:- Pointers are variables that hold memory addresses. As a program is executing,
all variables are stored in memory, each at its own unique address or location.
A pointer is a special type of variable that contains a memory address rather
than a data value. Just as data is modified when a normal variable is used,
the value of the address stored in a pointer is modified as a pointer variable
is manipulated. Here's an example:
int *intptr; // Declare a pointer that holds the address // of a memory location that can store an integer. // Note the use of * to indicate this is a pointer variable. intptr = new int; // Allocate memory for the integer. *intptr = 5; // Store 5 in the memory address stored in intptr. - We usually say that a pointer "points" to the location it is storing
(the "pointee"). So in the example above, intptr points to the pointee
5.

Notice the use of the "new" operator to allocate memory for our integer pointee. This is something we must do before trying to access the pointee.
int *ptr; // Declare integer pointer.
ptr = new int; // Allocate some memory for the integer.
*ptr = 5; // Dereference to initialize the pointee.
*ptr = *ptr + 1; // We are dereferencing ptr in order
                 // to add one to the value stored
                 // at the ptr address.
The * operator is used for dereferencing in C. One of the most common errors C/C++ programmers make in working with pointers is forgetting to initialize the pointee. This can sometimes cause a runtime crash because we are accessing a location in memory that contains unknown data. If we try and modify this data, we can cause subtle memory corruption making it a hard bug to track down.
- Pointer assignment between two pointers makes them point to the same pointee.
So the assignment y = x; makes y point to the same pointee as x. Pointer assignment
does not touch the pointee. It just changes one pointer to have the same location
as another pointer. After pointer assignment, the two pointers "share" the
pointee.
void main() {
 int* x; // Allocate the pointers x and y
 int* y; // (but not the pointees).

 x = new int; // Allocate an int pointee and set x to point to it.

 *x = 42; // Dereference x and store 42 in its pointee

 *y = 13; // CRASH -- y does not have a pointee yet

 y = x; // Pointer assignment sets y to point to x's pointee

 *y = 13; // Dereference y to store 13 in its (shared) pointee
}
Here is a trace of this code:
| 1. Allocate two pointers x and y. Allocating the pointers does not allocate any pointees. | 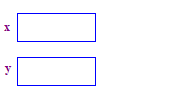 |
| 2. Allocate a pointee and set x to point to it. | 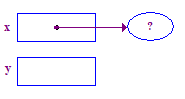 |
| 3. Dereference x to store 42 in its pointee. This is a basic example of the dereference operation. Start at x, follow the arrow over to access its pointee. | 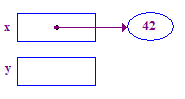 |
| 4. Try to dereference y to store 13 in its pointee. This crashes because y does not have a pointee -- it was never assigned one. | 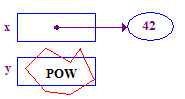 |
| 5. Assign y = x; so that y points to x's pointee. Now x and y point to the same pointee -- they are "sharing". |  |
| 6. Try to dereference y to store 13 in its pointee. This time it works, because the previous assignment gave y a pointee. | 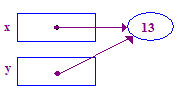 |
As you can see, pictures are very helpful in understanding pointer usage. Here is another example.
int my_int = 46; // Declare a normal integer variable.
                 // Set it to equal 46.

// Declare a pointer and make it point to the variable my_int
// by using the address-of operator.
int *my_pointer = &my_int;

cout << my_int << endl; // Displays 46.

*my_pointer = 107; // Derefence and modify the variable.

cout << my_int << endl; // Displays 107.
cout << *my_pointer << endl; // Also 107.
Notice in this example that we never allocated memory with the "new" operator. We declared a normal integer variable and manipulated it via pointers.
In this example, we illustrate the use of the delete operator which de-allocates heap memory, and how we can allocate for more complex structures. We will cover memory organization (heap and runtime stack) in another lesson. For now, just think of the heap as a free store of memory available to running programs.
int *ptr1; // Declare a pointer to int.
ptr1 = new int; // Reserve storage and point to it.

float *ptr2 = new float; // Do it all in one statement.

delete ptr1; // Free the storage.
delete ptr2;
In this final example, we show how pointers are used to pass values by reference to a function. This is how we modify the values of variables within a function.
// Passing parameters by reference.
#include <iostream>
using namespace std;

void Duplicate(int& a, int& b, int& c) {
  a *= 2;
  b *= 2;
  c *= 2;
}

int main() {
  int x = 1, y = 3, z = 7;
  Duplicate(x, y, z);
  // The following outputs: x=2, y=6, z=14.
  cout << "x="<< x << ", y="<< y << ", z="<< z;
  return 0;
}
If we were to leave the &'s off the arguments in the Duplicate function definition, we pass the variables "by value", i.e., a copy is made of the value of the variable. Any changes made to the variable in the function modify the copy. They do not modify the original variable.
When a variable is passed by reference we are not passing a copy of its value, we are passing the address of the variable to the function. Any modification that we do to the local variable actually modifies the original variable passed in.
If you are a C programmer, this is a new twist. We could do the same in C by declaring Duplicate() as Duplicate(int *x), in which case x is a pointer to an int, then calling Duplicate() with argument &x (address-of x), and using de-referencing of x within Duplicate() (see below). But C++ provides a simpler way of passing values to functions by reference, even though the old "C" way of doing it still works.
void Duplicate(int *a, int *b, int *c) {
  *a *= 2;
  *b *= 2;
  *c *= 2;
}

int main() {
  int x = 1, y = 3, z = 7;
  Duplicate(&x, &y, &z);
  // The following outputs: x=2, y=6, z=14.
  cout << "x=" << x << ", y=" << y << ", z=" << z;
  return 0;
}
Notice with C++ references, we do not need to pass the address of a variable, nor do we need to dereference the variable inside the called function.
What does the following program output? Draw a picture of memory to figure it out.
void DoIt(int &foo, int goo);

int main() {
  int *foo, *goo;
  foo = new int;
  *foo = 1;
  goo = new int;
  *goo = 3;
  *foo = *goo + 3;
  foo = goo;
  *goo = 5;
  *foo = *goo + *foo;
  DoIt(*foo, *goo);
  cout << (*foo) << endl;
}

void DoIt(int &foo, int goo) {
  foo = goo + 3;
  goo = foo + 4;
  foo = goo + 3;
  goo = foo;
}
Run the program to see if you got the correct answer.
Example #3: Passing Values by Reference
Write a function called accelerate() that takes as input the speed of a vehicle, and an amount. The function adds the amount to the speed to accelerate the vehicle. The speed parameter should be passed by reference, and amount by value. Here is our solution.
Example #4: Classes and Objects
Consider the following class:
// time.cpp, Maggie Johnson
// Description: A simple time class.

#include <iostream>
using namespace std;

class Time {
 private:
  int hours_;
  int minutes_;
  int seconds_;
 public:
  void set(int h, int m, int s) {hours_ = h; minutes_ = m; seconds_ = s; return;}
  void increment();
  void display();
};

void Time::increment() {
  seconds_++;
  minutes_ += seconds_/60;
  hours_ += minutes_/60;
  seconds_ %= 60;
  minutes_ %= 60;
  hours_ %= 24;
  return;
}

void Time::display() {
  cout << (hours_ % 12 ? hours_ % 12:12) << ':'
       << (minutes_ < 10 ? "0" :"") << minutes_ << ':'
       << (seconds_ < 10 ? "0" :"") << seconds_
       << (hours_ < 12 ? " AM" : " PM") << endl;
}

int main() {
  Time timer;
  timer.set(23,59,58);
  for (int i = 0; i < 5; i++) {
    timer.increment();
    timer.display();
    cout << endl;
  }
}
Notice that class member variables have a trailing underscore. This is done to differentiate between local variables and class variables.
Add a decrement method to this class. Here is our solution.
The wonders of Science: Computer Science
Exercises
As in the first module of this course, we do not provide solutions to exercises and projects.
Remember That a Good Program...
... is decomposed logically into functions where any one function does one and only one task.
... has a main program that reads like an outline of what the program will do.
... has descriptive function, constant and variable names.
... uses constants to avoid any "magic" numbers in the program.
... has a friendly user interface.
Warm-up Exercises
- Exercise 1
The integer 36 has a peculiar property: it is a perfect square, and is also the sum of the integers from 1 through 8. The next such number is 1225 which is 352, and the sum of the integers from 1 through 49. Find the next number that is a perfect square and also the sum of a series 1...n. This next number may be greater than 32767. You may use library functions that you know of, (or mathematical formulas) to make your program run faster. It is also possible to write this program using for-loops to determine if a number is a perfect square or a sum of a series. (Note: depending on your machine and your program, it can take quite a while to find this number.)
- Exercise 2
Your college book store needs your help in estimating its business for next year. Experience has shown that sales depend greatly on whether a book is required for a course or just optional, and whether or not it has been used in the class before. A new, required textbook will sell to 90% of prospective enrollment, but if it has been used in the class before, only 65% will buy. Similarly, 40% of prospective enrollment will buy a new, optional textbook, but if it has been used in the class before only 20% will buy. (Note that "used" here does not mean second-hand books.)
Write a program that accepts as input a series of books (until the user enters a sentinel). For each book ask for: a code for the book, the single copy cost for the book, the current number of books on hand, the prospective class enrollment, and data that indicates if the book is required/optional, new/used in past. As output, show all the input information in a nicely formatted screen along with how many books must be ordered (if any, note that only new books are ordered), the total cost of each order.
Then, after all input is complete, show the total cost of all book orders, and the expected profit if the store pays 80% of list price. Since we have not yet discussed any ways of dealing with a large set of data coming into a program (stay tuned!), just process one book at a time and show the output screen for that book. Then, when the user has finished entering all the data, your program should output the total and profit values.
Before you start writing code, take some time to think about design of this program. Decompose into a set of functions, and create a main() function that reads like an outline for your solution to the problem. Make sure each function does one task.
Here is sample output:
Please enter the book code: 1221
 single copy price: 69.95
 number on hand: 30
 prospective enrollment: 150
 1 for reqd/0 for optional: 1
 1 for new/0 for used: 0
***************************************************
Book: 1221
Price: $69.95
Inventory: 30
Enrollment: 150

This book is required and used.
***************************************************
Need to order: 67
Total Cost: $4686.65
***************************************************

Enter 1 to do another book, 0 to stop. 0
***************************************************
Total for all orders: $4686.65
Profit: $937.33
***************************************************
Database Project
In this project, we create a fully functional C++ program that implements a simple database application.
Our program will allow us to manage a database of composers and relevant information about them. The features of the program include:
- The ability to add a new composer
- The ability to rank a composer (i.e., indicate how much we like or dislike the composer's music)
- The ability to view all the composers in the database
- The ability to view all composers by rank
"There are two ways of constructing a software design: One way is to make it so simple that there are obviously no deficiencies, and the other way is to make it so complicated that there are no obvious deficiencies. The first method is far more difficult." - C.A.R. Hoare
Many of us learned to design and code using a "procedural" approach. The central question we begin with is "What must the program do?". We decompose the solution to a problem into tasks, each of which solves a part of the problem. These tasks map to functions in our program which are called sequentially from main() or from other functions. This step-by-step approach is ideal for some problems we need to solve. But more often than not, our programs are not just linear sequences of tasks or events.
With an object-oriented (OO) approach, we start with the question "What real-world objects am I modeling?" Instead of dividing a program into tasks as described above, we divide it into models of physical objects. These physical objects have a state defined by a set of attributes, and a set of behaviors or actions that they can perform. The actions might change the state of the object, or they might invoke actions of other objects. The basic premise is that an object "knows" how to do things by itself.
In OO design, we define physical objects in terms of classes and objects; attributes and behaviors. There are generally a large number of objects in an OO program. Many of these objects, however, are essentially the same. Consider the following.
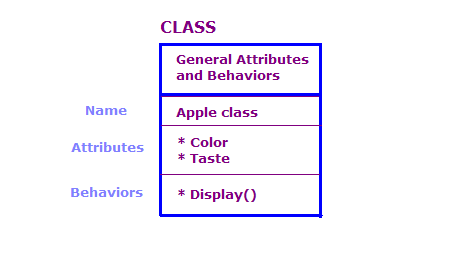

In this diagram, we have defined two objects which are of the Apple class. Each object has the same attributes and actions as the class, but the object defines the attributes for a specific type of apple. In addition, the Display action displays the attributes for that particular object, e.g., "Green" and "Sour".
An OO design consists of a set of classes, the data associated with these classes, and the set of actions the classes can perform. We also need to identify the ways different classes interact. This interaction can be performed by objects of a class invoking the actions of objects of other classes. For example, we could have a AppleOutputer class that outputs the color and taste of an array of Apple objects, by calling the Display() method of each Apple object.
Here are the steps we perform in doing OO design:
- Identify the classes, and define in general what an object of each class stores as data and what an object can do.
- Define the data elements of each class
- Define the actions of each class and how some actions of one class can be
implemented using actions of other related classes.
For a large system, these steps occur iteratively at different levels of detail.
For the composer database system, we need a Composer class which encapsulates all the data we want to store on an individual composer. An object of this class can promote or demote itself (change its rank), and display its attributes.
We also need a collection of Composer objects. For this, we define a Database class which manages the individual records. An object of this class can add or retrieve Composer objects, and display individual ones by invoking the display action of a Composer object.
Finally, we need some kind of user interface to provide interactive operations on the database. This is a placeholder class, i.e., we really don't know what the user interface is going to look like yet, but we do know we will need one. Maybe it will be graphical, maybe text-based. For now, we define a placeholder which we can fill in later.
Now that we have identified the classes for the composer database application, the next step is to define the attributes and actions for the classes. In a more complex application, we would sit down with pencil and paper or UML or CRC cards or OOD to map out the class hierarchy and how the objects interact.
For our composer database, we define a Composer class which contains the relevant data we want to store on each composer. It also contains methods for manipulating rankings, and displaying the data.
The Database class needs some kind of structure for holding Composer objects. We need to be able to add a new Composer object to the structure, as well as retrieve a specific Composer object. We'd also like to display all the objects either in order of entry, or by ranking.
The User Interface class implements a menu-driven interface, with handlers that call actions in the Database class.
If the classes are easily understood and their attributes and actions clear, as in the composer application, it's relatively easy to design the classes. But if there are any questions in your mind as to how the classes relate and interact, it's best to draw it out first, and work through the details before starting to code.
Once we have a clear picture of the design and have evaluated it (more on this soon), we define the interface for each class. We don't worry about implementation details at this point - just what are the attributes and actions, and what parts of a class' state and actions are available to other classes.
In C++, we normally do this by defining a header file for each class. The Composer class has private data members for all the data we want to store on a composer. We need accessors (“get” methods) and mutators (“set” methods), as well as the primary actions for the class.
// composer.h, Maggie Johnson
// Description: The class for a Composer record.
// The default ranking is 10 which is the lowest possible.
// Notice we use const in C++ instead of #define.
const int kDefaultRanking = 10;

class Composer {
 public:
  // Constructor
  Composer();
  // Here is the destructor which has the same name as the class
  // and is preceded by ~. It is called when an object is destroyed
  // either by deletion, or when the object is on the stack and
  // the method ends.
  ~Composer();

  // Accessors and Mutators
  void set_first_name(string in_first_name);
  string first_name();
  void set_last_name(string in_last_name);
  string last_name();
  void set_composer_yob(int in_composer_yob);
  int composer_yob();
  void set_composer_genre(string in_composer_genre);
  string composer_genre();
  void set_ranking(int in_ranking);
  int ranking();
  void set_fact(string in_fact);
  string fact();

  // Methods
  // This method increases a composer's rank by increment.
  void Promote(int increment);
  // This method decreases a composer's rank by decrement.
  void Demote(int decrement);
  // This method displays all the attributes of a composer.
  void Display();

 private:
  string first_name_;
  string last_name_;
  int composer_yob_; // year of birth
  string composer_genre_; // baroque, classical, romantic, etc.
  string fact_;
  int ranking_;
};
The Database class is straight-forward as well.
// database.h, Maggie Johnson
// Description: Class for a database of Composer records.
#include  <iostream>
#include "Composer.h"

// Our database holds 100 composers, and no more.
const int kMaxComposers = 100;

class Database {
 public:
  Database();
  ~Database();

  // Add a new composer using operations in the Composer class.
  // For convenience, we return a reference (pointer) to the new record.
  Composer& AddComposer(string in_first_name, string in_last_name,
                        string in_genre, int in_yob, string in_fact);
  // Search for a composer based on last name. Return a reference to the
  // found record.
  Composer& GetComposer(string in_last_name);
  // Display all composers in the database.
  void DisplayAll();
  // Sort database records by rank and then display all.
  void DisplayByRank();

 private:
  // Store the individual records in an array.
  Composer composers_[kMaxComposers];
  // Track the next slot in the array to place a new record.
  int next_slot_;
};
Notice how we have carefully encapsulated the composer-specific data in a separate class. We could have put a struct or class in the Database class to represent the Composer record, and accessed it directly there. But that would be "under-objectification", i.e., we are not modeling with objects as much as we could.
You'll see as you start to work on the implementation of the Composer and Database classes, that it is much cleaner to have a separate Composer class. In particular, having separate atomic operations on a Composer object greatly simplify the implementation of the Display() methods in the Database class.
Of course, there is also such a thing as "over-objectification" where we try and make everything a class, or we have more classes than we need. It takes practice to find the right balance, and you'll find that individual programmers will have differing opinions.
Determining if you are over- or under-objectifying can often be sorted out by carefully diagramming your classes. As mentioned earlier, it's important to work out a class design before you start coding and this can help you analyze your approach. A common notation used for this purpose is UML (Unified Modeling Language) Now that we have the classes defined for the Composer and Database objects, we need an interface that allows the user to interact with the database. A simple menu will do the trick:
Composer Database
---------------------------------------------
1) Add a new composer
2) Retrieve a composer's data
3) Promote/demote a composer's rank
4) List all composers
5) List all composers by rank
0) Quit
We could implement the user interface as a class, or as a procedural program. Not everything in a C++ program has to be a class. In fact, if the processing is sequential or task-oriented, as in this menu program, it's fine to implement it procedurally. It's important to implement it in such a way that it remains a "placeholder", i.e., if we want to create a graphical user interface at some point, we should not have to change anything in the system but the user interface.
The last thing we need to complete the application is a program to test the classes. For the Composer class, we want a main() program that takes input, populates a composer object and then displays it to make sure the class is working properly. We also want to call all the methods of the Composer class.
// test_composer.cpp, Maggie Johnson
//
// This program tests the Composer class.

#include <iostream>
#include "Composer.h"
using namespace std;

int main()
{
  cout << endl << "Testing the Composer class." << endl << endl;

  Composer composer;

  composer.set_first_name("Ludwig van");
  composer.set_last_name("Beethoven");
  composer.set_composer_yob(1770);
  composer.set_composer_genre("Romantic");
  composer.set_fact("Beethoven was completely deaf during the latter part of "
    "his life - he never heard a performance of his 9th symphony.");
  composer.Promote(2);
  composer.Demote(1);
  composer.Display();
}
We need a similar test program for the Database class.
// test_database.cpp, Maggie Johnson
//
// Description: Test driver for a database of Composer records.
#include <iostream>
#include "Database.h"
using namespace std;

int main() {
  Database myDB;

  // Remember that AddComposer returns a reference to the new record.
  Composer& comp1 = myDB.AddComposer("Ludwig van", "Beethoven", "Romantic", 1770,
    "Beethoven was completely deaf during the latter part of his life - he never "
    "heard a performance of his 9th symphony.");
  comp1.Promote(7);

  Composer& comp2 = myDB.AddComposer("Johann Sebastian", "Bach", "Baroque", 1685,
    "Bach had 20 children, several of whom became famous musicians as well.");
  comp2.Promote(5);

  Composer& comp3 = myDB.AddComposer("Wolfgang Amadeus", "Mozart", "Classical", 1756,
    "Mozart feared for his life during his last year - there is some evidence "
    "that he was poisoned.");
  comp3.Promote(2);

  cout << endl << "all Composers: " << endl << endl;
  myDB.DisplayAll();
}
Note that these simple test programs are a good first step, but they require us to manually inspect the output to be sure the program is working correctly. As a system gets larger, manual inspection of output rapidly becomes impractical. In a subsequent lesson, we'll introduce self-checking test programs in the form of unit tests.
The design for our application is now complete. The next step is to implement the .cpp files for the classes and the user interface. To start, go ahead and copy/paste the .h and test driver code above into files, and compile them. Use the test drivers to test your classes. Then, implement the following interface:
Composer Database
---------------------------------------------
1) Add a new composer
2) Retrieve a composer's data
3) Promote/demote a composer's rank
4) List all composers
5) List all composers by rank
0) Quit
Use the methods you defined in the Database class to implement the user interface. Make your methods error-proof. For example, a ranking should always be in the range 1-10. Don't let anyone add 101 composers either, unless you plan to change the data structure in the Database class.
Remember - all your code needs to follow our coding conventions, which are repeated here for your convenience:
- Every program we write begins with a header comment, providing the name of the author, their contact information, a short description, and usage (if relevant). Every function/method begins with a comment on operation and usage.
- We add explanatory comments using full sentences, whenever the code does not document itself, for example, if the processing is tricky, non-obvious, interesting, or important.
- Always use descriptive names: variables are lower-case words separated by _, as in my_variable. Function/method names use upper-case letters to mark words, as in MyExcitingFunction(). Constants start with a "k" and use upper-case letters to mark words, as in kDaysInWeek.
- Indentation is in multiples of two. The first level is two spaces; if further indentation is needed, we use four spaces, six spaces, etc.
Welcome to the Real World!
In this module, we introduce two very important tools used in most software engineering organizations. The first is a build tool, and the second is a configuration management system. Both of these tools are essential in industrial software engineering, where many engineers often work on one large system. These tools help to coordinate and control changes to the code base, and provide an efficient means for compiling and linking a system from many program and header files.
Makefiles
The process of building a program is usually managed with a build tool, which compiles and links the required files, in the correct order. Quite often, C++ files have dependencies, for example, a function called in one program resides in another program. Or, perhaps a header file is needed by several different .cpp files. A build tool figures out the correct compile order from these dependencies. It will also only compile files that have changed since the last build. This can save a lot of time in systems consisting of several hundreds or thousands of files.
An open source build tool called make is commonly used. To learn about it, read through this article. See if you can create a dependency graph for the Composer Database application, and then translate this into a makefile. Here is our solution.
Configuration Management Systems
The second tool used in industrial software engineering is Configuration Management (CM). This is used to manage change. Let's say Bob and Susan are both tech writers and both are working on updates to a technical manual. During a meeting, their manager assigns them each a section of the same document to update.
The technical manual is stored on a computer that both Bob and Susan can access. Without any CM tool or process in place, a number of problems could arise. One possible scenario is the computer storing the document might be set up so that Bob and Susan can not both work on the manual at the same time. This would slow them down considerably.
A more dangerous situation arises when the storage computer does allow the document to be opened by both Bob and Susan at the same time. Here is what could happen:
- Bob opens the document on his computer and works on his section.
- Susan opens the document on her computer and works on her section.
- Bob completes his changes and saves the document on the storage computer.
- Susan completes her changes and saves the document on the storage computer.
This illustration shows the problem that can occur if there are no controls on the single copy of the technical manual. When Susan saves her changes, she overwrites those made by Bob.

This is exactly the type of situation that a CM system can control. With a CM system, both Bob and Susan "check out" their own copy of the technical manual and work on them. When Bob checks his changes back in, the system knows that Susan has her own copy checked out. When Susan checks in her copy, the system analyzes the changes that both Bob and Susan made and creates a new version that merges the two sets of changes together.
CM systems have a number of features beyond managing concurrent changes as described above. Many systems store archives of all versions of a document, from the first time it was created. In the case of a technical manual, this can be very helpful when a user has an old version of the manual and is asking a tech writer questions. A CM system would allow the tech writer to access the old version and be able to see what the user is seeing.
CM systems are especially useful in controlling changes made to software. Such systems are called Software Configuration Management (SCM) systems. If you consider the huge number of individual source code files in a large software engineering organization and the huge number of engineers who must make changes to them, it's clear that an SCM system is critical.
Software Configuration Management
SCM systems are based on a simple idea: the definitive copies of your files are kept in a central repository. People check out copies of files from the repository, work on those copies, and then check them back in when they are finished. SCM systems manage and track revisions by multiple people against a single master set.
All SCM systems provide the following essential features:
- Concurrency Management
- Versioning
- Synchronization
Let's look at each of these features in more detail.
Concurrency Management
Concurrency refers to the simultaneous editing of a file by more than one person. With a large repository, we want people to be able to do this, but it can lead to some problems.
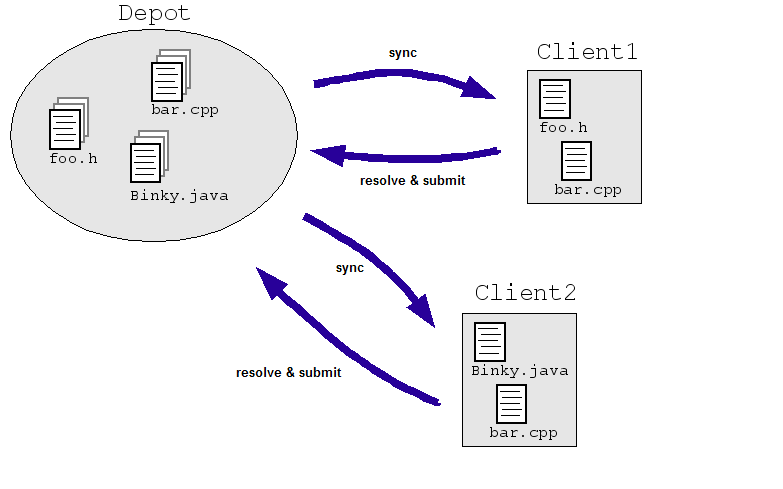
Consider a simple example in the engineering domain: Suppose we allow engineers to modify the same file simultaneously in a central repository of source code. Client1 and Client2 both need to make changes to a file at the same time:
- Client1 opens bar.cpp.
- Client2 opens bar.cpp.
- Client1 changes the file and saves it.
- Client2 changes the file and saves it overwriting Client1's changes.
Obviously, we don't want this to happen. Even if we controlled the situation by having the two engineers work on separate copies instead of directly on a master set (as in the illustration below), the copies must somehow be reconciled. Most SCM systems deal with this problem by allowing multiple engineers to check a file out ("sync" or "update") and make changes as needed. The SCM system then runs algorithms to merge the changes as files are checked back in ("submit" or "commit") to the repository.
These algorithms can be simple (ask the engineers to resolve conflicting changes) or not-so-simple (determine how to merge the conflicting changes intelligently and only ask an engineer if the system really gets stuck).
Versioning
Versioning refers to keeping track of file revisions which makes it possible to re-create (or roll back to) a previous version of the file. This is done either by making an archive copy of every file when it is checked into the repository, or by saving every change made to a file. At any time, we can use the archives or change information to create a previous version. Versioning systems can also create log reports of who checked in changes, when they were checked in, and what the changes were.
Synchronization
With some SCM systems, individual files are checked in and out of the repository. More powerful systems allow you to check out more than one file at a time. Engineers check out their own, complete, copy of the repository (or part thereof) and work on files as needed. They then commit their changes back to the master repository periodically, and update their own personal copies to stay up-to-date with changes other people have made. This process is called syncing or updating.
Subversion
Subversion (SVN) is an open-source version control system. It has all of the features described above.
SVN adopts a simple methodology when conflicts occur. A conflict is when two or more engineers make different changes to the same area of the code base and then both submit their changes. SVN only alerts the engineers that there is a conflict - it's up to the engineers to resolve it.
We are going to use SVN throughout this course to help you become familiar with configuration management. Such systems are very common in industry.
The first step is to install SVN on your system. Click here for instructions. Find your operating system and download the appropriate binary.
Some SVN Terminology
- Revision: A change in a file or set of files. A revision is one "snapshot" in a constantly changing project.
- Repository: The master copy where SVN stores a project's full revision history. Each project has one repository.
- Working Copy: The copy in which an engineer make changes to a project. There can be many working copies of a given project each owned by an individual engineer.
- Check Out: To request a working copy from the repository. A working copy equals the state of the project when it was checked out.
- Commit: To send changes from your working copy into the central repository. Also known as check-in or submit.
- Update: To bring others' changes from the repository into your working copy, or to indicate if your working copy has any uncommitted changes. This is the same as a sync, as described above. So, update/sync brings your working copy up-to-date with the repository copy.
- Conflict: The situation when two engineers try to commit changes to the same area of a file. SVN indicates conflicts, but the engineers must resolve them.
- Log message: A comment you attach to a revision when you commit it, which describes your changes. The log provides a summary of what's been going on in a project.
Now that you have SVN installed, we'll run through some basic commands. The first thing to do is set up a repository in a specified directory. Here are the commands:
$ svnadmin create /usr/local/svn/newrepos
$ svn import mytree file:///usr/local/svn/newrepos/project -m "Initial import"
Adding         mytree/foo.c
Adding         mytree/bar.c
Adding         mytree/subdir
Adding         mytree/subdir/foobar.h

Committed revision 1.
The import command copies the contents of directory mytree into the directory project in the repository. We can take a look at the directory in the repository with thelist command
$ svn list file:///usr/local/svn/newrepos/project
bar.c
foo.c
subdir/
The import does not create a working copy. To do this, you need to use the svn checkout command. This creates a working copy of the directory tree. Let's do that now:
$ svn checkout file:///usr/local/svn/newrepos/project
A    foo.c
A    bar.c
A    subdir
A    subdir/foobar.h
…
Checked out revision 215.
Now that you have a working copy, you can make changes to the files and directories there. Your working copy is just like any other collection of files and directories - you can add new ones or edit them, move them around, you can even delete the entire working copy. Note that if you copy and move files in your working copy, it is important to use svn copy and svn move instead of your operating system commands. To add a new file, use svn add and to delete a file use svn delete. If all you want to do is edit, just open the file with your editor and edit away!
There are some standard directory names often used with Subversion. The "trunk" directory holds the main line of development for your project. A "branches" directory holds any branch version you might be working on.
$ svn list file:///usr/local/svn/repos
/trunk
/branches
So, let's say you have made all the required changes to your working copy and you want to sync it with the repository. If a lot of other engineers are working in this area of the repository, it's important to keep your working copy up-to-date. You can use the svn status command to view the changes that you have made.
A       subdir/new.h      # file is scheduled for addition
D       subdir/old.c        # file is scheduled for deletion
M       bar.c                  # the content in bar.c has local modifications
Note that there are lots of flags on the status command to control this output. If you'd like to view the specific changes in a modified file, use svn diff.
$ svn diff bar.c
Index: bar.c
===================================================================
--- bar.c	(revision 5)
+++ bar.c	(working copy)
## -1,18 +1,19 ##
+#include
+#include

 int main(void) {
-  int temp_var;
+ int new_var;
...
Finally, to update your working copy from the repository, use the svn update command.
$ svn update
U  foo.c
U  bar.c
G  subdir/foobar.h
C  subdir/new.h
Updated to revision 2.
This is one place where a conflict might occur. In the output above, the "U" indicates no changes were made to the repository versions of these files and an update was done. The "G" means a merge occurred. The repository version had been changed, but the changes did not conflict with yours. The "C" indicates a conflict. This means that the changes from the repository overlapped with yours, and now you have to choose between them.
For every file that has a conflict, Subversion puts three files in your working copy:
- file.mine: This is your file as it existed in your working copy before you updated your working copy.
- file.rOLDREV: This is the file you checked out of the repository prior to making your changes.
- file.rNEWREV: This file is the current version in the repository.
You can do one of three things to resolve the conflict:
- Go through the files and do the merge manually.
- Copy one of the temporary files created by SVN over your working copy version.
- Run svn revert to throw away all of your changes.
Once you've resolved the conflict, you let SVN know by running svn resolved. This removes the three temporary files and SVN no longer views the file in a conflict state.
The last thing to do is to commit your final version to the repository. This is done with the svn commit command. When you commit a change, you need to provide a log message, which describes your changes. This log message is attached to the revision you create.
svn commit -m "Update files to include new headers."
There is so much more to learn about SVN, and how it can support large software engineering projects. There are extensive resources available on the web - just do a Google search on "Subversion".
For practice, create a repository for your Composer Database system, and import all of your files. Then checkout a working copy and go through the commands described above.
References
Application: A Study in Anatomy
Check out eSkeletons from The University of Texas at Austin