
Overridable config parameters provide the option to let report editors modify default values in a data source. Defining config parameters as overridable makes a data source more flexible, and gives users a way to create user-configurable report templates.
For example, a connector providing weather data could include a location parameter that lets report viewers request a weather report from a locale different than the default.
This document describes how overridable parameters are defined, enabled for modification, and how parameter values can be modified by report users. To learn more about how parameters are used in Looker Studio see Data source parameters.
Roles
The user roles referenced throughout the document:
| Role | Definition |
|---|---|
| Connector developer | A user that has built a community connector. |
| Data source owner | A user that created and owns a data source. |
| Report editor | A user with edit mode access to a report. |
| Report viewer | A user with view mode access to a report. |
Defining overridable parameters
The connector developer defines config parameters in the
getConfig() function of a
community connector. To define a config parameter as overridable the connector
calls setAllowOverride(true).
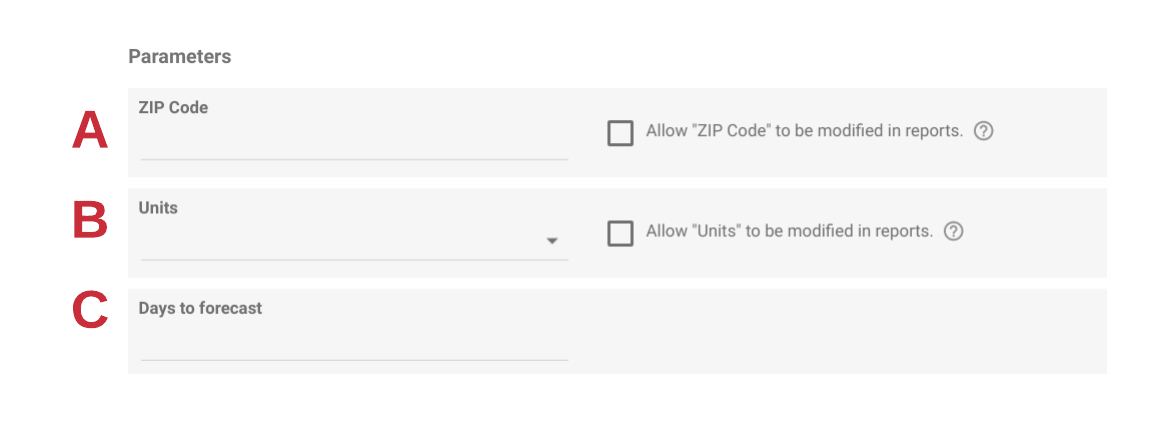
The following example defines 2 overridable parameters: zipcode and units
and 1 parameter that is not overridable: days-to-forcecast.
function getConfig(request) {
  var config = cc.getConfig();

  // A
  config
      .newTextInput()
      .setId("zipcode")
      .setName("ZIP Code")
      .setAllowOverride(true);

  // B
  config
    .newSelectSingle()
    .setId("units")
    .setName("Units")
    .addOption(
        config
          .newOptionBuilder()
          .setLabel("Metric")
          .setValue("metric")
    )
    .addOption(
      config
        .newOptionBuilder()
        .setLabel("Imperial")
        .setValue("imperial")
    )
    .setAllowOverride(true);

  // C
  config
    .newTextInput()
    .setId("days-to-forecast")
    .setName("Days to forecast")
      .setAllowOverride(false);


  return config.build();
}
When to avoid defining a parameter as overridable
It is recommended to learn how Connectors, Data Sources, and Reports work in relation to each other by reviewing How Looker Studio connects to your data.
Avoid defining a parameter as overridable in the following cases:
- When the value of a parameter affects the schema.
- If a user changes a parameter value and the schema of the new data returned is different than defined in the data source, any report dependent on the data source could break because of missing fields.
- If a parameter value controls sensitive data. E.g. Account selection.
- Do not define a parameter as overridable if you want to prevent unintentional viewing or sharing of sensitive data.
Enabling parameters for report users
Data source owners control which overridable parameters are allowed to be modified by report editors. Similarly, report editors control which parameters can be modified by report viewers.
Allow report editors to modify parameters values
The data source owner controls which parameters are allowed to be modified in reports. This is configured during creation or editing of a data source and is applicable only to parameters that have been defined as overridable by the Connector developer. If enabled then report editors will be able to Modify parameters in a report.
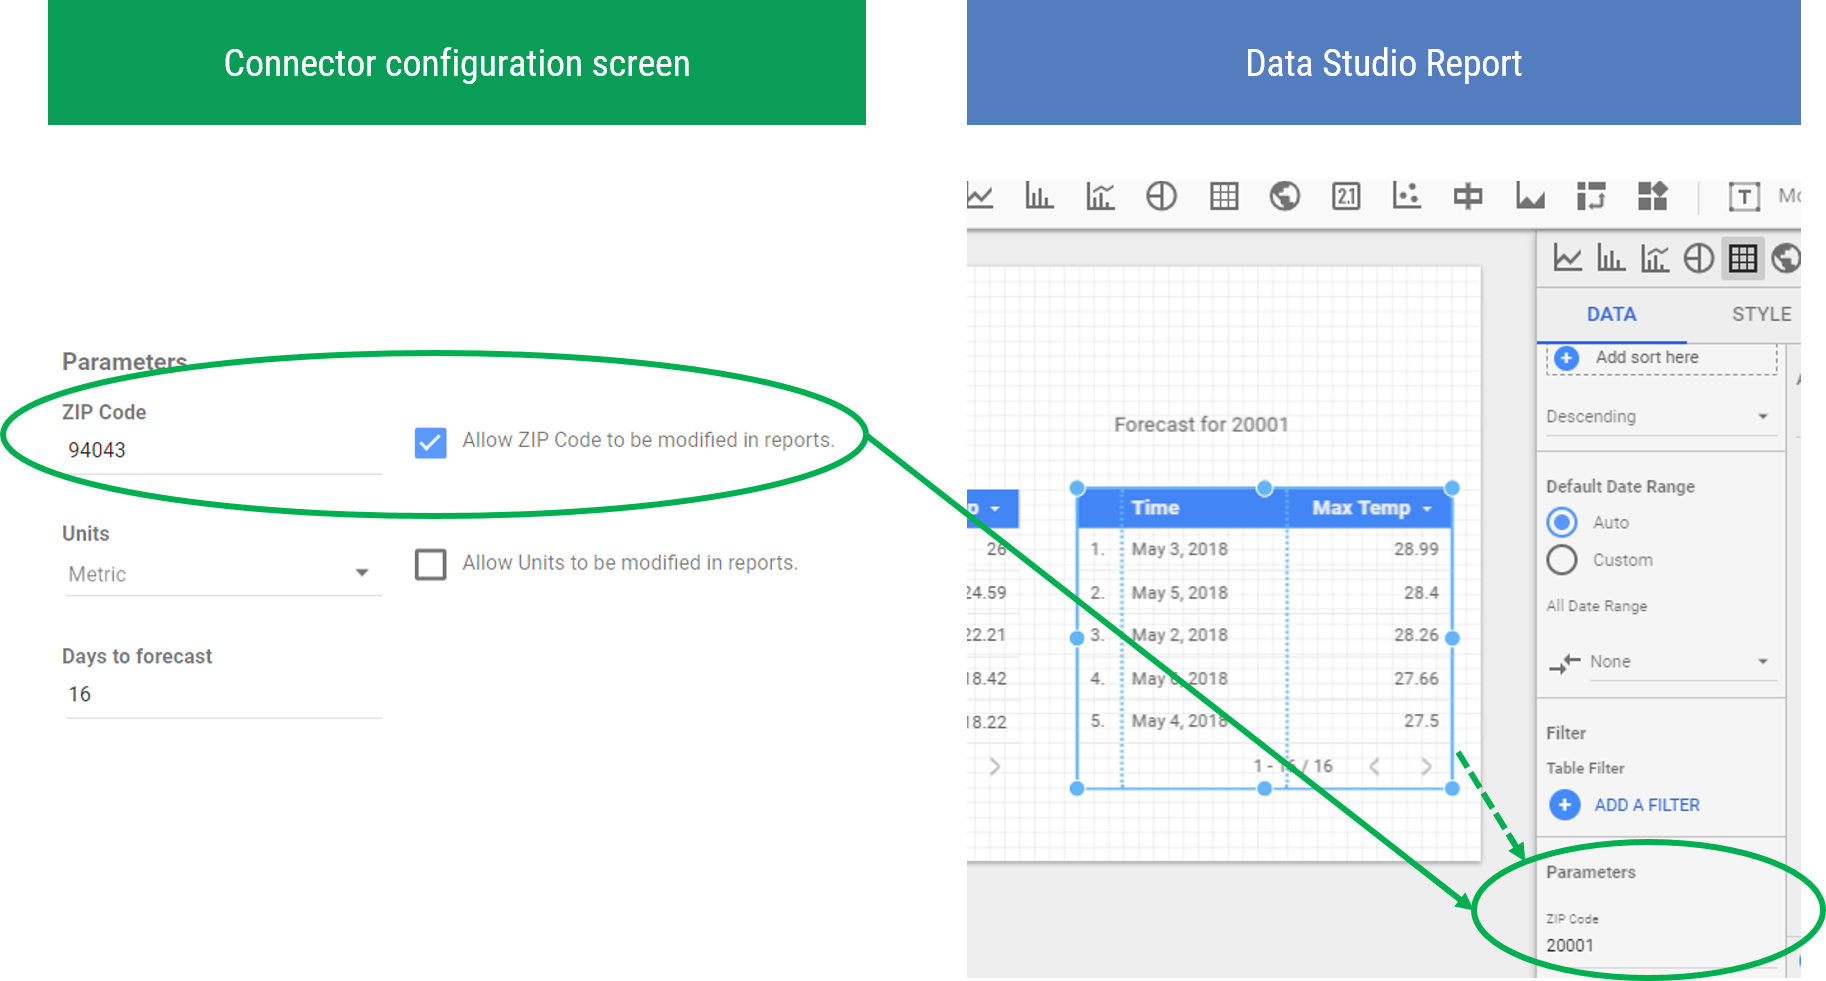
In the following example, a connector has 2 parameters defined as overridable:
zipcode and units. The data source owner has only allowed zipcode to be
modified in reports. In the report, the report editor has the option to modify
the zipcode parameter value.
Allow report viewers to modify parameters values
Report editors control which parameters can be modified by report viewers. The parameter values can then be modified through the report URL by any viewer of the report.
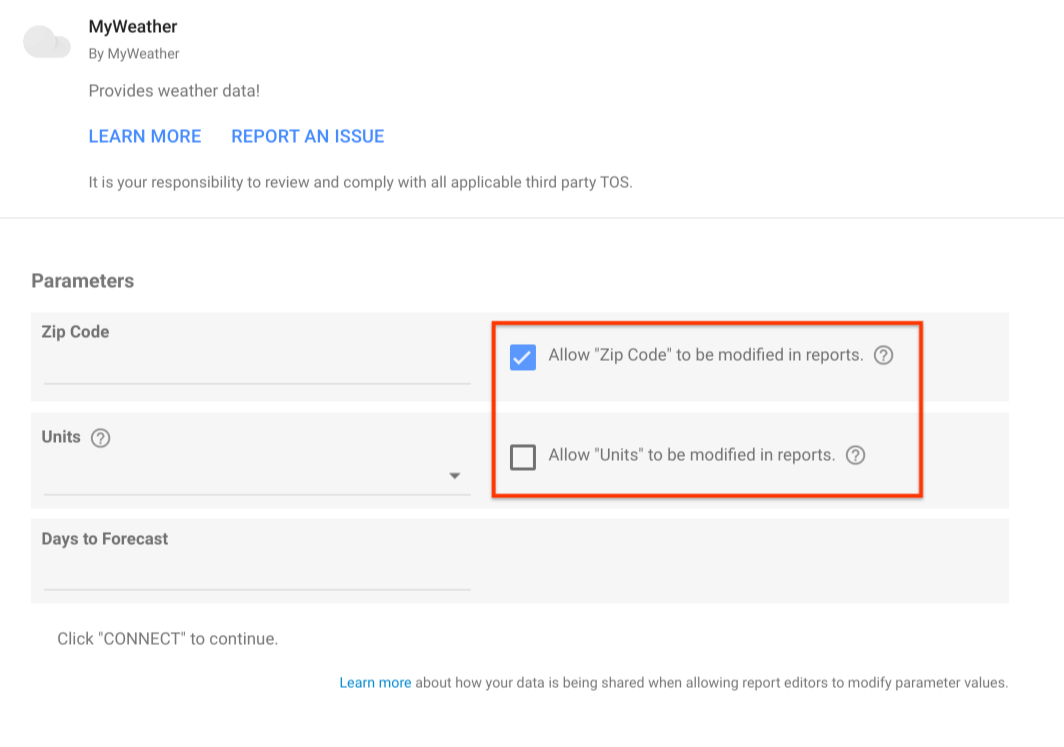
For example, consider a connector that has 2 parameters defined as overridable:
zipcode and units (figure 1). If the data source owner has allowed
zipcode to be modified in reports (figure 2) then report editors will only
be capable of allowing zipcode to be modified by report viewers. The report
editor will not have access or visibility to allow the units parameter to be
modified by report viewers.
URL parameters
To allow report viewers to edit parameter values through the report URL:
- Edit the report.
- Select Resource -> Manage report URL parameters.
- Use the Allow to be modified in the report URL checkboxes to allow or disallow modification of parameter values in the report URL. Changes are automatically saved.
- Click Close in the upper right.
Modifying parameter values
Report editors can modify parameter values using the report properties panel while report viewers can modify parameter values through the report URL.
Report properties panel
To learn how a report editor can set parameter values, see Modify parameters in a report.
Report URL parameters
For parameters that are allowed to be modified in the report URL, values can be set through a URL-encoded JSON object appended to the report URL in view mode.
To create a URL config:
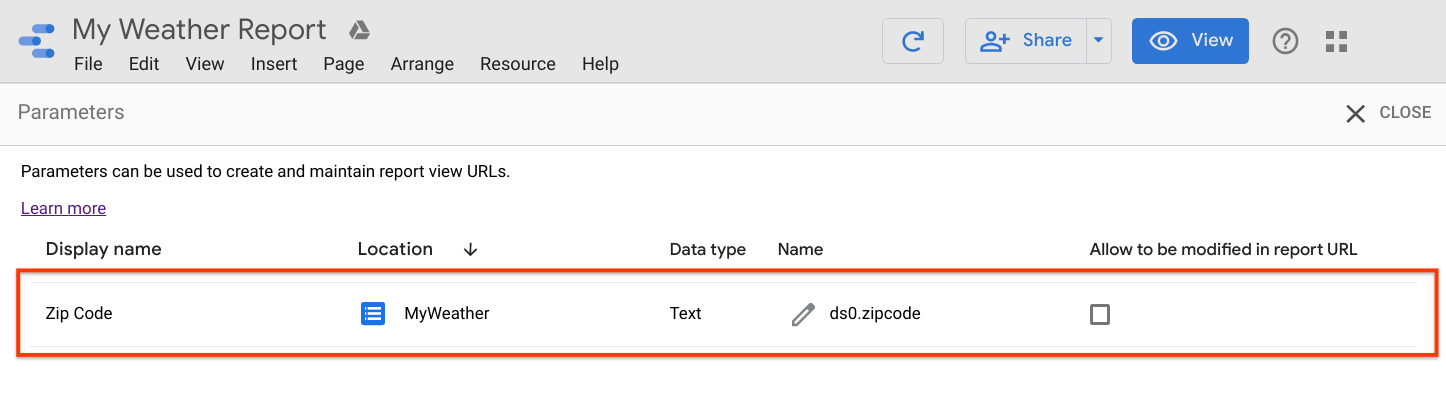
Gather parameter names
- Edit the report.
- Select Resource -> Manage report URL parameters.
- Note the name of the parameters you intend to set through the report URL.
For example, in the figure below the parameter name is
ds0.zipcode.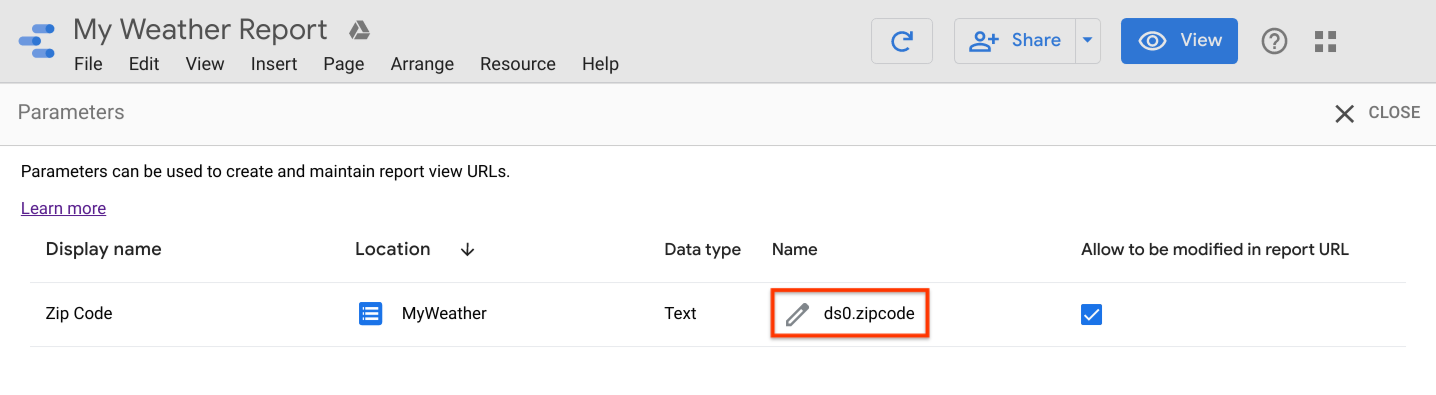
Create the parameter object
Parameters are defined via a JSON object. The keys for the parameter values are the parameter names.
{
  "parameterName": parameterValue
}
Parameter value types are one of
STRING,NUMBER, orBOOLEAN. For parameters that accept multiple values (i.e. Multi-select dropdowns) use an array of values.For example, if the parameter name is
ds0.zipcode, to set ZIP Code to94094, the JSON is as follows:{ "ds0.zipcode": "94094" }URL Encode the parameter object
After you create the parameter object, use JSON.stringify() to turn it into a string, then use [encodeURIComponent] to URL encode it.
var params = {
  "ds0.zipcode": "94094"
};
var paramsAsString = JSON.stringify(params);
var encodedParams = encodeURIComponent(paramsAsString)
This results in the following encoded string:
"%7B%22ds0.zipcode%22%3A%2294094%22%7D"Build the report URL
Once you have the URL encoded parameter object, append it to the report view URL using the
paramsquery parameter.https://lookerstudio.google.com/reporting/REPORT_ID/page/PAGE_ID?params=%7B%22ds0.zipcode%22%3A%2294094%22%7DMake sure you replace REPORT_ID and PAGE_ID with the values for your report and page.
Use the URL
The report URL will override parameters as defined in the JSON parameters object based on Parameter inheritance.
Parameter object example
The following parameter object shows how to set multiple parameters. It also illustrates setting parameter values for the different input types.
ds0.includeTodayis a checkbox inputds0.unitsis a single select inputds1.countriesis a multi-select inputds1.labelNameis a text input.
  {
    "ds0.includeToday": true,
    "ds0.units": "Metric",
    "ds1.countries": ["Canada", "Mexico"],
    "ds1.labelName": "Population"
  }
Parameter inheritance
The value used for a parameter follows an order of precedence based on where the parameter is set. Parameters set at higher precedence locations override parameters set at lower precedence locations. The order of precedence (from lowest to highest) is:
- Data source (default)
- Report URL
- Report properties panel, following the data source parameter inheritance rules.