
1. 始める前に
パスワードの代わりにパスキーを使用すると、ウェブサイトでのユーザー アカウントの安全性、シンプルさ、使いやすさを向上させることができます。パスキーを導入すると、ユーザーは、指紋、顔認証、デバイスの PIN など、デバイスの画面ロック機能を使用して、ウェブサイトやアプリにログインできるようになります。パスキーはユーザー アカウントに関連付けて作成する必要があります。また、その公開鍵は、ユーザーがパスキーを使用してログインする前にサーバーに保存しておく必要があります。
この Codelab では、基本的なフォームベースのユーザー名とパスワードのログインを変更して、パスキーをサポートするログインを実装します。このログインには次の要素が含まれます。
- ユーザーがログインした後にパスキーを作成するボタン。
- 登録済みのパスキーのリストを表示する UI。
- 既存のログイン フォームで、フォームの自動入力により登録済みのパスキーを使用してユーザーがログインできるようにする機能。
前提条件
- JavaScript に関する基本的な知識
- パスキーに関する基本的な知識
- Web Authentication API(WebAuthn)に関する基本的な知識
学習内容
- パスキーを作成する方法。
- パスキーを使用してユーザーを認証する方法。
- フォームでログイン オプションとしてパスキーを提示する方法。
必要なもの
次のいずれかの組み合わせが必要です。
- Android 9 以降を搭載している Android デバイス(生体認証センサー付きが望ましい)と Google Chrome。
- Windows 10 以降を搭載している Windows デバイスと Chrome。
- iOS 16 以降を搭載している iPhone または iPadOS 16 以降を搭載している iPad と Safari 16 以降。
- macOS Ventura 以降を搭載している Apple デスクトップ デバイスと Safari 16 以降または Chrome。
2. セットアップする
この Codelab では Glitch というサービスを使用します。ブラウザのみを使用して、クライアント サイドとサーバーサイドの JavaScript コードを編集し、デプロイできます。
プロジェクトを開く
- Glitch でプロジェクトを開きます。
- [Remix] をクリックして Glitch プロジェクトをフォークします。
- Glitch の下部にあるナビゲーション メニューで、[Preview] > [Preview in a new window] をクリックします。ブラウザで別のタブが開きます。
![Glitch の下部にあるナビゲーション メニューの [Preview in a new window] ボタン](https://developers.google.com/static/codelabs/passkey-form-autofill/img/47fb4e6ce68a97ae.png?hl=ja)
ウェブサイトの初期状態を確認する
- プレビュータブでランダムなユーザー名を入力し、[Next] をクリックします。
- ランダムなパスワードを入力して [Sign-in] をクリックします。パスワードは無視され、認証されてホームページが表示されます。
- 表示名を変更したい場合は、その操作を行います。初期状態でできることは以上です。
- [Sign out] をクリックします。
初期状態では、ユーザーはログインするたびにパスワードを入力する必要があります。ユーザーがデバイスの画面ロック機能を使用してログインできるように、このフォームにパスキーのサポートを追加します。https://passkeys-codelab.glitch.me/ で最終状態を試すことができます。
パスキーの仕組みの詳細については、パスキーの仕組みをご覧ください。
3. パスキーを作成する機能を追加する
ユーザーがパスキーを使用して認証できるようにするには、パスキーを作成、登録してその公開鍵をサーバーに保存する機能をユーザーに提供する必要があります。
ユーザーがパスワードでログインした後にパスキーを作成できるようにするのがいいでしょう。また、ユーザーがパスキーを作成するための UI と、/home ページで登録済みのすべてのパスキーのリストを表示する UI もあったほうがいいでしょう。次のセクションでは、パスキーの作成と登録を行う関数を作成します。
registerCredential() 関数を作成する
- Glitch で
public/client.jsファイルを開き、一番下までスクロールします。 - 対応するコメントの後に、次の
registerCredential()関数を追加します。
public/client. js
// TODO: Add an ability to create a passkey: Create the registerCredential() function.
export async function registerCredential() {

  // TODO: Add an ability to create a passkey: Obtain the challenge and other options from the server endpoint.

  // TODO: Add an ability to create a passkey: Create a credential.

  // TODO: Add an ability to create a passkey: Register the credential to the server endpoint.

};
この関数はサーバー側でパスキーの作成と登録を行います。
サーバー エンドポイントからチャレンジとその他のオプションを取得する
パスキーを作成する前に、WebAuthn に渡すパラメータ(チャレンジを含む)をサーバーにリクエストする必要があります。WebAuthn は、ユーザーがパスキーを作成し、そのパスキーで認証できるようにするためのブラウザ API です。うれしいことに、この Codelab には、これらのパラメータを返すサーバー エンドポイントがすでに用意されています。
- サーバー エンドポイントからチャレンジとその他のオプションを取得するには、
registerCredential()関数本体の中の対応するコメントの後に、次のコードを追加します。
public/client.js
// TODO: Add an ability to create a passkey: Obtain the challenge and other options from the server endpoint.
const options = await _fetch('/auth/registerRequest');
次のコード スニペットには、サーバーから受け取るサンプルのオプションが含まれています。
{
  challenge: *****,
  rp: {
    id: "example.com",
  },
  user: {
    id: *****,
    name: "john78",
    displayName: "John",
  },
  pubKeyCredParams: [{
    alg: -7, type: "public-key"
  },{
    alg: -257, type: "public-key"
  }],
  excludeCredentials: [{
    id: *****,
    type: 'public-key',
    transports: ['internal', 'hybrid'],
  }],
  authenticatorSelection: {
    authenticatorAttachment: "platform",
    requireResidentKey: true,
  }
}
WebAuthn の仕様では、サーバーとクライアントの間のプロトコルは規定されていません。ただし、この Codelab のサーバーは、WebAuthn の navigator.credentials.create() API に渡される PublicKeyCredentialCreationOptions ディクショナリにできるだけ近い JSON を返すように設計されています。
次の表に、PublicKeyCredentialCreationOptions ディクショナリの重要なパラメータを示します(すべてを網羅しているわけではありません)。
パラメータ | 説明 |
この登録を行うためにサーバーで生成されたチャレンジであり、形式は | |
ユーザーの一意の ID。この値は、メールアドレスやユーザー名などの個人を特定する情報を含まない | |
このフィールドには、メールアドレスやユーザー名など、ユーザーが認識できるアカウントの一意の識別子を格納します。この識別子はアカウント選択画面に表示されます(ユーザー名を使用する場合はパスワード認証の値と同じ値を使用します)。 | |
これはオプションのフィールドであり、アカウントのわかりやすい名前を表します。一意である必要はなく、ユーザーが選択した名前でも構いません。このフィールドに含めるのに適した値がウェブサイトにない場合は、空の文字列を渡してください。ブラウザによっては、アカウント選択画面にこの値が表示されることがあります。 | |
リライング パーティ(RP)ID はドメインです。ウェブサイトは、この値として自身のドメイン、または登録可能なサフィックスを指定できます。たとえば、RP のオリジンが https://login.example.com:1337 の場合は、RP ID として | |
このフィールドには、RP でサポートされる公開鍵アルゴリズムを指定します。 | |
すでに登録されている認証情報 ID のリストを指定します。これにより、同じデバイスが 2 回登録されないようにします。このフィールドを指定する場合、 | |
| |
ブール値 | |
|
認証情報を作成する
registerCredential()関数本体の中の対応するコメントの後で、Base64URL でエンコードされた一部のパラメータをバイナリに戻します。具体的には、user.idとchallengeの文字列、ならびにexcludeCredentials配列に含まれるid文字列のインスタンスをバイナリに戻します。
public/client.js
// TODO: Add an ability to create a passkey: Create a credential.
// Base64URL decode some values.
options.user.id = base64url.decode(options.user.id);
options.challenge = base64url.decode(options.challenge);

if (options.excludeCredentials) {
  for (let cred of options.excludeCredentials) {
    cred.id = base64url.decode(cred.id);
  }
}
- 次の行で、
authenticatorSelection.authenticatorAttachmentを"platform"に、authenticatorSelection.requireResidentKeyをtrueに設定します。これにより、検出可能な認証情報の機能を持つプラットフォーム認証システム(そのデバイス自体)のみが許容されるようになります。
public/client.js
// Use platform authenticator and discoverable credential.
options.authenticatorSelection = {
  authenticatorAttachment: 'platform',
  requireResidentKey: true
}
- 次の行で、
navigator.credentials.create()メソッドを呼び出して認証情報を作成します。
public/client.js
// Invoke the WebAuthn create() method.
const cred = await navigator.credentials.create({
  publicKey: options,
});
この呼び出しを行うと、ブラウザはデバイスの画面ロックを使用してユーザーの本人確認を試みます。
認証情報をサーバー エンドポイントに登録する
ユーザーが本人確認を行うと、パスキーが作成され、保存されます。ウェブサイトは、公開鍵が含まれた認証情報オブジェクトを受け取ります。この公開鍵をサーバーに送信してパスキーを登録できます。
次のコード スニペットには、認証情報オブジェクトの例が含まれています。
{
  "id": *****,
  "rawId": *****,
  "type": "public-key",
  "response": {
    "clientDataJSON": *****,
    "attestationObject": *****,
    "transports": ["internal", "hybrid"]
  },
  "authenticatorAttachment": "platform"
}
次の表に、PublicKeyCredential オブジェクトの重要なパラメータを示します(すべてを網羅しているわけではありません)。
パラメータ | 説明 |
作成されたパスキーの、Base64URL でエンコードされた ID。この ID によって、ブラウザは認証時に一致するパスキーがデバイス内にあるかどうかを判別できます。この値は、バックエンドのデータベースに保存する必要があります。 | |
認証情報 ID の | |
エンコードされたクライアント データの | |
エンコードされたアテステーション オブジェクトの | |
デバイスがサポートしているトランスポートのリスト: | |
パスキー対応デバイスでこの認証情報が作成されると、 |
認証情報オブジェクトをサーバーに送信する手順は次のとおりです。
- 認証情報を文字列としてサーバーに送信するため、認証情報のバイナリ パラメータを Base64URL としてエンコードします。
public/client.js
// TODO: Add an ability to create a passkey: Register the credential to the server endpoint.
const credential = {};
credential.id = cred.id;
credential.rawId = cred.id; // Pass a Base64URL encoded ID string.
credential.type = cred.type;

// The authenticatorAttachment string in the PublicKeyCredential object is a new addition in WebAuthn L3.
if (cred.authenticatorAttachment) {
  credential.authenticatorAttachment = cred.authenticatorAttachment;
}

// Base64URL encode some values.
const clientDataJSON = base64url.encode(cred.response.clientDataJSON);
const attestationObject = base64url.encode(cred.response.attestationObject);

// Obtain transports.
const transports = cred.response.getTransports ? cred.response.getTransports() : [];

credential.response = {
  clientDataJSON,
  attestationObject,
  transports
};
- 次の行で、オブジェクトをサーバーに送信します。
public/client.js
return await _fetch('/auth/registerResponse', credential);
プログラムを実行すると、サーバーは HTTP code 200 を返します。これは、認証情報が登録されたことを意味します。
これで registerCredential() 関数が完成しました。
このセクションの解答コードを確認する
public/client.js
// TODO: Add an ability to create a passkey: Create the registerCredential() function.
export async function registerCredential() {

  // TODO: Add an ability to create a passkey: Obtain the challenge and other options from server endpoint.
  const options = await _fetch('/auth/registerRequest');

  // TODO: Add an ability to create a passkey: Create a credential.
  // Base64URL decode some values.

  options.user.id = base64url.decode(options.user.id);
  options.challenge = base64url.decode(options.challenge);

  if (options.excludeCredentials) {
    for (let cred of options.excludeCredentials) {
      cred.id = base64url.decode(cred.id);
    }
  }

  // Use platform authenticator and discoverable credential.
  options.authenticatorSelection = {
    authenticatorAttachment: 'platform',
    requireResidentKey: true
  }

  // Invoke the WebAuthn create() method.
  const cred = await navigator.credentials.create({
    publicKey: options,
  });

  // TODO: Add an ability to create a passkey: Register the credential to the server endpoint.
  const credential = {};
  credential.id = cred.id;
  credential.rawId = cred.id; // Pass a Base64URL encoded ID string.
  credential.type = cred.type;

  // The authenticatorAttachment string in the PublicKeyCredential object is a new addition in WebAuthn L3.
  if (cred.authenticatorAttachment) {
    credential.authenticatorAttachment = cred.authenticatorAttachment;
  }

  // Base64URL encode some values.
  const clientDataJSON = base64url.encode(cred.response.clientDataJSON);
  const attestationObject =
  base64url.encode(cred.response.attestationObject);

  // Obtain transports.
  const transports = cred.response.getTransports ?
  cred.response.getTransports() : [];

  credential.response = {
    clientDataJSON,
    attestationObject,
    transports
  };

  return await _fetch('/auth/registerResponse', credential);
};
4. パスキーの認証情報の登録と管理を行うための UI を作成する
registerCredential() 関数を作成しましたが、これを呼び出すボタンが必要です。また、登録済みのパスキーのリストを表示する必要もあります。

プレースホルダの HTML を追加する
- Glitch で
views/home.htmlファイルを開きます。 - 対応するコメントの後に、パスキー登録のボタンとパスキーのリストを表示する UI プレースホルダを追加します。
views/home.html
<!-- TODO: Add an ability to create a passkey: Add placeholder HTML. -->
<section>
<h3 class="mdc-typography mdc-typography--headline6"> Your registered
passkeys:</h3>
<div id="list"></div>
</section>
<p id="message" class="instructions"></p>
<mwc-button id="create-passkey" class="hidden" icon="fingerprint" raised>Create a passkey</mwc-button>
div#list 要素はリストのプレースホルダです。
パスキーのサポートを確認する
パスキーをサポートするデバイスを使用するユーザーにのみパスキーを作成するオプションを表示するには、最初に WebAuthn が利用可能かどうかを確認する必要があります。利用可能である場合、[Create a passkey] ボタンを表示するには、hidden クラスを削除する必要があります。
環境がパスキーをサポートしているかどうかを確認するには、次の手順を行います。
views/home.htmlファイルの対応するコメントの後に、window.PublicKeyCredential、PublicKeyCredential.isUserVerifyingPlatformAuthenticatorAvailable、PublicKeyCredential.isConditionalMediationAvailableがtrueであるかどうかを判断する条件文を記述します。
views/home.html
// TODO: Add an ability to create a passkey: Check for passkey support.
const createPasskey = $('#create-passkey');
// Feature detections
if (window.PublicKeyCredential &&
    PublicKeyCredential.isUserVerifyingPlatformAuthenticatorAvailable &&
    PublicKeyCredential.isConditionalMediationAvailable) {
- 条件の内部で、デバイスがパスキーを作成できるかどうかを確認し、次にフォームの自動入力でパスキーを提示できるかどうかを確認します。
views/home.html
try {
  const results = await Promise.all([

    // Is platform authenticator available in this browser?
    PublicKeyCredential.isUserVerifyingPlatformAuthenticatorAvailable(),

    // Is conditional UI available in this browser?
    PublicKeyCredential.isConditionalMediationAvailable()
  ]);
- すべての条件が満たされている場合は、パスキーを作成するボタンを表示します。それ以外の場合は、警告メッセージを表示します。
views/home.html
    if (results.every(r => r === true)) {

      // If conditional UI is available, reveal the Create a passkey button.
      createPasskey.classList.remove('hidden');
    } else {

      // If conditional UI isn't available, show a message.
      $('#message').innerText = 'This device does not support passkeys.';
    }
  } catch (e) {
    console.error(e);
  }
} else {

  // If WebAuthn isn't available, show a message.
  $('#message').innerText = 'This device does not support passkeys.';
}
登録済みのパスキーのリストを表示する
- 登録済みのパスキーをサーバーから取得してリストにして表示する
renderCredentials()関数を定義します。うれしいことに、ログインしているユーザーの登録済みのパスキーを取得する/auth/getKeysサーバー エンドポイントがすでに用意されています。
views/home.html
// TODO: Add an ability to create a passkey: Render registered passkeys in a list.
async function renderCredentials() {
  const res = await _fetch('/auth/getKeys');
  const list = $('#list');
  const creds = html`${res.length > 0 ? html`
    <mwc-list>
      ${res.map(cred => html`
        <mwc-list-item>
          <div class="list-item">
            <div class="entity-name">
              <span>${cred.name || 'Unnamed' }</span>
          </div>
          <div class="buttons">
            <mwc-icon-button data-cred-id="${cred.id}"
            data-name="${cred.name || 'Unnamed' }" @click="${rename}"
            icon="edit"></mwc-icon-button>
            <mwc-icon-button data-cred-id="${cred.id}" @click="${remove}"
            icon="delete"></mwc-icon-button>
          </div>
         </div>
      </mwc-list-item>`)}
  </mwc-list>` : html`
  <mwc-list>
    <mwc-list-item>No credentials found.</mwc-list-item>
  </mwc-list>`}`;
  render(creds, list);
};
- 次の行で、ユーザーが
/homeページにアクセスしたら、初期化としてrenderCredentials()関数を呼び出して、登録済みのパスキーを表示します。
views/home.html
renderCredentials();
パスキーを作成して登録する
パスキーを作成して登録するには、前に実装した registerCredential() 関数を呼び出す必要があります。
[Create a passkey] ボタンをクリックしたときに registerCredential() 関数をトリガーする手順は次のとおりです。
- ファイル内のプレースホルダの HTML の後にある次の
importステートメントを見つけます。
views/home.html
import {
  $,
  _fetch,
  loading,
  updateCredential,
  unregisterCredential,
} from '/client.js';
importステートメントの本文の最後にregisterCredential()関数を追加します。
views/home.html
// TODO: Add an ability to create a passkey: Create and register a passkey.
import {
  $,
  _fetch,
  loading,
  updateCredential,
  unregisterCredential,
  registerCredential
} from '/client.js';
- ファイル内の対応するコメントの後で
register()関数を定義します。この関数は、registerCredential()関数を呼び出し、ローディング UI を表示し、登録後にrenderCredentials()を呼び出します。これにより、ブラウザでパスキーが作成されていることが明確に示されます。また、問題発生時にはエラー メッセージが表示されます。
views/home.html
// TODO: Add an ability to create a passkey: Create and register a passkey.
async function register() {
  try {

    // Start the loading UI.
    loading.start();

    // Start creating a passkey.
    await registerCredential();

    // Stop the loading UI.
    loading.stop();

    // Render the updated passkey list.
    renderCredentials();
register()関数の内部で例外をキャッチします。デバイスにパスキーがすでに存在する場合、navigator.credentials.create()メソッドはInvalidStateErrorエラーをスローします。これを調べるにはexcludeCredentials配列を使用します。この場合は、適切なメッセージをユーザーに表示します。また、ユーザーが認証ダイアログをキャンセルした場合はNotAllowedErrorエラーがスローされます。この場合は、何も表示せずにエラーを無視します。
views/home.html
  } catch (e) {

    // Stop the loading UI.
    loading.stop();

    // An InvalidStateError indicates that a passkey already exists on the device.
    if (e.name === 'InvalidStateError') {
      alert('A passkey already exists for this device.');

    // A NotAllowedError indicates that the user canceled the operation.
    } else if (e.name === 'NotAllowedError') {
      Return;

    // Show other errors in an alert.
    } else {
      alert(e.message);
      console.error(e);
    }
  }
};
register()関数の後にある行で、[Create a passkey] ボタンのclickイベントにregister()関数をアタッチします。
views/home.html
createPasskey.addEventListener('click', register);
このセクションの解答コードを確認する
views/home.html
<!-- TODO: Add an ability to create a passkey: Add placeholder HTML. -->
<section>
<h3 class="mdc-typography mdc-typography--headline6"> Your registered
passkeys:</h3>
<div id="list"></div>
</section>
<p id="message" class="instructions"></p>
<mwc-button id="create-passkey" class="hidden" icon="fingerprint" raised>Create a passkey</mwc-button>
views/home.html
// TODO: Add an ability to create a passkey: Create and register a passkey.
import {
  $,
  _fetch,
  loading,
  updateCredential,
  unregisterCredential,
  registerCredential
} from '/client.js';
views/home.html
// TODO: Add an ability to create a passkey: Check for passkey support.
const createPasskey = $('#create-passkey');

// Feature detections
if (window.PublicKeyCredential &&
    PublicKeyCredential.isUserVerifyingPlatformAuthenticatorAvailable &&
    PublicKeyCredential.isConditionalMediationAvailable) {
  try {
    const results = await Promise.all([

      // Is platform authenticator available in this browser?
      PublicKeyCredential.isUserVerifyingPlatformAuthenticatorAvailable(),

      // Is conditional UI available in this browser?
      PublicKeyCredential.isConditionalMediationAvailable()
    ]);
    if (results.every(r => r === true)) {

      // If conditional UI is available, reveal the Create a passkey button.
      createPasskey.classList.remove('hidden');
    } else {

      // If conditional UI isn't available, show a message.
      $('#message').innerText = 'This device does not support passkeys.';
    }
  } catch (e) {
    console.error(e);
  }
} else {

  // If WebAuthn isn't available, show a message.
  $('#message').innerText = 'This device does not support passkeys.';
}

// TODO: Add an ability to create a passkey: Render registered passkeys in a list.
async function renderCredentials() {
  const res = await _fetch('/auth/getKeys');
  const list = $('#list');
  const creds = html`${res.length > 0 ? html`
  <mwc-list>
    ${res.map(cred => html`
      <mwc-list-item>
        <div class="list-item">
          <div class="entity-name">
            <span>${cred.name || 'Unnamed' }</span>
          </div>
          <div class="buttons">
            <mwc-icon-button data-cred-id="${cred.id}" data-name="${cred.name || 'Unnamed' }" @click="${rename}" icon="edit"></mwc-icon-button>
            <mwc-icon-button data-cred-id="${cred.id}" @click="${remove}" icon="delete"></mwc-icon-button>
          </div>
        </div>
      </mwc-list-item>`)}
  </mwc-list>` : html`
  <mwc-list>
    <mwc-list-item>No credentials found.</mwc-list-item>
  </mwc-list>`}`;
  render(creds, list);
};

renderCredentials();

// TODO: Add an ability to create a passkey: Create and register a passkey.
async function register() {
  try {

    // Start the loading UI.
    loading.start();

    // Start creating a passkey.
    await registerCredential();

    // Stop the loading UI.
    loading.stop();

    // Render the updated passkey list.
    renderCredentials();
  } catch (e) {

    // Stop the loading UI.
    loading.stop();

    // An InvalidStateError indicates that a passkey already exists on the device.
    if (e.name === 'InvalidStateError') {
      alert('A passkey already exists for this device.');

    // A NotAllowedError indicates that the user canceled the operation.
    } else if (e.name === 'NotAllowedError') {
      Return;

    // Show other errors in an alert.
    } else {
      alert(e.message);
      console.error(e);
    }
  }
};

createPasskey.addEventListener('click', register);
試してみる
ここまでの手順をすべて完了していれば、ウェブサイトでパスキーを作成、登録、表示する機能が実装されています。
これらの機能を試す手順は次のとおりです。
- プレビュータブで、ランダムなユーザー名とパスワードでログインします。
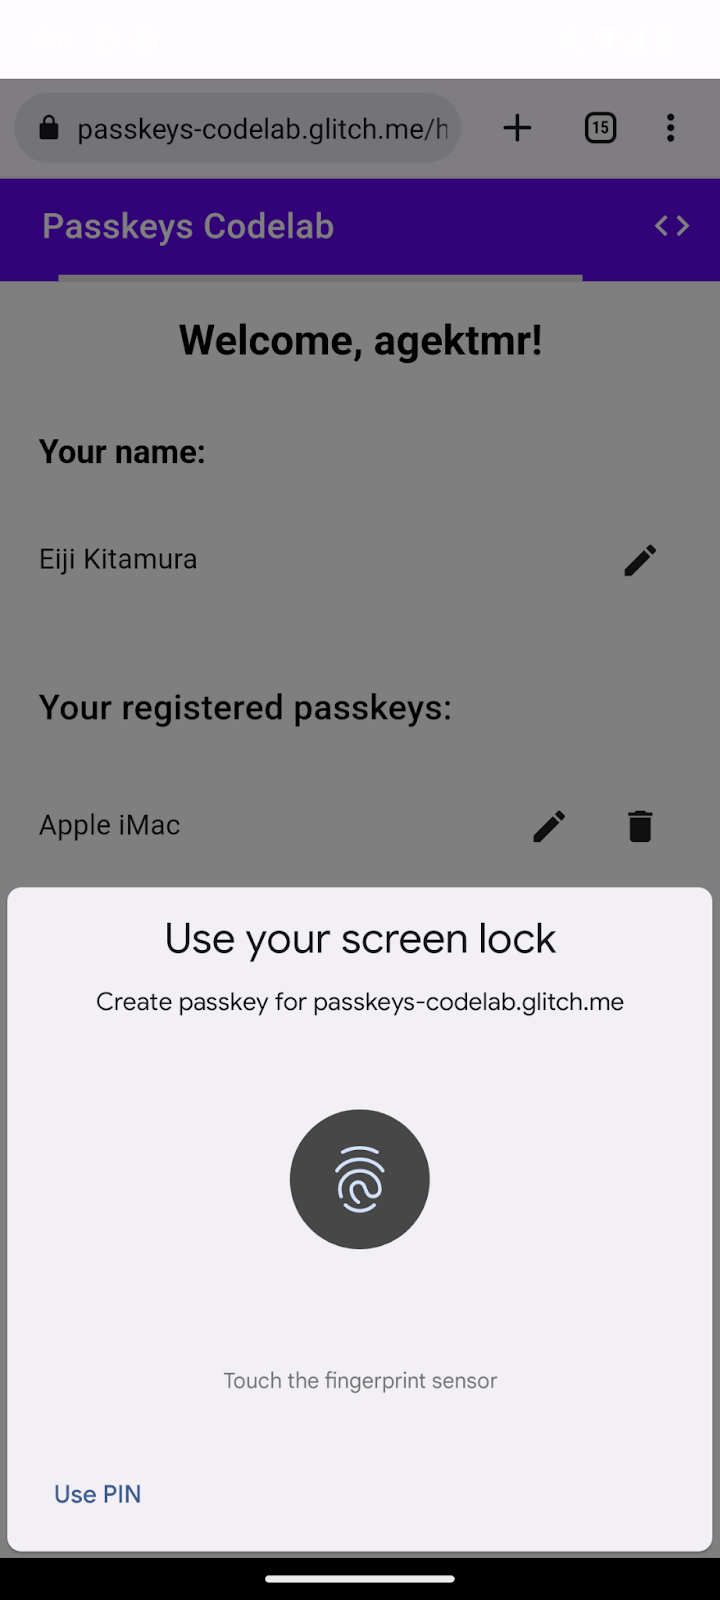
- [Create a passkey] をクリックします。
- デバイスの画面ロックを使用して本人確認を行います。
- パスキーが登録済みであり、ウェブページの [Your registered passkeys] セクションに表示されていることを確認します。
登録済みのパスキーの名前変更と削除
リストに表示されている登録済みのパスキーの名前変更と削除を行うことができます。この Codelab ではそれらのコードが実装されているため、動作はコードで確認できます。
パソコンで Chrome を使用している場合は、chrome://settings/passkeys で登録済みのパスキーを削除できます。Android の場合は、設定のパスワード マネージャーで登録済みのパスキーを削除できます。
他のプラットフォームで登録済みのパスキーの名前変更と削除を行う方法については、それぞれのプラットフォームのサポートページをご覧ください。
5. パスキーによる認証機能を追加する
ユーザーはパスキーを作成して登録できるようになりました。ウェブサイトでの安全な認証方法としてパスキーを使用する準備が整いました。あとは、パスキーによる認証機能をウェブサイトに追加する必要があります。
authenticate() 関数を作成する
public/client.jsファイルの対応するコメントの後に、authenticate()という関数を作成します。この関数は、ユーザーをローカルで確認してから、サーバーとの間で確認します。
public/client.js
// TODO: Add an ability to authenticate with a passkey: Create the authenticate() function.
export async function authenticate() {

  // TODO: Add an ability to authenticate with a passkey: Obtain the challenge and other options from the server endpoint.

  // TODO: Add an ability to authenticate with a passkey: Locally verify the user and get a credential.

  // TODO: Add an ability to authenticate with a passkey: Verify the credential.

};
サーバー エンドポイントからチャレンジとその他のオプションを取得する
ユーザーに認証を求める前に、WebAuthn で渡すパラメータ(チャレンジを含む)をサーバーにリクエストする必要があります。
authenticate()関数の内部の対応するコメントの後で_fetch()関数を呼び出して、サーバーにPOSTリクエストを送信します。
public/client.js
// TODO: Add an ability to authenticate with a passkey: Obtain the challenge and other options from the server endpoint.
const options = await _fetch('/auth/signinRequest');
この Codelab のサーバーは、WebAuthn の navigator.credentials.get() API に渡される PublicKeyCredentialRequestOptions ディクショナリにできるだけ近い JSON を返すように設計されています。次のコード スニペットには、受け取るオプションのサンプルが含まれています。
{
  "challenge": *****,
  "rpId": "passkeys-codelab.glitch.me",
  "allowCredentials": []
}
次の表に、PublicKeyCredentialRequestOptions ディクショナリの重要なパラメータを示します(すべてを網羅しているわけではありません)。
パラメータ | 説明 |
サーバーで生成されたチャレンジで、形式は | |
RP ID はドメインです。ウェブサイトは、この値として自身のドメイン、または登録可能なサフィックスを指定できます。この値は、パスキーの作成時に使用された | |
このプロパティは、この認証の対象となる認証システムの検出に使用されます。ブラウザでアカウント選択画面を表示できるようにするには、空の配列を渡すか、未指定にします。 | |
|
ユーザーをローカルで確認し、認証情報を取得する
authenticate()関数内部の対応するコメントの後で、challengeパラメータをバイナリに戻します。
public/client.js
// TODO: Add an ability to authenticate with a passkey: Locally verify the user and get a credential.
// Base64URL decode the challenge.
options.challenge = base64url.decode(options.challenge);
allowCredentialsパラメータに空の配列を渡して、ユーザーが認証を行う際にアカウント選択画面が表示されるようにします。
public/client.js
// An empty allowCredentials array invokes an account selector by discoverable credentials.
options.allowCredentials = [];
アカウント選択画面では、パスキーとともに保存されているユーザーの情報を使用します。
mediation: 'conditional'オプションを指定してnavigator.credentials.get()メソッドを呼び出します。
public/client.js
// Invoke the WebAuthn get() method.
const cred = await navigator.credentials.get({
  publicKey: options,

  // Request a conditional UI.
  mediation: 'conditional'
});
このオプションは、フォーム自動入力の一環として条件付きでパスキーを提示するようブラウザに指示します。
認証情報を検証する
ユーザーがローカルで本人確認を行ったら、サーバーで検証可能なシグネチャが含まれる認証情報オブジェクトを受け取ります。
次のコード スニペットには、サンプルの PublicKeyCredential オブジェクトが含まれています。
{
  "id": *****,
  "rawId": *****,
  "type": "public-key",
  "response": {
    "clientDataJSON": *****,
    "authenticatorData": *****,
    "signature": *****,
    "userHandle": *****
  },
  authenticatorAttachment: "platform"
}
次の表に、PublicKeyCredential オブジェクトの重要なパラメータを示します(すべてを網羅しているわけではありません)。
パラメータ | 説明 |
認証済みパスキー認証情報の、Base64URL でエンコードされた ID。 | |
認証情報 ID の | |
クライアント データの | |
認証システムデータの | |
シグネチャの | |
作成時に設定されたユーザー ID を含む | |
この認証情報がローカル デバイスから取得された場合は、 |
認証情報オブジェクトをサーバーに送信する手順は次のとおりです。
authenticate()関数内部の対応するコメントの後で、認証情報のバイナリ パラメータをエンコードして、文字列としてサーバーに送信できるようにします。
public/client.js
// TODO: Add an ability to authenticate with a passkey: Verify the credential.
const credential = {};
credential.id = cred.id;
credential.rawId = cred.id; // Pass a Base64URL encoded ID string.
credential.type = cred.type;

// Base64URL encode some values.
const clientDataJSON = base64url.encode(cred.response.clientDataJSON);
const authenticatorData = base64url.encode(cred.response.authenticatorData);
const signature = base64url.encode(cred.response.signature);
const userHandle = base64url.encode(cred.response.userHandle);

credential.response = {
  clientDataJSON,
  authenticatorData,
  signature,
  userHandle,
};
- オブジェクトをサーバーに送信します。
public/client.js
return await _fetch(`/auth/signinResponse`, credential);
プログラムを実行すると、サーバーは HTTP code 200 を返します。これは、認証情報が検証されたことを意味します。
これで authentication() 関数が完成しました。
このセクションの解答コードを確認する
public/client.js
// TODO: Add an ability to authenticate with a passkey: Create the authenticate() function.
export async function authenticate() {

  // TODO: Add an ability to authenticate with a passkey: Obtain the
  challenge and other options from the server endpoint.
  const options = await _fetch('/auth/signinRequest');

  // TODO: Add an ability to authenticate with a passkey: Locally verify
  the user and get a credential.
  // Base64URL decode the challenge.
  options.challenge = base64url.decode(options.challenge);

  // The empty allowCredentials array invokes an account selector
  by discoverable credentials.
  options.allowCredentials = [];

  // Invoke the WebAuthn get() function.
  const cred = await navigator.credentials.get({
    publicKey: options,

    // Request a conditional UI.
    mediation: 'conditional'
  });

  // TODO: Add an ability to authenticate with a passkey: Verify the credential.
  const credential = {};
  credential.id = cred.id;
  credential.rawId = cred.id; // Pass a Base64URL encoded ID string.
  credential.type = cred.type;

  // Base64URL encode some values.
  const clientDataJSON = base64url.encode(cred.response.clientDataJSON);
  const authenticatorData =
  base64url.encode(cred.response.authenticatorData);
  const signature = base64url.encode(cred.response.signature);
  const userHandle = base64url.encode(cred.response.userHandle);

  credential.response = {
    clientDataJSON,
    authenticatorData,
    signature,
    userHandle,
  };

  return await _fetch(`/auth/signinResponse`, credential);
};
6. ブラウザの自動入力にパスキーを追加する
ユーザーが再度アクセスした場合は、できる限り簡単かつ安全にログインできるようにする必要があります。ログインページに [Sign in with a passkey] ボタンを追加すると、ユーザーはこのボタンを押し、ブラウザのアカウント選択画面でパスキーを選択し、画面ロックを使用して本人確認を行うことができます。
ただし、パスワードからパスキーへの移行は、すべてのユーザーに対して一挙に行われるわけではありません。すべてのユーザーがパスキーに移行するまでパスワードをなくすことはできないので、それまではパスワード ベースのログイン フォームを残す必要があります。しかし、パスワード フォームとパスキーボタンを両方表示すると、ユーザーはログインでいずれを使用するかを選択しなければなりません。単純でわかりやすいログイン プロセスが理想的です。
このような場合に「条件付き UI」が役に立ちます。条件付き UI は WebAuthn の機能です。パスワードの他に、自動入力項目としてパスキーを提示するフォーム入力フィールドを作成できます。ユーザーは、自動入力の候補でパスキーをタップすると、デバイスの画面ロックを使用してローカルで本人確認を行うよう求められます。ユーザーの操作はパスワード ベースのログインの操作とほぼ同じであるため、シームレスなユーザー エクスペリエンスになります。
条件付き UI を有効にする
条件付き UI を有効にするには、入力フィールドの autocomplete 属性に webauthn トークンを追加するだけです。このトークンを設定し、mediation: 'conditional' 文字列を指定して navigator.credentials.get() メソッドを呼び出すと、条件付きで画面ロック UI をトリガーできます。
- 条件付き UI を有効にするには、
view/index.htmlファイルの対応するコメントの後で、既存のユーザー名入力フィールドを次の HTML に置き換えます。
view/index.html
<!-- TODO: Add passkeys to the browser autofill: Enable conditional UI. -->
<input
  type="text"
  id="username"
  class="mdc-text-field__input"
  aria-labelledby="username-label"
  name="username"
  autocomplete="username webauthn"
  autofocus />
機能の検出、WebAuthn の呼び出し、条件付き UI の有効化
view/index.htmlファイルの対応するコメントの後で、既存のimportステートメントを次のコードに置き換えます。
view/index.html
// TODO: Add passkeys to the browser autofill: Detect features, invoke WebAuthn, and enable a conditional UI.
import {
  $,
  _fetch,
  loading,
  authenticate
} from "/client.js";
このコードは、前に実装した authenticate() 関数をインポートします。
window.PulicKeyCredentialオブジェクトが使用可能であることと、PublicKeyCredential.isConditionalMediationAvailable()メソッドがtrue値を返すことを確認したら、authenticate()関数を呼び出します。
view/index.html
// TODO: Add passkeys to the browser autofill: Detect features, invoke WebAuthn, and enable a conditional UI.
if (
  window.PublicKeyCredential &&
  PublicKeyCredential.isConditionalMediationAvailable
) {
  try {

    // Is conditional UI available in this browser?
    const cma =
      await PublicKeyCredential.isConditionalMediationAvailable();
    if (cma) {

      // If conditional UI is available, invoke the authenticate() function.
      const user = await authenticate();
      if (user) {

        // Proceed only when authentication succeeds.
        $("#username").value = user.username;
        loading.start();
        location.href = "/home";
      } else {
        throw new Error("User not found.");
      }
    }
  } catch (e) {
    loading.stop();

    // A NotAllowedError indicates that the user canceled the operation.
    if (e.name !== "NotAllowedError") {
      console.error(e);
      alert(e.message);
    }
  }
}
このセクションの解答コードを確認する
view/index.html
<!-- TODO: Add passkeys to the browser autofill: Enable conditional UI. -->
<input
  type="text"
  id="username"
  class="mdc-text-field__input"
  aria-labelledby="username-label"
  name="username"
  autocomplete="username webauthn"
  autofocus
/>
view/index.html
// TODO: Add passkeys to the browser autofill: Detect features, invoke WebAuthn, and enable a conditional UI.
import {
  $,
  _fetch,
  loading,
  authenticate
} from '/client.js';
view/index.html
// TODO: Add passkeys to the browser autofill: Detect features, invoke WebAuthn, and enable a conditional UI.
// Is WebAuthn avaiable in this browser?
if (window.PublicKeyCredential &&
    PublicKeyCredential.isConditionalMediationAvailable) {
  try {

    // Is a conditional UI available in this browser?
    const cma= await PublicKeyCredential.isConditionalMediationAvailable();
    if (cma) {

      // If a conditional UI is available, invoke the authenticate() function.
      const user = await authenticate();
      if (user) {

        // Proceed only when authentication succeeds.
        $('#username').value = user.username;
        loading.start();
        location.href = '/home';
      } else {
        throw new Error('User not found.');
      }
    }
  } catch (e) {
    loading.stop();

    // A NotAllowedError indicates that the user canceled the operation.
    if (e.name !== 'NotAllowedError') {
      console.error(e);
      alert(e.message);
    }
  }
}
試してみる
パスキーの作成、登録、表示、認証をウェブサイトで実装しました。
これらの機能を試す手順は次のとおりです。
- プレビュータブを開きます。
- 必要に応じてログアウトします。
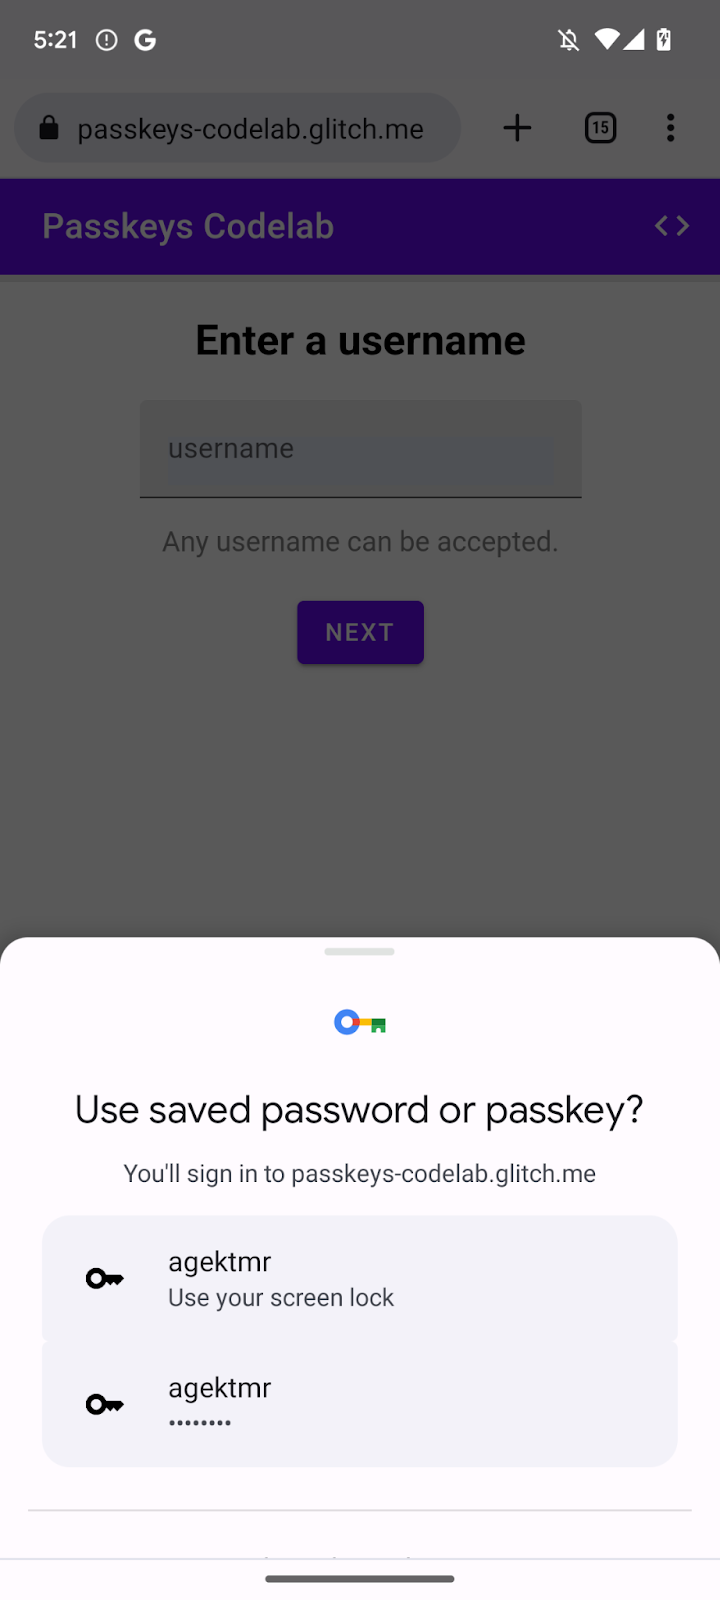
- ユーザー名のテキスト ボックスをクリックします。ダイアログが表示されます。
- ログインに使用するアカウントを選択します。
- デバイスの画面ロックを使用して本人確認を行います。
/homeページにリダイレクトされ、ログインされます。
7. 完了
これでこの Codelab は終了です。ご不明な点がございましたら、FIDO-DEV のメーリング リストまたは StackOverflow(passkey タグを使用)でお問い合わせください。