
1. 시작하기 전에
비밀번호 대신 패스키를 사용하면 웹사이트에서 사용자 계정을 더 안전하고 간편하고 쉽게 사용할 수 있습니다. 패스키를 사용하면 사용자가 지문, 얼굴 또는 기기 PIN과 같은 기기의 화면 잠금 기능을 사용하여 웹사이트 또는 앱에 로그인할 수 있습니다. 패스키를 생성하여 사용자 계정과 연결해야 하며, 공개 키를 서버에 저장해야 사용자가 로그인할 수 있습니다.
이 Codelab에서는 기본 양식 기반 사용자 이름과 비밀번호 로그인을 패스키를 지원하고 다음을 포함하는 로그인으로 전환합니다.
- 사용자가 로그인한 후 패스키를 생성하는 버튼
- 등록된 패스키 목록을 표시하는 UI
- 사용자가 양식 자동 완성을 통해 등록된 패스키로 로그인할 수 있는 기존 로그인 양식
기본 요건
- JavaScript에 관한 기본 이해
- 패스키에 관한 기본 이해
- Web Authentication API(WebAuthn)에 관한 기본 이해
학습할 내용
- 패스키 생성 방법
- 패스키로 사용자를 인증하는 방법
- 양식에서 패스키를 로그인 옵션으로 제안하도록 허용하는 방법
필요한 항목
다음 기기 조합 중 하나:
- Android 9 이상을 실행하는 Android 기기에 설치된 Chrome(생체 인식 센서를 함께 사용하는 것이 좋음)
- Windows 10 이상을 실행하는 Windows 기기에 설치된 Chrome
- iOS 16 이상을 실행하는 iPhone 또는 iPadOS 16 이상을 실행하는 iPad 기기에 설치된 Safari 16 이상
- macOS Ventura 이상을 실행하는 Apple 데스크톱 기기에 설치된 Safari 16 이상 또는 Chrome
2. 설정
이 Codelab에서는 JavaScript로 클라이언트 및 서버 측 코드를 수정하고 브라우저에서만 배포할 수 있는 Glitch라는 서비스를 사용합니다.
프로젝트 열기
- Glitch에서 프로젝트를 엽니다.
- 리믹스를 클릭하여 Glitch 프로젝트를 포크합니다.
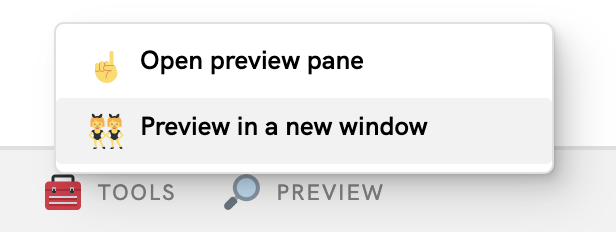
- Glitch 하단의 탐색 메뉴에서 미리보기 > 새 창에서 미리보기를 클릭합니다. 브라우저에 다른 탭이 열립니다.
웹사이트의 초기 상태 확인
- 미리보기 탭에서 임의의 사용자 이름을 입력한 후 다음을 클릭합니다.
- 임의의 비밀번호를 입력한 후 로그인을 클릭합니다. 비밀번호는 무시되지만 인증이 완료되어 홈페이지로 이동하게 됩니다.
- 원하는 경우 표시 이름을 변경하세요. 초기 상태에서 할 수 있는 작업은 이것뿐입니다.
- 로그아웃을 클릭합니다.
이 상태에서는 사용자가 로그인할 때마다 비밀번호를 입력해야 합니다. 사용자가 기기의 화면 잠금 기능으로 로그인할 수 있도록 이 양식에 패스키 지원을 추가합니다. 최종 상태는 https://passkeys-codelab.glitch.me/에서 사용해 볼 수 있습니다.
패스키의 작동 방식에 대한 자세한 내용은 패스키의 작동 방식을 참고하세요.
3. 패스키 생성 기능 추가
사용자가 패스키로 인증하도록 하려면 패스키를 생성 및 등록하고 공개 키를 서버에 저장할 수 있는 권한을 부여해야 합니다.
사용자가 비밀번호로 로그인한 후 패스키 생성을 허용하고, 사용자가 패스키를 생성하고 /home 페이지에서 등록된 모든 패스키 목록을 볼 수 있도록 하는 UI를 추가하려고 합니다. 다음 섹션에서 패스키를 생성하고 등록하는 함수를 만들어 봅니다.
registerCredential() 함수 만들기
- Glitch에서
public/client.js파일로 이동한 후 끝까지 스크롤합니다. - 관련 주석 뒤의 다음
registerCredential()함수를 추가합니다.
public/client. js
// TODO: Add an ability to create a passkey: Create the registerCredential() function.
export async function registerCredential() {

  // TODO: Add an ability to create a passkey: Obtain the challenge and other options from the server endpoint.

  // TODO: Add an ability to create a passkey: Create a credential.

  // TODO: Add an ability to create a passkey: Register the credential to the server endpoint.

};
이 함수는 서버에 패스키를 생성하고 등록합니다.
서버 엔드포인트에서 챌린지 및 기타 옵션 가져오기
패스키를 생성하기 전에 챌린지를 포함하여 서버에서 WebAuthn을 전달할 매개변수를 요청해야 합니다. WebAuthn은 사용자가 패스키를 생성하고 패스키로 사용자를 인증할 수 있는 브라우저 API입니다. 다행히 이 Codelab에는 이러한 매개변수로 응답하는 서버 엔드포인트가 이미 있습니다.
- 서버 엔드포인트에서 챌린지 및 기타 옵션을 가져오려면 관련 주석 뒤의
registerCredential()함수의 본문에 다음 코드를 추가합니다.
public/client.js
// TODO: Add an ability to create a passkey: Obtain the challenge and other options from the server endpoint.
const options = await _fetch('/auth/registerRequest');
다음 코드 스니펫에는 서버에서 수신하는 샘플 옵션이 포함되어 있습니다.
{
  challenge: *****,
  rp: {
    id: "example.com",
  },
  user: {
    id: *****,
    name: "john78",
    displayName: "John",
  },
  pubKeyCredParams: [{
    alg: -7, type: "public-key"
  },{
    alg: -257, type: "public-key"
  }],
  excludeCredentials: [{
    id: *****,
    type: 'public-key',
    transports: ['internal', 'hybrid'],
  }],
  authenticatorSelection: {
    authenticatorAttachment: "platform",
    requireResidentKey: true,
  }
}
서버와 클라이언트 간 프로토콜은 WebAuthn 사양의 일부가 아닙니다. 그러나 이 Codelab의 서버는 WebAuthn navigator.credentials.create() API에 전달된 PublicKeyCredentialCreationOptions 사전과 최대한 유사한 JSON을 반환하도록 설계되었습니다.
다음 표에 모든 내용이 포함되지는 않지만 PublicKeyCredentialCreationOptions 사전에 있는 중요한 매개변수가 포함되어 있습니다.
매개변수 | 설명 |
이 등록을 위한 | |
사용자의 고유 ID입니다. 이 값은 이메일 주소 또는 사용자 이름과 같은 개인 식별 정보를 포함하지 않는 | |
이 입력란에는 이메일 주소 또는 사용자 이름과 같이 사용자가 인식할 수 있는 계정의 고유 식별자가 있어야 합니다. 계정 선택기에 표시됩니다. (사용자 이름을 사용하는 경우 비밀번호 인증에서와 동일한 값을 사용하세요.) | |
이 입력란은 선택사항이며 사용자 친화적인 계정 이름입니다. 고유하지 않아도 되며 사용자가 선택한 이름일 수 있습니다. 웹사이트에 포함할 수 있는 적합한 값이 없는 경우 빈 문자열을 전달합니다. 브라우저에 따라 계정 선택기에 표시될 수 있습니다. | |
신뢰 당사자(RP) ID는 도메인입니다. 웹사이트에서 도메인 또는 등록 가능한 접미사를 지정할 수 있습니다. 예를 들어 RP의 출처가 https://login.example.com:1337인 경우 RP ID는 | |
이 입력란은 RP에서 지원되는 공개 키 알고리즘을 지정합니다. | |
동일한 기기가 두 번 등록되는 것을 방지하기 위해 이미 등록된 사용자 인증 정보 ID 목록을 제공합니다. 제공되는 경우 | |
| |
불리언 | |
|
사용자 인증 정보 만들기
- 관련 주석 뒤의
registerCredential()함수의 본문에서 Base64URL로 인코딩된 일부 매개변수, 특히user.id및challenge문자열과excludeCredentials배열에 포함된id문자열의 인스턴스를 다시 바이너리로 변환합니다.
public/client.js
// TODO: Add an ability to create a passkey: Create a credential.
// Base64URL decode some values.
options.user.id = base64url.decode(options.user.id);
options.challenge = base64url.decode(options.challenge);

if (options.excludeCredentials) {
  for (let cred of options.excludeCredentials) {
    cred.id = base64url.decode(cred.id);
  }
}
- 다음 줄에서
authenticatorSelection.authenticatorAttachment를"platform"으로 설정하고authenticatorSelection.requireResidentKey를true로 설정합니다. 검색 가능한 사용자 인증 정보 기능이 있는 플랫폼 인증자(기기 자체)만 사용할 수 있습니다.
public/client.js
// Use platform authenticator and discoverable credential.
options.authenticatorSelection = {
  authenticatorAttachment: 'platform',
  requireResidentKey: true
}
- 다음 줄에서
navigator.credentials.create()메서드를 호출하여 사용자 인증 정보를 만듭니다.
public/client.js
// Invoke the WebAuthn create() method.
const cred = await navigator.credentials.create({
  publicKey: options,
});
이 호출을 통해 브라우저에서 기기의 화면 잠금으로 사용자의 신원을 확인합니다.
서버 엔드포인트에 사용자 인증 정보 등록하기
사용자가 신원을 확인한 후 패스키가 생성되고 저장됩니다. 패스키를 등록하기 위해 서버로 보낼 수 있는 공개 키가 포함된 사용자 인증 정보 객체를 웹사이트에서 수신합니다.
다음 코드 스니펫에는 사용자 인증 정보 객체의 예시가 포함되어 있습니다.
{
  "id": *****,
  "rawId": *****,
  "type": "public-key",
  "response": {
    "clientDataJSON": *****,
    "attestationObject": *****,
    "transports": ["internal", "hybrid"]
  },
  "authenticatorAttachment": "platform"
}
다음 표에 모든 내용이 포함되지는 않지만 PublicKeyCredential 객체에 있는 중요한 매개변수가 포함되어 있습니다.
매개변수 | 설명 |
생성된 패스키의 Base64URL로 인코딩된 ID입니다. 이 ID는 인증 시 브라우저에서 기기에 일치하는 패스키가 있는지 확인하는 데 도움이 됩니다. 이 값은 백엔드의 데이터베이스에 저장해야 합니다. | |
사용자 인증 정보 ID의 | |
| |
| |
기기가 지원하는 전송 목록: | |
이 사용자 인증 정보가 패스키 지원 기기에서 생성되면 |
사용자 인증 정보 객체를 서버로 보내려면 다음 단계를 따르세요.
- 사용자 인증 정보의 바이너리 매개변수를 서버에 문자열로 전송할 수 있도록 Base64URL로 인코딩합니다.
public/client.js
// TODO: Add an ability to create a passkey: Register the credential to the server endpoint.
const credential = {};
credential.id = cred.id;
credential.rawId = cred.id; // Pass a Base64URL encoded ID string.
credential.type = cred.type;

// The authenticatorAttachment string in the PublicKeyCredential object is a new addition in WebAuthn L3.
if (cred.authenticatorAttachment) {
  credential.authenticatorAttachment = cred.authenticatorAttachment;
}

// Base64URL encode some values.
const clientDataJSON = base64url.encode(cred.response.clientDataJSON);
const attestationObject = base64url.encode(cred.response.attestationObject);

// Obtain transports.
const transports = cred.response.getTransports ? cred.response.getTransports() : [];

credential.response = {
  clientDataJSON,
  attestationObject,
  transports
};
- 다음 줄에서 객체를 서버로 전송합니다.
public/client.js
return await _fetch('/auth/registerResponse', credential);
프로그램을 실행하면 서버에서 사용자 인증 정보가 등록되었음을 나타내는 HTTP code 200을 반환합니다.
이제 완전한 registerCredential() 함수가 만들어졌습니다.
이 섹션의 솔루션 코드 검토
public/client.js
// TODO: Add an ability to create a passkey: Create the registerCredential() function.
export async function registerCredential() {

  // TODO: Add an ability to create a passkey: Obtain the challenge and other options from server endpoint.
  const options = await _fetch('/auth/registerRequest');

  // TODO: Add an ability to create a passkey: Create a credential.
  // Base64URL decode some values.

  options.user.id = base64url.decode(options.user.id);
  options.challenge = base64url.decode(options.challenge);

  if (options.excludeCredentials) {
    for (let cred of options.excludeCredentials) {
      cred.id = base64url.decode(cred.id);
    }
  }

  // Use platform authenticator and discoverable credential.
  options.authenticatorSelection = {
    authenticatorAttachment: 'platform',
    requireResidentKey: true
  }

  // Invoke the WebAuthn create() method.
  const cred = await navigator.credentials.create({
    publicKey: options,
  });

  // TODO: Add an ability to create a passkey: Register the credential to the server endpoint.
  const credential = {};
  credential.id = cred.id;
  credential.rawId = cred.id; // Pass a Base64URL encoded ID string.
  credential.type = cred.type;

  // The authenticatorAttachment string in the PublicKeyCredential object is a new addition in WebAuthn L3.
  if (cred.authenticatorAttachment) {
    credential.authenticatorAttachment = cred.authenticatorAttachment;
  }

  // Base64URL encode some values.
  const clientDataJSON = base64url.encode(cred.response.clientDataJSON);
  const attestationObject =
  base64url.encode(cred.response.attestationObject);

  // Obtain transports.
  const transports = cred.response.getTransports ?
  cred.response.getTransports() : [];

  credential.response = {
    clientDataJSON,
    attestationObject,
    transports
  };

  return await _fetch('/auth/registerResponse', credential);
};
4. 패스키 사용자 인증 정보를 등록하고 관리하기 위한 UI 빌드
이제 registerCredential() 함수를 사용할 수 있으므로 이를 호출하는 버튼이 필요합니다. 또한 등록된 패스키 목록을 표시해야 합니다.
자리표시자 HTML 추가
- Glitch에서
views/home.html파일로 이동합니다. - 관련 주석 뒤의 패스키와 패스키 목록을 등록하는 버튼을 표시하는 UI 자리표시자를 추가합니다.
views/home.html
<!-- TODO: Add an ability to create a passkey: Add placeholder HTML. -->
<section>
<h3 class="mdc-typography mdc-typography--headline6"> Your registered
passkeys:</h3>
<div id="list"></div>
</section>
<p id="message" class="instructions"></p>
<mwc-button id="create-passkey" class="hidden" icon="fingerprint" raised>Create a passkey</mwc-button>
div#list 요소는 목록의 자리표시자입니다.
패스키 지원 확인
패스키를 지원하는 기기를 사용하는 사용자에게만 패스키 생성 옵션을 표시하려면 먼저 WebAuthn을 사용할 수 있는지 확인해야 합니다. 그러면 패스키 생성 버튼을 표시하도록 hidden 클래스를 삭제해야 합니다.
환경에서 패스키를 지원하는지 확인하려면 다음 단계를 따르세요.
- 관련 주석 뒤의
views/home.html파일 끝에window.PublicKeyCredential,PublicKeyCredential.isUserVerifyingPlatformAuthenticatorAvailable,PublicKeyCredential.isConditionalMediationAvailable이true인 경우 실행되는 조건문을 작성합니다.
views/home.html
// TODO: Add an ability to create a passkey: Check for passkey support.
const createPasskey = $('#create-passkey');
// Feature detections
if (window.PublicKeyCredential &&
    PublicKeyCredential.isUserVerifyingPlatformAuthenticatorAvailable &&
    PublicKeyCredential.isConditionalMediationAvailable) {
- 조건문 본문에서 기기가 패스키를 생성할 수 있는지 확인한 후 양식 자동 완성에서 패스키를 제안할 수 있는지 확인합니다.
views/home.html
try {
  const results = await Promise.all([

    // Is platform authenticator available in this browser?
    PublicKeyCredential.isUserVerifyingPlatformAuthenticatorAvailable(),

    // Is conditional UI available in this browser?
    PublicKeyCredential.isConditionalMediationAvailable()
  ]);
- 모든 조건이 충족되면 패스키 생성 버튼을 표시합니다. 그렇지 않으면 경고 메시지를 표시합니다.
views/home.html
    if (results.every(r => r === true)) {

      // If conditional UI is available, reveal the Create a passkey button.
      createPasskey.classList.remove('hidden');
    } else {

      // If conditional UI isn't available, show a message.
      $('#message').innerText = 'This device does not support passkeys.';
    }
  } catch (e) {
    console.error(e);
  }
} else {

  // If WebAuthn isn't available, show a message.
  $('#message').innerText = 'This device does not support passkeys.';
}
등록된 패스키를 목록에 렌더링
- 등록된 패스키를 서버에서 가져와 목록으로 렌더링하는
renderCredentials()함수를 정의합니다. 다행히 로그인한 사용자의 등록된 패스키를 가져오는/auth/getKeys서버 엔드포인트가 이미 있습니다.
views/home.html
// TODO: Add an ability to create a passkey: Render registered passkeys in a list.
async function renderCredentials() {
  const res = await _fetch('/auth/getKeys');
  const list = $('#list');
  const creds = html`${res.length > 0 ? html`
    <mwc-list>
      ${res.map(cred => html`
        <mwc-list-item>
          <div class="list-item">
            <div class="entity-name">
              <span>${cred.name || 'Unnamed' }</span>
          </div>
          <div class="buttons">
            <mwc-icon-button data-cred-id="${cred.id}"
            data-name="${cred.name || 'Unnamed' }" @click="${rename}"
            icon="edit"></mwc-icon-button>
            <mwc-icon-button data-cred-id="${cred.id}" @click="${remove}"
            icon="delete"></mwc-icon-button>
          </div>
         </div>
      </mwc-list-item>`)}
  </mwc-list>` : html`
  <mwc-list>
    <mwc-list-item>No credentials found.</mwc-list-item>
  </mwc-list>`}`;
  render(creds, list);
};
- 다음 줄에서
renderCredentials()함수를 호출하여 사용자가 초기화로/home페이지에 도달하는 즉시 등록된 패스키를 표시합니다.
views/home.html
renderCredentials();
패스키 생성 및 등록
패스키를 생성하고 등록하려면 앞에서 구현한 registerCredential() 함수를 호출해야 합니다.
패스키 생성 버튼을 클릭할 때 registerCredential() 함수를 트리거하려면 다음 단계를 따르세요.
- 자리표시자 HTML 뒤의 파일에서 다음
import문을 찾습니다.
views/home.html
import {
  $,
  _fetch,
  loading,
  updateCredential,
  unregisterCredential,
} from '/client.js';
import문의 본문 끝에registerCredential()함수를 추가합니다.
views/home.html
// TODO: Add an ability to create a passkey: Create and register a passkey.
import {
  $,
  _fetch,
  loading,
  updateCredential,
  unregisterCredential,
  registerCredential
} from '/client.js';
- 관련 주석 뒤의 파일 끝에
registerCredential()함수와 로드 UI를 호출하고 등록 후renderCredentials()를 호출하는register()함수를 정의합니다. 이렇게 하면 브라우저에서 패스키를 생성하고 문제 발생 시 오류 메시지를 표시합니다.
views/home.html
// TODO: Add an ability to create a passkey: Create and register a passkey.
async function register() {
  try {

    // Start the loading UI.
    loading.start();

    // Start creating a passkey.
    await registerCredential();

    // Stop the loading UI.
    loading.stop();

    // Render the updated passkey list.
    renderCredentials();
register()함수의 본문에서 예외를 포착합니다. 기기에 패스키가 이미 있으면navigator.credentials.create()메서드에서InvalidStateError오류가 발생합니다.excludeCredentials배열로 이를 검사할 수 있습니다. 이 경우 사용자에게 관련 메시지를 표시합니다. 또한 사용자가 인증 대화상자를 취소하면NotAllowedError오류가 발생합니다. 이 경우 메시지를 자동으로 무시합니다.
views/home.html
  } catch (e) {

    // Stop the loading UI.
    loading.stop();

    // An InvalidStateError indicates that a passkey already exists on the device.
    if (e.name === 'InvalidStateError') {
      alert('A passkey already exists for this device.');

    // A NotAllowedError indicates that the user canceled the operation.
    } else if (e.name === 'NotAllowedError') {
      Return;

    // Show other errors in an alert.
    } else {
      alert(e.message);
      console.error(e);
    }
  }
};
register()함수 다음 줄에서 패스키 생성 버튼의click이벤트에register()함수를 연결합니다.
views/home.html
createPasskey.addEventListener('click', register);
이 섹션의 솔루션 코드 검토
views/home.html
<!-- TODO: Add an ability to create a passkey: Add placeholder HTML. -->
<section>
<h3 class="mdc-typography mdc-typography--headline6"> Your registered
passkeys:</h3>
<div id="list"></div>
</section>
<p id="message" class="instructions"></p>
<mwc-button id="create-passkey" class="hidden" icon="fingerprint" raised>Create a passkey</mwc-button>
views/home.html
// TODO: Add an ability to create a passkey: Create and register a passkey.
import {
  $,
  _fetch,
  loading,
  updateCredential,
  unregisterCredential,
  registerCredential
} from '/client.js';
views/home.html
// TODO: Add an ability to create a passkey: Check for passkey support.
const createPasskey = $('#create-passkey');

// Feature detections
if (window.PublicKeyCredential &&
    PublicKeyCredential.isUserVerifyingPlatformAuthenticatorAvailable &&
    PublicKeyCredential.isConditionalMediationAvailable) {
  try {
    const results = await Promise.all([

      // Is platform authenticator available in this browser?
      PublicKeyCredential.isUserVerifyingPlatformAuthenticatorAvailable(),

      // Is conditional UI available in this browser?
      PublicKeyCredential.isConditionalMediationAvailable()
    ]);
    if (results.every(r => r === true)) {

      // If conditional UI is available, reveal the Create a passkey button.
      createPasskey.classList.remove('hidden');
    } else {

      // If conditional UI isn't available, show a message.
      $('#message').innerText = 'This device does not support passkeys.';
    }
  } catch (e) {
    console.error(e);
  }
} else {

  // If WebAuthn isn't available, show a message.
  $('#message').innerText = 'This device does not support passkeys.';
}

// TODO: Add an ability to create a passkey: Render registered passkeys in a list.
async function renderCredentials() {
  const res = await _fetch('/auth/getKeys');
  const list = $('#list');
  const creds = html`${res.length > 0 ? html`
  <mwc-list>
    ${res.map(cred => html`
      <mwc-list-item>
        <div class="list-item">
          <div class="entity-name">
            <span>${cred.name || 'Unnamed' }</span>
          </div>
          <div class="buttons">
            <mwc-icon-button data-cred-id="${cred.id}" data-name="${cred.name || 'Unnamed' }" @click="${rename}" icon="edit"></mwc-icon-button>
            <mwc-icon-button data-cred-id="${cred.id}" @click="${remove}" icon="delete"></mwc-icon-button>
          </div>
        </div>
      </mwc-list-item>`)}
  </mwc-list>` : html`
  <mwc-list>
    <mwc-list-item>No credentials found.</mwc-list-item>
  </mwc-list>`}`;
  render(creds, list);
};

renderCredentials();

// TODO: Add an ability to create a passkey: Create and register a passkey.
async function register() {
  try {

    // Start the loading UI.
    loading.start();

    // Start creating a passkey.
    await registerCredential();

    // Stop the loading UI.
    loading.stop();

    // Render the updated passkey list.
    renderCredentials();
  } catch (e) {

    // Stop the loading UI.
    loading.stop();

    // An InvalidStateError indicates that a passkey already exists on the device.
    if (e.name === 'InvalidStateError') {
      alert('A passkey already exists for this device.');

    // A NotAllowedError indicates that the user canceled the operation.
    } else if (e.name === 'NotAllowedError') {
      Return;

    // Show other errors in an alert.
    } else {
      alert(e.message);
      console.error(e);
    }
  }
};

createPasskey.addEventListener('click', register);
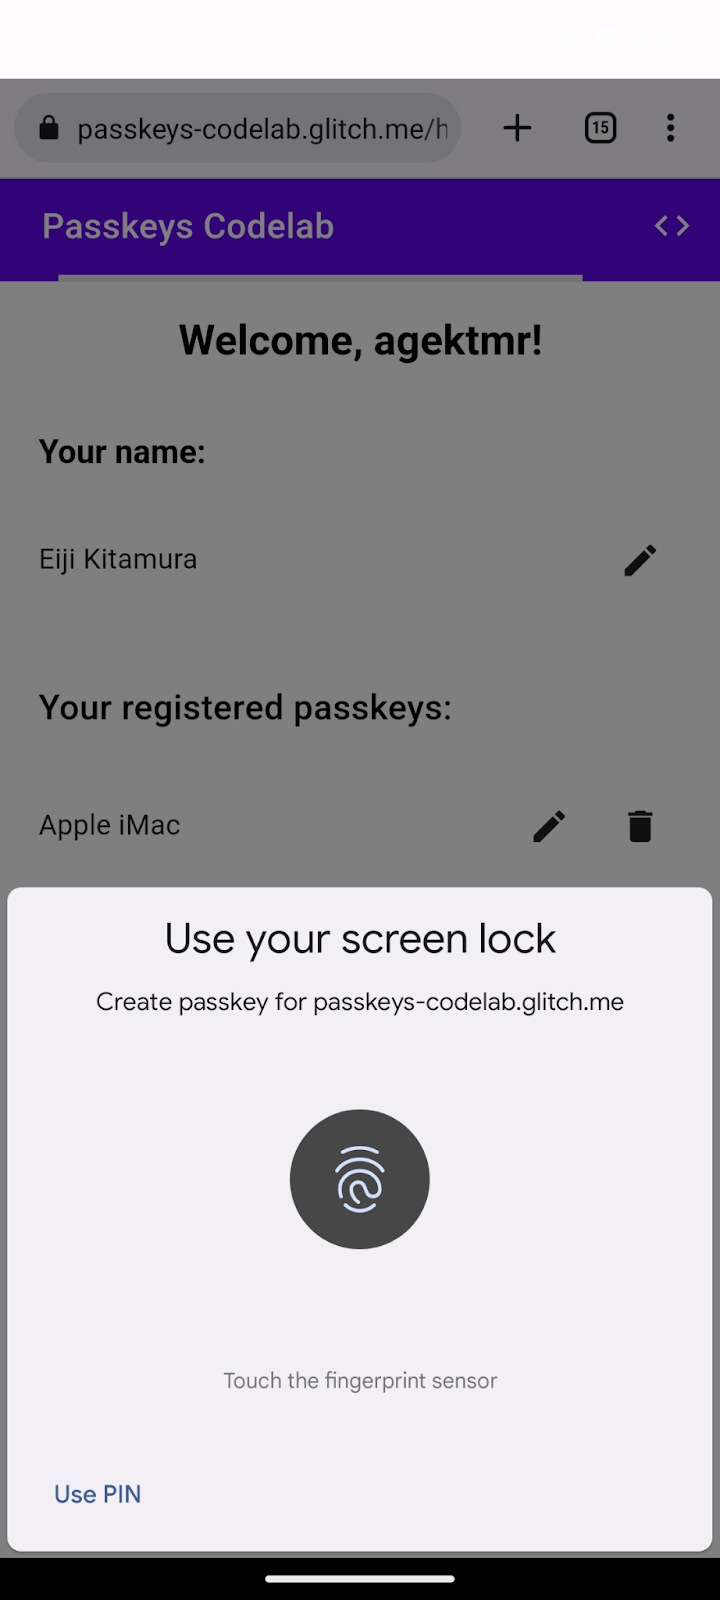
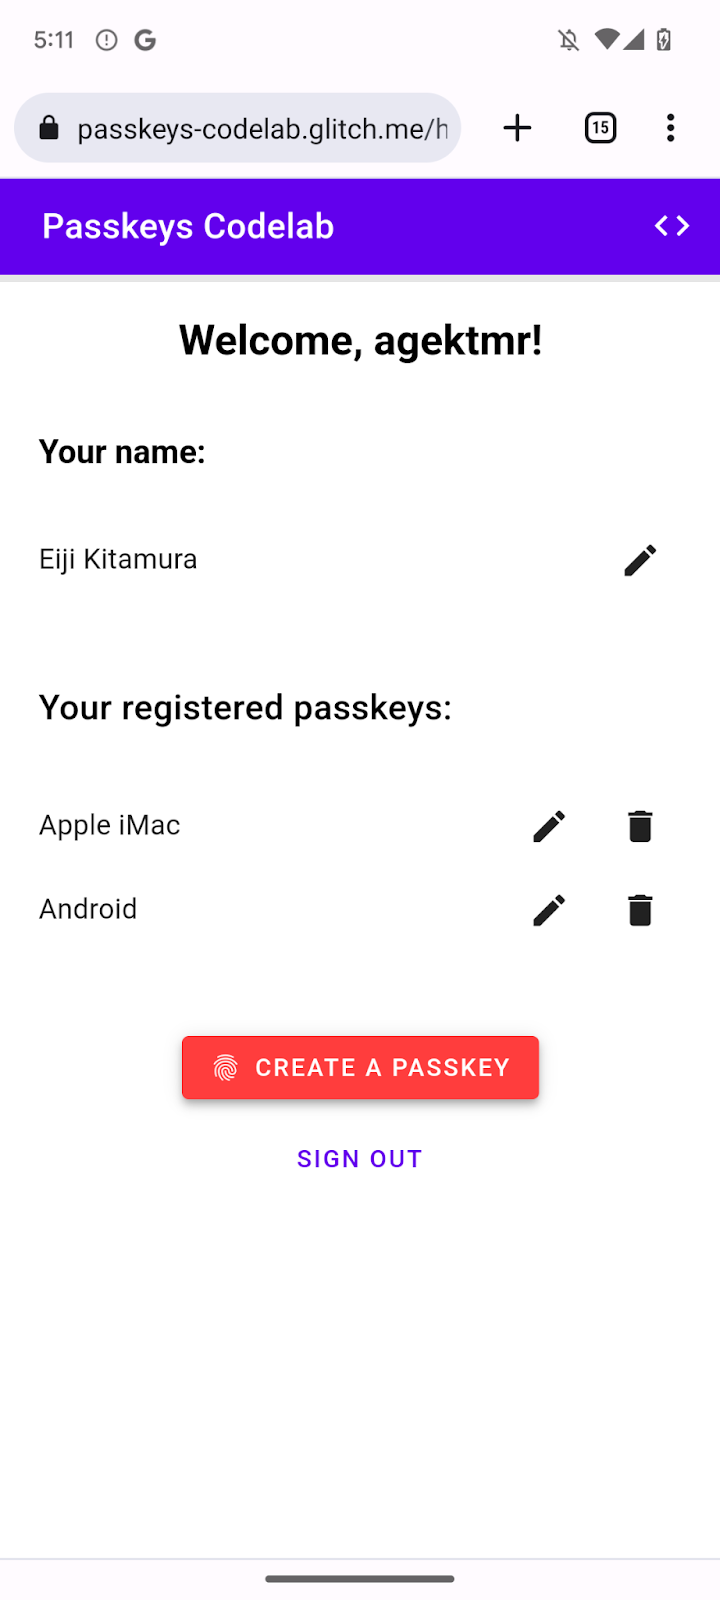
직접 해 보기
지금까지의 모든 단계를 완료했다면 웹사이트에서 패스키를 생성, 등록, 표시하는 기능을 구현한 것입니다.
사용해 보려면 다음 단계를 따르세요.
- 미리보기 탭에서 임의의 사용자 이름과 비밀번호로 로그인합니다.
- 패스키 생성을 클릭합니다.
- 기기의 화면 잠금으로 본인 확인을 수행합니다.
- 웹페이지의 등록된 패스키 섹션에 패스키가 등록되고 표시되는지 확인합니다.
등록된 패스키 이름 변경 및 삭제
목록에 등록된 패스키의 이름을 변경하거나 삭제할 수 있어야 합니다. Codelab에 포함되므로 코드에서 어떻게 작동하는지 확인할 수 있습니다.
Chrome에서는 데스크톱의 chrome://settings/passkeys 또는 Android 설정의 비밀번호 관리자에서 등록된 패스키를 삭제할 수 있습니다.
다른 플랫폼에서 등록된 패스키 이름을 변경 및 삭제하는 방법에 대해서는 해당 플랫폼별 지원 페이지를 참고하세요.
5. 패스키로 인증하는 기능 추가
이제 사용자가 패스키를 생성 및 등록할 수 있으며 웹사이트에 안전하게 인증하기 위한 수단으로 사용할 수 있습니다. 이제 웹사이트에 패스키 인증 기능을 추가해야 합니다.
authenticate() 함수 만들기
- 관련 주석 뒤의
public/client.js파일에서 사용자를 로컬에서 확인한 다음 서버에 대해 확인하는authenticate()함수를 만듭니다.
public/client.js
// TODO: Add an ability to authenticate with a passkey: Create the authenticate() function.
export async function authenticate() {

  // TODO: Add an ability to authenticate with a passkey: Obtain the challenge and other options from the server endpoint.

  // TODO: Add an ability to authenticate with a passkey: Locally verify the user and get a credential.

  // TODO: Add an ability to authenticate with a passkey: Verify the credential.

};
서버 엔드포인트에서 챌린지 및 기타 옵션 가져오기
사용자에게 인증을 요청하기 전에 챌린지를 포함하여 서버에서 WebAuthn을 전달할 매개변수를 요청해야 합니다.
- 관련 주석 뒤의
authenticate()함수의 본문에서_fetch()함수를 호출하여 서버에POST요청을 전송합니다.
public/client.js
// TODO: Add an ability to authenticate with a passkey: Obtain the challenge and other options from the server endpoint.
const options = await _fetch('/auth/signinRequest');
이 Codelab의 서버는 WebAuthn navigator.credentials.get() API에 전달된 PublicKeyCredentialRequestOptions 사전과 최대한 유사한 JSON을 반환하도록 설계되었습니다. 다음 코드 스니펫에는 수신해야 하는 예시 옵션이 포함되어 있습니다.
{
  "challenge": *****,
  "rpId": "passkeys-codelab.glitch.me",
  "allowCredentials": []
}
다음 표에 모든 내용이 포함되지는 않지만 PublicKeyCredentialRequestOptions 사전에 있는 중요한 매개변수가 포함되어 있습니다.
매개변수 | 설명 |
| |
RP ID는 도메인입니다. 웹사이트에서 도메인 또는 등록 가능한 접미사를 지정할 수 있습니다. 이 값은 패스키 생성 시 사용된 | |
이 속성은 이 인증에 적합한 인증자를 찾는 데 사용됩니다. 빈 배열을 전달하거나, 지정되지 않은 상태로 두면 브라우저에 계정 선택기가 표시됩니다. | |
|
로컬에서 사용자 확인 및 사용자 인증 정보 가져오기
- 관련 주석 뒤의
authenticate()함수의 본문에서challenge매개변수를 다시 바이너리로 변환합니다.
public/client.js
// TODO: Add an ability to authenticate with a passkey: Locally verify the user and get a credential.
// Base64URL decode the challenge.
options.challenge = base64url.decode(options.challenge);
- 사용자가 인증할 때 계정 선택기를 열 수 있도록 빈 배열을
allowCredentials매개변수에 전달합니다.
public/client.js
// An empty allowCredentials array invokes an account selector by discoverable credentials.
options.allowCredentials = [];
계정 선택기는 패스키에 저장된 사용자 정보를 사용합니다.
mediation: 'conditional'옵션과 함께navigator.credentials.get()메서드를 호출합니다.
public/client.js
// Invoke the WebAuthn get() method.
const cred = await navigator.credentials.get({
  publicKey: options,

  // Request a conditional UI.
  mediation: 'conditional'
});
이 옵션은 양식 자동 완성의 일부로 조건부로 패스키를 추천하도록 브라우저에 지시합니다.
사용자 인증 정보 확인하기
사용자가 로컬에서 신원을 확인한 후에는 서버에서 확인할 수 있는 서명이 포함된 사용자 인증 정보 객체를 수신해야 합니다.
다음 코드 스니펫에는 PublicKeyCredential 객체의 예시가 포함되어 있습니다.
{
  "id": *****,
  "rawId": *****,
  "type": "public-key",
  "response": {
    "clientDataJSON": *****,
    "authenticatorData": *****,
    "signature": *****,
    "userHandle": *****
  },
  authenticatorAttachment: "platform"
}
다음 표에 모든 내용이 포함되지는 않지만 PublicKeyCredential 객체에 있는 중요한 매개변수가 포함되어 있습니다.
매개변수 | 설명 |
인증된 패스키 사용자 인증 정보의 Base64URL로 인코딩된 ID입니다. | |
사용자 인증 정보 ID의 | |
클라이언트 데이터의 | |
인증자 데이터의 | |
서명의 | |
생성 시 설정된 사용자 ID를 포함하는 | |
이 사용자 인증 정보를 로컬 기기에서 가져온 경우 |
사용자 인증 정보 객체를 서버로 보내려면 다음 단계를 따르세요.
- 관련 주석 뒤의
authenticate()함수의 본문에서 사용자 인증 정보의 바이너리 매개변수를 인코딩하여 서버에 문자열로 전송할 수 있습니다.
public/client.js
// TODO: Add an ability to authenticate with a passkey: Verify the credential.
const credential = {};
credential.id = cred.id;
credential.rawId = cred.id; // Pass a Base64URL encoded ID string.
credential.type = cred.type;

// Base64URL encode some values.
const clientDataJSON = base64url.encode(cred.response.clientDataJSON);
const authenticatorData = base64url.encode(cred.response.authenticatorData);
const signature = base64url.encode(cred.response.signature);
const userHandle = base64url.encode(cred.response.userHandle);

credential.response = {
  clientDataJSON,
  authenticatorData,
  signature,
  userHandle,
};
- 객체를 서버로 전송합니다.
public/client.js
return await _fetch(`/auth/signinResponse`, credential);
프로그램을 실행하면 서버에서 사용자 인증 정보가 확인되었음을 나타내는 HTTP code 200을 반환합니다.
이제 전체 authentication() 함수가 만들어졌습니다.
이 섹션의 솔루션 코드 검토
public/client.js
// TODO: Add an ability to authenticate with a passkey: Create the authenticate() function.
export async function authenticate() {

  // TODO: Add an ability to authenticate with a passkey: Obtain the
  challenge and other options from the server endpoint.
  const options = await _fetch('/auth/signinRequest');

  // TODO: Add an ability to authenticate with a passkey: Locally verify
  the user and get a credential.
  // Base64URL decode the challenge.
  options.challenge = base64url.decode(options.challenge);

  // The empty allowCredentials array invokes an account selector
  by discoverable credentials.
  options.allowCredentials = [];

  // Invoke the WebAuthn get() function.
  const cred = await navigator.credentials.get({
    publicKey: options,

    // Request a conditional UI.
    mediation: 'conditional'
  });

  // TODO: Add an ability to authenticate with a passkey: Verify the credential.
  const credential = {};
  credential.id = cred.id;
  credential.rawId = cred.id; // Pass a Base64URL encoded ID string.
  credential.type = cred.type;

  // Base64URL encode some values.
  const clientDataJSON = base64url.encode(cred.response.clientDataJSON);
  const authenticatorData =
  base64url.encode(cred.response.authenticatorData);
  const signature = base64url.encode(cred.response.signature);
  const userHandle = base64url.encode(cred.response.userHandle);

  credential.response = {
    clientDataJSON,
    authenticatorData,
    signature,
    userHandle,
  };

  return await _fetch(`/auth/signinResponse`, credential);
};
6. 브라우저 자동 완성에 패스키 추가
사용자가 돌아오면 최대한 쉽고 안전하게 로그인하도록 합니다. 패스키로 로그인 버튼을 로그인 페이지에 추가하면 사용자가 버튼을 누르고 브라우저의 계정 선택기에서 패스키를 선택한 다음 화면 잠금을 사용하여 신원을 확인할 수 있습니다.
그러나 모든 사용자가 비밀번호에서 패스키로 한꺼번에 전환하지는 않습니다. 즉, 모든 사용자가 패스키로 전환할 때까지 비밀번호를 삭제할 수 없으므로 그때까지 비밀번호 기반 로그인 양식을 그대로 두어야 합니다. 하지만 비밀번호 양식과 패스키 버튼을 그대로 두면 사용자가 이 중에 어떤 로그인 방식을 사용할지 번거롭게 선택해야 합니다. 간단한 로그인 프로세스를 사용하는 것이 가장 좋습니다.
이때 사용하는 것이 조건부 UI입니다. 조건부 UI는 양식 입력란을 만들어 비밀번호 외에 자동 완성 항목의 일부로 패스키를 제안할 수 있는 WebAuthn 기능입니다. 사용자가 자동 완성 추천에서 패스키를 탭하면 로컬에서 신원을 확인하기 위해 기기의 화면 잠금을 사용하라는 메시지가 표시됩니다. 사용자 작업이 비밀번호 기반 로그인 작업과 거의 동일하기 때문에 이 동작으로 원활한 사용자 경험을 제공할 수 있습니다.

조건부 UI 사용 설정
조건부 UI를 사용 설정하려면 입력란의 autocomplete 속성에 webauthn 토큰을 추가하기만 하면 됩니다. 토큰이 설정되면 mediation: 'conditional' 문자열로 navigator.credentials.get() 메서드를 호출하여 화면 잠금 UI를 조건부로 트리거할 수 있습니다.
- 조건부 UI를 사용 설정하려면
view/index.html파일의 관련 주석 뒤의 기존 사용자 이름 입력란을 다음 HTML로 바꿔야 합니다.
view/index.html
<!-- TODO: Add passkeys to the browser autofill: Enable conditional UI. -->
<input
  type="text"
  id="username"
  class="mdc-text-field__input"
  aria-labelledby="username-label"
  name="username"
  autocomplete="username webauthn"
  autofocus />
기능 감지, WebAuthn 호출, 조건부 UI 사용 설정
- 관련 주석 뒤의
view/index.html파일에서 기존import문을 다음 코드로 바꿉니다.
view/index.html
// TODO: Add passkeys to the browser autofill: Detect features, invoke WebAuthn, and enable a conditional UI.
import {
  $,
  _fetch,
  loading,
  authenticate
} from "/client.js";
이 코드는 앞에서 구현한 authenticate() 함수를 가져옵니다.
window.PulicKeyCredential객체를 사용할 수 있고PublicKeyCredential.isConditionalMediationAvailable()메서드가true값을 반환하는지 확인한 후authenticate()함수를 호출합니다.
view/index.html
// TODO: Add passkeys to the browser autofill: Detect features, invoke WebAuthn, and enable a conditional UI.
if (
  window.PublicKeyCredential &&
  PublicKeyCredential.isConditionalMediationAvailable
) {
  try {

    // Is conditional UI available in this browser?
    const cma =
      await PublicKeyCredential.isConditionalMediationAvailable();
    if (cma) {

      // If conditional UI is available, invoke the authenticate() function.
      const user = await authenticate();
      if (user) {

        // Proceed only when authentication succeeds.
        $("#username").value = user.username;
        loading.start();
        location.href = "/home";
      } else {
        throw new Error("User not found.");
      }
    }
  } catch (e) {
    loading.stop();

    // A NotAllowedError indicates that the user canceled the operation.
    if (e.name !== "NotAllowedError") {
      console.error(e);
      alert(e.message);
    }
  }
}
이 섹션의 솔루션 코드 검토
view/index.html
<!-- TODO: Add passkeys to the browser autofill: Enable conditional UI. -->
<input
  type="text"
  id="username"
  class="mdc-text-field__input"
  aria-labelledby="username-label"
  name="username"
  autocomplete="username webauthn"
  autofocus
/>
view/index.html
// TODO: Add passkeys to the browser autofill: Detect features, invoke WebAuthn, and enable a conditional UI.
import {
  $,
  _fetch,
  loading,
  authenticate
} from '/client.js';
view/index.html
// TODO: Add passkeys to the browser autofill: Detect features, invoke WebAuthn, and enable a conditional UI.
// Is WebAuthn avaiable in this browser?
if (window.PublicKeyCredential &&
    PublicKeyCredential.isConditionalMediationAvailable) {
  try {

    // Is a conditional UI available in this browser?
    const cma= await PublicKeyCredential.isConditionalMediationAvailable();
    if (cma) {

      // If a conditional UI is available, invoke the authenticate() function.
      const user = await authenticate();
      if (user) {

        // Proceed only when authentication succeeds.
        $('#username').value = user.username;
        loading.start();
        location.href = '/home';
      } else {
        throw new Error('User not found.');
      }
    }
  } catch (e) {
    loading.stop();

    // A NotAllowedError indicates that the user canceled the operation.
    if (e.name !== 'NotAllowedError') {
      console.error(e);
      alert(e.message);
    }
  }
}
직접 해 보기
웹사이트에서 패스키의 생성, 등록, 표시, 인증을 구현했습니다.
사용해 보려면 다음 단계를 따르세요.
- 미리보기 탭으로 이동합니다.
- 필요한 경우 로그아웃합니다.
- 사용자 이름 텍스트 상자를 클릭합니다. 대화상자가 나타납니다.
- 로그인에 사용할 계정을 선택합니다.
- 기기의 화면 잠금으로 본인 확인을 수행합니다.
/home페이지로 리디렉션되고 로그인됩니다.
7. 수고하셨습니다.
이 Codelab을 완료했습니다. 궁금한 점이 있으면 FIDO-DEV 메일링 리스트 또는 StackOverflow에서 passkey 태그로 확인하세요.