Privet یک API کشف محلی Cloud Device است که توسط سرویس های ابری استفاده می شود. این سند در بخش های زیر سازماندهی شده است:
- مقدمه : مقدمه ای بر Privet
- کشف : مکانیسم های کشف محلی
- اطلاعیه ها : اعلامیه های کشف محلی
- API : API های Privet برای دستگاه های ابری عمومی
- API چاپگر : APIهای Privet که توسط چاپگرها استفاده می شود
- پیوست : نمودارهای تکمیلی
1. مقدمه
دستگاه های متصل به ابر مزایای بسیاری دارند. آنها میتوانند از خدمات تبدیل آنلاین استفاده کنند، در حالی که دستگاه آفلاین است میزبان صفهای شغلی باشند و از هر نقطهای در جهان قابل دسترسی باشند. با این حال، با بسیاری از دستگاههای ابری که توسط یک کاربر خاص قابل دسترسی هستند، باید روشی برای یافتن نزدیکترین دستگاه بر اساس موقعیت مکانی ارائه کنیم. هدف از پروتکل Privet این است که انعطاف پذیری دستگاه های ابری را با مکانیزم کشف محلی مناسب پیوند دهد تا دستگاه ها به راحتی در محیط های جدید کشف شوند.
اهداف این پروتکل عبارتند از:- دستگاه های ابری را به صورت محلی قابل شناسایی کنید
- دستگاه های ابری را با یک سرویس ابری ثبت کنید
- دستگاه های ثبت شده را با نمایش ابری آنها مرتبط کنید
- فعال کردن عملکرد آفلاین
- پیاده سازی را ساده کنید تا دستگاه های کوچک بتوانند از آن استفاده کنند
پروتکل Privet از 2 بخش اصلی تشکیل شده است: کشف و API. Discovery برای یافتن دستگاه در شبکه محلی و API برای دریافت اطلاعات در مورد دستگاه و انجام برخی اقدامات استفاده می شود. در سراسر این سند، دستگاه به یک دستگاه متصل به ابر که پروتکل Privet را اجرا می کند، اشاره دارد.
2. کشف
Discovery یک پروتکل مبتنی بر zeroconf (mDNS + DNS-SD) است. دستگاه باید IPv4 Link-Local Addressing را پیاده سازی کند. دستگاه باید با مشخصات mDNS و DNS-SD مطابقت داشته باشد.
- http://www.rfc-editor.org/rfc/rfc3927.txt (IPv4 Link-local)
- http://www.rfc-editor.org/rfc/rfc4862.txt (IPv6 Link-local)
- http://www.rfc-editor.org/rfc/rfc6762.txt (mDNS)
- http://www.rfc-editor.org/rfc/rfc6763.txt (DNS-SD)
دستگاه باید مطابق با مشخصات بالا حل تعارض نام را انجام دهد.
2.1. نوع خدمات
DNS Service Discovery از قالب زیر برای انواع سرویس استفاده می کند: _applicationprotocol._transportprotocol . در مورد پروتکل Privet، نوع سرویس برای DNS-SD باید این باشد: _privet._tcp
این دستگاه می تواند انواع خدمات دیگر را نیز پیاده سازی کند. توصیه می شود از نام نمونه سرویس یکسانی برای همه انواع سرویس های پیاده سازی شده توسط دستگاه استفاده کنید. به عنوان مثال: یک چاپگر ممکن است خدمات "Printer XYZ._privet._tcp" و "Printer XYZ._printer._tcp" را اجرا کند. راه اندازی را برای کاربر ساده می کند. با این حال، مشتریان Privet فقط به دنبال "_privet._tcp" خواهند بود.
علاوه بر نوع سرویس اصلی، دستگاه باید سوابق PTR را برای نوع(های) فرعی مربوطه خود تبلیغ کند (مشخصات DNS-SD را ببینید: "7.1. انتخابی نمونه های انتخابی (Subtypes)"). قالب باید به شرح زیر باشد: _<subtype>._sub._privet._tcp
در حال حاضر تنها نوع فرعی دستگاه پشتیبانی شده چاپگر است. بنابراین، همه چاپگرها باید دو رکورد PTR را تبلیغ کنند:
- _privet._tcp.local.
- _printer._sub._privet._tcp.local.
2.2. رکورد TXT
DNS Service Discovery فیلدهایی را برای افزودن اطلاعات اختیاری در مورد یک سرویس در رکوردهای TXT تعریف می کند. یک رکورد TXT از جفت کلید/مقدار تشکیل شده است. هر جفت کلید/مقدار از طول بایت شروع می شود و تا 255 بایت متن شروع می شود. کلید متن قبل از اولین کاراکتر '=' و مقدار آن متن بعد از اولین کاراکتر '=' تا پایان است. مشخصات اجازه نمی دهد تا هیچ مقداری در رکورد وجود نداشته باشد، در چنین حالتی هیچ کاراکتر '=' یا بدون متن بعد از کاراکتر '=' وجود نخواهد داشت. (مشخصات DNS-SD را ببینید: "6.1. قوانین فرمت عمومی برای رکوردهای DNS TXT" برای فرمت رکورد DNS TXT و "6.2. DNS-SD TXT Record Size" برای طول توصیه شده).
Privet به دستگاه نیاز دارد که جفت کلید/مقدار زیر را در رکورد TXT ارسال کند. رشته های کلید/مقدار به حروف بزرگ و کوچک حساس نیستند، برای مثال «CS=online» و «cs=ONLINE» یکسان هستند. اطلاعات موجود در رکورد TXT باید همان اطلاعاتی باشد که از طریق /info API قابل دسترسی است (به بخش API 4.1 مراجعه کنید).
توصیه می شود اندازه رکورد TXT را زیر 512 بایت نگه دارید.
2.2.1. txtvers
نسخه ساختار TXT. txtvers باید اولین رکورد ساختار TXT باشد. در حال حاضر تنها نسخه پشتیبانی شده 1 است.
txtvers=1
2.2.2. ty
یک نام قابل خواندن برای کاربر از دستگاه ارائه می دهد. به عنوان مثال:
ty=Google Cloud Ready Printer Model XYZ
2.2.3. یادداشت (اختیاری)
یک نام قابل خواندن برای کاربر از دستگاه ارائه می دهد. به عنوان مثال:
note=1st floor lobby printer
توجه: این یک کلید اختیاری است و ممکن است از آن صرفنظر شود. با این حال، در صورت وجود، کاربر باید بتواند این مقدار را تغییر دهد. هنگام ثبت نام دستگاه باید از همین شرح استفاده شود.
2.2.4. آدرس اینترنتی
نشانی وب سرور این دستگاه (شامل پروتکل) به آن متصل است. به عنوان مثال:
url=https://www.google.com/cloudprint
2.2.5. نوع
فهرستی از انواع فرعی دستگاه که توسط این دستگاه پشتیبانی می شود، جدا شده با کاما. قالب این است: "type=_subtype1,_subtype2". در حال حاضر، تنها نوع فرعی دستگاه پشتیبانی شده چاپگر است.
type=printer
هر زیرنوع فهرست شده باید با استفاده از یک رکورد PTR مربوطه تبلیغ شود. برای هر زیرنوع سرویس پشتیبانی شده، باید یک مورد مربوطه وجود داشته باشد. نام نوع فرعی سرویس (<subtype>._sub._privet._tcp) باید با نوع دستگاه در اینجا برابر باشد.
2.2.6. شناسه
شناسه دستگاه اگر دستگاه هنوز ثبت نشده است، این کلید باید وجود داشته باشد، اما مقدار باید خالی باشد. به عنوان مثال:
  id=11111111-2222-3333-4444-555555555555
  id=
2.2.7. cs
وضعیت اتصال فعلی دستگاه را نشان می دهد. چهار مقدار ممکن در این مشخصات تعریف شده است.
- "آنلاین" نشان می دهد که دستگاه در حال حاضر به ابر متصل است.
- "آفلاین" نشان می دهد که دستگاه در شبکه محلی در دسترس است، اما نمی تواند با سرور صحبت کند.
- "اتصال" نشان می دهد که دستگاه در حال انجام دنباله راه اندازی خود است و هنوز به طور کامل آنلاین نیست.
- "not-configured" نشان می دهد که دسترسی به اینترنت دستگاه هنوز پیکربندی نشده است. این مقدار در حال حاضر استفاده نمی شود، اما ممکن است در نسخه های بعدی مشخصات مفید باشد.
- cs=آنلاین
- cs=آفلاین
- cs=اتصال
اگر دستگاه با یک ابر ثبت شده است، هنگام راه اندازی باید اتصال با یک سرور را برای تشخیص وضعیت اتصال آن بررسی کند (به عنوان مثال، فراخوانی API ابری برای دریافت تنظیمات دستگاه). دستگاه ممکن است از وضعیت اتصال کانال اعلانات خود (به عنوان مثال XMPP) برای گزارش این مقدار استفاده کند. دستگاههای ثبتنشده هنگام راهاندازی ممکن است یک دامنه را برای تشخیص وضعیت اتصال آنها پینگ کنند (برای مثال، پینگ www.google.com برای دستگاههای چاپ ابری).
3. اطلاعیه ها
هنگام راه اندازی، خاموش شدن یا تغییر وضعیت دستگاه، دستگاه باید مرحله اعلام را همانطور که در مشخصات mDNS توضیح داده شده است انجام دهد. باید اطلاعیه مربوطه را حداقل دو بار با فاصله حداقل یک ثانیه بین آنها ارسال کند.
3.1. راه اندازی
هنگام راهاندازی دستگاه، باید مراحل بررسی و اعلام را همانطور که در مشخصات mDNS توضیح داده شده است انجام دهد. رکوردهای SRV، PTR و TXT باید در این مورد ارسال شوند. توصیه می شود در صورت امکان همه رکوردها را در یک پاسخ DNS گروه بندی کنید. اگر نه، ترتیب زیر توصیه می شود: رکوردهای SRV، PTR، TXT.
3.2. خاموش شدن
هنگام خاموش شدن دستگاه، باید سعی کند با ارسال یک "بسته خداحافظی" با TTL=0 (همانطور که در مستندات mDNS توضیح داده شده است) همه طرف های علاقه مند را در مورد آن مطلع کند.
3.3. به روز رسانی
در صورتی که هر گونه اطلاعات توضیح داده شده در TXT تغییر کرده باشد، دستگاه باید اعلامیه به روز رسانی ارسال کند. فقط کافی است رکورد جدید TXT را در این مورد ارسال کنید. به عنوان مثال، پس از ثبت نام دستگاه، باید یک اعلامیه به روز رسانی شامل شناسه دستگاه جدید ارسال کند.
4. API
پس از کشف یک دستگاه ابری، ارتباط مشتری با دستگاه مستقیماً از طریق شبکه محلی فعال می شود. همه API ها مبتنی بر HTTP 1.1 هستند. فرمت های داده مبتنی بر JSON هستند. درخواستهای API ممکن است درخواستهای GET یا POST باشند.
هر درخواست باید حاوی یک هدر معتبر " X-Privet-Token " باشد. تنها درخواستی که مجاز به داشتن سرصفحه خالی "X-Privet-Token" است، درخواست /privet/info است (توجه داشته باشید که هدر باید همچنان وجود داشته باشد). اگر هدر "X-Privet-Token" وجود نداشته باشد، دستگاه باید با خطای HTTP 400 زیر پاسخ دهد:
HTTP/1.1 400 Missing X-Privet-Token header.
اگر سرصفحه "X-Privet-Token" خالی یا نامعتبر است، دستگاه باید با "خطای نامعتبر X-Privet-Token" پاسخ دهد (invalid_x_privet_token، برای جزئیات بیشتر به بخش خطاها مراجعه کنید). تنها استثنا API /info است. برای مشاهده اطلاعات بیشتر در مورد اینکه چرا این کار انجام می شود و چگونه باید توکن ها تولید شوند، به پیوست A: حملات و پیشگیری XSSI و XSRF مراجعه کنید.
اگر یک API درخواستی وجود نداشته باشد یا پشتیبانی نشود، دستگاه باید یک خطای HTTP 404 را برگرداند.
4.1. در دسترس بودن API
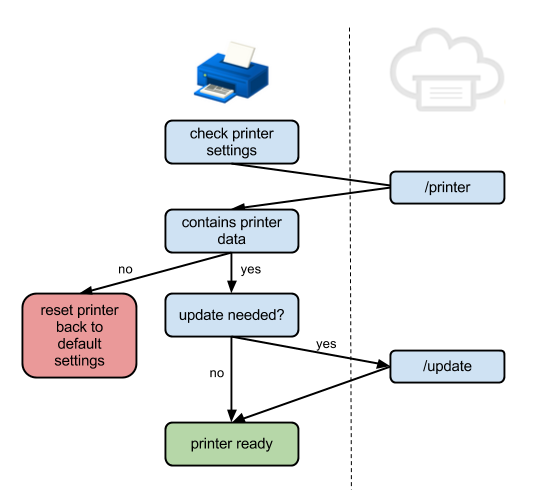
قبل از نمایش هر API (از جمله /info API)، دستگاه باید برای بررسی تنظیمات محلی با سرور تماس بگیرد. تنظیمات محلی باید بین راه اندازی مجدد حفظ شود. اگر سرور در دسترس نباشد، باید از آخرین تنظیمات محلی شناخته شده استفاده شود. اگر دستگاه هنوز ثبت نشده است، باید تنظیمات پیش فرض را انجام دهد.
دستگاههای Cloud Print برای ثبت، دریافت و بهروزرسانی تنظیمات محلی باید مراحل زیر را دنبال کنند.
4.1.1. ثبت نام
هنگامی که دستگاه ثبت می شود، باید پارامتر "local_settings" را به شرح زیر مشخص کند:
{
       "current": {
                "local_discovery": true,
                "access_token_enabled": true,
                "printer/local_printing_enabled": true,
                "printer/conversion_printing_enabled": true,
                "xmpp_timeout_value": 300
        }
}
| نام ارزش | نوع ارزش | توضیحات |
|---|---|---|
| محلی_کشف | بولی | نشان می دهد که آیا عملکرد کشف محلی مجاز است یا خیر. اگر "نادرست" باشد، همه APIهای محلی (از جمله /info) و کشف DNS-SD باید غیرفعال شوند. بهطور پیشفرض، دستگاههای ثبتشده جدید باید «درست» را بگذرانند. |
| access_token_enabled | بولی (اختیاری) | نشان می دهد که آیا /accesstoken API باید در شبکه محلی در معرض دید قرار گیرد. به طور پیش فرض باید "درست" باشد. |
| printer/local_printing_enabled | بولی (اختیاری) | نشان می دهد که آیا عملکرد چاپ محلی (/printer/createjob، /printer/submitdoc، /printer/jobstate) باید در شبکه محلی نمایش داده شود یا خیر. به طور پیش فرض باید "درست" باشد. |
| printer/conversion_printing_enabled | بولی (اختیاری) | نشان می دهد که آیا چاپ محلی ممکن است کار را برای تبدیل به سرور ارسال کند. فقط زمانی معنا پیدا می کند که چاپ محلی فعال باشد. |
| xmpp_timeout_value | int (اختیاری) | تعداد ثانیه های بین پینگ های کانال XMPP را نشان می دهد. به طور پیش فرض باید 300 (5 دقیقه) یا بیشتر باشد. |
مهم: فقدان مقدار اختیاری نشان می دهد که عملکرد مربوطه به طور کامل توسط دستگاه پشتیبانی نمی شود.
4.1.2. راه اندازی
هنگام راهاندازی دستگاه، باید با سرور تماس بگیرد تا بررسی کند چه APIهایی برای نمایش در شبکه محلی موجود است. برای چاپگرهای متصل به Cloud Print، آنها باید تماس بگیرند:
/cloudprint/printer?printerid=<printer_id>
/cloudprint/list
/cloudprint/printer بر /cloudprint/list ترجیح داده می شود، اما هر دو کار خواهند کرد.
این API پارامترهای دستگاه فعلی، از جمله تنظیمات API محلی را برمیگرداند. پاسخ سرور به شکل زیر خواهد بود:
"local_settings": {
        "current": {
                "local_discovery": true,
                "access_token_enabled": true,
                "printer/local_printing_enabled": true,
                "printer/conversion_printing_enabled": true,
                "xmpp_timeout_value": 300
         },
         "pending": {
                "local_discovery": true,
                "access_token_enabled": true,
                "printer/local_printing_enabled": false,
                "printer/conversion_printing_enabled": false,
                "xmpp_timeout_value": 500
         }
}
شیء "current" تنظیماتی را نشان می دهد که در حال حاضر در حال اجرا هستند.
شیء "pending" تنظیماتی را نشان می دهد که باید روی دستگاه اعمال شود (این شی ممکن است وجود نداشته باشد).
هنگامی که دستگاه تنظیمات "در انتظار" را مشاهده کرد، باید وضعیت خود را به روز کند (به زیر مراجعه کنید).
4.1.3. به روز رسانی
در صورت نیاز به بهروزرسانی تنظیمات، یک اعلان XMPP به دستگاه ارسال میشود. این اطلاعیه در قالب زیر خواهد بود:
<device_id>/update_settings
با دریافت چنین اعلانی، دستگاه باید از سرور درخواست کند تا آخرین تنظیمات را دریافت کند. دستگاه های Cloud Print باید از موارد زیر استفاده کنند:
/cloudprint/printer?printerid=<printer_id>
هنگامی که دستگاه بخش "در انتظار" را در نتیجه API /cloudprint/printer (در هنگام راهاندازی یا به دلیل اعلان) مشاهده کرد، باید وضعیت داخلی خود را بهروزرسانی کند تا تنظیمات جدید را به خاطر بسپارد. برای تأیید تنظیمات جدید باید با API سرور تماس بگیرد. برای چاپگرهای ابری، دستگاه باید /cloudprint/update API را فراخوانی کند و مانند هنگام ثبت نام از پارامتر "local_settings" استفاده کند.
هنگام اتصال مجدد به کانال XMPP، دستگاه باید /cloudprint/printer API را صدا کند تا بررسی کند آیا تنظیمات محلی از آخرین بار تغییر کرده است یا خیر.
4.1.3.1. تنظیمات محلی در انتظار
پارامتر "local_settings" که دستگاه برای فراخوانی API سرور استفاده می کند، هرگز نباید دارای بخش "در انتظار" باشد.
4.1.3.2. تنظیمات محلی فعلی
فقط دستگاه میتواند بخش «current» «local_settings» را تغییر دهد. هر کس دیگری بخش "در انتظار" را تغییر خواهد داد، و منتظر بمانید تا تغییرات توسط دستگاه به بخش "جاری" منتشر شود.
4.1.4. آفلاین
در صورت عدم امکان تماس با سرور در حین راه اندازی، پس از اعلان، دستگاه باید از آخرین تنظیمات محلی شناخته شده استفاده کند.
4.1.5. حذف دستگاه از سرویس
اگر دستگاه از سرویس حذف شده باشد (به عنوان مثال GCP)، یک اعلان XMPP به دستگاه ارسال می شود. این اطلاعیه در قالب زیر خواهد بود:
<device_id>/delete
با دریافت چنین اعلان، دستگاه باید برای بررسی وضعیت خود به سرور مراجعه کند. دستگاه های Cloud Print باید از موارد زیر استفاده کنند:
/cloudprint/printer?printerid=<printer_id>
دستگاه باید یک پاسخ HTTP موفق با موفقیت=نادرست و بدون شرح دستگاه/چاپگر دریافت کند. این بدان معناست که دستگاه از سرور حذف شده است و دستگاه باید اعتبار خود را پاک کند و به حالت تنظیمات کارخانه پیش فرض برود.
هر زمان که دستگاه پاسخی دریافت می کند که نشان می دهد در نتیجه API /cloudprint/printer حذف شده است (راه اندازی، اعلان تنظیمات به روز رسانی، پینگ روزانه)، باید اعتبار خود را حذف کرده و به حالت پیش فرض برود.
4.2. /privet/info API
API اطلاعات اجباری است و باید توسط هر دستگاهی اجرا شود. این یک درخواست HTTP GET برای آدرس اینترنتی "/privet/info" است: GET /privet/info HTTP/1.1
info API اطلاعات اولیه در مورد دستگاه و عملکردی که پشتیبانی می کند را برمی گرداند. این API هرگز نباید وضعیت دستگاه را تغییر دهد یا اقدامی انجام دهد، زیرا در برابر حملات XSRF آسیب پذیر است. این تنها API است که مجاز به داشتن هدر خالی "X-Privet-Token" است. مشتریان باید /privet/info API را با هدر "X-Privet-Token" که روی X-Privet-Token تنظیم شده است تماس بگیرند: ""
API اطلاعات باید دادههای مطابق با دادههای موجود در رکورد TXT را در طول کشف برگرداند.
4.2.1. ورودی
/privet/info API هیچ پارامتر ورودی ندارد.
4.2.2. بازگشت
/privet/info API اطلاعات اولیه دستگاه و عملکردهای پشتیبانی شده را برمی گرداند.
ستون TXT فیلد مربوطه را در رکورد DNS-SD TXT نشان می دهد.
| نام ارزش | نوع ارزش | توضیحات | TXT |
|---|---|---|---|
| نسخه | رشته | بالاترین نسخه (major.minor) API پشتیبانی شده، در حال حاضر 1.0 | |
| نام | رشته | نام دستگاه قابل خواندن توسط انسان. | ty |
| توضیحات | رشته | (اختیاری) توضیحات دستگاه. باید توسط کاربر قابل تغییر باشد. | توجه داشته باشید |
| آدرس اینترنتی | رشته | URL سروری که این دستگاه با آن صحبت می کند. URL باید شامل مشخصات پروتکل باشد، به عنوان مثال: https://www.google.com/cloudprint. | آدرس اینترنتی |
| نوع | لیست رشته ها | لیست انواع دستگاه های پشتیبانی شده | نوع |
| شناسه | رشته | شناسه دستگاه، اگر دستگاه هنوز ثبت نشده باشد، خالی شود. | شناسه |
| device_state | رشته | وضعیت دستگاه بیکار یعنی دستگاه آماده است پردازش به این معنی است که دستگاه مشغول است و عملکرد ممکن است برای مدتی محدود شود توقف به این معنی است که دستگاه کار نمی کند و مداخله کاربر مورد نیاز است | |
| حالت اتصال | رشته | وضعیت اتصال به سرور (base_url) آنلاین - اتصال در دسترس است آفلاین - بدون اتصال اتصال - انجام مراحل راه اندازی پیکربندی نشده - اتصال هنوز پیکربندی نشده است یک دستگاه ثبت شده ممکن است وضعیت اتصال خود را بر اساس وضعیت کانال اعلان گزارش دهد (به عنوان مثال وضعیت اتصال XMPP). | cs |
| سازنده | رشته | نام سازنده دستگاه | |
| مدل | رشته | مدل دستگاه | |
| شماره_سریال | رشته | شناسه دستگاه منحصر به فرد در این مشخصات، این باید یک UUID باشد. (مشخصات GCP 1.1) (اختیاری) اکیداً توصیه میکنیم از شناسه شماره سریال یکسانی در همه جا استفاده کنید، تا مشتریان مختلف بتوانند دستگاه مشابهی را شناسایی کنند. به عنوان مثال، چاپگرهایی که IPP را پیادهسازی میکنند ممکن است از این شناسه شماره سریال در قسمت "چاپگر-دستگاه-id" استفاده کنند. | |
| سیستم عامل | رشته | نسخه سیستم عامل دستگاه | |
| زمان کار | بین المللی | تعداد ثانیه از بوت دستگاه. | |
| setup_url | رشته | (اختیاری) URL (از جمله پروتکل) صفحه با دستورالعمل های راه اندازی | |
| support_url | رشته | (اختیاری) URL (از جمله پروتکل) صفحه با پشتیبانی، اطلاعات پرسش و پاسخ | |
| update_url | رشته | (اختیاری) URL (از جمله پروتکل) صفحه با دستورالعمل های به روز رسانی سیستم عامل | |
| x-privet-token | رشته | مقدار هدر X-Privet-Token که برای جلوگیری از حملات XSSI و XSRF باید به همه API ها منتقل شود. 6.1 را ببینید. برای جزئیات | |
| api | توضیحات API ها | لیست API های پشتیبانی شده (در زیر توضیح داده شده است) | |
| حالت_معنایی | JSON | (اختیاری) وضعیت معنایی دستگاه در قالب CloudDeviceState . |
api - یک لیست JSON حاوی لیستی از APIهای موجود از طریق شبکه محلی است. توجه داشته باشید که ممکن است همه APIها به طور همزمان از طریق شبکه محلی در دسترس نباشند. به عنوان مثال، دستگاهی که به تازگی متصل شده است فقط باید از /register api پشتیبانی کند:
"api": [
        "/privet/register",
]
"api": [
        "/privet/accesstoken",
        "/privet/capabilities",
        "/privet/printer/submitdoc",
]
API های زیر در حال حاضر در دسترس هستند:
- /privet/register - API برای ثبت دستگاه در شبکه محلی. (برای جزئیات به /privet/register API مراجعه کنید). این API باید پس از ثبت موفقیت آمیز دستگاه در ابر پنهان شود.
- /privet/accesstoken - API برای درخواست رمز دسترسی از دستگاه (برای جزئیات به /privet/accesstoken API مراجعه کنید).
- /privet/capabilities - API برای بازیابی قابلیتهای دستگاه (برای جزئیات به /privet/capabilities API مراجعه کنید).
- /privet/printer/* - API مخصوص نوع دستگاه "printer"، برای جزئیات بیشتر به APIهای خاص چاپگر مراجعه کنید.
{
        "version": "1.0",
        "name": "Gene’s printer",
        "description": "Printer connected through Chrome connector",
        "url": "https://www.google.com/cloudprint",
        "type": [
                "printer"
        ],
        "id": "11111111-2222-3333-4444-555555555555",
        "device_state": "idle",
        "connection_state": "online",
        "manufacturer": "Google",
        "model": "Google Chrome",
        "serial_number": "1111-22222-33333-4444",
        "firmware": "24.0.1312.52",
        "uptime": 600,
        "setup_url": "http://support.google.com/cloudprint/answer/1686197/?hl=en",
        "support_url": "http://support.google.com/cloudprint/?hl=en",
        "update_url": "http://support.google.com/cloudprint/?hl=en",
        "x-privet-token": "AIp06DjQd80yMoGYuGmT_VDAApuBZbInsQ:1358377509659",
        "api": [
                "/privet/accesstoken",
                "/privet/capabilities",
                "/privet/printer/submitdoc",
        ]
}
{
        "version": "1.0",
        "name": "Gene’s printer",
        "description": "Printer connected through Chrome connector",
        "url": "https://www.google.com/cloudprint",
        "type": [
                "printer"
        ],
        "id": "11111111-2222-3333-4444-555555555555",
        "device_state": "stopped",
        "connection_state": "online",
        "manufacturer": "Google",
        "model": "Google Chrome",
        "serial_number": "1111-22222-33333-4444",
        "firmware": "24.0.1312.52",
        "uptime": 600,
        "setup_url": "http://support.google.com/cloudprint/answer/1686197/?hl=en",
        "support_url": "http://support.google.com/cloudprint/?hl=en",
        "update_url": "http://support.google.com/cloudprint/?hl=en",
        "x-privet-token": "AIp06DjQd80yMoGYuGmT_VDAApuBZbInsQ:1358377509659",
        "api": [
                "/privet/accesstoken",
                "/privet/capabilities",
                "/privet/printer/submitdoc",
        ],
        "semantic_state": {
                "version": "1.0",
                "printer": {
                        "state": "STOPPED",
                        "marker_state": {
                                "item": [
                                        {
                                                "vendor_id": "ink",
                                                "state": "EXHAUSTED",
                                                "level_percent": 0
                                        }
                                ]
                        }
                }
        }
}
4.2.3. خطاها
API /privet/info فقط در صورتی که هدر X-Privet-Token وجود نداشته باشد باید خطا را برگرداند. باید خطای HTTP 400 باشد:
HTTP/1.1 400 Missing X-Privet-Token header.
4.3. /privet/register API
/privet/register API اختیاری است. این یک درخواست HTTP POST است. /privet/register API باید یک هدر معتبر X-Privet-Token را بررسی کند. دستگاه باید این API را در url "/privet/register" پیاده سازی کند:
POST /privet/register?action=start&user=user@domain.com HTTP/1.1
POST /privet/register?action=complete&user=user@domain.com HTTP/1.1
دستگاه باید /privet/register API را فقط زمانی در معرض نمایش بگذارد که در حال حاضر امکان ثبت نام ناشناس را داشته باشد. به عنوان مثال:
- هنگامی که دستگاه روشن است (یا پس از کلیک کردن روی یک دکمه خاص روی دستگاه) و هنوز ثبت نشده است، باید API /privet/register را نشان دهد تا به کاربر از شبکه محلی اجازه دهد تا چاپگر را ادعا کند.
- پس از تکمیل ثبتنام، دستگاه باید نمایش API /privet/register را متوقف کند تا از بازیابی دستگاه توسط کاربر دیگری در شبکه محلی جلوگیری شود.
- برخی از دستگاهها ممکن است روشهای مختلفی برای ثبت دستگاهها داشته باشند و نباید API /privet/register را به هیچ وجه در معرض نمایش قرار دهند (به عنوان مثال، رابط Chrome Cloud Print).
فرآیند ثبت نام شامل 3 مرحله است (به ثبت نام ناشناس برای Cloud Print مراجعه کنید).
- فرآیند ثبت نام ناشناس را آغاز کنید.
- یک کلاینت این فرآیند را با فراخوانی /privet/register API آغاز می کند. ممکن است دستگاه در آن زمان منتظر تأیید کاربر باشد.
- رمز ادعا را دریافت کنید.
مشتری نظرسنجی می کند تا بفهمد دستگاه چه زمانی برای ادامه کار آماده است. پس از آماده شدن دستگاه، درخواستی برای بازیابی رمز ثبت نام و URL ثبت نام به سرور ارسال می کند. رمز دریافتی و URL باید به مشتری بازگردانده شود. در طی این مرحله، اگر دستگاه تماس دیگری برای شروع ثبت نام دریافت کرد، باید:
- اگر این همان کاربری است که ثبت نام را شروع کرده است - تمام داده های قبلی (در صورت وجود) را رها کنید و فرآیند ثبت نام جدید را شروع کنید.
- اگر این کاربر متفاوت است - خطای device_busy و 30 ثانیه پایان زمان را برگردانید.
مراحل ثبت نام را کامل کنید.
پس از اینکه مشتری دستگاه را ادعا کرد، مشتری باید دستگاه را برای تکمیل ثبت نام مطلع کند. پس از تکمیل فرآیند ثبت نام، دستگاه باید یک اعلامیه به روز رسانی، از جمله شناسه دستگاه تازه به دست آمده ارسال کند.
توجه: هنگامی که دستگاه در حال پردازش یک تماس API /privet/register است، هیچ تماس API /privet/register دیگری نمیتواند به طور همزمان پردازش شود. دستگاه باید خطای device_busy و وقفه 30 ثانیه ای را برگرداند.
تایید کاربر برای ثبت نام در دستگاه به شدت توصیه می شود. در صورت پیاده سازی، دستگاه باید پس از دریافت یک تماس /privet/register?action=start API منتظر تایید کاربر باشد. مشتری با /privet/register?action=getClaimToken API تماس میگیرد تا از تکمیل تأیید کاربر و در دسترس بودن رمز ادعا مطلع شود. اگر کاربر ثبت نام در دستگاه را لغو کند (مثلاً دکمه لغو را فشار دهد)، خطای user_cancel باید برگردانده شود. اگر کاربر ثبت نام را در بازه زمانی مشخصی تایید نکرده باشد، خطای confirmation_timeout باید برگردانده شود. برای جزئیات بیشتر به بخش پیش فرض ها مراجعه کنید.
4.3.1. ورودی
/privet/register API دارای پارامترهای ورودی زیر است:| نام | ارزش |
|---|---|
| اقدام | می تواند یکی از موارد زیر باشد: شروع - برای شروع فرآیند ثبت نام getClaimToken - رمز ادعای دستگاه را بازیابی کنید لغو - برای لغو فرآیند ثبت نام کامل - برای تکمیل فرآیند ثبت نام |
| کاربر | ایمیل کاربری که این دستگاه را ادعا می کند. |
دستگاه باید بررسی کند که آدرس ایمیل همه اقدامات (شروع، دریافتClaimToken، لغو، تکمیل) مطابقت داشته باشد.
4.3.2. بازگشت
/privet/register API داده های زیر را برمی گرداند:| نام ارزش | نوع ارزش | توضیحات |
|---|---|---|
| اقدام | رشته | عملکرد مشابه در پارامتر ورودی. |
| کاربر | رشته (اختیاری) | همان کاربر در پارامتر ورودی (ممکن است از دست رفته باشد، اگر در ورودی حذف شود). |
| نشانه | رشته (اختیاری) | نشانه ثبت نام (اجباری برای پاسخ "getClaimToken"، برای "شروع"، "کامل"، "لغو" حذف شده است). |
| ادعا_url | رشته (اختیاری) | URL ثبت نام (اجباری برای پاسخ "getClaimToken"، برای "شروع"، "کامل"، "لغو" حذف شده است). برای چاپگرهای ابری باید "complete_invite_url" دریافت شده از سرور باشد. |
| automated_claim_url | رشته (اختیاری) | URL ثبت نام (اجباری برای پاسخ "getClaimToken"، برای "شروع"، "کامل"، "لغو" حذف شده است). برای چاپگرهای ابری باید "automated_invite_url" دریافت شده از سرور باشد. |
| device_id | رشته (اختیاری) | شناسه دستگاه جدید (برای پاسخ "شروع" حذف شده است، برای "کامل" اجباری است). |
دستگاه باید فقط پس از تکمیل ثبت نام، شناسه دستگاه خود را در پاسخ API /privet/info برگرداند.
مثال 1:
{
        "action": "start",
        "user": "user@domain.com",
}
مثال 2:
{
        "action": "getClaimToken",
        "user": "user@domain.com",
        "token": "AAA111222333444555666777",
        "claim_url": "https://domain.com/SoMeUrL",
}
مثال 3:
{
        "action": "complete",
        "user": "user@domain.com",
        "device_id": "11111111-2222-3333-4444-555555555555",
}
4.3.3. خطاها
/privet/register API ممکن است خطاهای زیر را برگرداند (برای جزئیات به بخش خطاها مراجعه کنید):| خطا | توضیحات |
|---|---|
| device_busy | دستگاه مشغول است و نمی تواند عمل درخواستی را انجام دهد. پس از اتمام زمان، دوباره تلاش کنید. |
| pending_user_action | در پاسخ به "getClaimToken" این خطا نشان می دهد که دستگاه هنوز در انتظار تایید کاربر است و درخواست "getClaimToken" باید پس از اتمام زمان دوباره امتحان شود. |
| user_cancel | کاربر به صراحت فرآیند ثبت نام را از دستگاه لغو کرد. |
| confirmation_timeout | زمان تایید کاربر تمام می شود. |
| invalid_action | عمل نامعتبر نامیده می شود. برای مثال، اگر کلاینت قبل از فراخوانی action=start و action=getClaimToken را فراخوانی کند. |
| invalid_params | پارامترهای نامعتبر مشخص شده در درخواست. (پارامترهای ناشناخته باید با خیال راحت برای سازگاری آینده نادیده گرفته شوند). برای مثال، اگر کلاینت action=unknown یا user= نامیده است، این را برگردانید. |
| device_config_error | تاریخ/زمان (یا برخی تنظیمات دیگر) در سمت دستگاه اشتباه است. کاربر باید برود (به وب سایت داخلی دستگاه) و تنظیمات دستگاه را پیکربندی کند. |
| آفلاین | دستگاه در حال حاضر آفلاین است و نمی تواند با سرور صحبت کند. |
| server_error | خطای سرور در هنگام ثبت نام |
| invalid_x_privet_token | X-Privet-Token در درخواست نامعتبر یا خالی است. |
پس از اینکه ثبت نام با موفقیت انجام شد، دستگاه باید افشای /privet/register API را متوقف کند. اگر دستگاه API /privet/register را نمایش نمیدهد، باید خطای HTTP 404 را برگرداند. بنابراین، اگر دستگاهی قبلاً ثبت شده است، فراخوانی این API باید 404 را برگرداند. اگر هدر X-Privet-Token وجود نداشته باشد، دستگاه باید خطای HTTP 400 را برگرداند.
4.4. /privet/accesstoken API
/privet/accesstoken API اختیاری است. این یک درخواست HTTP GET است. /privet/accesstoken API باید هدر معتبر "X-Privet-Token" را بررسی کند. دستگاه باید این API را در url "/privet/accesstoken" پیاده سازی کند:GET /privet/accesstoken HTTP/1.1
هنگامی که دستگاه تماس API /accesstoken را دریافت می کند، باید با سرور تماس بگیرد تا رمز دسترسی کاربر داده شده را بازیابی کند و رمز را به مشتری بازگرداند. سپس مشتری از رمز دسترسی برای دسترسی به این دستگاه از طریق ابر استفاده می کند.
دستگاههای Cloud Print باید با API زیر تماس بگیرند:
/cloudprint/proximitytoken
"proximity_token": {
        "user": "user@domain.com",
        "token": "AAA111222333444555666777",
        "expires_in": 600
}
4.4.1. ورودی
/privet/accesstoken API دارای پارامترهای ورودی زیر است:| نام | ارزش |
|---|---|
| کاربر | ایمیل کاربری که قصد استفاده از این نشانه دسترسی را داشت. ممکن است در درخواست خالی باشد. |
4.4.2. بازگشت
/privet/accesstoken API داده های زیر را برمی گرداند:| نام ارزش | نوع ارزش | توضیحات |
|---|---|---|
| نشانه | رشته | رمز دسترسی که توسط سرور برگردانده شده است |
| کاربر | رشته | همان کاربر در پارامتر ورودی. |
| expires_in | بین المللی | تعداد ثانیه تا انقضای این نشانه. از سرور دریافت و در این پاسخ ارسال شد. |
مثال:
{
        "token": "AAA111222333444555666777",
        "user": "user@domain.com",
        "expires_in": 600
}
4.4.3. خطاها
/privet/accesstoken API ممکن است خطاهای زیر را برگرداند (برای جزئیات به بخش خطاها مراجعه کنید):| خطا | توضیحات |
|---|---|
| آفلاین | دستگاه در حال حاضر آفلاین است و نمی تواند با سرور صحبت کند. |
| دسترسی_رد شده | حقوق ناکافی دسترسی رد شد. وقتی سرور به صراحت درخواست را رد کرد، دستگاه باید این خطا را برگرداند. |
| invalid_params | پارامترهای نامعتبر مشخص شده در درخواست. (پارامترهای ناشناخته باید با خیال راحت برای سازگاری آینده نادیده گرفته شوند). به عنوان مثال، اگر مشتری /accesstoken?user= یا /accesstoken را صدا کند. |
| server_error | خطای سرور |
| invalid_x_privet_token | X-Privet-Token در درخواست نامعتبر یا خالی است. |
اگر دستگاه API /privet/accesstoken را نمایش نمیدهد، باید خطای HTTP 404 را برگرداند. اگر هدر X-Privet-Token وجود نداشته باشد، دستگاه باید خطای HTTP 400 را برگرداند.
4.5. /privet/capabilities API
/privet/capabilities API اختیاری است. این یک درخواست HTTP GET است. /privet/capabilities API باید هدر معتبر "X-Privet-Token" را بررسی کند. دستگاه باید این API را در url "/privet/capabilities" پیاده سازی کند:GET /privet/capabilities HTTP/1.1
4.5.1. ورودی
/privet/capabilities API دارای پارامترهای ورودی زیر است:| نام | ارزش |
|---|---|
| آفلاین | (اختیاری) فقط می تواند "آفلاین=1" باشد. در این حالت، دستگاه باید قابلیتهایی را برای استفاده آفلاین بازگرداند (اگر با قابلیتهای «آنلاین» متفاوت باشد). |
4.5.2. بازگشت
/privet/capabilities API قابلیتهای دستگاه را در قالب JSON توصیف دستگاه ابری (CDD) برمیگرداند (برای جزئیات به سند CDD مراجعه کنید). حداقل چاپگرها باید لیستی از انواع پشتیبانی شده را در اینجا برگردانند. برای مثال، یک چاپگر Cloud Ready که در حال حاضر آنلاین است ممکن است چیزی شبیه به این را (حداقل):
{
        "version": "1.0",
        "printer": {
                "supported_content_type": [
                        {
                                "content_type": "application/pdf",
                                "min_version": "1.4"
                        },
                        { "content_type": "image/pwg-raster" },
                        { "content_type": "image/jpeg" },
                        { "content_type": "*/*" }
                ]
        }
}
{
        "version": "1.0",
        "printer": {
                "supported_content_type": [
                        {
                                "content_type": "application/pdf",
                                "min_version": "1.4"
                        },
                        { "content_type": "image/pwg-raster" },
                        { "content_type": "image/jpeg" }
                ]
        }
}
توجه : چاپگرها اولویت نوع محتوای پشتیبانی شده را با استفاده از ترتیب بیان می کنند. به عنوان مثال، در نمونه های بالا، چاپگر مشخص می کند که داده های "application/pdf" را به "image/pwg-raster" و "image/jpeg" ترجیح می دهد. مشتریان باید در صورت امکان به اولویت بندی چاپگر احترام بگذارند (برای جزئیات به سند CDD مراجعه کنید).
4.5.3. خطاها
/privet/capabilities API ممکن است خطاهای زیر را برگرداند (برای جزئیات به بخش خطاها مراجعه کنید):| خطا | توضیحات |
|---|---|
| invalid_x_privet_token | X-Privet-Token در درخواست نامعتبر یا خالی است. |
اگر دستگاه API /privet/capabilities را نمایش نمیدهد، باید خطای HTTP 404 را برگرداند. اگر هدر X-Privet-Token وجود نداشته باشد، دستگاه باید خطای HTTP 400 را برگرداند.
4.6. خطاها
خطاها از APIهای بالا در قالب زیر برگردانده می شوند:| نام ارزش | نوع ارزش | توضیحات |
|---|---|---|
| خطا | رشته | نوع خطا (تعریف شده برای API) |
| توضیحات | رشته (اختیاری) | توصیف خطا توسط انسان. |
| server_api | رشته (اختیاری) | در صورت خطای سرور، این فیلد حاوی API سرور است که ناموفق است. |
| سرور_کد | int (اختیاری) | در صورت خطای سرور، این فیلد حاوی کد خطایی است که سرور برگردانده است. |
| سرور_http_code | int (اختیاری) | در صورت بروز خطای HTTP سرور، این قسمت حاوی کد خطای HTTP است که سرور برگردانده شده است. |
| تایم اوت | int (اختیاری) | تعداد ثانیههایی که مشتری باید قبل از امتحان مجدد منتظر بماند (فقط برای خطاهای قابل بازیابی). مشتری باید وقفه زمانی واقعی را از این مقدار به مقدار 20% به صورت تصادفی تبدیل کند. |
اگر هدر X-Privet-Token وجود نداشته باشد، همه APIها باید خطای HTTP 400 را برگردانند.
سرصفحه HTTP/1.1 400 X-Privet-Token وجود ندارد.
مثال 1:
{
        "error": "server_error",
        "description": "Service unavailable",
        "server_api": "/submit",
        "server_http_code": 503
}
مثال 2:
{
        "error": "printer_busy",
        "description": "Printer is currently printing other job",
        "timeout": 15
}
5. API چاپگر
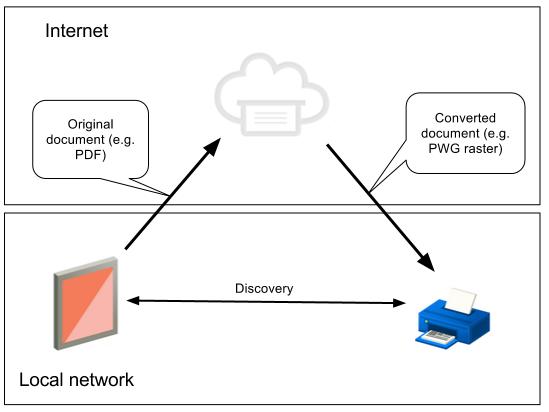
یکی از انواع دستگاه هایی که این پروتکل پشتیبانی می کند چاپگر نوع است. دستگاههایی که از این نوع پشتیبانی میکنند، ممکن است برخی از عملکردهای خاص چاپگرها را اجرا کنند. در حالت ایدهآل، چاپ روی چاپگرهای آماده ابری از طریق سرور Cloud Print انجام میشود:
در برخی موارد ممکن است مشتری نیاز به ارسال سند به صورت محلی داشته باشد. ممکن است زمانی که مشتری شناسه Google نداشته باشد یا نتواند با سرور Cloud Print صحبت کند، نیاز باشد. در چنین شرایطی، کار چاپ به صورت محلی به چاپگر ارسال می شود. چاپگر به نوبه خود از سرویس Cloud Print برای صف بندی کار و تبدیل استفاده می کند. چاپگر کار ارسال شده به صورت محلی را مجدداً به سرویس Cloud Print ارسال می کند و سپس آن را درخواست می کند، زیرا از طریق ابر ارسال شده است. این فرآیند تجربه کاربری انعطاف پذیری را از نظر خدمات (تبدیل) و مدیریت/ردیابی کار چاپ ارائه می دهد.
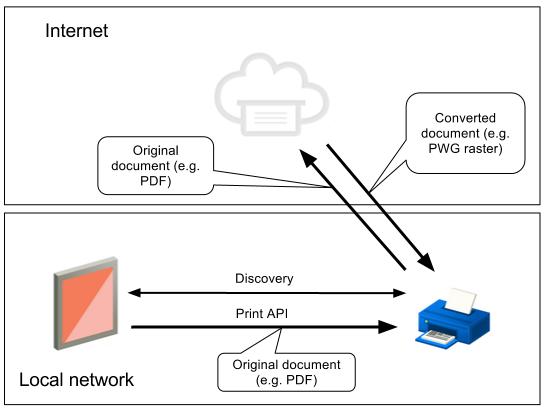
از آنجایی که سرویس Cloud Print تبدیل را اجرا می کند، چاپگر باید از همه فرمت های ورودی ("*/*") در میان لیست انواع محتوای پشتیبانی شده، تبلیغ کند:
{
        "version": "1.0",
        "printer": {
                "supported_content_type": [
                        { "content_type": "image/pwg-raster" },
                        { "content_type": "*/*" }
                ]
        }
}
در برخی موارد یک راه حل کاملا آفلاین مورد نظر است. از آنجایی که چاپگرها از تعداد محدودی از فرمتهای ورودی پشتیبانی میکنند، مشتری باید اسناد را به چند فرمت چاپگر پشتیبانی شده بومی تبدیل کند.
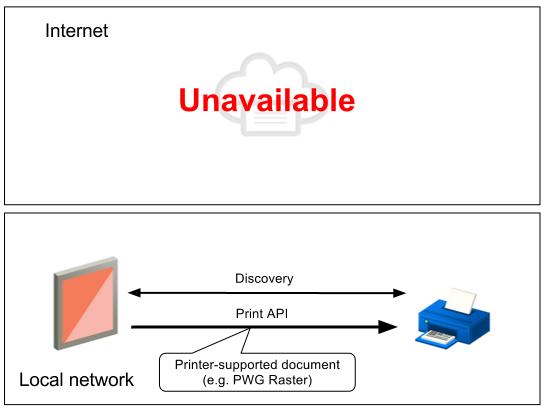
این مشخصات به همه چاپگرها نیاز دارد که حداقل از قالب PWG Raster ("تصویر/pwg-raster") برای جعبه چاپ آفلاین پشتیبانی کنند. چاپگر ممکن است از فرمت های دیگری (به عنوان مثال JPEG) پشتیبانی کند و اگر مشتری از آن پشتیبانی کند، ممکن است اسناد را در آن قالب ارسال کند. چاپگر باید انواع پشتیبانی شده را از طریق /capabilities API نمایش دهد، برای مثال:
{
        "version": "1.0",
        "printer": {
                "supported_content_type": [
                        { "content_type": "image/pwg-raster" },
                        { "content_type": "image/jpeg" }
                ]
        }
}
چاپ ساده - مشتری سند را از طریق شبکه محلی به /submitdoc API می فرستد (بدون تعیین پارامتر job_id). سند ارسالی با استفاده از تنظیمات پیشفرض بلیط چاپ چاپ میشود و نیازی به وضعیت کار چاپ نیست. اگر چاپگر فقط از این نوع چاپ پشتیبانی می کند، باید ONLY /submitdoc API را در پاسخ API /privet/info تبلیغ کند.
"api": [
        "/privet/accesstoken",
        "/privet/capabilities",
        "/privet/printer/submitdoc",
]
چاپ پیشرفته - مشتری باید ابتدا با فراخوانی /privet/printer/createjob API با یک بلیط کار معتبر CJT در درخواست، یک کار چاپ روی چاپگر ایجاد کند. چاپگر باید بلیط چاپ را در حافظه ذخیره کند و یک job_id را به مشتری برگرداند. سپس مشتری /printer/submitdoc API را فراخوانی می کند و job_id قبلاً دریافت شده را مشخص می کند. در آن زمان چاپگر شروع به چاپ می کند. مشتری با فراخوانی /privet/printer/jobstate API وضعیت کار چاپ را از چاپگر نظرسنجی می کند.
در یک محیط چند مشتری، هیچ تضمینی وجود ندارد که این API چگونه نامیده شود. این امکان برای یک کلاینت وجود دارد که بین تماس های /createjob->/submitdoc مشتری دیگر /createjob را فراخوانی کند. برای حذف بن بست های احتمالی و بهبود قابلیت استفاده، توصیه می کنیم یک صف کوچک از کارهای چاپی در انتظار چاپگر داشته باشید (حداقل 3-5):
- /createjob اولین نقطه موجود در صف را می گیرد.
- طول عمر کار (در صف) حداقل 5 دقیقه است.
- اگر تمام نقاط صف گرفته شود، قدیمیترین کار غیرچاپ حذف شده و کار جدید در آنجا قرار میگیرد.
- اگر در حال حاضر یک کار چاپی در دستگاه در حال چاپ است (چاپ ساده یا پیشرفته)، /submitdoc باید وضعیت اشغال را برگرداند و برای امتحان مجدد این کار چاپ، یک مهلت زمانی پیشنهاد کند.
- اگر /submitdoc به کاری اشاره دارد که از صف حذف شده است (به دلیل جایگزینی یا مهلت زمانی)، چاپگر باید یک خطای invalid_print_job را برگرداند و کلاینت فرآیند را از مرحله /createjob دوباره امتحان می کند. مشتری باید قبل از تلاش مجدد، برای یک دوره وقفه تصادفی حداکثر تا 5 ثانیه صبر کند.
اگر محدودیتهای حافظه مانع از ذخیره چندین کار معلق در دستگاه شود، ممکن است یک صف طولانی از 1 کار چاپ داشته باشید. همچنان باید از همان پروتکل فوق پیروی کند. پس از اتمام یا شکست کاری با خطا، چاپگر باید اطلاعات مربوط به وضعیت کار را حداقل به مدت 5 دقیقه ذخیره کند. اندازه صف برای ذخیره وضعیتهای کار تکمیلشده باید حداقل 10 باشد. اگر وضعیتهای شغلی بیشتری وجود دارد که باید ذخیره شوند، ممکن است قدیمیترین مورد قبل از وقفه زمانی 5 دقیقهای از صف حذف شود.
توجه: در حال حاضر مشتریان برای وضعیت شغلی نظرسنجی خواهند کرد. در آینده، ممکن است از چاپگر بخواهیم زمانی که وضعیت کار چاپ تغییر کرده است، اعلان TXT DNS ارسال کند.
5.1. /privet/printer/createjob API
/privet/printer/createjob API اختیاری است (به چاپ ساده در بالا مراجعه کنید). این یک درخواست HTTP POST است. /privet/printer/createJob API باید یک هدر معتبر "X-Privet-Token" را بررسی کند. دستگاه باید این API را در URL "/Privet/Printer/CreateJob" پیاده سازی کند:
POST /privet/printer/createjob HTTP/1.1
5.1.1. ورودی
/Privet/Printer/CreateJob API هیچ پارامتر ورودی در URL ندارد. بدنه درخواست باید حاوی داده های بلیط کار چاپ در قالب CJT باشد.5.1.2. بازگشت
/privet/printer/createJob API داده های زیر را برمی گرداند:| نام ارزش | نوع ارزش | توضیحات |
|---|---|---|
| job_id | رشته | شناسه کار چاپی تازه ایجاد شده. |
| expires_in | بین المللی | تعداد ثانیه این کار چاپ معتبر است. |
مثال:
{
        "job_id": "123",
        "expires_in": 600
}
5.1.3. خطاها
/Privet/Printer/CreateJob API ممکن است خطاهای زیر را برگرداند (برای جزئیات بیشتر به بخش خطاها مراجعه کنید):| خطا | توضیحات |
|---|---|
| نامعتبر_تیکت | بلیط چاپی ارسال شده نامعتبر است. |
| چاپگر_بیز | چاپگر شلوغ است و در حال حاضر نمی تواند پردازش /ایجاد Job را انجام دهد. پس از مدت زمان طولانی دوباره امتحان کنید. |
| چاپگر_ | چاپگر در حالت خطا است و برای رفع آن نیاز به تعامل کاربر دارد. توضیحات باید حاوی توضیحات دقیق تر باشد (به عنوان مثال "کاغذ کاغذ در سینی 1"). |
| INPLAID_X_PRIVET_TOKEN | X-Privet-Token در درخواست نامعتبر یا خالی است. |
اگر دستگاه در معرض/privet/printer/CreateJob قرار نگیرد ، باید خطای HTTP 404 را برگرداند. اگر هدر X-Privet-Token از بین نرود ، دستگاه باید خطای HTTP 400 را برگرداند.
5.2. /Privet/Printer/SubmitDoc API
/Privet/Printer/SubmitDoc API برای اجرای چاپ از طریق یک شبکه محلی (آفلاین یا ارسال مجدد به چاپ ابر) لازم است. این یک درخواست پست HTTP است. /Privet/Printer/SubmitDoc API باید یک هدر معتبر "X-Privet-Token" را بررسی کند. دستگاه باید این API را در URL "/Privet/Printer/SubmitDoc" پیاده سازی کند:POST /privet/printer/submitdoc HTTP/1.1
اگر چاپگر قادر به نگه داشتن تمام داده های موجود در بافر داخلی خود نباشد ، باید از مکانیسم های TCP برای کاهش سرعت انتقال داده تا زمانی که بخشی از سند را چاپ کند ، استفاده کند و دوباره بخشی از بافر را در دسترس قرار دهد. (به عنوان مثال ، چاپگر ممکن است Windowsize = 0 را در لایه های TCP تنظیم کند ، که باعث می شود مشتری منتظر بماند.)
ارسال سندی به چاپگر ممکن است زمان قابل توجهی طول بکشد. مشتری باید در حالی که چاپ در حال انجام است ، بتواند وضعیت چاپگر و کار (چاپ پیشرفته) را بررسی کند. برای انجام این کار ، چاپگر باید به مشتری اجازه دهد هنگام پردازش/privet/چاپگر/ارسال کننده API با API/Privet/Info و/Privet/Printer/JobState تماس بگیرد. برای همه مشتری ها توصیه می شود که یک موضوع جدید را برای اجرای تماس API/Privet/Printer/SubmitDoc شروع کنند ، به طوری که موضوع اصلی می تواند از API/Privet/Info و/Privet/Printer/Printer/JobState برای بررسی حالت های چاپگر و کار استفاده کند.
توجه : پس از اتمام یا سقط جنین کار چاپ محلی ، اکیداً توصیه می شود (و در نسخه بعدی این مشخصات لازم خواهد بود) تا وضعیت نهایی کار را به رابط /ارسال CloudPrint /ارسال برای اهداف حسابداری و تجربه کاربر گزارش دهید. پارامترهای "چاپگر" ، "عنوان" ، "ContentType" و "final_semantic_state" (در قالب printjobstate ) مورد نیاز است ، و پارامترهای "برچسب" (پارامتر مکرر) و "بلیط" (بلیط کار در قالب CloudJobticket ). توجه داشته باشید که PrintJobstate ارائه شده در واقع باید نهایی باشد ، یعنی نوع آن باید انجام شود یا سقط شود ، و در صورت سقط جنین باید علت ارائه شود (برای جزئیات بیشتر به کار خود مراجعه کنید). همچنین توجه داشته باشید که این استفاده از رابط /cloudprint /ارسال برای گزارش مشاغل چاپی محلی در مشخصات آن ذکر نشده است زیرا این بخش برای توصیف کاربرد اصلی رابط در نظر گرفته شده است: ارسال کار چاپی با سند برای چاپ در پارامتر "محتوا".
5.2.1. ورودی
/privet/printer/submitDoc API پارامترهای ورودی زیر را دارد:| نام | ارزش |
|---|---|
| job_id | (اختیاری) شناسه کار چاپ. ممکن است برای مورد چاپ ساده حذف شود (به بالا مراجعه کنید). باید با یکی که توسط چاپگر برگشته است مطابقت داشته باشد. |
| user_name | (اختیاری) نام کاربری قابل خواندن انسان. این قطعی نیست و فقط باید برای حاشیه نویسی شغلی چاپ شود. اگر شغل دوباره به سرویس چاپ ابر ارسال شود ، این رشته باید به کار چاپ ابر وصل شود. |
| نام مشتری | (اختیاری) نام برنامه مشتری در حال ساخت این درخواست. فقط برای اهداف نمایش اگر شغل دوباره به سرویس چاپ ابر ارسال شود ، این رشته باید به کار چاپ ابر وصل شود. |
| job_name | (اختیاری) نام کار چاپی که باید ضبط شود. اگر شغل دوباره به سرویس چاپ ابر ارسال شود ، این رشته باید به کار چاپ ابر وصل شود. |
| آفلاین | (اختیاری) فقط می تواند "آفلاین = 1" باشد. در این حالت چاپگر فقط باید چاپ آفلاین را امتحان کند (بدون ارسال مجدد به سرور چاپ ابر). |
بدنه درخواست باید حاوی یک سند معتبر برای چاپ باشد. "طول محتوا" باید طول صحیح درخواست را شامل شود. عنوان "نوع محتوا" باید تنظیم شود تا نوع MIME را مستند کند و یکی از انواع CDD را مطابقت دهد (مگر اینکه CDD "*/*" را مشخص کند).
به مشتریان بسیار توصیه می شود که یک نام کاربری معتبر (یا ایمیل) ، نام مشتری و نام شغلی را با این درخواست ارائه دهند. این زمینه ها فقط در UIS برای بهبود تجربه کاربر استفاده می شوند.
5.2.2. بازگشت
/Privet/Printer/SubmitDoc API داده های زیر را برمی گرداند:| نام ارزش | نوع ارزش | توضیحات |
|---|---|---|
| job_id | رشته | شناسه کار چاپی تازه ایجاد شده (چاپ ساده) یا job_id که در درخواست (چاپ پیشرفته) مشخص شده است. |
| expires_in | بین المللی | تعداد ثانیه این کار چاپ معتبر است. |
| شغل_نوع | رشته | از نوع محتوای سند ارسال شده. |
| job_size | int 64 بیتی | اندازه داده های چاپ در بایت. |
| job_name | رشته | (اختیاری) نام شغلی مشابه در ورودی (در صورت وجود). |
مثال:
{
        "job_id": "123",
        "expires_in": 500,
        "job_type": "application/pdf",
        "job_size": 123456,
        "job_name": "My PDF document"
}
5.2.3. خطاها
/Privet/Printer/SubmitDoc API ممکن است خطاهای زیر را برگرداند (برای جزئیات بیشتر به بخش خطاها مراجعه کنید):| خطا | توضیحات |
|---|---|
| INPLAID_PRINT_JOB | شناسه شغلی نامعتبر/منقضی شده در درخواست مشخص شده است. پس از مدت زمان طولانی دوباره امتحان کنید. |
| INPLAID_DOCUMENMENT_TYPE | نوع MIME از نوع MIME توسط چاپگر پشتیبانی نمی شود. |
| نامعتبر | سند ارسال شده نامعتبر است. |
| Document_too_large | سند بیش از حداکثر اندازه مجاز است. |
| چاپگر_بیز | چاپگر شلوغ است و در حال حاضر نمی تواند سند را پردازش کند. پس از مدت زمان طولانی دوباره امتحان کنید. |
| چاپگر_ | چاپگر در حالت خطا است و برای رفع آن نیاز به تعامل کاربر دارد. توضیحات باید حاوی توضیحات دقیق تر باشد (به عنوان مثال "کاغذ کاغذ در سینی 1"). |
| params نامعتبر | پارامترهای نامعتبر مشخص شده در درخواست. (پارامترهای ناشناخته باید برای سازگاری آینده با خیال راحت نادیده گرفته شوند) |
| user_cancel | کاربر به صراحت فرآیند چاپ را از دستگاه لغو کرد. |
| server_error | ارسال سند به Cloud Print شکست خورده است. |
| INPLAID_X_PRIVET_TOKEN | X-Privet-Token در درخواست نامعتبر یا خالی است. |
اگر دستگاه در معرض/privet/چاپگر/SubmitDoc قرار نگیرد ، باید خطای HTTP 404 را برگرداند. اگر هدر X-Privet-Token از بین نرود ، دستگاه باید خطای HTTP 400 را برگرداند.
توجه :/Privet/Printer/SubmitDoc API ممکن است در سمت چاپگر (به دلیل بار بزرگ وصل شده) نیاز به کار ویژه داشته باشد. در بعضی موارد (بستگی به اجرای و پلت فرم سرور چاپگر HTTP دارد) ، چاپگر ممکن است قبل از بازگشت خطای HTTP ، سوکت را ببندد. از طرف دیگر ، چاپگر ممکن است خطای 503 را برگرداند (به جای خطای Privet). چاپگرها باید تا حد امکان برای بازگشت Privet امتحان کنند. با این حال ، هر مشتری که مشخصات Privet را اجرا می کند باید بتواند از نزدیک سوکت (بدون خطای HTTP) و 503 مورد خطای HTTP برای/privet/چاپگر/ارسال API استفاده کند. در این حالت ، مشتری باید آن را به عنوان خطای Privet "Printer_Busy" با "Timeout" تنظیم کند تا 15 ثانیه تنظیم شود. برای جلوگیری از احیای بی نهایت ، مشتری ممکن است پس از تعداد معقول تلاش ها ، دوباره امتحان کند (به عنوان مثال ، 3).
5.3. /Privet/Printer/JobState API
/Privet/Printer/JobState API اختیاری است (به چاپ ساده در بالا مراجعه کنید). این یک درخواست دریافت HTTP است. /Privet/Printer/JobState API باید یک هدر معتبر "X-Privet-Token" را بررسی کند. دستگاه باید این API را در URL "/Privet/Printer/JobState" پیاده سازی کند:GET /privet/printer/jobstate HTTP/1.1
5.3.1. ورودی
/Privet/Printer/JobState API دارای پارامترهای ورودی زیر است:| نام | ارزش |
|---|---|
| job_id | برای بازگشت وضعیت ، شناسه کار را چاپ کنید. |
5.3.2. بازگشت
/Privet/Printer/JobState API داده های زیر را برمی گرداند:| نام ارزش | نوع ارزش | توضیحات |
|---|---|---|
| job_id | رشته | شناسه کار را چاپ کنید اطلاعات وضعیت برای آن وجود دارد. |
| دولت | رشته | پیش نویس - کار چاپی در دستگاه ایجاد شده است (هنوز هیچ/privet/چاپگر/ارسال تماس دریافت شده است). صف - کار چاپی دریافت و صف شده است ، اما چاپ هنوز شروع نشده است. in_progress - کار چاپ در پیشرفت چاپ است. متوقف شده - کار چاپی متوقف شده است ، اما می توان به صورت دستی یا خودکار مجدداً راه اندازی شد. انجام شده - کار چاپ انجام شده است. سقط جنین - کار چاپ ناموفق بود. |
| توضیحات | رشته | (اختیاری) توضیحات قابل خواندن انسانی از وضعیت کار چاپ. در صورت متوقف شدن یا سقط جنین ، باید اطلاعات اضافی را شامل شود. قسمت معنایی_ستات معمولاً توضیحات بهتر و معنادار تری را برای مشتری ارائه می دهد. |
| expires_in | بین المللی | تعداد ثانیه این کار چاپ معتبر است. |
| شغل_نوع | رشته | (اختیاری) نوع محتوا از سند ارسال شده. |
| job_size | int 64 بیتی | (اختیاری) اندازه داده های چاپ در بایت. |
| job_name | رشته | (اختیاری) نام شغلی مشابه در ورودی (در صورت وجود). |
| server_job_id | رشته | (اختیاری) شناسه کار برگشتی از سرور (اگر شغل به سرویس چاپ ابر ارسال شده است). برای چاپ آفلاین حذف شده است. |
| معنایی_نه | JSON | (اختیاری) وضعیت معنایی کار در قالب PrintJobstate . |
مثال (چاپ با گزارش از طریق Cloud Print):
{
        "job_id": "123",
        "state": "in_progress",
        "expires_in": 100,
        "job_type": "application/pdf",
        "job_size": 123456,
        "job_name": "My PDF document",
        "server_job_id": "1111-2222-3333-4444"
}
مثال (خطای چاپ آفلاین):
{
        "job_id": "123",
        "state": "stopped",
        "description": "Out of paper",
        "expires_in": 100,
        "job_type": "application/pdf",
        "job_size": 123456,
        "job_name": "My PDF document"
}
مثال (کار چاپی که توسط کاربر سقط شده است):
{
        "job_id": "123",
        "state": "aborted",
        "description": "User action",
        "expires_in": 100,
        "job_type": "application/pdf",
        "job_size": 123456,
        "job_name": "My PDF document",
        "semantic_state": {
                "version": "1.0",
                "state": {
                        "type": "ABORTED",
                        "user_action_cause": {"action_code": "CANCELLED"}
                },
                "pages_printed": 7
        }
}
مثال (کار چاپ به دلیل خارج شدن از کاغذ متوقف شد). به مراجعه به حالت دستگاه توجه کنید. مشتری برای به دست آوردن جزئیات بیشتر در مورد وضعیت دستگاه ، باید با API /privet /info تماس بگیرد:
{
        "job_id": "123",
        "state": "stopped",
        "description": "Out of paper",
        "expires_in": 100,
        "job_type": "application/pdf",
        "job_size": "123456",
        "job_name": "My PDF document",
        "semantic_state": {
                "version": "1.0",
                "state": {
                        "type": "STOPPED",
                        "device_state_cause": {"error_code": "INPUT_TRAY"}
                },
                "pages_printed": 7
        }
}
5.3.3. خطاها
/Privet/Printer/JobState API ممکن است خطاهای زیر را برگرداند (برای جزئیات بیشتر به بخش خطاها مراجعه کنید):| خطا | توضیحات |
|---|---|
| INPLAID_PRINT_JOB | شناسه شغلی نامعتبر/منقضی شده در درخواست مشخص شده است. |
| server_error | دریافت وضعیت شغلی چاپ (برای کارهای چاپی ارسال شده برای چاپ ابر) شکست خورده است. |
| INPLAID_X_PRIVET_TOKEN | X-Privet-Token در درخواست نامعتبر یا خالی است. |
اگر دستگاه در معرض/privet/printer/jobstate قرار نگیرد ، باید خطای HTTP 404 را برگرداند. اگر هدر X-Privet-Token از بین نرود ، دستگاه باید خطای HTTP 400 را برگرداند.
6. پیوست
6.1. رفتار و تنظیمات پیش فرض
در این بخش رفتار پیش فرض مورد نظر ما از همه دستگاه های سازگار با Privet توضیح داده شده است.- دستگاه های خارج از جعبه فقط باید API های فقط /privet /info و /privet /ثبت نام را پشتیبانی کنند. تمام API های دیگر (به عنوان مثال /Privet /AccessToken ، چاپ محلی) باید غیرفعال شوند.
- ثبت نام نیاز به تعامل فیزیکی با یک دستگاه دارد.
- کاربر باید برای تأیید دسترسی آنها به دستگاه ، یک عمل فیزیکی را روی دستگاه (به عنوان مثال با فشار دادن یک دکمه) انجام دهد.
- بعد از اینکه کاربر اقدامی را که در بالا ذکر شد انجام داد ، چاپگر باید درخواست /CloudPrint /Register را ارسال کند. نباید این درخواست را تا بعد از انجام عمل ارسال کند (به نمودار دنباله 1 مراجعه کنید).
- اگر دستگاه در حال پردازش درخواست /privet /ثبت است (به عنوان مثال ، منتظر عمل فوق) است ، باید کلیه درخواست های دیگر /خصوصی /ثبت نام را رد کند. دستگاه باید خطای دستگاه_بسی را در این حالت برگرداند.
- دستگاه باید درخواست هر درخواست /ثبت نام را که در طی 60 ثانیه از اقدامات فیزیکی ذکر شده در بالا دریافت نمی کند. دستگاه باید در این حالت خطای تأیید_ timeout را برگرداند.
- اختیاری: توصیه می شود اما مورد نیاز نیست ، موارد زیر ممکن است تجربه کاربر را بهبود بخشد:
- چاپگر ممکن است یک چراغ یا صفحه نمایش آن را چشمک بزند تا نشان دهد کاربر برای تأیید ثبت نام باید اقدامی انجام دهد.
- این چاپگر ممکن است روی صفحه نمایش خود بیان کند که "آن را به Google Cloud Print برای کاربر" abc@def.com "ثبت می کند - برای ادامه کار را فشار دهید" ، جایی که abc@def.com پارامتر کاربر از تماس /ثبت API است. این باعث می شود یک کاربر روشن تر شود:
- این درخواست ثبت نام آنها است که آنها تأیید می کنند
- چه اتفاقی می افتد اگر S/او درخواست را تحریک نکند.
- علاوه بر اقدامات فیزیکی برای تأیید از چاپگر (به عنوان مثال ، دکمه OK را فشار دهید) ، یک چاپگر همچنین ممکن است دکمه ای را برای لغو درخواست به کاربر ارائه دهد (به عنوان مثال ، "Cancel را برای رد کردن" فشار دهید). این امر به کاربرانی که درخواست ثبت نام را برای لغو آن قبل از زمان 60 ثانیه انجام نمی دهند ، امکان می دهد. دستگاه باید خطای user_cancel را در این مورد برگرداند.
- نقل و انتقالات مالکیت:
- دستگاه ممکن است صریحاً از سرویس ابری حذف شود.
- اگر دستگاه موفقیت دریافت کند ، اما هیچ توضیحات دستگاه در نتیجه تماس /cloudprint /چاپگر (برای GCP) وجود ندارد ، باید به حالت پیش فرض (خارج از جعبه) برگردد.
- اگر اعتبار دستگاه دیگر کار نکند (صریحاً به دلیل پاسخ "اعتبار نامعتبر" از سرور) ، باید به حالت پیش فرض (خارج از جعبه) برگردد.
- تنظیم مجدد کارخانه محلی باید اعتبار دستگاه را پاک کرده و آن را به حالت پیش فرض تنظیم کند.
- اختیاری: دستگاه ممکن است یک مورد منو را برای پاک کردن اعتبار و قرار دادن آن در حالت پیش فرض فراهم کند.
- دستگاه هایی که از اعلان های XMPP پشتیبانی می کنند باید شامل توانایی پینگ سرور باشند. زمان پینگ باید از طریق "local_settings" از سرور قابل کنترل باشد.
- دستگاه ممکن است به صراحت سرور (/cloudprint/printer api برای GCP ، علاوه بر پلینگ XMPP) را بیشتر از یک بار در روز (24 ساعت) پینگ کند تا اطمینان حاصل شود که آنها در همگام سازی هستند. توصیه می شود پنجره چک را در پنجره 24-32 ساعت تصادفی کنید.
- اختیاری: برای دستگاه های چاپ ابر ، توصیه می شود اما نیازی به داشتن یک روش دستی (دکمه) نیست تا به کاربر اجازه دهد چک برای کارهای جدید چاپ از دستگاه را آغاز کند. برخی از چاپگرها قبلاً این را دارند.
- اختیاری. چاپگرهای سازمانی ممکن است گزینه ای برای غیرفعال کردن کشف محلی به طور کامل داشته باشند. در چنین حالتی ، دستگاه باید این تنظیمات محلی را در سرور به روز کند. تنظیمات محلی جدید باید خالی باشد (تنظیم "local_discovery" به "false" ، به این معنی است که می توان آن را از سرویس GCP دوباره فعال کرد).
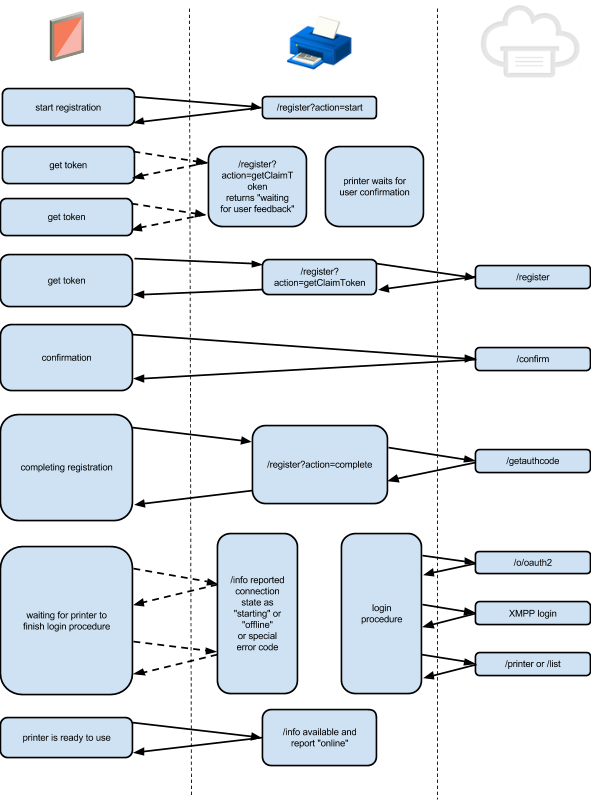
6.1.2 نمودار ثبت نام پیش فرض
6.2. حملات و پیشگیری XSSI و XSRF
در این بخش احتمال حملات XSSI و XSRF به دستگاه و نحوه محافظت از آنها (از جمله تکنیک های تولید توکن) توضیح داده خواهد شد.جزئیات بیشتر در اینجا آمده است: http://googleonlinesecurance.blogspot.com/2011/05/website-securance-for-webmaster.html
به طور معمول ، حملات XSSI و XSRF در هنگام استفاده از مکانیسم های احراز هویت کوکی امکان پذیر است. در حالی که Google از کوکی ها با سرویس چاپ ابر خود استفاده نمی کند ، چنین حملاتی هنوز امکان پذیر است. دسترسی به شبکه محلی ، با طراحی ، به طور ضمنی به درخواست ها اعتماد می کند.
6.2.1. xssi
این امکان وجود دارد که یک وب سایت مخرب بتواند آدرس IP و شماره پورت یک دستگاه سازگار با Privet را حدس بزند و سعی کند با استفاده از "SRC = <Name> API>" در داخل یک برچسب <script> تماس بگیرد:<script type="text/javascript" src="http://192.168.1.42:8080/privet/info"></script>
برای جلوگیری از این نوع حمله ، تمام تماس های API Privet باید به عنوان "X-Privet-Token" در درخواست نیاز داشته باشد. برچسب های اسکریپت "SRC = <Api>" قادر به اضافه کردن هدر نیستند ، و به طور موثری در برابر این نوع حمله محافظت می کنند.
6.2.2. xsrf
http://en.wikipedia.org/wiki/Cross-site_request_forgeryاین امکان وجود دارد که یک وب سایت مخرب بتواند آدرس IP و شماره پورت یک دستگاه سازگار با Privet را حدس بزند و سعی کنید با استفاده از یک <frame> ، فرم ها یا برخی دیگر از مکانیسم های بارگیری متقاطع ، API Privet را فراخوانی کنید. مهاجمان قادر به دسترسی به نتایج درخواست نخواهند بود ، اما اگر درخواست عملی را انجام دهد (به عنوان مثال چاپ) ، می توانند آن را تحریک کنند.
برای جلوگیری از این حمله ، ما به محافظت زیر نیاز داریم:
- ترک /privet /info api برای xsrf باز است
- /API Privet/INFO نباید هیچ اقدامی را در دستگاه انجام دهد
- برای دریافت X-Privet-Token از API /Privet /INFO استفاده کنید
- تمام API های دیگر باید یک X-Prevet-Token معتبر را در عنوان "X-Privet-Token" بررسی کنند.
- X-Privet-Token باید فقط 24 ساعت معتبر باشد.
حتی اگر یک مهاجم قادر به اجرای API /privet /info باشد ، آنها قادر به خواندن X-Privet-Token از پاسخ نیستند و بنابراین قادر به تماس با API دیگر نیستند.
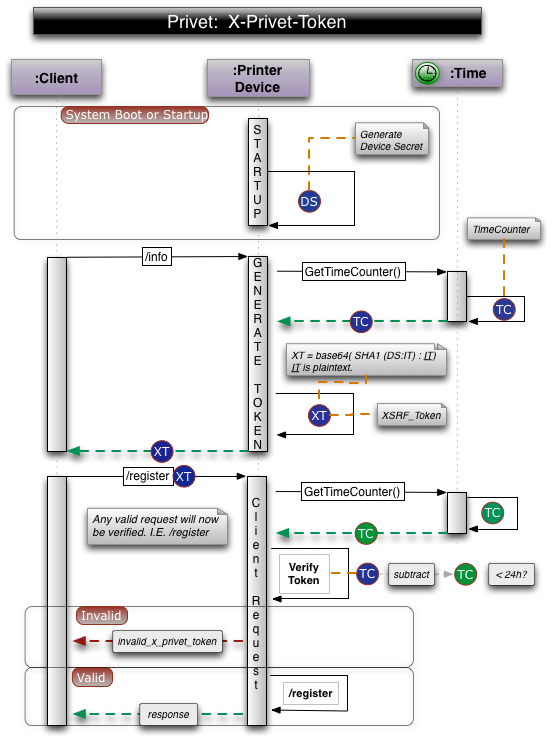
به شدت توصیه می شود که با استفاده از الگوریتم زیر نشانه XSRF را تولید کنید:
XSRF_token = base64( SHA1(device_secret + DELIMITER + issue_timecounter) + DELIMITER + issue_timecounter )
عناصر نسل XSRF:
- تعیین کننده یک شخصیت خاص است ، معمولاً: '
- Issue_Timecounter چند ثانیه از زمان برخی از رویداد (دوره برای Timestamp) یا زمان بوت دستگاه (برای پیشخوان های CPU) است. ISSUSE_TIMECONTONCE هنگام خاموش شدن دستگاه به طور مداوم در حال افزایش است (به تأیید توکن در زیر مراجعه کنید).
- عملکرد SHA1 - هش با استفاده از الگوریتم SHA1
- Base64 - رمزگذاری Base64
- FEECTION_SECRET - راز مخصوص دستگاه. راز دستگاه باید در هر راه اندازی مجدد به روز شود.
روشهای توصیه شده برای تولید مخفی دستگاه:
- در هر راه اندازی مجدد یک UUID جدید ایجاد کنید
- تعداد تصادفی 64 بیتی در هر راه اندازی مجدد ایجاد کنید
این دستگاه برای ذخیره تمام نشانه های XSRF که صادر کرده است لازم نیست. هنگامی که دستگاه نیاز به تأیید یک توکن XSRF برای اعتبار دارد ، باید پایه 64 را رمزگذاری کند. از نیمه دوم (ClearText) شماره_ timeCounter را دریافت کنید ، و سعی کنید هش sha1 از device_secret + Delimiter + Issue_Timecounter را از آن استفاده کنید. اگر SHA1 تازه تولید شده با یکی از نشانه ها مطابقت داشته باشد ، دستگاه اکنون باید بررسی کند که آیا شماره_ timecount در دوره اعتبار از (24 ساعت) از پیشخوان زمان فعلی است یا خیر. برای انجام این کار ، دستگاه پیشخوان زمان فعلی (به عنوان مثال پیشخوان CPU) را می گیرد و Issue_timecounter را از آن جدا می کند. نتیجه باید تعداد ثانیه از زمان مسئله توکن باشد.
نکته مهم: این روش توصیه شده برای اجرای حفاظت از XSRF است. مشتری های مشخصات Privet سعی نمی کنند نشانه XSRF را درک کنند ، در عوض آنها باید به عنوان یک جعبه سیاه رفتار کنند. شکل 6.2.3 یک روش توصیه شده برای اجرای X-Privet-Token و تأیید یک درخواست معمولی را نشان می دهد.
6.2.3 نمودار توکن و تأیید توکن X-Privet
6.3. نمودارهای گردش کار
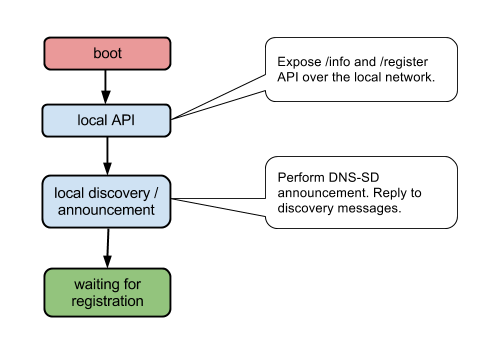
در این بخش یک گردش کار در موارد مختلف نشان داده شده است.6.3.1. چاپگر خارج از گردش کار
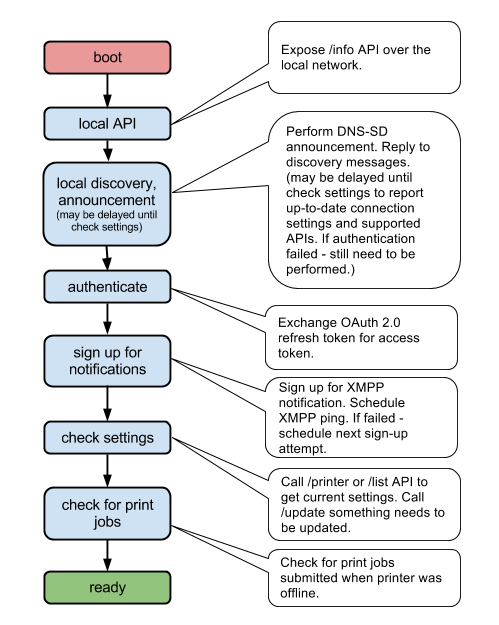
6.3.2. راه اندازی چاپگر ثبت شده
6.3.3 اعلان های XMPP گردش کار
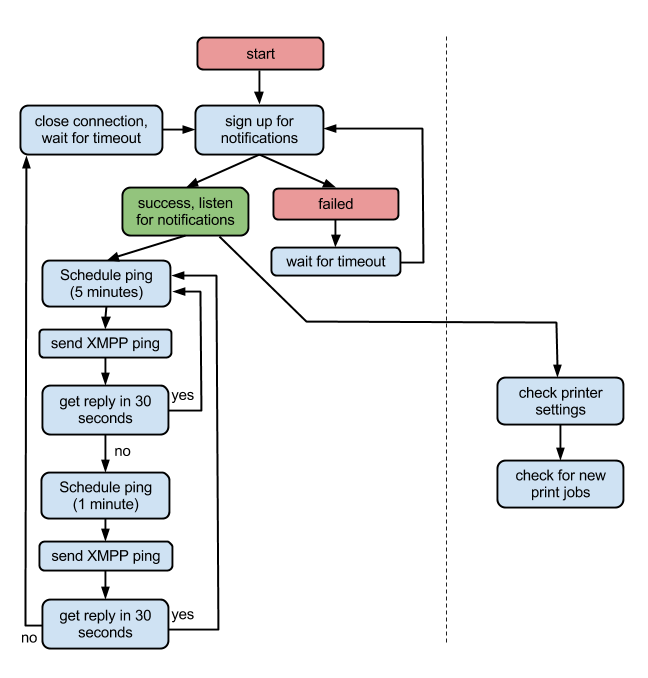
6.3.4. تنظیمات چاپگر را بررسی کنید