
Bu sayfada, metin ve kart mesajlar arasındaki farklar açıklanmaktadır.
Chat uygulamaları temel bilgileri aktarmak için kısa mesajlar gönderdiğinde mesajlar, Google Chat'teki kullanıcıların mesaj yazma şekli gibi satır içi olarak gösterilir. Chat uygulamaları, metinden daha fazlasını içeren mesajlar veya kullanıcıların etkileşimde bulunabileceği mesajlar oluşturmak için kartları kullanabilir. Sohbet uygulamaları, kart içeren kısa mesajlar da ekleyebilir. Kullanıcılardan, form doldurma gibi çok adımlı işlemleri tamamlamalarını istemek için Chat uygulamaları, yeni bir pencerede iletişim kutusu olarak açılan kartlar da oluşturabilir.
Kısa mesajın anatomisi
Google Chat API'de mesajlar JSON nesneleri olarak gösterilir. Bir mesajın içinde, kısa mesaj text nesnesi olarak temsil edilir.
Aşağıdaki örnekte Chat uygulaması, yazılım geliştiricilerden oluşan bir ekibe, alanda kod dondurmanın yaklaştığını bildiren bir kısa mesaj oluşturuyor:
{
  "text": "Attention <users/all>: Code freeze starts at `11:59 am` Pacific Standard Time! If you need a little more time, type `/moreTime` and I'll push the code freeze back one hour."
}
JSON aşağıdaki mesajı döndürür:

Kart mesajının anatomisi
Google Chat API'de mesajlar JSON nesneleri olarak gösterilir. Mesaj içinde kart, cardsV2 dizisi olarak temsil edilir ve aşağıdakilerden oluşur:
- Bir veya daha fazla
CardWithIdnesne. - Kartı tanımlamak için kullanılan ve belirli bir mesaj kapsamında yer alan
cardId. (Farklı mesajlardaki kartlar aynı kimliğe sahip olabilir.) Aşağıdakilerden oluşan bir
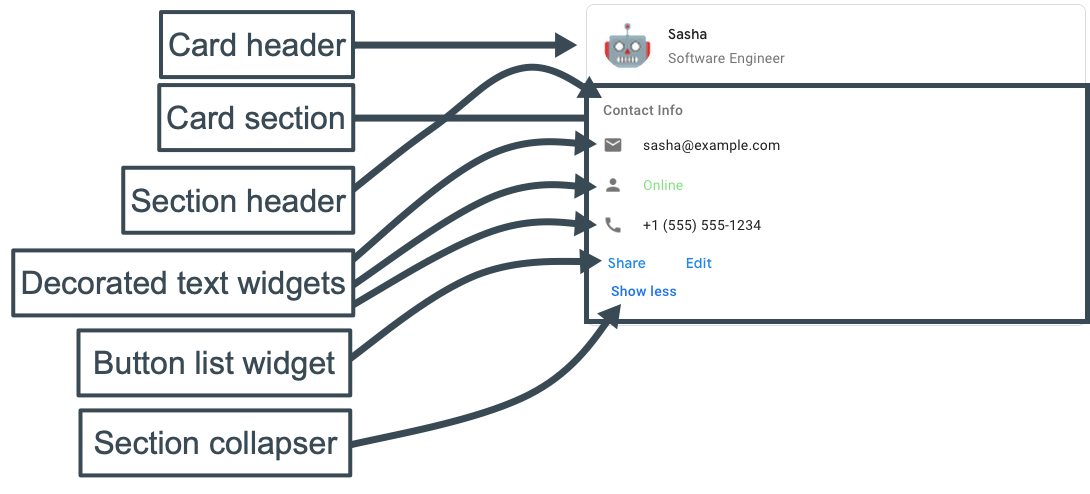
cardnesnesi:- Başlık, alt başlık ve avatar tarzı resim gibi öğeleri belirten bir
headernesnesi. - Her biri en az bir widget içeren bir veya daha fazla
sectionnesne. - Bir veya daha fazla
widgetnesne. Her widget; metin, resim, düğme ve diğer nesne türlerini temsil edebilen bileşik bir nesnedir.
- Başlık, alt başlık ve avatar tarzı resim gibi öğeleri belirten bir
Örneğin, aşağıdaki kart mesajı header, section ve widget nesnelerini içerir:
Aşağıdaki kod, kart mesajının JSON'unu temsil eder:
JSON
{
  "cardsV2": [
    {
      "cardId": "unique-card-id",
      "card": {
        "header": {
          "title": "Sasha",
          "subtitle": "Software Engineer",
          "imageUrl": "https://developers.google.com/chat/images/quickstart-app-avatar.png",
          "imageType": "CIRCLE",
          "imageAltText": "Avatar for Sasha"
        },
        "sections": [
          {
            "header": "Contact Info",
            "collapsible": true,
            "uncollapsibleWidgetsCount": 1,
            "widgets": [
              {
                "decoratedText": {
                  "startIcon": {
                    "knownIcon": "EMAIL"
                  },
                  "text": "sasha@example.com"
                }
              },
              {
                "decoratedText": {
                  "startIcon": {
                    "knownIcon": "PERSON"
                  },
                  "text": "<font color=\"#80e27e\">Online</font>"
                }
              },
              {
                "decoratedText": {
                  "startIcon": {
                    "knownIcon": "PHONE"
                  },
                  "text": "+1 (555) 555-1234"
                }
              },
              {
                "buttonList": {
                  "buttons": [
                    {
                      "text": "Share",
                      "onClick": {
                        "openLink": {
                          "url": "https://example.com/share"
                        }
                      }
                    },
                    {
                      "text": "Edit",
                      "onClick": {
                        "action": {
                          "function": "goToView",
                          "parameters": [
                            {
                              "key": "viewType",
                              "value": "EDIT"
                            }
                          ]
                        }
                      }
                    }
                  ]
                }
              }
            ]
          }
        ]
      }
    }
  ]
}
Kart Oluşturucu ile kartları tasarlayın ve önizleyin.
Card Builder'ı açın