This section introduces AdvancedExampleServlet2. AdvancedExampleServlet2 is
an example data source implementation that defines capabilities and the
flow of events. This section also provides step-by-step instructions on
how to run and test AdvancedExampleServlet2.
Note: You must complete the Getting Started section before you begin this section.
Introducing AdvancedExampleServlet2
The AdvancedExampleServlet2 class is located in the examples package.
This class provides an example implementation that defines capabilities
and flow of events.
The most important parts of AdvancedExampleServlet2 are
described in the following sections:
Defining the flow of events
AdvancedExampleServlet2 defines the flow of events
by overriding the HttpServlet.doGet() method
and calling various helper functions provided by DataSourceHelper.
The following snippet overrides doGet(). The HttpServletRequest parameter
encapsulates the request made by a visualization to the servlet. The HttpServletResponse parameter
encapsulates the response from the servlet to the querying visualization.
This snippet also sets dsRequest to null. dsRequest is
used at various points throughout the rest of the code.
  @Override
  protected void doGet(HttpServletRequest req, HttpServletResponse resp) throws IOException {
    DataSourceRequest dsRequest = null;
The following snippet extracts the request
parameters from HttpServletRequest
to create the context in which the request runs.
    try {
      // Extract the request parameters.
      dsRequest = new DataSourceRequest(req);
The following snippet takes the query from
the dsRequest object and splits
it into two separate queries. One query is called the data source
query, the other the completion query. Because the data source's
declared capability is SELECT, the data source query consists
of a SELECT operation if the dsRequest object
includes a SELECT operation.
The completion query
consists of all other operations required by the request, which might also
include a SELECT operation. For example, if the query requested
is SELECT a ORDER
BY b,
then the data source query will be SELECT a, b and the completion
query will be the same as the original query SELECT a ORDER BY b.
      // Split the query.
      QueryPair query = DataSourceHelper.splitQuery(dsRequest.getQuery(), Capabilities.SELECT);
The following snippet takes the data
source query created by the previous snippet and the HttpServletRequest, and
creates a data table. See the Using
capabilities section
for more details.
      // Generate the data table.
      DataTable data = generateMyDataTable(query.getDataSourceQuery(), req);
The following code takes the completion query produced when the query was split, the datatable produced by the previous snippet, and the user locale from the querying visualization. The code then creates a new data table.
      // Apply the completion query to the data table.
      DataTable newData = DataSourceHelper.applyQuery(query.getCompletionQuery(), data,
          dsRequest.getUserLocale());
The following code takes the data
table produced by the previous snippet, and the
request parameters from HttpServletRequest. The code
then sets the servlet response. The servlet container returns this response
to the querying visualization.
DataSourceHelper.setServletResponse(newData, dsRequest, resp);
Handling errors
The following snippet catches an exception,
gets the appropriate message, formats the response, and sets the servlet
response. If dsRequest is
null, the
DataSourceRequest is not available, possibly due to failure
of the constructor. In this case, the HttpRequest is
used instead of the DataSourceRequest.
    catch (RuntimeException rte) {
      log.error("A runtime exception has occured", rte);
      ResponseStatus status = new ResponseStatus(StatusType.ERROR, ReasonType.INTERNAL_ERROR,
          rte.getMessage());
      if (dsRequest == null) {
        dsRequest = DataSourceRequest.getDefaultDataSourceRequest(req);
      }
      DataSourceHelper.setServletErrorResponse(status, dsRequest, resp);
    } catch (DataSourceException e) {
      if (dsRequest != null) {
        DataSourceHelper.setServletErrorResponse(e, dsRequest, resp);
      } else {
        DataSourceHelper.setServletErrorResponse(e, req, resp);
      }
    }
Using URL parameters
The following snippet takes the data
source query that was created when the query was split and the HttpServletRequest.
The HttpServletRequest can optionally include a tableId parameter
specified as a URL. This tableId parameter
determines which data table is returned as follows:
- If the
tableIdparameter is omitted, or is anything other thanplanets, the data source returns the animals data table. - If the
tableIdparameter is specified asplanets, the data source returns the planets data table.
When you write your own code to return a data table, you decide which parameters to take.
  private DataTable generateMyDataTable(Query query, HttpServletRequest req)
      throws TypeMismatchException {
    String tableID = req.getParameter("tableId");
    if ((tableID != null) && (tableID.equalsIgnoreCase("planets"))) {
      return generatePlanetsTable(query);
    }
    return generateAnimalsTable(query);
  }
Using capabilities
The following snippet takes the query and generates the animals
data table.
private DataTable generateAnimalsTable(Query query) throws TypeMismatchException {
  DataTable data = new DataTable();
  List requiredColumns = getRequiredColumns(query,
      ANIMAL_TABLE_COLUMNS);
  data.addColumns(requiredColumns);

  // Populate the data table
  for (String key : animalLinksByName.keySet()) {
    TableRow row = new TableRow();
    for (ColumnDescription selectionColumn : requiredColumns) {
      String columnName = selectionColumn.getId();
      if (columnName.equals(ANIMAL_COLUMN)) {
        row.addCell(key);
      } else if (columnName.equals(ARTICLE_COLUMN)) {
        row.addCell(animalLinksByName.get(key));
      }
    }
    data.addRow(row);
  }
  return data;
}
The following snippet takes the query and generates the planets
data table.
private DataTable generatePlanetsTable(Query query) throws TypeMismatchException {
  DataTable data = new DataTable();
  List requiredColumns = getRequiredColumns(
      query, planetTableColumns);
  data.addColumns(requiredColumns);

  // Populate data table
  for (Planet planet : Planet.values()) {
    TableRow row = new TableRow();
    for (ColumnDescription selectionColumn : requiredColumns) {
      String columnName = selectionColumn.getId();
      if (columnName.equals(PLANET_COLUMN)) {
        row.addCell(planet.name());
      } else if (columnName.equals(MASS_COLUMN)) {
        row.addCell(planet.getMass());
      } else if (columnName.equals(GRAVITY_COLUMN)) {
        row.addCell(planet.getSurfaceGravity());
      } else if (columnName.equals(MOONS_COLUMN)) {
        row.addCell(planet.getNumberOfMoons());
      }
    }
    data.addRow(row);
  }
  return data;
}
Running and Testing AdvancedExampleServlet2
This section provides instructions on how to run and test AdvancedExampleServlet2.
To run and test AdvancedExampleServlet2, update
your web application, and set up a visualization that queries the data
source, as described in the following sections:
Updating a Web Application on Apache Tomcat
Follow or adapt the instructions below to update your web application on Apache Tomcat. These instructions are specific to Apache Tomcat on a Windows system:
- The
web.xmlfile you previously copied to theWEB-INFdirectory already contains the definition and mapping required for this example. The lines that define this are:
<servlet>
  <servlet-name>AdvancedExampleServlet2</servlet-name>
  <description>
  AdvancedExampleServlet2
  </description>
  <servlet-class>AdvancedExampleServlet2</servlet-class>
</servlet>

<servlet-mapping>
  <servlet-name>AdvancedExampleServlet2</servlet-name>
  <url-pattern>/advanced</url-pattern>
</servlet-mapping>
- Start Tomcat, or restart Tomcat if it is already running.
- Click the following link:http://localhost:8080/myWebApp/advanced
The screen displays 6-7 lines of text, depending on your screen width. The text begins withgoogle.visualization.Query.setResponseand ends with{v:'http://en.wikipedia.org/wiki/Tiger'}]}]}});
This is the response that the example CSV data source sends to a visualization.
Using a Visualization to View the Data
The all_examples.html file in the <data_source_library_install>/examples/src/html directory
can be used to view a visualization of the data.
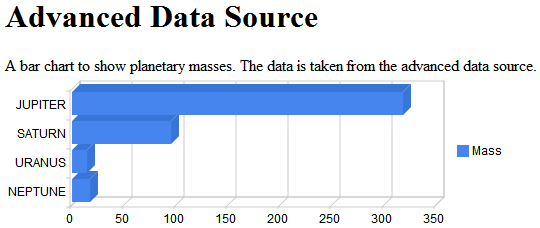
The following snippet from all_examples specifies
the advanced servlet, the planets table, a select query, and
a bar chart visualization.
query = new google.visualization.Query('advanced?tableId=planets&tq=select planet,mass');
...
var chart = new google.visualization.BarChart(document.getElementById('advanced_div'));
For an explanation of the other visualizations included in all_examples.html,
see the Using an External Data Store section.
For more information on how to specify a visualization and use the query language, see Using Charts and the Query Language Reference.
Follow, or adapt, the instructions below to view a visualization of the data provided by the advanced data source:
- If you haven't already done so, copy the
all_examples.htmlfile from the<data_source_library_install>/examples/src/htmldirectory
to the<tomcat_home>/webapps/myWebApp/directory.
- Click the following link: http://localhost:8080/myWebApp/all_examples.html in
a browser. You should see the following:
Next Steps
To further explore the examples provided with the library, see Examples Quick Reference. To learn more about implementing a complex data source, see Implementation Tips.