작업이 사용자에게 매일 가치를 제공한다면 일일 업데이트를 구성하여 사용자에게 작업 알림을 제공하세요. 사용자가 작업의 일일 업데이트를 구독하면 푸시 알림을 받게 되며, 탭하여 작업의 인텐트 중 하나를 호출할 수 있습니다.
이 업데이트에 대한 사용자 환경은 다음과 같습니다.
- 사용자가 일일 업데이트로 구성한 작업의 인텐트 중 하나를 호출합니다.
- 사용자는 메시지에 따라 일일 업데이트를 구독합니다. 이 프롬프트는 대화 중에 표시되거나 대화가 끝날 때 추천 칩으로 제공됩니다.
- 사용자는 일일 업데이트를 받을 시간을 예약하고 Google 어시스턴트에 업데이트를 등록합니다.
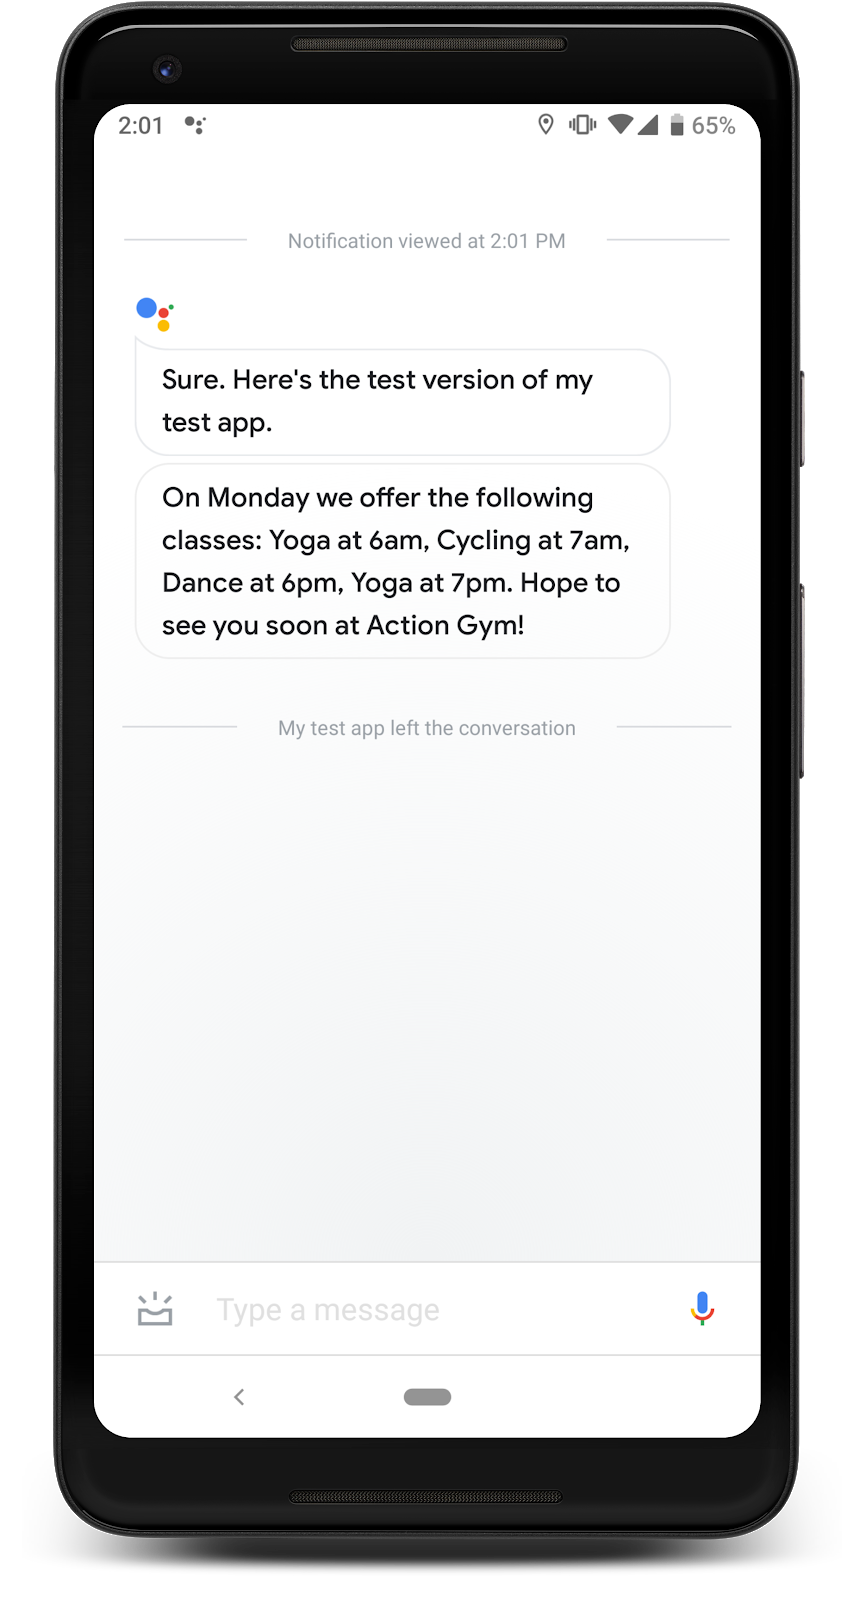
- 매일 예약된 시간에 사용자의 휴대기기로 어시스턴트 알림이 수신됩니다.
- 사용자가 이 알림을 열면 일일 업데이트로 구성한 인텐트를 호출하고 작업과 상호작용합니다.
기본적으로 일일 업데이트 등록 메시지는 사용자가 작업을 성공적으로 종료할 때 추천 칩으로 표시됩니다. 대화 중 등록 메시지를 추가하거나 사용자의 업데이트를 맞춤설정할 수도 있습니다.
사용 사례
일일 업데이트는 유용한 참여 도구가 될 수 있지만 모든 작업에 통합해서는 안 됩니다. 일일 업데이트 구독을 작업에 추가할지 결정할 때 다음 팁을 고려하세요.
- 일일 업데이트를 통해 사용자에게 매일 다양하고 유용한 정보가 표시되는지 확인합니다. 일일 업데이트를 탭할 때마다 같은 메시지가 표시된다면 사용자는 며칠 후에 구독을 취소할 것입니다.
- 사용자가 일일 업데이트의 인텐트로 바로 이동하는 경우 대화상자가 사용자에게 의미가 있는지 확인하세요. 사용자는 반드시 대화의 처음부터 시작하지 않을 수 있으므로 많은 맥락이 있다고 기대해서는 안 됩니다.
- 사용자에게 일일 업데이트에 등록하라는 메시지를 표시하기 전에 작업의 이점을 사용자에게 표시하세요. 사용자에게 구독 옵션이 주어졌을 때 '매일 이 콘텐츠를 보고 싶어요'라고 생각해야 합니다.
- 등록과 관련하여 반복적으로 제안하여 사용자가 부담을 느끼지 마세요. 사용자에게 정기 결제 항목을 표시한 직후에 일일 업데이트 정기 결제를 제공하고 다른 맥락에서 혜택을 반복하지 마세요.
- 업데이트 인텐트가 트리거된 후에는 대화를 짧게 유지합니다. 대부분의 일일 업데이트는 단일 응답으로만 구성되며 사용자 입력 없이 닫아야 합니다.
일일 업데이트 설정
Dialogflow에서 탐색
계속을 클릭하여 Dialogflow에서 일일 업데이트 샘플을 가져옵니다. 그런 다음 아래 단계에 따라 샘플을 배포하고 테스트합니다.
- 에이전트 이름을 입력하고 샘플의 새 Dialogflow 에이전트를 만듭니다.
- 에이전트 가져오기가 완료되면 Go to agent(에이전트로 이동)를 클릭합니다.
- 기본 탐색 메뉴에서 Fulfillment로 이동합니다.
- 인라인 편집기를 사용 설정한 다음 배포를 클릭합니다. 편집기에 샘플 코드가 포함되어 있습니다.
- 기본 탐색 메뉴에서 통합으로 이동한 다음 Google 어시스턴트를 클릭합니다.
- 표시되는 모달 창에서 Auto-preview changes를 사용 설정하고 Test를 클릭하여 작업 시뮬레이터를 엽니다.
- 시뮬레이터에서
Talk to my test app를 입력하여 샘플을 테스트합니다.
일일 업데이트를 위해 작업의 인텐트 중 하나를 구성하려면 다음 안내를 따르세요.
1. 업데이트 인텐트 준비
작업의 인텐트 중 하나를 트리거 인텐트로 구성합니다. 이 인텐트를 사용하면 일일 업데이트가 사용자에게 전송될 수 있습니다. 사용자가 일일 업데이트 알림을 열면 인텐트가 트리거되고 그때부터 대화가 계속됩니다.
Dialogflow에서 트리거 인텐트를 정의하려면 다음 단계를 따르세요.
- Dialogflow 콘솔에서 통합을 클릭합니다.
- Google Assistant(Google 어시스턴트) 섹션에서 Integration Settings(통합 설정)를 클릭합니다.
- 검색 > 암시적 호출에서 인텐트 추가를 클릭하고 트리거 인텐트가 없는 경우 선택합니다.
- 변경사항 자동 미리보기가 아직 사용 설정되지 않은 경우 사용 설정합니다.
- 닫기를 클릭합니다.
Actions SDK에서 업데이트 인텐트를 작업 패키지의 트리거 인텐트로 정의합니다.
2. 업데이트 사용 설정
트리거하는 인텐트의 일일 업데이트를 사용 설정하려면 다음을 실행하세요.
- Actions 콘솔에서 개발 > 작업으로 이동합니다.
- 트리거 인텐트를 선택합니다. 인텐트가 목록에 표시되지 않으면 트리거 인텐트로 구성되어 있고 Dialogflow의 어시스턴트 통합이 변경사항 자동 미리보기로 설정되어 있는지 확인하세요.
- 사용자 참여 발생 시간 섹션까지 아래로 스크롤하고 사용자에게 일일 업데이트를 제공하시겠어요?를 사용 설정합니다.
- 콘텐츠 제목을 입력합니다.
- 저장을 클릭합니다.
이제 인텐트에 일일 업데이트 정기 결제를 제공하도록 작업을 구성했습니다. 이제 휴대기기에서 일일 업데이트를 테스트할 수 있습니다.
업데이트 등록 맞춤설정 (선택사항)
추천 칩과 어시스턴트가 처리하는 일일 업데이트 등록 흐름 외에도 자체 대화상자와 등록 프롬프트로 사용자가 일일 업데이트를 구독할 수 있습니다.
선택적인 일일 업데이트 기능을 처리하는 작업의 전체 예는 Actions on Google 사용자 참여 샘플(Node.js 및 자바)을 참고하세요.
대화에 커스텀 일일 업데이트 등록 메시지를 추가하려면 다음 안내를 따르세요.
1. 등록 메시지 추가
사용자에게 일일 업데이트를 구독하라는 메시지를 표시하려면 대화에 대화상자와 추천 칩을 추가합니다. 사용자가 업데이트 인텐트와 상호작용한 후 이러한 메시지를 제공하여 사용자가 일일 업데이트 내용을 이해할 수 있도록 합니다.
다음 예시 코드는 사용자에게 매일 가장 낮은 예상 온도를 제공하는 일일 업데이트를 구독하도록 메시지를 표시합니다.
app.intent('Daily Lowest Temperature', (conv, params) => {
const today = DAYS[new Date().getDay()];
const lowestTemperature = lowestTemperatures[today];
conv.ask(`The lowest temperature for today is ${lowestTemperature}`);
conv.ask('I can send you daily updates with the lowest temperature' +
' of the day. Would you like that?');
conv.ask(new Suggestions('Send daily updates'));
});
@ForIntent("Daily Lowest Temperature")
public ActionResponse dailyLowestTemperature(ActionRequest request) {
ResponseBuilder responseBuilder = getResponseBuilder(request);
Integer lowestTemperature =
LOWEST_TEMPERATURES.get(LocalDate.now().getDayOfWeek());
responseBuilder
.add("The lowest temperature for today is " + lowestTemperature + " degrees Fahrenheit.")
.add("I can send you daily updates with the lowest temperature of " +
"the day. Would you like that?")
.addSuggestions(new String[] {
"Send daily updates"
});
return responseBuilder.build();
}
아래의 JSON은 웹훅 응답을 설명합니다.
{
  "payload": {
    "google": {
      "expectUserResponse": true,
      "richResponse": {
        "items": [
          {
            "simpleResponse": {
              "textToSpeech": "The lowest temperature for today is 75 degrees Fahrenheit"
            }
          },
          {
            "simpleResponse": {
              "textToSpeech": "I can send you daily updates with the lowest temperature of the day. Would you like that?"
            }
          }
        ],
        "suggestions": [
          {
            "title": "Send daily updates"
          }
        ]
      }
    }
  }
}
아래의 JSON은 웹훅 응답을 설명합니다.
{
  "expectUserResponse": true,
  "expectedInputs": [
    {
      "possibleIntents": [
        {
          "intent": "actions.intent.TEXT"
        }
      ],
      "inputPrompt": {
        "richInitialPrompt": {
          "items": [
            {
              "simpleResponse": {
                "textToSpeech": "The lowest temperature for today is 75 degrees Fahrenheit"
              }
            },
            {
              "simpleResponse": {
                "textToSpeech": "I can send you daily updates with the lowest temperature of the day. Would you like that?"
              }
            }
          ],
          "suggestions": [
            {
              "title": "Send daily updates"
            }
          ]
        }
      }
    }
  ]
}
2. 업데이트 등록 처리
사용자가 등록 프롬프트를 따를 때 트리거되는 새 인텐트를 설정합니다. 이 새 인텐트의 처리에서 다음 매개변수를 사용하여 actions_intent_CONFIGURE_UPDATES
내장 인텐트를 트리거합니다.
intent: 구성한 업데이트 인텐트로 설정합니다.frequency: 'DAILY'로 설정합니다.
다음 코드는 '일일 최저 기온' 인텐트의 일일 업데이트를 등록합니다.
app.intent('Subscribe to Daily Updates', (conv) => {
conv.ask(new RegisterUpdate({
intent: 'Daily Lowest Temperature',
frequency: 'DAILY',
}));
});
conv.ask(new RegisterUpdate({
intent: 'Daily Lowest Temperature',
frequency: 'DAILY',
}));
@ForIntent("Subscribe to Daily Updates")
public ActionResponse subscribeToDailyUpdates(ActionRequest request) {
ResponseBuilder responseBuilder = getResponseBuilder(request);
return responseBuilder.add(new RegisterUpdate()
.setIntent("Daily Lowest Temperature")
.setFrequency("DAILY"))
.build();
}
ResponseBuilder responseBuilder = getResponseBuilder(request);
return responseBuilder.add(new RegisterUpdate()
.setIntent("Daily Lowest Temperature")
.setFrequency("DAILY"))
.build();
{
  "payload": {
    "google": {
      "expectUserResponse": true,
      "systemIntent": {
        "intent": "actions.intent.REGISTER_UPDATE",
        "data": {
          "@type": "type.googleapis.com/google.actions.v2.RegisterUpdateValueSpec",
          "intent": "Daily Lowest Temperature",
          "triggerContext": {
            "timeContext": {
              "frequency": "DAILY"
            }
          }
        }
      }
    }
  }
}
{
  "expectUserResponse": true,
  "expectedInputs": [
    {
      "possibleIntents": [
        {
          "intent": "actions.intent.REGISTER_UPDATE",
          "inputValueData": {
            "@type": "type.googleapis.com/google.actions.v2.RegisterUpdateValueSpec",
            "intent": "Daily Lowest Temperature",
            "triggerContext": {
              "timeContext": {
                "frequency": "DAILY"
              }
            }
          }
        }
      ]
    }
  ]
}
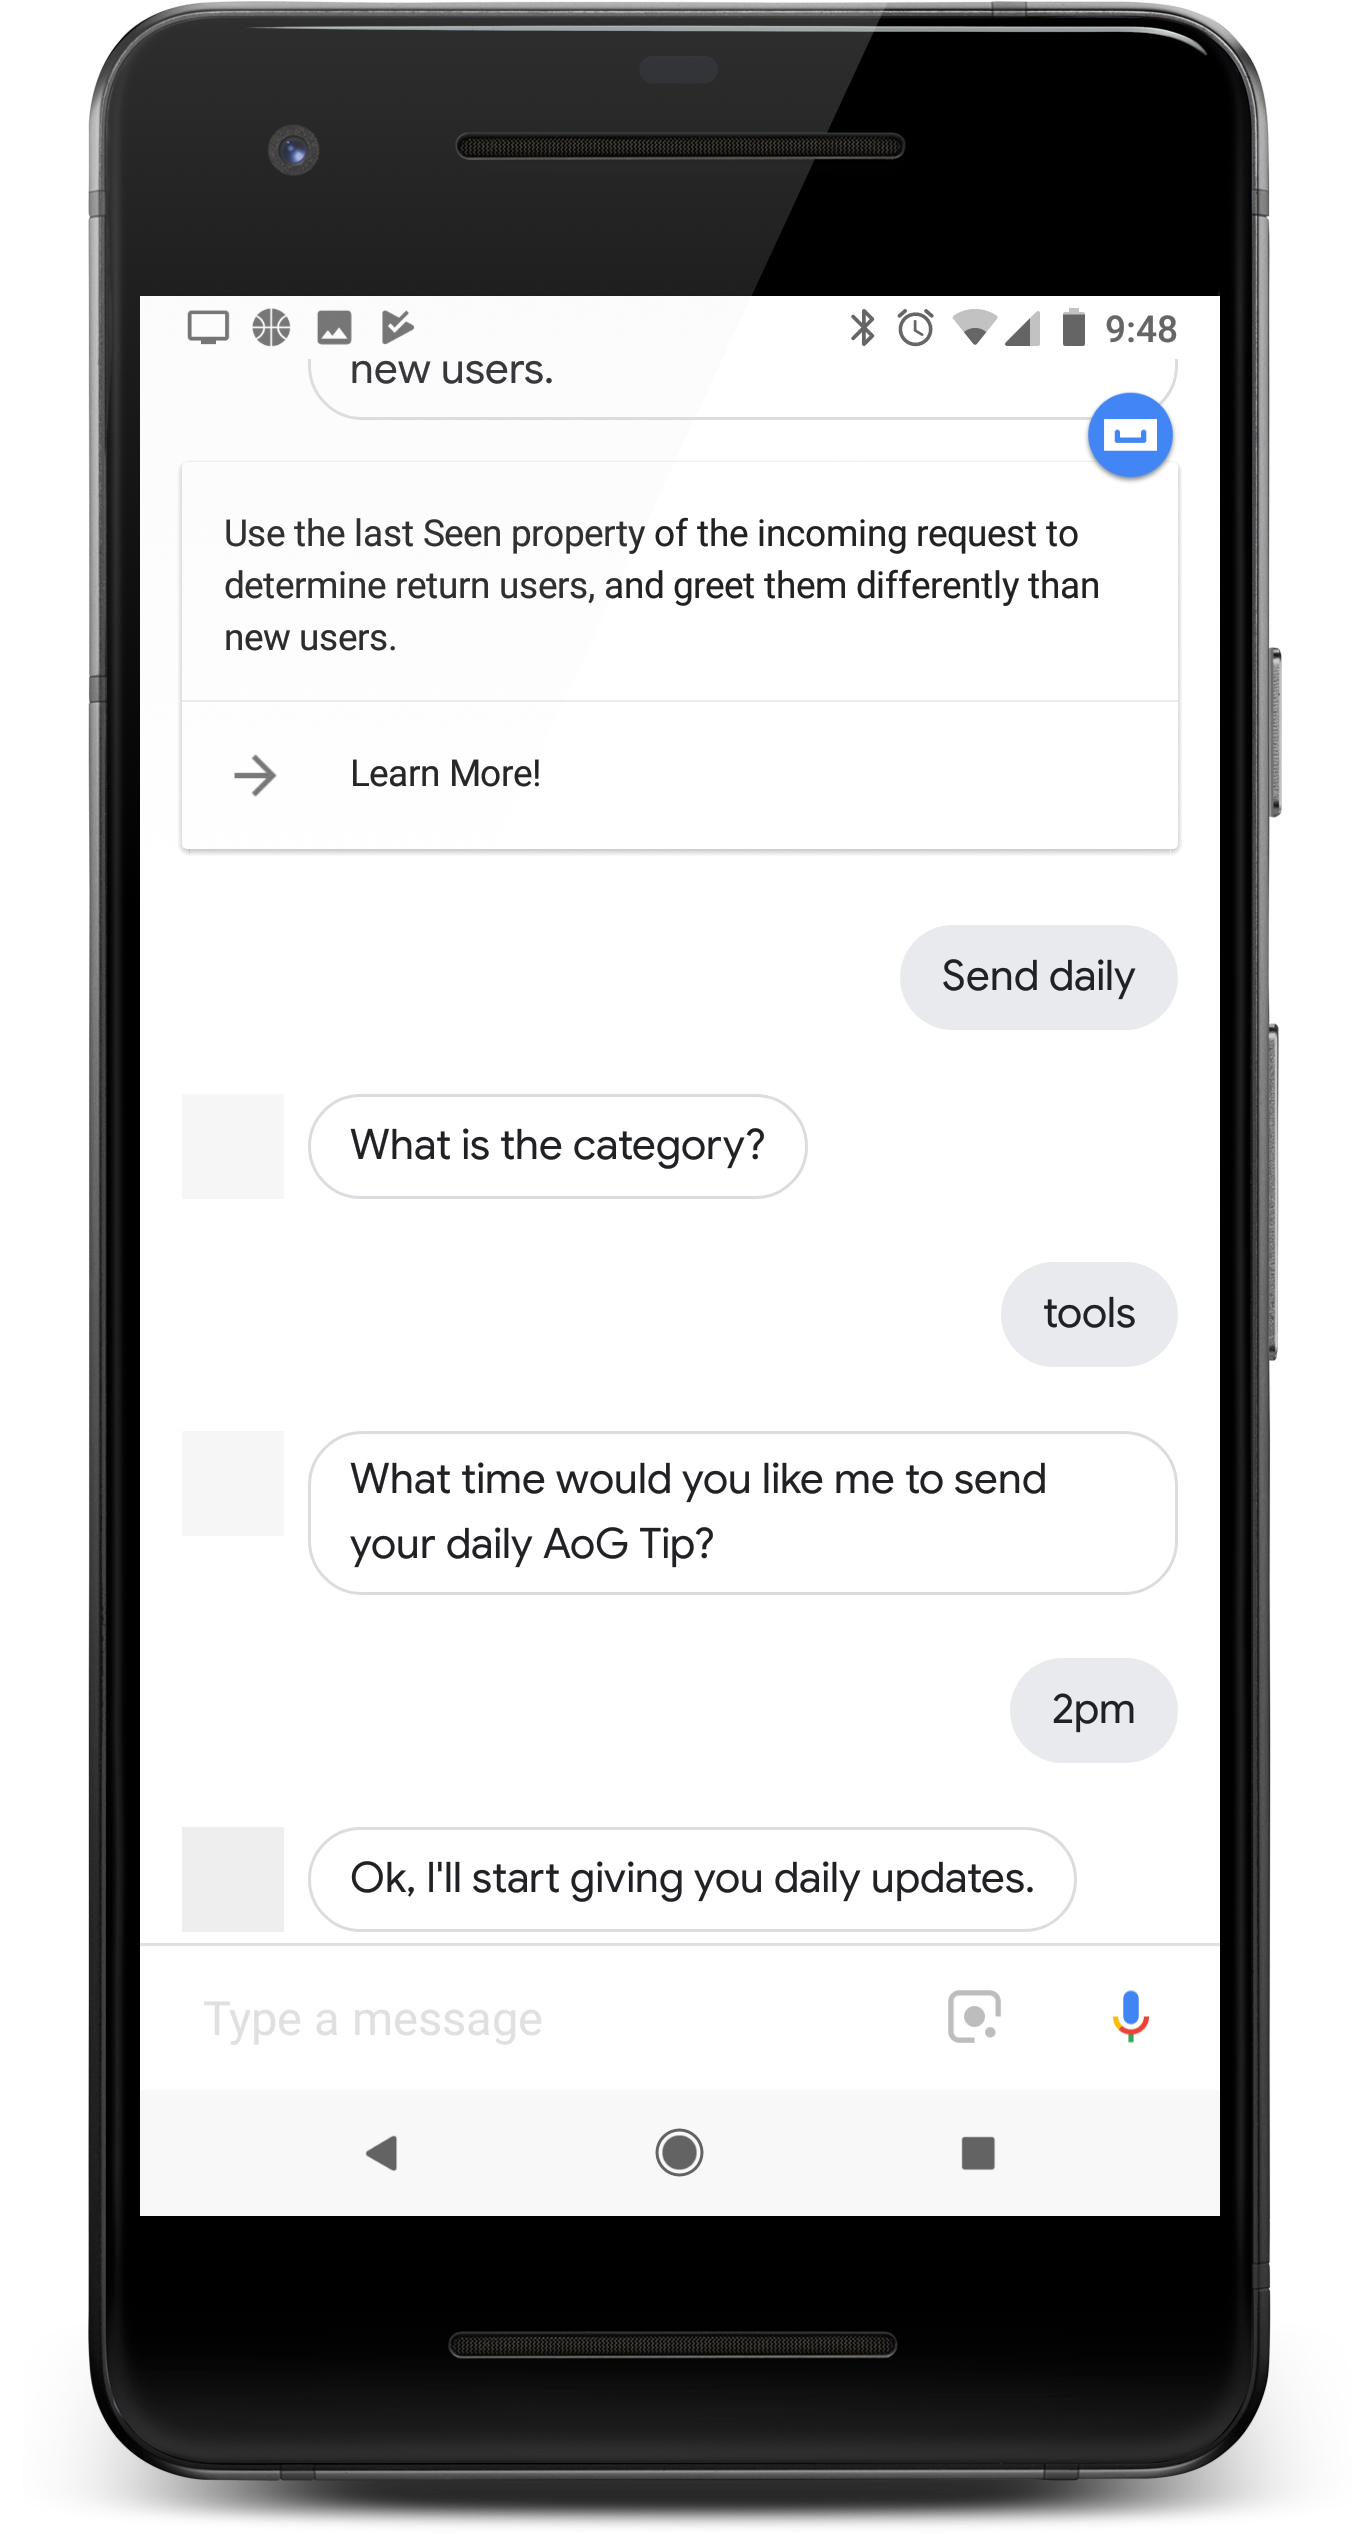
3. 결과 처리
어시스턴트가 대화를 이어받으며 사용자에게 나머지 일일 업데이트 구성을 안내합니다. 등록이 완료되면 어시스턴트는 등록 성공 여부를 나타내는 매개변수를 사용하여 인텐트를 트리거합니다.
이 단계에 대한 안내는 Dialogflow를 사용하는지 아니면 개발용 Actions SDK를 사용하는지에 따라 다릅니다.
등록 결과를 처리하는 인텐트를 만들려면 다음 단계를 따르세요.
- Dialogflow 콘솔에서 새 인텐트를 만듭니다.
actions_intent_REGISTER_UPDATE이벤트를 추가합니다.- 인텐트에 웹훅 처리를 사용 설정합니다.
- 저장을 클릭합니다.
registered 매개변수를 확인하고 그에 따라 대화를 피벗합니다.
app.intent('Confirm Daily Updates Subscription', (conv, params, registered) => {
if (registered && registered.status === 'OK') {
conv.close(`Ok, I'll start giving you daily updates.`);
} else {
conv.close(`Ok, I won't give you daily updates.`);
}
});
@ForIntent("Confirm Daily Updates Subscription")
public ActionResponse confirmDailyUpdatesSubscription(ActionRequest request) {
ResponseBuilder responseBuilder = getResponseBuilder(request);
if (request.isUpdateRegistered()) {
responseBuilder.add("Ok, I'll start giving you daily updates.");
} else {
responseBuilder.add("Ok, I won't give you daily updates.");
}
return responseBuilder.endConversation().build();
}
{
  "payload": {
    "google": {
      "expectUserResponse": false,
      "richResponse": {
        "items": [
          {
            "simpleResponse": {
              "textToSpeech": "Ok, I'll start giving you daily updates."
            }
          }
        ]
      }
    }
  }
}
처리 코드에서 actions.intent.REGISTER.UPDATE 내장 인텐트 처리를 추가합니다. 결과의 registered 매개변수를 확인하고 그에 따라 대화를 피벗합니다.
app.intent('actions.intent.REGISTER_UPDATE', (conv, params, registered) => {
if (registered && registered.status === 'OK') {
conv.close(`Ok, I'll start giving you daily updates.`);
} else {
conv.close(`Ok, I won't give you daily updates.`);
}
});
@ForIntent("actions.intent.REGISTER_UPDATE")
public ActionResponse confirmDailyUpdatesSubscription(ActionRequest request) {
ResponseBuilder responseBuilder = getResponseBuilder(request);
if (request.isUpdateRegistered()) {
responseBuilder.add("Ok, I'll start giving you daily updates.");
} else {
responseBuilder.add("Ok, I won't give you daily updates.");
}
return responseBuilder.endConversation().build();
}
{
  "expectUserResponse": false,
  "finalResponse": {
    "richResponse": {
      "items": [
        {
          "simpleResponse": {
            "textToSpeech": "Ok, I'll start giving you daily updates."
          }
        }
      ]
    }
  }
}
업데이트 맞춤설정 (선택사항)
업데이트 인텐트를 맞춤설정하려면 사용자가 일일 업데이트를 등록할 때 맞춤 매개변수를 추가합니다. 업데이트 인텐트를 처리할 때는 이러한 매개변수를 참조하여 해당 사용자의 일일 업데이트를 맞춤설정합니다.
이 기능에 관한 안내는 Dialogflow를 사용하는지 아니면 개발용 Actions SDK를 사용하는지에 따라 다릅니다.
업데이트용 커스텀 매개변수를 처리하도록 Dialogflow 개체를 정의한 다음 매개변수 값을 업데이트 인텐트의 인수로 전달합니다. Dialogflow에서 맞춤형 업데이트를 설정하려면 다음 단계를 따르세요.
- Dialogflow 콘솔에서 새 항목을 만듭니다.
- 매개변수와 관련된 항목과 동의어를 추가합니다.
- 저장을 클릭한 다음 업데이트 인텐트를 엽니다.
- 작업 및 매개변수 섹션에서
actions.intent.CONFIGURE_UPDATES를 이벤트로 설정합니다. 같은 섹션에서 새 항목과 동일한 유형의 매개변수를 추가합니다. CONFIGURE_UPDATES내장 인텐트를 처리하는 '등록 업데이트' 인텐트를 엽니다.- 작업 및 매개변수 섹션에서 필수 매개변수를 추가하고 유형을 이전에 만든 항목으로 설정합니다.
- 다음 콘텐츠가 있는
arguments객체를 포함하도록 등록 인텐트의 처리 코드를 업데이트합니다.name- Dialogflow에 구성된 매개변수 이름입니다.textValue- 매개변수의 값입니다.
다음 코드는 매개변수 값을 읽고 업데이트 등록 요청에 사용합니다.
app.intent('setup_update', (conv) => {
  conv.ask(new RegisterUpdate({
    intent: 'update_of_the_day',
    arguments: [
      {
        name: 'category',
        textValue: 'Daily_lowest_temperature',
      },
    ],
    frequency: 'DAILY',
  }));
});
@ForIntent("setup_update")
public ActionResponse setupUpdate2(ActionRequest request) {
  List<Argument> args =
      Arrays.asList(
          new Argument()
              .setName("category")
              .setTextValue(request.getParameter("category").toString()));
  return getResponseBuilder(request)
      .add(new RegisterUpdate().setIntent("intent_name").setArguments(args).setFrequency("DAILY"))
      .build();
}
{
  "payload": {
    "google": {
      "expectUserResponse": true,
      "richResponse": {
        "items": [
          {
            "simpleResponse": {
              "textToSpeech": "PLACEHOLDER"
            }
          }
        ]
      },
      "userStorage": "{\"data\":{}}",
      "systemIntent": {
        "intent": "actions.intent.REGISTER_UPDATE",
        "data": {
          "@type": "type.googleapis.com/google.actions.v2.RegisterUpdateValueSpec",
          "intent": "update_of_the_day",
          "arguments": [
            {
              "name": "category",
              "textValue": "Daily_lowest_temperature"
            }
          ],
          "triggerContext": {
            "timeContext": {
              "frequency": "DAILY"
            }
          }
        }
      }
    }
  },
  "outputContexts": [
    {
      "name": "/contexts/_actions_on_google",
      "lifespanCount": 99,
      "parameters": {
        "data": "{}"
      }
    }
  ]
}
인텐트 처리에서 사용자에게 추가 정보를 요청한 다음 그 정보를 업데이트 인텐트의 인수로 전달합니다. Actions SDK에서 맞춤 업데이트를 설정하려면 다음 단계를 따르세요.
- 맞춤설정에 사용할 정보를 묻는 메시지를 사용자에게 표시합니다.
CONFIGURE UPDATES를 처리하는 '업데이트 등록' 인텐트의 처리 코드에는 다음 콘텐츠가 있는arguments객체가 포함됩니다.name- 인수의 이름입니다.textValue- 인수로 전달할 사용자의 정보입니다.
다음 코드는 업데이트 등록 요청과 함께 인수를 전송합니다.
app.intent('actions.intent.TEXT', (conv) => {
  if (conv.input.raw === 'Send daily') {
    conv.ask(new RegisterUpdate({
      intent: 'update_of_the_day',
      arguments: [
        {
          name: 'category',
          textValue: 'Daily_lowest_temperature',
        },
      ],
      frequency: 'DAILY',
    }));
  }
});
@ForIntent("actions.intent.CONFIGURE_UPDATES")
public ActionResponse configureUpdatesActionsSdk(ActionRequest request) {
  List<Argument> args =
      Arrays.asList(
          new Argument()
              .setName("category")
              .setTextValue(request.getParameter("category").toString()));
  return getResponseBuilder(request)
      .add(new RegisterUpdate().setIntent("intent_name").setArguments(args).setFrequency("DAILY"))
      .build();
}

@ForIntent("actions.intent.TEXT")
public ActionResponse text(ActionRequest request) {
  ResponseBuilder rb = getResponseBuilder(request);
  String input = request.getRawInput().getQuery();
  if (input.equals("DAILY_NOTIFICATION_SUGGESTION")) {
    rb.add("For which category do you want to receive daily updates?");
  } else {
    rb.add("Sorry, I didn't get that. Please try again later").endConversation();
  }
  return rb.build();
}
{
  "expectUserResponse": true,
  "expectedInputs": [
    {
      "inputPrompt": {
        "richInitialPrompt": {
          "items": [
            {
              "simpleResponse": {
                "textToSpeech": "PLACEHOLDER"
              }
            }
          ]
        }
      },
      "possibleIntents": [
        {
          "intent": "actions.intent.REGISTER_UPDATE",
          "inputValueData": {
            "@type": "type.googleapis.com/google.actions.v2.RegisterUpdateValueSpec",
            "intent": "update_of_the_day",
            "arguments": [
              {
                "name": "category",
                "textValue": "Daily_lowest_temperature"
              }
            ],
            "triggerContext": {
              "timeContext": {
                "frequency": "DAILY"
              }
            }
          }
        }
      ]
    }
  ],
  "conversationToken": "{\"data\":{}}",
  "userStorage": "{\"data\":{}}"
}
사용자가 일일 업데이트를 호출하면 이제 업데이트 인텐트에 등록 중에 사용자가 제공한 값이 포함된 인수가 포함됩니다. 이러한 값을 사용하여 각 사용자의 업데이트를 맞춤설정합니다.
일일 업데이트 테스트하기
작업을 빌드하는 데 사용한 Google 계정과 동일한 Google 계정으로 Google 어시스턴트가 설치된 휴대기기를 통해 일일 업데이트를 테스트합니다. 작업을 호출하고 일일 업데이트를 구독한 다음 업데이트 시간 무렵에 기기의 알림을 확인합니다.