A conversation model defines what users can say to your Actions and how your Actions respond to users. The main building blocks of your conversation model are intents, types, scenes, and prompts. After one of your Actions is invoked, Google Assistant hands the user off to that Action, and the Action begins a conversation with the user, based on your conversation model, which consists of:
Valid user requests - To define what users can say to your Actions, you create a collection of intents that augment the Assistant NLU, so it can understand requests that are specific to your Actions. Each intent defines training phrases that describe what users can say to match that intent. The Assistant NLU expands these training phrases to include similar phrases, and the aggregation of those phrases results in the intent's language model.
Action logic and responses - Scenes process intents, carry out required logic, and generate prompts to return to the user.

Define valid user requests
To define what users can say to your Actions, you use a combination of intents and types. User intents and types let you augment the Assistant NLU with your own language models. System intents and types let you take advantage of built-in language models and event detection like users wanting to quit your Action or Assistant detecting no input at all.
Create user intents
User intents let you define your own training phrases that define what users might say to your Actions. The Assistant NLU uses these phrases to train itself to understand what your users say. When users say something that matches a user intent's language model, Assistant matches the intent and notifies your Action, so you can carry out logic and respond back to users.

To create a user intent:
- In the Develop tab, click User intents > ⊕ (New intent), specify a name, and press Enter to create the intent.
- Click the newly created intent in the left menu. The Intent editor appears.
- Add training phrases to the intent. You should add as many training phrases as possible to train the Assistant NLU.
- Optional: Annotate training phrases to instruct the Assistant NLU to parse
and extract typed parameters from user input that matches a specified type:
- Enter a name for the parameter in the Add new parameter field.
- Select a system type from the drop down menu or create a custom type.
- Specify if the parameter is a list. This lets the parameter collect multiple values of the same type.
- In the Add training phrases section, highlight the text you want to apply the type to. This tells the Assistant NLU to treat the highlighted text as a parameter. If users say something that matches the type, the NLU extracts that value as a parameter.
Create system intents
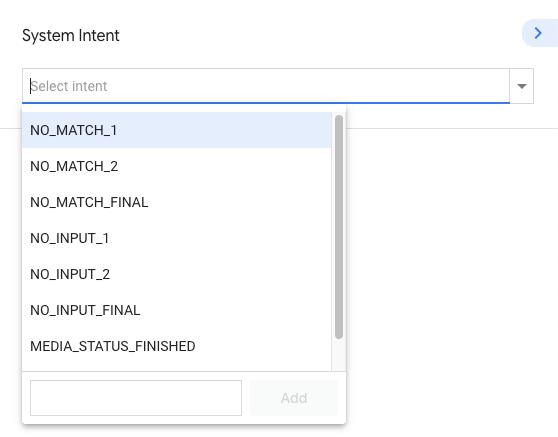
System intents let you take advantage of intents with pre-defined language models for common events like users wanting to quit your Action or when user input times out. To create system intents:
- In the Develop tab, click on System intents. A set of system intents are available, like NO_MATCH, NO_INPUT, and CANCEL.
- Each system intent contain their own handlers, which you can customize for each type of system intent. For example, system intents let you trigger webhook events and send static prompts when the event occurs.
Create custom types
Custom types let you create your own type specification to train the NLU to understand a set of values that should map to a single key.
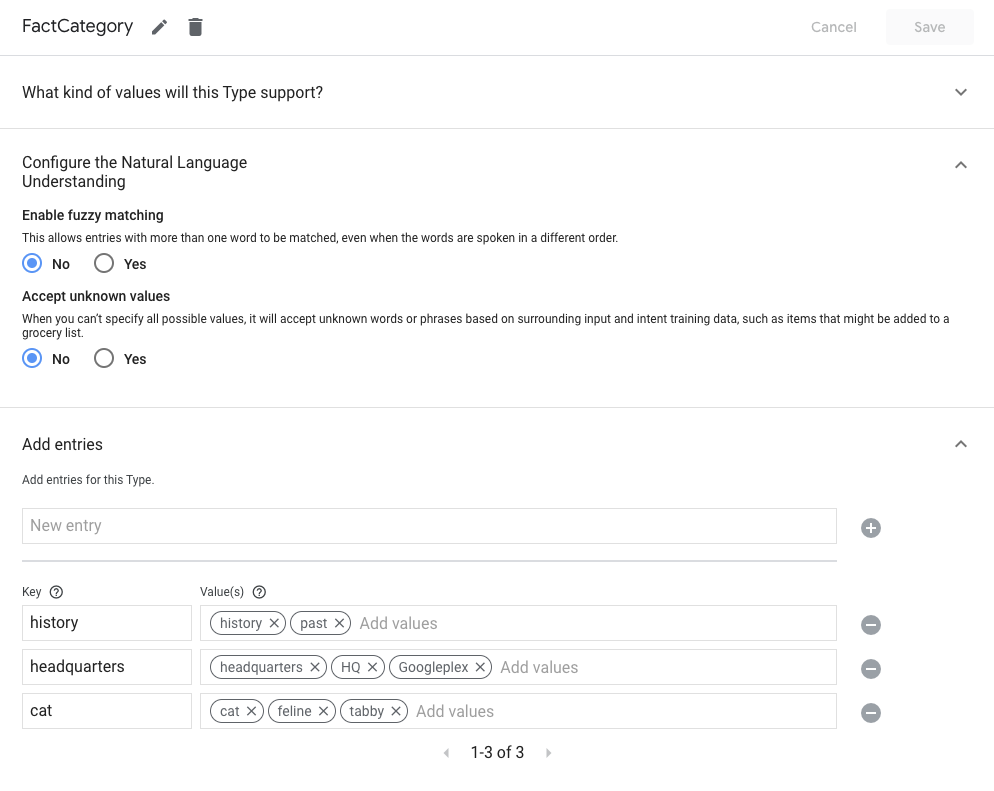
To create a custom type:
- In the Develop tab, click on Types > ⊕ (New type).
Select how to provide type values in the What kind of values with this type support? section:
- Words and synonyms allow you to map multiple values to a single key,
which are called an entry. Your type can contain one or many entries. If you
choose this option, you can also enable the following NLU settings:
- Enable fuzzy matching - This allows entries with more than one word to be matched, even when the words are spoken in a different order.
- Accept unknown values - When you can't specify all possible values, it will accept unknown words or phrases based on surrounding input and intent training data, such as items that might be added to a grocery list.
- Regular expressions allows the type to match on regular expression patterns based on Google's RE2 standard.
- Free form text allows the type to match anything a user says.
- Words and synonyms allow you to map multiple values to a single key,
which are called an entry. Your type can contain one or many entries. If you
choose this option, you can also enable the following NLU settings:
Specify type values in the Add entries section. If you chose Free form text, your type matches any text, so you don't have to provide any entries.
Build Action logic and responses
The Assistant NLU matches user requests to intents, so that your Action can process them in scenes. Scenes are powerful logic executors that let you process events during a conversation.
Create a scene
The following sections describe how to create scenes and define functionality for each scene's lifecycle stage.
To create a scene:
- In the Develop tab, click on Scenes > ⊕ (New scene), specify a name, and press Enter to create a scene.
- Click on the newly created scene in the left menu. The Scene editor appears.
Define one-time setup
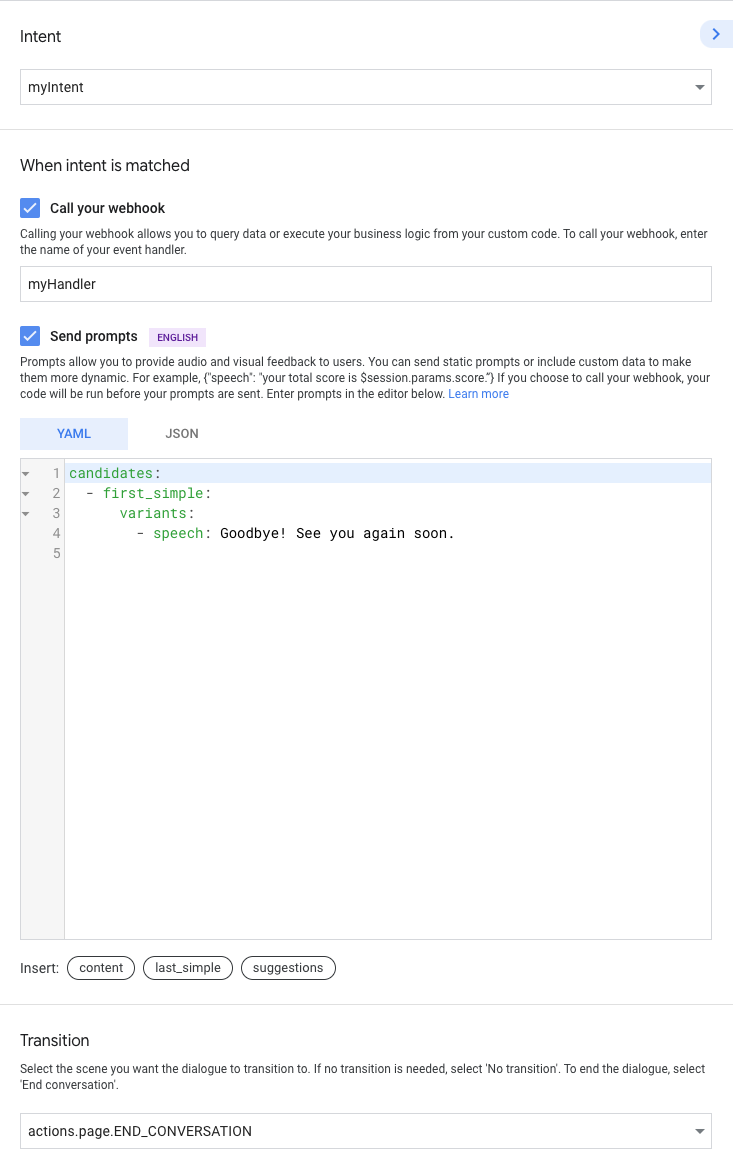
When a scene first becomes active, you can carry out one time tasks in the On enter stage. The On enter stage executes only once, and is the only stage that doesn't run inside a scene's execution loop.
Within a scene, click the On enter stage to specify its functionality. You can specify the following functionality in this stage:
- Call your webhook - Triggers a webhook. See the webhooks documentation for more information on webhooks.
- Send prompts - Specify static prompts to the user so they know how to continue with the conversation. See the prompts documentation for more information on specifying prompts.
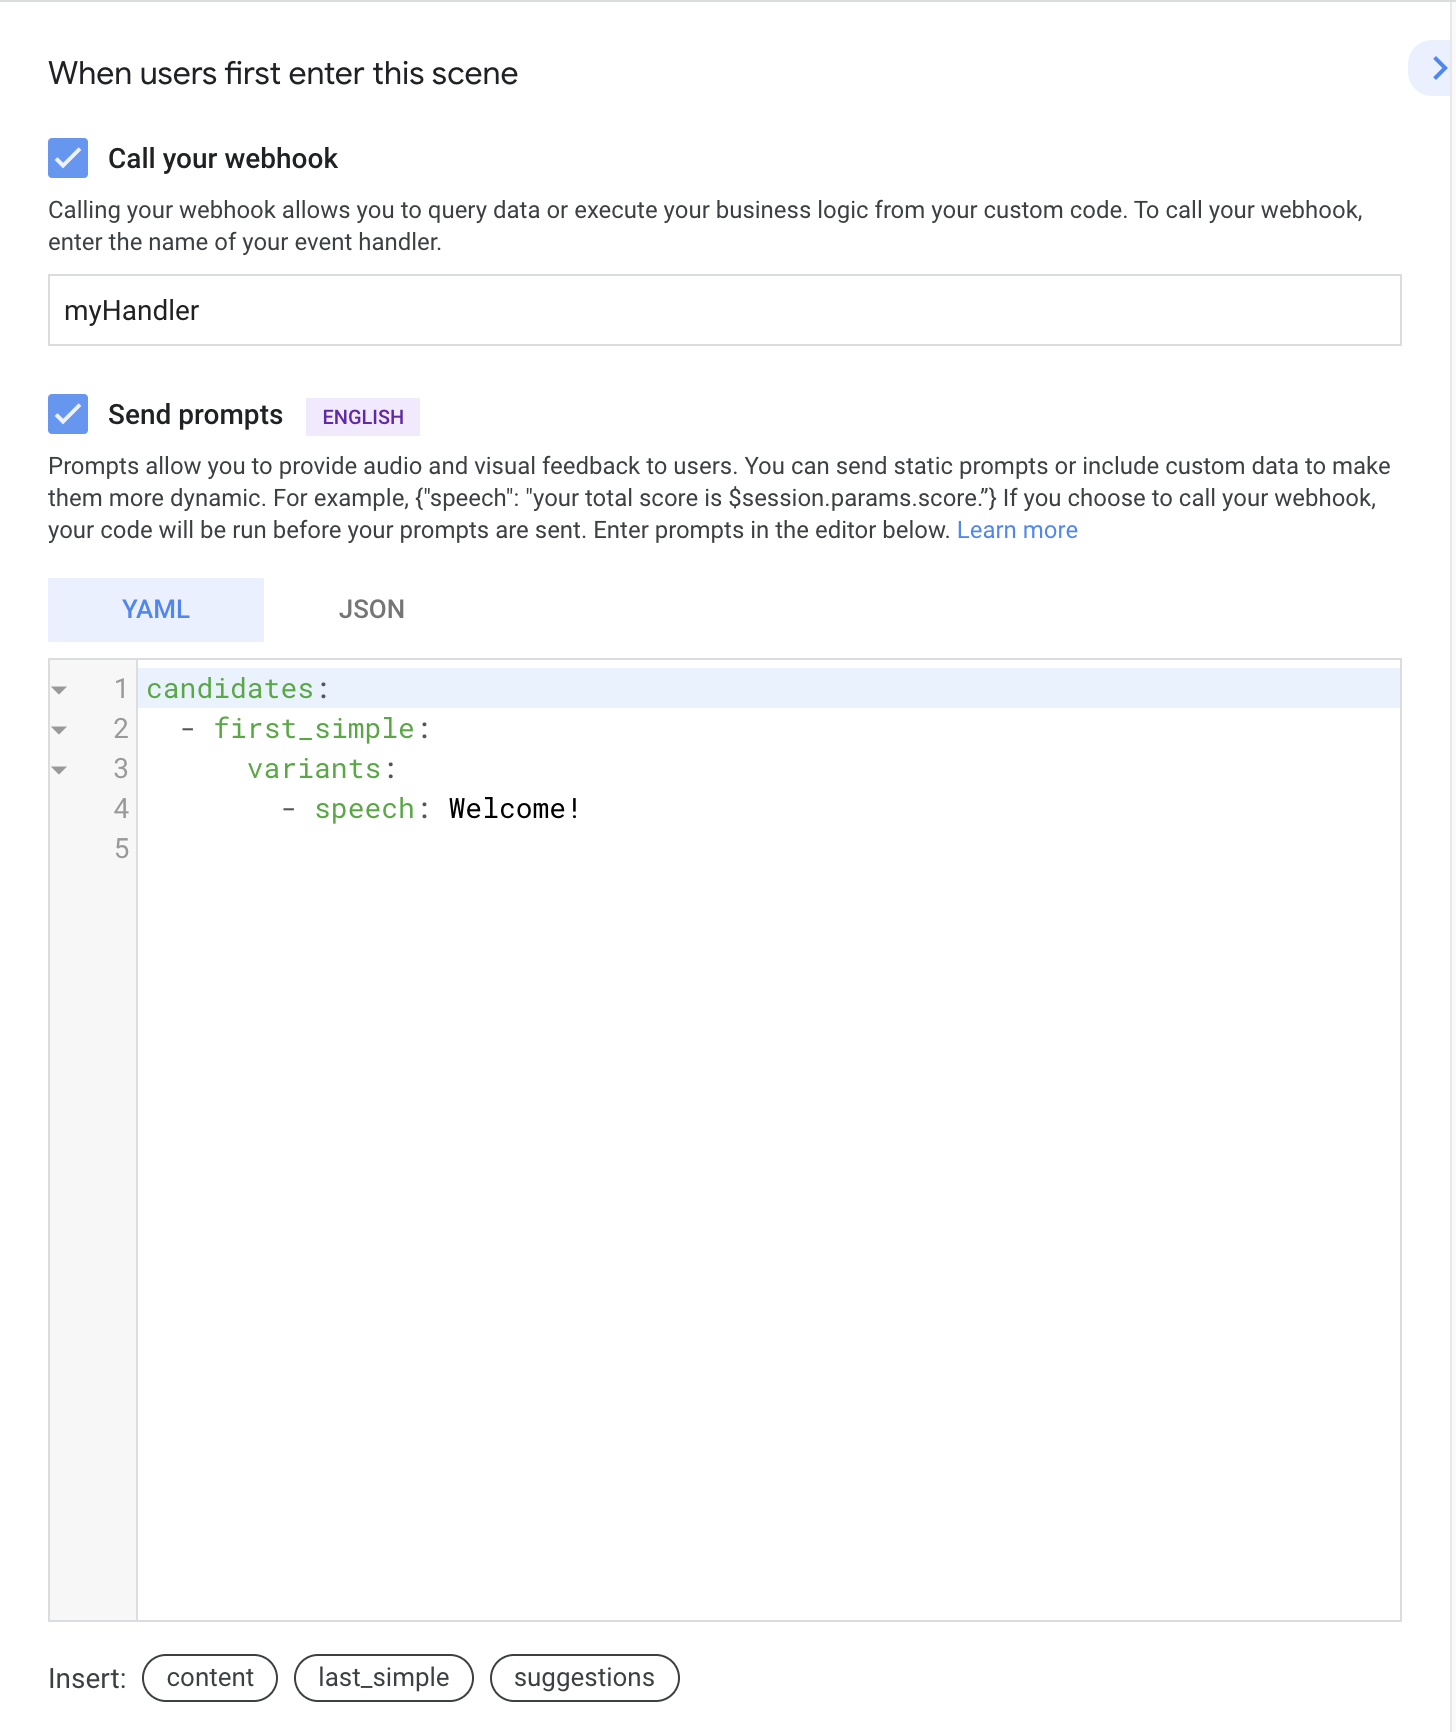
Figure 4. Example of a scene's on enter stage
Check conditions
Conditions let you check slot filling, session storage, user storage, and home storage parameters to control scene execution flow.
Within a scene, click on the + icon for the Condition stage. The Condition editor appears on the right. You can specify the following functionality in this stage:
- Condition - Specify the actual conditional statement to base logic off of. See the conditions documentation for syntax information.
- Call your webhook - Triggers a webhook. See the webhooks documentation for more information on webhooks.
- Send prompts - Specifies static prompts to send to the user, so they know how to continue with the conversation. See the prompts documentation for more information on specifying prompts.
- Transition - Specifies the scene to transition to when the conditional statement is true.

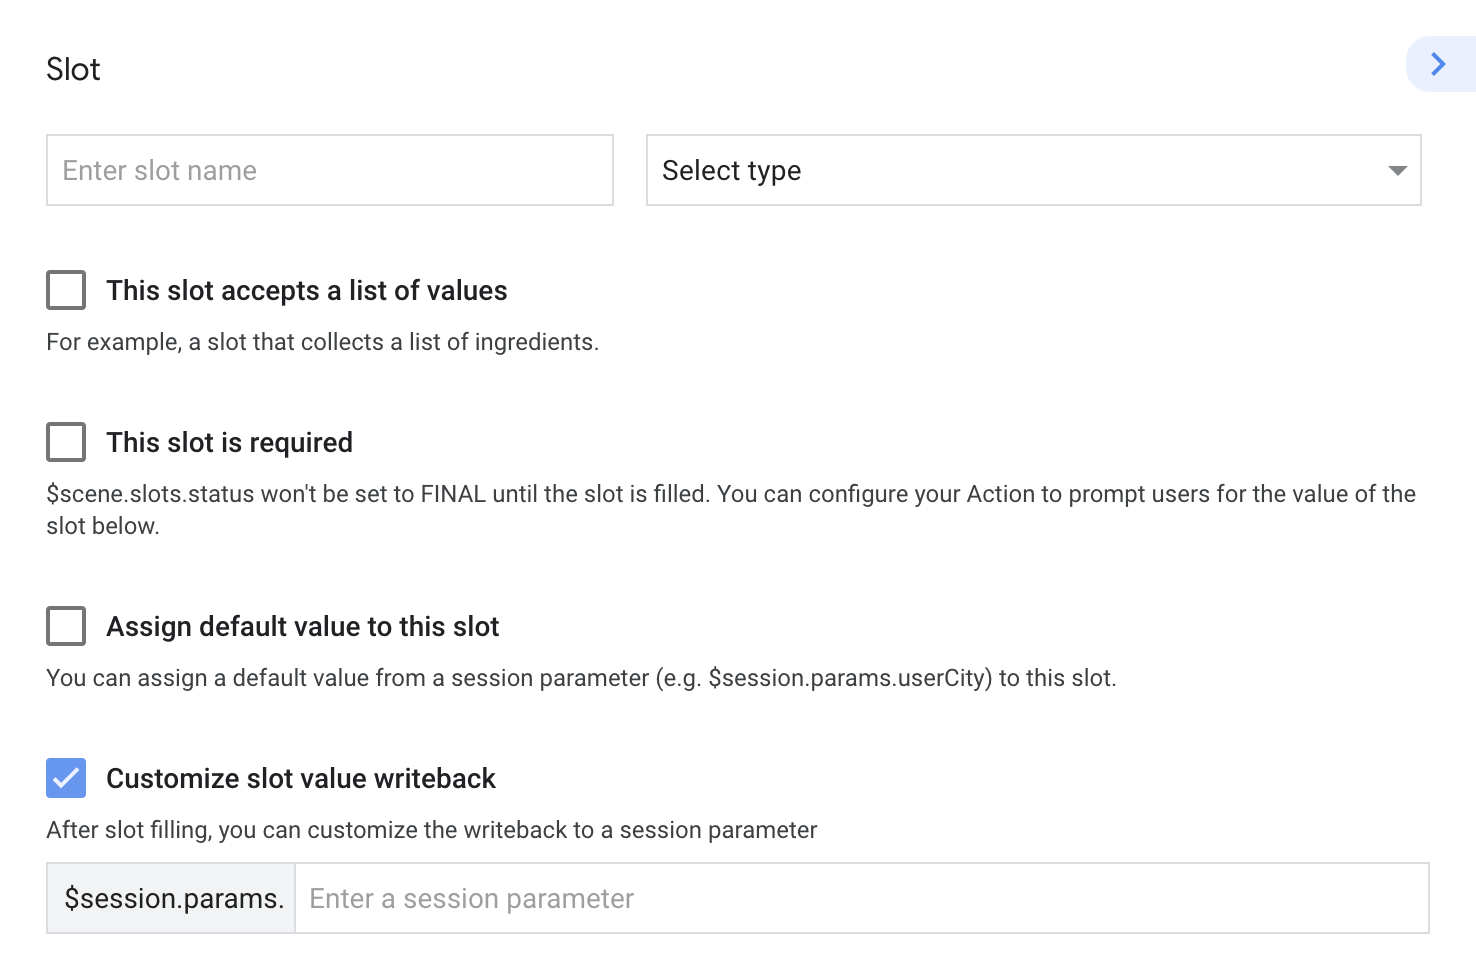
Define slot filling
Slots let you extract typed parameters from user input.
In the scene editor, click the + icon for the Slot filling stage. The editor for the slot appears on the right. You can specify the following properties of a slot:
- Slot name: Specifies the name of the slot. If you want to take advantage of slot value mapping, use the same name as the corresponding intent parameter.
- Slot type: Specifies the slot's type with either a system type or custom type.
- This slot is required: Marks this slot as required. If enabled, slot filling won't complete until this slot is filled.
- Assign default value to this slot: Specifies a default value for the slot that's read from the specified session parameter.
- Customize slot value writeback: Specifies a session parameter to persist the slot's value after slot filling is complete.
- Slot validation: Trigger a webhook when a slot is filled. This setting applies to all slots.
- Call your webhook (Enabled when the slot is required): Triggers a webhook. See the webhooks documentation for more information on webhooks.
- Send prompts (Enabled when the slot is required): Specifies static prompts to send to the user, so they know how to continue with the conversation. See the prompts documentation for more information on specifying prompts.
For certain slot types (like those related to transactions or user engagement), an additional section appears where you can configure the slot. Slot configurations can change the conversational experience for users based on the properties you provide.
To configure a slot, provide properties in a JSON object either in your
fulfillment (referenced as a session parameter) or in the inline JSON editor.
You can find the available properties for each slot type in the
Actions Builder JSON reference. For example, the actions.type.DeliveryAddressValue
slot type corresponds to the reference content for the
DeliveryAddressValue
slot.
Slot value mapping
In many cases, a previous intent match can include parameters that partially or entirely fill a corresponding scene's slot values. In these cases, all slots filled by intent parameters map to the scene's slot filling if the slot name matches the intent parameter name.
For example, if a user matches an intent to order a beverage by saying "I want to order a large vanilla coffee", existing slots for size, flavor, and beverage type are considered filled in the corresponding scene if that scene defines same slots.
Process input
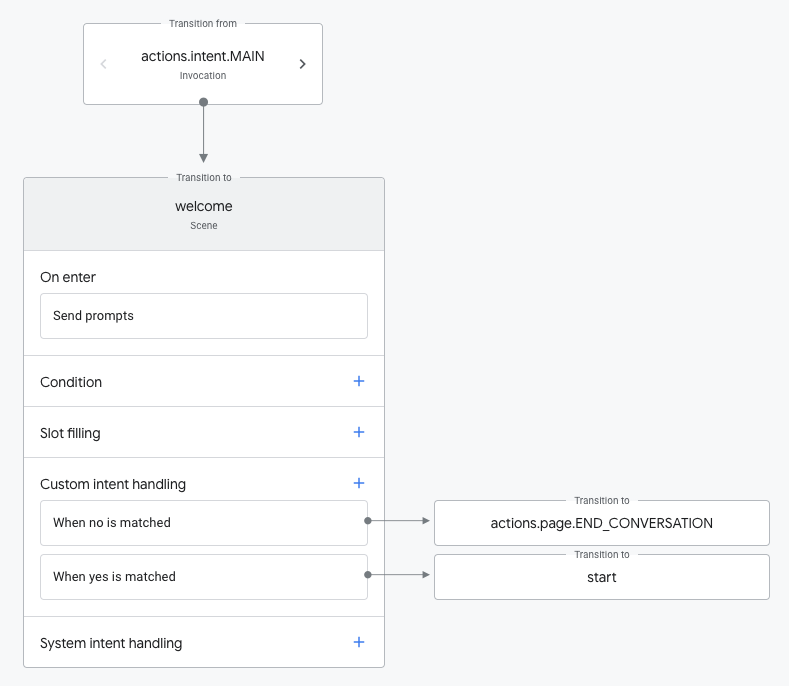
During this stage, you can have the Assistant NLU match user input to intents. You can scope intent matching to a specific scene by adding the desired intents to the scene. This lets you control conversation flow by telling Assistant to match specific intents when specific scenes are active.
Within a scene, click on the + icon for the User intent handling or System intent handling stage. The editor for the intent handler appears on the right. You can specify the following functionality of the intent handler:
- Intent - Specifies the intent that you want to match within this scene.
- Call your webhook - Triggers a webhook. See the webhooks documentation for more information on how you can handle a webhook request.
- Send prompts - Specify static prompts to the user, so they know how to respond. See the prompts documentation for more information on specifying prompts.
- Transition (if applicable) - Specifies the scene to transition to when the specified intent matches.