瞭解如何匯入 3D 模型、將其轉換為 Sceneform 格式,並在 Android Studio 中預覽。
匯入新的 3D 素材資源
Sceneform 支援下列格式的 3D 素材資源:
- 玻利維亞幣
- glTF (不支援動畫)
- 含有或不含動畫的 FBX。
如要匯入新的 3D 素材資源,請按照下列步驟操作:
確認專案的
app資料夾含有sampledata資料夾。如要建立資料夾,請在「Project」視窗中的
app資料夾上按一下滑鼠右鍵,然後選取「New > Sample Data Directory」。sampledata資料夾是 Android Studio 專案的一部分,但其內容不會納入您的 APK 中。將 3D 模型來源素材資源檔案 (
*.obj、*.fbx或*.gltf) 及其所有依附元件 (*.mtl、*.bin、*.png、*.jpg等) 複製到sampledata資料夾中。請勿將這些來源檔案複製到專案的
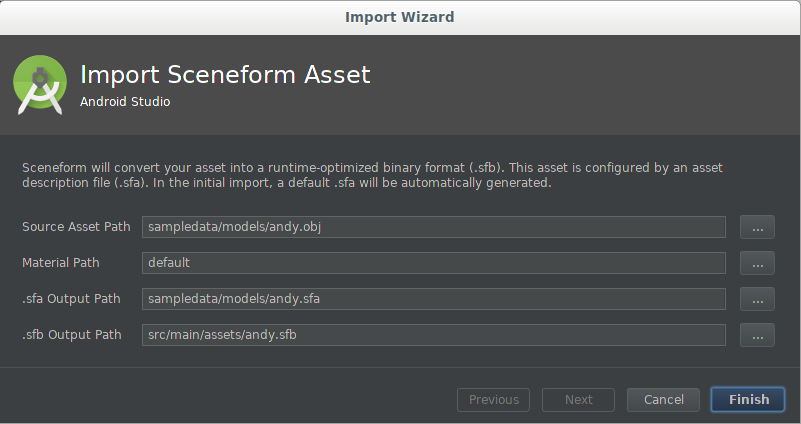
assets或res資料夾,以免不必要的 APK 納入這些 APK。在 3D 模型來源素材資源上按一下滑鼠右鍵,然後選取「Import Sceneform Asset」(匯入場景資產),即可開始匯入程序。
值是由應用程式's
build.gradle中的sceneform.asset()項目使用,並決定要在專案中產生*.sfa和*.sfb檔案的位置。如果你是第一次匯入模型,請使用預設值。
欄位 說明 來源素材資源路徑 要匯入的 OBJ、FBX 或 glTF 3D 模型資產的檔案名稱。 Material 路徑 default會指示 Sceneform' 使用內建的預設材質或自訂材質*.mat檔案的路徑。
.sfa 輸出路徑 使用預設值,或是在 sampledata資料夾中指定其他路徑。如果沒有,系統會產生 .sfa 檔案。您可以修改以控管匯入程序的某些部分。
以確保
*.sfa不會包含在 APK 中。.sfb 輸出路徑 根據預設,系統會使用 src/main/assets/資料夾,這會使用任意素材資源檔案名稱。如果檔案名稱 (不含副檔名) 是有效的資源 ID (例如
R.raw.filename),您可以改為使用src/main/res/raw/資料夾。如要進一步瞭解如何在應用程式中使用
assets/和res/資料夾,請參閱 Android 的應用程式資源總覽。動畫檔案 如要匯入
*.fbx動畫檔案,請按一下加號 (+),然後個別新增其他檔案。按一下「Finish」(匯入) 即可開始匯入程序。
為匯入資產,外掛程式會執行下列作業:
將 Sceneform Gradle 外掛程式新增至專案 (如果還沒有的話):
build.gradledependencies { … classpath 'com.google.ar.sceneform:plugin:1.15.0' }更新 app's
build.gradle檔案以包含apply plugin行和新匯入素材資源的sceneform.asset()項目:apply plugin: 'com.google.ar.sceneform.plugin' sceneform.asset('sampledata/models/andy.obj', // 'Source Asset Path' specified during import. 'default', // 'Material Path' specified during import. 'sampledata/models/andy.sfa', // '.sfa Output Path' specified during import. 'src/main/res/raw/andy') // '.sfb Output Path' specified during import.app's
build.gradle中的這些新項目會建立兩個 Gradle 工作:createAsset-<asset-name>會建立一個場景場景定義 (*.sfa) 檔案 (如果還沒有的話)。這項工作不會覆寫現有的
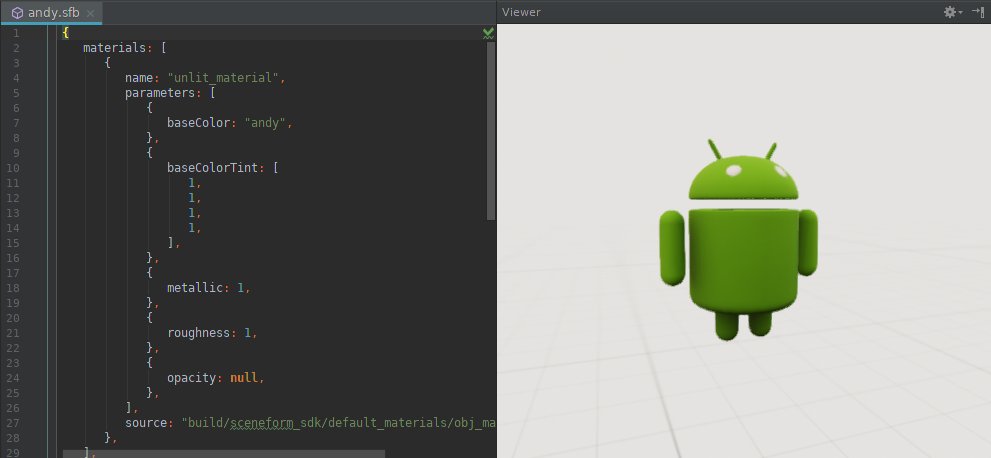
*.sfa檔案,這代表您在匯入後對 SFA 檔案所做的任何修改都不會遭到覆寫。*.sfa檔案是文字檔,內含資產匯入設定的完整易讀說明。它會參照來源素材資源中的模型和紋理,同時透過 Sceneform' 實體材料提供材質參數,藉此定義材質。compileAsset-<asset-name>會將*.sfa檔案編譯為 Sceneform 二進位素材資源 (*.sfb) 檔案。這個
*.sfb檔案會建構在應用程式的 APK 中,並會在執行階段載入,以建立可轉譯。
在文字視窗中開啟
*.sfa,在「Viewer」(檢視者) 視窗中開啟*.sfb。
更新先前匯入的 3D 素材資源
當您更新先前匯入的 OBJ、FBX 或 glTF 模型來源檔案 (*.obj、*.fbx 或 *.gltf) 時,應用程式& 中的對應 sceneform.asset() 項目會讓外掛程式根據目前的 *.sfa 參數,自動產生更新的 *.sfb 檔案。
如何疊代已匯入的素材資源參數:
- 請參考 SFA 檔案格式參考資料來修改
*.sfa文字檔案。 - 儲存變更。這會重新編譯資產並更新
*.sfb檔案。 - 按兩下
*.sfb檔案即可開啟資產的「檢視者」視窗,藉此預覽已更新的資產。
如果要更新先前匯入的動畫資產,請在匯入對話方塊的「動畫檔案」部分中,使用加號 (+) 來個別匯入更新後的 *.fbx 檔案。
Gradle 資產定義
匯入程序會在 build.gradle 檔案結尾加上任何 *.fbx 動畫檔案。
sceneform.asset('sampledata/models/andy_dance.fbx',
'default',
'sampledata/models/andy_dance.sfa',
'src/main/res/raw/andy_dance',
['sampledata/models/andy_wave_r.fbx',
'sampledata/models/andy_wave_l.fbx'])
建立可轉譯
資產編譯為 *.sfb 格式後,您就可以建構 ModelRenderable,並將其連接至場景中的節點,如下所示:
ModelRenderable.builder()
    // To load as an asset from the 'assets' folder ('src/main/assets/andy.sfb'):
    .setSource(this, Uri.parse("andy.sfb"))

    // Instead, load as a resource from the 'res/raw' folder ('src/main/res/raw/andy.sfb'):
    //.setSource(this, R.raw.andy)

    .build()
    .thenAccept(renderable -> andyRenderable = renderable)
    .exceptionally(
        throwable -> {
          Log.e(TAG, "Unable to load Renderable.", throwable);
          return null;
    });
使用自訂材質
場景的預設材質可讓開發人員輕鬆獲得出色的結果。此外,您也可以使用自訂資料來深度自訂素材資源的外觀。
為資產指派自訂素材的步驟如下:
使用 [Custom Material 參考資料](/sceneform/develop/custom-material) 指南建立自訂材質定義 (
*.mat) 檔案。將自訂內容套用至資產:
匯入新素材資源時:
- 在匯入程序中指定自訂資料
*.mat檔案。
如何更新先前匯入的資產:
- 在匯入程序中指定自訂資料