Learn how to use Augmented Faces in your own apps.
Prerequisites
- Xcode version 13.0 or later
- Cocoapods 1.4.0 or later if using Cocoapods
- An ARKit-compatible Apple device running iOS 12.0 or later (deployment target of iOS 12.0 or later required)
Build and run the sample app
See the Quickstart for detailed steps.
- Clone or download the ARCore SDK for iOS from GitHub to obtain the sample app code.
- Open a Terminal window and run
pod installfrom the folder where the Xcode project exists. - Open the sample app in Xcode version 10.3 or greater and connect the device to your development machine via USB. To avoid build errors, make sure you are building from the
.xcworkspacefile and not the.xcodeprojfile. - Press Cmd+R or click Run. Use a physical device, not the simulator, to work with Augmented Faces.
- Tap “OK” to give the camera access to the sample app. The app should open the front camera and immediately track your face in the camera feed. It should place images of fox ears over both sides of your forehead, and place a fox nose over your own nose.
Overview of implementing Augmented Faces in your app
Import *.scn files into Xcode
To add your own assets such as textures and 3D models to a detected face in your app, drag the *.scn asset into Xcode.
Initialize an Augmented Faces session
To use the Augmented Faces API from your app, initialize an Augmented Faces session. This session is responsible for taking in camera images at 60 fps, and will asynchronously return face updates to a delegate method. When initializing, simply pass the capture device’s field of view, and make sure you set the delegate.
// Session takes a float for field of view
let faceSession = try? GARAugmentedFaceSession(fieldOfView: cameraFieldOfView)
faceSession?.delegate = self
Pass camera images to the session
Now that your session is initialized and configured properly, your app can start sending camera images to the session. The sample app gets camera images by creating an AVCaptureSession with video frames from the front camera.
The following code sample shows an implementation of AVFoundation’s capture output delegate method, which passes the image, a timestamp, and a recognition rotation to your face session.
func captureOutput(_ output: AVCaptureOutput,
                     didOutput sampleBuffer: CMSampleBuffer,
                     from connection: AVCaptureConnection) {

     faceSession.update(with: imageBuffer,
                        timestamp: frameTime,
                        recognitionRotation: rotationDegrees)
}
After the image is processed, the Augmented Faces API sends a delegate callback that returns a GARAugmentedFaceFrame. It contains an Augmented Face object which helps you attach effects to the face. It also contains the image buffer and the timestamp that you passed into the update method. This is useful for synchronizing the face effects to the images. This object also gives you a display transform and a projection matrix to make sure you can set up the 3D world and 2D views in a way that makes it easy to render your face effects that appear attached to the detected face.
var face: GARAugmentedFace? { get }
var capturedImage: CVPixelBuffer { get }
var timestamp: TimeInterval { get }
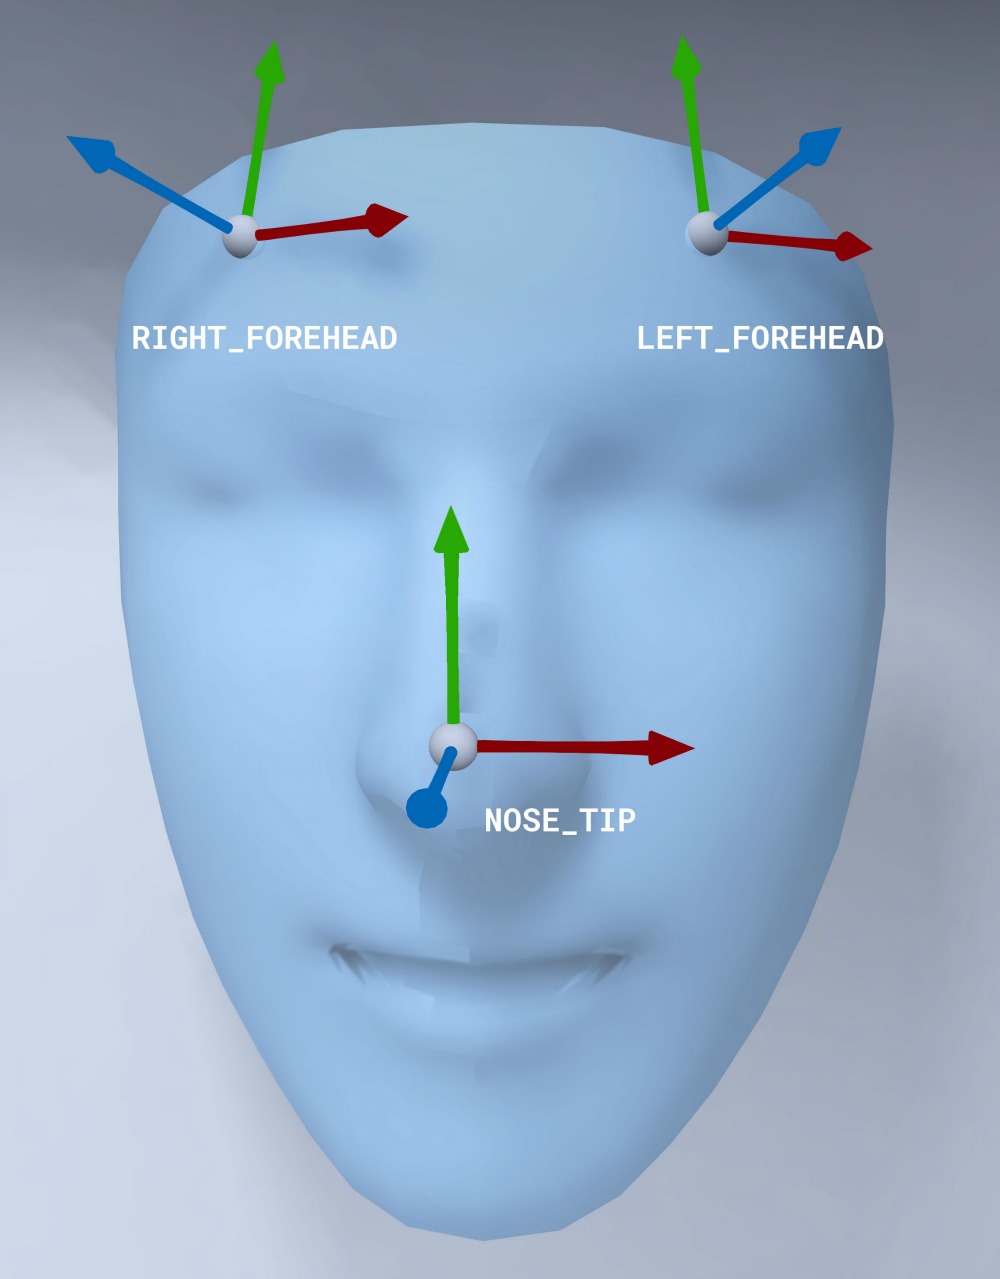
Face mesh orientation
Note the orientation of the face mesh for iOS:
Apply a 2D texture to face
The Sample app provides a class to convert your Augmented Face to an SCNGeometry object. You can use this geometry to easily attach to a SceneKit node, which you will place at the Augmented Face’s Center transform.
let faceNode = SCNNode()

// Gets the most recent frame's face
let face = faceSession.currentFrame?.face

// This is instantiated once, not with every frame
let faceGeometryConverter = FaceMeshGeometryConverter()

// Converts Augmented Face to SCNGeometry object
let faceMesh = faceGeometryConverter.geometryFromFace(face)

// Assigns geometry to node and sets the pose
faceNode.geometry = faceMesh
faceNode.simdTransform = face.centerTransform
The 2D face texture is loaded as a UIImage and set to a material that is attached to the geometry of the face mesh.
faceTextureMaterial = SCNMaterial()
faceTextureMaterial.diffuse.contents = UIImage(named:@"face.png")

faceMesh?.firstMaterial = faceTextureMaterial
Attach 3D objects to the face
The GARAugmentedFace received from the delegate callback, provides 3 different regions, or transforms, you can use for attaching content to a face. These transforms allow you to get the nose, left of the forehead, and right of the forehead in world space. Here, a nose transform is used to attach a sphere to the nose.
// Create node and add to scene
let node = SCNNode(geometry: SCNSphere(radius: .02))
sceneView.rootNode.addChild(node)

// Every frame updates the node's position
node.simdWorldTransform = session.currentFrame.face.transform(for: .nose)
Import your own assets into Xcode
To add assets such as textures and 3D models to a detected face in your app, first import the assets into Xcode.
- Export a
*.dae(3D model) file. - Drag the
*.daefile into the Xcode project. - Convert the file into
.scnformat in Xcode by going to Editor > Convert to SceneKit scene file format (.scn).