There are several ways to provision devices. Your customers' business requirements determine which provisioning methods you'll want to use.
Device provisioning basics
The device provisioning deployment scenarios that your customers want to support (such as BYOD or company-owned) determine the modes of operation you'll use (such as device owner mode or profile owner mode). Similarly, the modes of operation and Android releases you need to support determine which provisioning methods you'll implement.
Deployment scenarios
In a company-owned deployment scenario, the enterprise owns and fully controls the devices its employees use. Typically, organizations deploy company-owned devices when they need to strictly monitor and manage the whole device.
Companies that support a BYOD deployment scenario allow their employees to bring personally-owned devices to work, and to use those devices to access privileged company information and applications.
Modes of operation
Company-owned deployments are supported by the device owner mode of operation. In Android, your management app is called the device policy controller (DPC). The DPC enforces policies on an Android-powered device and when it acts as the device owner, it manages the entire device. As device owner, the DPC can perform device-wide actions, such as configure device-wide connectivity, configure global settings, and perform a factory reset.
BYOD deployments are supported by the profile owner mode of operation. Through the DPC, the enterprise enables personal devices for work use by adding a work profile to the primary user account on the device. The work profile is associated with the primary user, but as a separate profile. As profile owner, the DPC manages only the work profile on the device and has limited control outside of the work profile.
Device owner provisioning methods
You must provision the device owner mode of operation during the initial setup of a new device or after a factory reset. Device owner mode can't be provisioned on a device at any other time.
Depending on the use case, there are 2 main types of provisioning methods for provisioning device owner mode.
- In a device-driven flow, IT admins can use NFC to provision large numbers of devices. This flow can be used for managed Google Play Account or Google Workspace scenarios.
- In a user-driven flow, the options depend on whether the organization
uses Google Workspace.
- In a Google Workspace scenario, the user adds their Google Account during initial device setup, and the DPC must guide the user through the steps to set up the device owner. A user-driven flow can help end users set up new devices and also is an alternative when devices don't support NFC.
- When an organization doesn't use Google Workspace, you should use the managed Google Play Accounts method.
Note: If you limit distribution of your app to specific countries in Play, these restrictions are ignored during device owner provisioning. The DPC will be downloaded even if the device is not in a targeted country.
Profile owner provisioning methods
The recommended method to provision the profile owner mode of operation depends on whether the organization uses Google Workspace.
- In the Google Workspace case, the recommended method is a user-driven flow where the user adds their user Google Account, and the DPC guides the user through the steps to set up the profile owner.
- When an organization doesn't use Google Workspace, the recommended method is the managed Google Play Accounts method.
The traditional method, where the user is instructed to manually install the DPC, is also supported. It relies on the user to download your DPC from Google Play and install it, and then the DPC guides the user through the rest of the process to set up the profile owner.
Key provisioning differences across Android versions
| Deployment scenario | Mode of operation | Provisioning method | 5.0, 5.1 | 6.0, later | 7.0, later |
|---|---|---|---|---|---|
| Company-owned | Device Owner | QR code | ✓ | ||
| Managed Google Play Accounts | ✓ | ✓ | |||
| Google Account | ✓ | ✓ | |||
| NFC | ✓ | ✓ | ✓ | ||
| BYOD | Profile Owner | Managed Google Play Accounts | ✓ | ✓ | ✓ |
| Google Account | 5.11 | ✓ | ✓ | ||
| Manual DPC install | ✓ | ✓ | ✓ |
General implementation considerations
Here are some things to consider as you write your DPC, regardless of which mode of operation you implement.
Google Play services compatibility
The Google Play services APK guide instructs developers to perform a version check of Google Play services before performing API transactions. Because attempting to update Google Play services causes serious disruptions in the device setup process, your DPC must not attempt to update Google Play services before device provisioning is complete.
Key points about DPC compatibility with Google Play services are:
- The DPC should run using the Google Play services that shipped with a particular device.
- The DPC shouldn't rely on new features in future versions of Google Play services being available at the time of device provisioning.
When device provisioning is complete, the DPC can prompt the user to update Google Play services so the DPC can use the latest features. However, if a feature isn't available for some reason, the DPC must fall back gracefully to the version that shipped with the device.
Retrieve device details
Due to propagation delays, it may take up to 2 minutes before a call to devices.get for a newly-enrolled device will return the details of the device.
If your workflow requires the details before the end user can use the device or work profile, we suggest using a progress screen in your DPC and waiting until the call succeeds.
Implementation considerations for profile owner mode
Here are some things to consider as you write your DPC to implement the profile owner mode of operation.
Remove or disable the personal DPC
When provisioning the profile owner mode of operation, the DPC starts running in the personal profile and initiates the process to create a work profile. Once the work profile is created, the DPC is also running inside the work profile. The DPC in the work profile completes the provisioning process. At that point, the DPC in the personal profile should disable itself or the device user should remove it.
User removes the personal DPC
- The personal DPC listens for
ACTION_MANAGED_PROFILE_PROVISIONED. (For Android 5.1 devices, the personal DPC should instead listen forACTION_MANAGED_PROFILE_ADDED). - The personal DPC initiates an uninstall request
ACTION_UNINSTALL_PACKAGE. This prompts the user to uninstall the personal DPC. For the best user experience, the uninstall process should happen during the provisioning flow.
Personal DPC disables itself
- The personal DPC listens for
ACTION_MANAGED_PROFILE_PROVISIONED. (For Android 5.1 devices, the personal DPC should instead listen forACTION_MANAGED_PROFILE_ADDED). - If applicable, the personal DPC should release device admin privileges before disabling itself.
- The personal DPC initiates a
setApplicationEnabledSettingdisable request with theCOMPONENT_ENABLED_STATE_DISABLEDparameter. - The user can re-enable the personal DPC from Google Play.
Implementation considerations for device owner mode
Here are some things to consider as you write your DPC to implement the device owner mode of operation.
Device must be new or factory reset
You must provision the device owner mode of operation during the initial setup of a new device or after a factory reset. Device owner mode can't be provisioned on a device at any other time.
Device owner mode gives the DPC complete control over a device. If provisioning device owner mode after initial setup were allowed:
- Malware could potentially create a device owner and take over the device.
- Privacy issues could result if there were already some user data or apps on the device.
Set up device owner mode only on company-owned devices
You should provision device owner mode only on devices that you identify as being owned by your customer's company. You can verify this by detecting a unique device identifier (such as a serial number), or by using a dedicated set of accounts that are authorized for device enrollment through your EMM policy.
If you can't verify company ownership of a device, you must create a fail-safe mechanism so that device owner mode is not provisioned by mistake. For example, you could prompt the device user to confirm or take some affirmative action before provisioning device owner mode.
Enable system apps
When the DPC provisions a work profile, any system apps without launcher icons are assumed to be critical to the device and are automatically allowed to run in the work profile. System apps that have launcher icons are considered to be optional, and you can decide whether to enable them.
Enable system apps through Google Play
Enabling system apps using Google Play is easy, and users get app updates as they're available.
Enable system apps using Android framework APIs
If you want users to see system apps as soon as they start using their devices,
enable system apps as part of the device provisioning process. The DPC enables
system apps by package name or by intent using
DevicePolicyManager.enableSystemApp().
There are a few ways to identify the system apps you want to enable and present in your EMM console to IT admins.
Create system app catalogs
In this method, each device determines which apps are on the device and sends this data back to the EMM console. The EMM console dynamically displays this data when creating device policy, which allows the IT admin to manage apps on a per-app basis.
If the work profile isn't provisioned yet on the device, pull a list of all apps with launcher icons on a device using
queryIntentActivities():private List<ResolveInfo> getAppsWithLauncher() { Intent i = new Intent(Intent.ACTION_MAIN); i.addCategory(Intent.CATEGORY_LAUNCHER); return getPackageManager().queryIntentActivities(i, 0); }If the work profile is already provisioned on the device, pull a list of all apps in the work profile using
PackageManager.GET_DISABLED_COMPONENTSandPackageManager.GET_UNINSTALLED_PACKAGES.Find system apps in the apps list by checking
FLAG_SYSTEM, which indicates if an app is installed in the device's system image.
Pros:
- Provides IT admins with a complete picture of the apps on all devices.
- Provides granular control over which apps are enabled.
Cons:
- Because each device has a different app catalog, it's hard to apply a model of single policy configuration to multiple device types.
- It can be challenging to present the volume of OEM-specific apps in a meaningful way for IT admins.
Categorize system apps by functionality
When an IT admin wants to enable a system app for a group of devices, they select a generic app based on functionality; for example, "System Browser." The DPC then allows all system apps for that intent.
Pros:
- Simple, functionality-based enablement for IT admins.
- Ensures consistent functionality across a variety of devices (at least for common use cases).
Cons:
- Limits system apps to those that are supported across all device types.
- IT admins might want to push one OEM version of an app (such as a Samsung® browser), but not another (such as an LG® browser).
- IT admins might not want to push multiple apps, but they can't prevent it when there are multiple intent handlers.
Support only approved system apps
You work with the OEM to identify specific OEM packages and support only those packages within the EMM console. This also lets you catalog the managed configurations for the OEM app, which you wouldn't know otherwise because the OEM app isn't hosted on Google Play.
Pros:
- Vastly simplifies the integration workflow, and eliminates the edge cases that are problematic in the first two options.
- You can catalog the managed configurations for the OEM app and present them in the EMM console for IT admins.
- Enables close relationships with OEMs for supporting flagship devices.
Cons:
- Less scalable and reduces consumer choice as a result.
Test scenarios for your DPC
Test DPC is an open source app provided by Google for testing enterprise capabilities in your DPC app. Test DPC is available from github or Google Play. You can use Test DPC to:
- Simulate features in Android
- Set and enforce policies
- Set app and intent restrictions
- Set up work profiles
- Set up fully managed Android devices
While Test DPC is intended primarily as a vehicle to test your enterprise solution for Android, you can also use it as a source of sample code for Android features.
Customize provisioning
During device provisioning, the system user interface shows a default color in the status bar and a default logo at the top of the screen. Set custom colors and logos to provide a consistent visual transition between your DPC and the system interface, or allow admins to do so using your EMM console. For example, an admin might upload a company logo or customize the look of screens that show notifications.
Your DPC enforces the color and logo choices using the
DevicePolicyManager.EXTRA_PROVISIONING_MAIN_COLOR
and
DevicePolicyManager.EXTRA_PROVISIONING_LOGO_URI
extras.
To set a custom color, use
EXTRA_PROVISIONING_MAIN_COLOR
to set an integer that indicates the predominant color to show during device
provisioning. Put the extra (constant) in an intent with
ACTION_PROVISION_MANAGED_PROFILE
or
ACTION_PROVISION_MANAGED_DEVICE.
To see how the integers are represented, see
Color.
For an example, see
MAIN_COLOR
in the TestDPC app.
To set a custom logo, use
EXTRA_PROVISIONING_LOGO_URI
to set an image that's displayed at the top of the screen during device
provisioning. Put the extra (constant) in an intent with
ACTION_PROVISION_MANAGED_PROFILE
or
ACTION_PROVISION_MANAGED_DEVICE.
Make sure the image has a reasonable pixel density for the device.
For an example, see
LOGO_URI
in the TestDPC app.
QR Code method
The QR Code provisioning method sets up and configures device owner mode by scanning a QR Code from the setup wizard. The QR Code contains a payload of key-value pairs with all the information that's needed for the DPC to provision a device.
Your EMM console should provide a way for IT admins to create QR codes for the devices they want to provision. The IT admin sends the QR codes to their end users, and the end users provision their devices by scanning the QR codes.
Use cases for QR Code provisioning
Some devices, such as tablets, don't support NFC. QR Code provisioning is an convinient way to provision a distributed fleet of devices that don't support NFC. An IT admin can send QR codes to their users to allow user-driven provisioning.
QR Code provisioning doesn't require a Google identity, such as a Google domain or Google Account. Organizations that use Android, but don't use Google Workspace, don't have a Google identity.
Like NFC, QR Code provisioning enables kiosk and single-use deployments where a Google identity (or any identity) isn't needed or desirable. For example, a kiosk device in a store belongs to no one and shouldn't have an end user identity.
Create a QR Code
A valid QR Code for QR Code provisioning is a UTF-8 encoded JavaScript® Object Notation (JSON) string. You can include these properties in valid QR Code:
Always required
Required if a DPC isn't already installed on the device
EXTRA_PROVISIONING_DEVICE_ADMIN_PACKAGE_DOWNLOAD_LOCATIONEXTRA_PROVISIONING_DEVICE_ADMIN_PACKAGE_CHECKSUM
Recommended if the device isn't already connected to Wi-Fi
Optional
EXTRA_PROVISIONING_LOCALEEXTRA_PROVISIONING_TIME_ZONEEXTRA_PROVISIONING_ADMIN_EXTRAS_BUNDLEEXTRA_PROVISIONING_DEVICE_ADMIN_PACKAGE_DOWNLOAD_COOKIE_HEADEREXTRA_PROVISIONING_LOCAL_TIMEEXTRA_PROVISIONING_WIFI_HIDDENEXTRA_PROVISIONING_WIFI_SECURITY_TYPEEXTRA_PROVISIONING_WIFI_PROXY_HOSTEXTRA_PROVISIONING_WIFI_PROXY_PORTEXTRA_PROVISIONING_WIFI_PROXY_BYPASSEXTRA_PROVISIONING_WIFI_PAC_URLEXTRA_PROVISIONING_SKIP_ENCRYPTION
This sample builds a valid QR Code:
{
"android.app.extra.PROVISIONING_DEVICE_ADMIN_COMPONENT_NAME":
"com.emm.android/com.emm.android.DeviceAdminReceiver",

"android.app.extra.PROVISIONING_DEVICE_ADMIN_SIGNATURE_CHECKSUM":
"gJD2YwtOiWJHkSMkkIfLRlj-quNqG1fb6v100QmzM9w=",

"android.app.extra.PROVISIONING_DEVICE_ADMIN_PACKAGE_DOWNLOAD_LOCATION":
"https://path.to/dpc.apk",
    "android.app.extra.PROVISIONING_SKIP_ENCRYPTION": false,
    "android.app.extra.PROVISIONING_WIFI_SSID": "GuestNetwork",
    "android.app.extra.PROVISIONING_ADMIN_EXTRAS_BUNDLE": {
        "dpc_company_name": "Acme Inc.",
        "emm_server_url": "https://server.emm.biz:8787",
        "another_custom_dpc_key": "dpc_custom_value"
    }
}
QR Code provisioning process
- The setup wizard prompts the user to tap the Welcome screen 6 times. The taps have to be done in the same place on the screen.
- The setup wizard prompts the user to connect to the Internet so the setup wizard can download a QR Code reader.
- Google Play services downloads a module that contains a QR Code recognition engine.
- The user scans the QR Code provided by their IT admin.
- The setup wizard downloads your DPC app and initiates the device owner
provisioning process using
ACTION_PROVISION_MANAGED_DEVICE.
Managed Google Play Accounts method
A DPC can use the managed Google Play Accounts provisioning method to set up device owner mode or profile owner mode. This provisioning method is targeted at organizations that aren't using Google Workspace.
The managed Google Play Accounts provisioning method uses the DPC Support Library. This client library ensures the smooth operation of managed Google Play Accounts. It also maintains compatibility with future updates to the managed Google Play Accounts provisioning process.
Prerequisites to provisioning devices
- The enterprise ID is created and enrolled with an EMM identity and the ESA is set, as described in Create and Enroll an Enterprise.
- The user's corporate identity is known to your EMM console.
- The user can sign in to the DPC app using credentials accepted by your EMM console, typically corporate email credentials.
Set up profile owner mode
You can provision the profile owner mode of operation on a device that's being used in a BYOD scenario as a personal device.
- The user manually downloads your DPC from Google Play and launches it.
- The DPC provisions the work profile using
ACTION_PROVISION_MANAGED_PROFILE. - Complete the final setup steps.
Set up device owner mode
You must provision the device owner mode of operation during initial setup of a new device or after a factory reset. Device owner mode can't be provisioned on a device at any other time.
During device setup, the user enters a special DPC-specific token when they are
prompted to add an account. A token is in the format afw#DPC_IDENTIFIER. For
an EMM named ACME, afw#acme would install the default DPC of the ACME EMM.
Each EMM must request a specific DPC identifier from Google before they can use
it in the provisioning process.
- The user turns on a new or factory reset device and the setup wizard launches.
- When prompted to add an account, the user enters a special token in the
format
afw#DPC_IDENTIFIERthat identifies the DPC for your EMM. - Using the DPC identifier in the token, the setup wizard adds a temporary Google Account to the device. This temporary account is only used to download the DPC for your EMM from Google Play, and is removed in the final setup steps.
- The DPC provisions the device using
ACTION_PROVISION_MANAGED_DEVICE. - Complete the final setup steps.
Final setup steps for all modes of operation
Perform these steps only after the initial steps for setting up profile owner mode or device owner mode are complete.
The DPC makes sure that the device can support managed Google Play Accounts by initializing the DPC Support Library:
AndroidForWorkAccountSupport androidForWorkAccountSupport =
  new AndroidForWorkAccountSupport(context, admin);
androidForWorkAccountSupport.ensureWorkingEnvironment(callback);
If you're setting up device owner mode on a device, this step removes the temporary Google Account that was added to download the DPC.
The user signs into the DPC using their EMM credentials. These are typically corporate email credentials.
The DPC requests managed Google Play Account credentials for the authenticated corporate user from the EMM console.
If the EMM console doesn't have a Google Play
userIdfor the user, it creates a new user by callingUsers.insert(). If you are provisioning device owner mode, specify a device account (for dedicated device deployments) or a user account (for company-owned deployments).Set the Device's policy by calling
Devices.update. You should set the policy before adding the managed Google Play Account to the device, otherwise the policy will not be applied for a short period of time after adding the account to the device.The EMM console requests the account credentials for the
userIdby callingUsers.generateAuthenticationToken(). This authentication token is short-lived and can't be reused. The DPC should use the token to add the account programmatically (it's of no use to the end user).The Google Play EMM API returns the authentication token to the EMM console.
The EMM console forwards the authentication token to the DPC.
The DPC adds the managed Google Play Account to the device using
androidForWorkAccountSupport.addAndroidForWorkAccount(token,
  accountAddedCallback);
Google Account method
A DPC can use the Google Account provisioning method to set up device owner mode or profile owner mode. With the Google Account provisioning method, the DPC guides the user through the provisioning steps after the user adds their Google Account during the initial device setup.
When a user enters their Google Account credentials:
- The Google authentication server authenticates the user account.
- The authentication server then communicates with the enterprise server to see if the account's domain is registered as either a Google Workspace domain or an EMM-managed domain.
- If so, the system automatically downloads the DPC associated with the domain from Google Play and installs it.
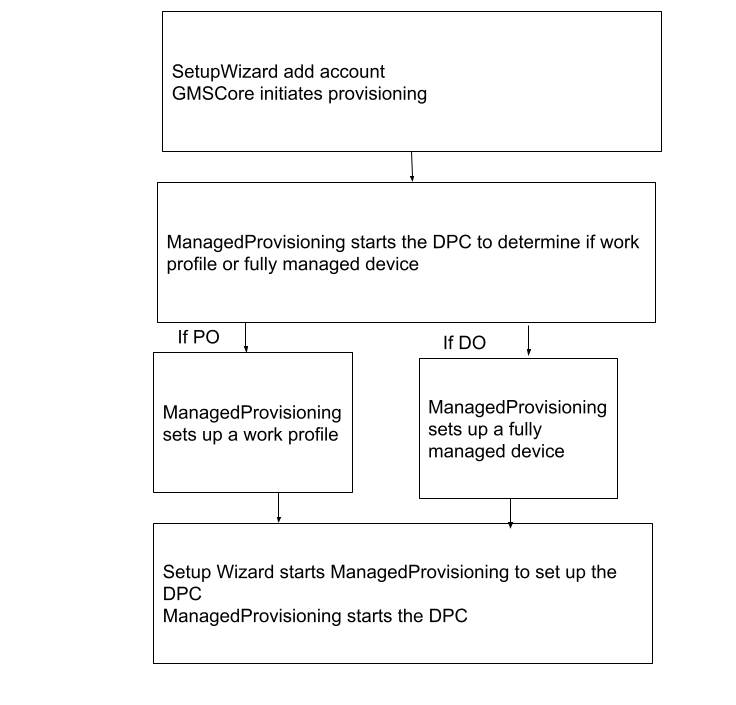
Set up profile owner mode
You can provision the profile owner mode of operation during initial setup of a device or when the user is adding an account using Settings > Add account.
- Account authentication is started by a user from the setup wizard or from Settings > Add account.
- GMSCore initiates work profile provisioning using
ACTION_PROVISION_MANAGED_DEVICE_FROM_TRUSTED_SOURCE. - The DPC is automatically downloaded to the device and launched using the
ACTION_GET_PROVISIONING_MODEhandler to verify that work profile provisioning is supported by the DPC.EXTRA_PROVISIONING_ADMIN_EXTRAS_BUNDLE— Extra information for the work profile such as email address. The DPC will also receive is_setup_wizard here as part of this bundle. This bundle will be included inACTION_GET_PROVISIONING_MODEandACTION_ADMIN_POLICY_COMPLIANCEhandlers.EXTRA_PROVISIONING_ACCOUNT_TO_MIGRATE— Name of the authenticated account to be migrated into the new work profile.
- The platform carries out work profile provisioning.
- When the work profile is provisioned, the DPC receives the broadcast
ACTION_PROFILE_PROVISIONING_COMPLETE. The DPC'sACTION_ADMIN_POLICY_COMPLIANCEhandler is launched in the work profile. Once the work profile is created, the DPC is also running inside the work profile. The DPC pushes policies for that managed Google Account, ensures that the device isn't in a compromised state, and verifies that the policies are enforced (such as requiring a password). - The DPC in the personal profile disables itself or the user removes it.

Set up device owner mode or COPE
You must provision the device owner mode of operation during initial setup of a new device or after a factory reset. Device owner mode can't be added to a device at any other time.
- Account authentication is started by a user from the setup wizard.
- GMSCore initiates device owner provisioning using
ACTION_PROVISION_MANAGED_DEVICE_FROM_TRUSTED_SOURCE. 3.The DPC is automatically downloaded to the device and is launched using theGET_PROVISIONING_MODEhandler to pick the desired provisioning mode.EXTRA_PROVISIONING_ADMIN_EXTRAS_BUNDLE— Extra information for the work profile such as locale, Wi-Fi, email address. The DPC will also receive is_setup_wizard here as part of this bundle. This bundle will be included inACTION_GET_PROVISIONING_MODEandACTION_ADMIN_POLICY_COMPLIANCEhandlers.
- The platform provisions the device to the desired provisioning mode.
- When the device is provisioned, the DPC receives these broadcasts and the DPC's
ACTION_ADMIN_POLICY_COMPLIANCEhandler is launched: - The DPC uses the value of
Global.DEVICE_PROVISIONEDto verify that the device is new or factory reset (unprovisioned):- 0 — Unprovisioned.
- 1 — Provisioned.
- The DPC completes the provisioning process by pushing policies for that managed device, ensuring that the device isn't in a compromised state, and verifying that the policies are enforced (such as requiring a password).
Implementation considerations for the Google Account method
The DPC should detect the Google Account authentication flow by looking for specific extras in the launch intent that was used (see
LaunchIntentUtil):- Account of type
android.accounts.Account— Indicates that the account was added from the setup wizard or from Settings > Add account, which requires the launched DPC to manage the device or profile. is_setup_wizardof type Boolean — If true, the DPC was launched in the setup wizard before the setup wizard completed, otherwise from Settings > Add account or another flow.
A check for whether the DPC was launched as part of the Google Account method is:
boolean isSynchronousAuthLaunch(Intent launchIntent) { return launchIntent.hasExtra("is_setup_wizard"); }- Account of type
The DPC should not call
finish()before it has finished setup. It should also return a positive result code (such asRESULT_OK) as the DPC is launched withstartActivityForResult()and waits for a result.The DPC should wait for a result code from the provisioning process before calling
finish()if the DPC setup flow reaches the point of sending anACTION_PROVISION_*intent. Use thestartActivityForResult()andonActivityResult()callbacks when launchingACTION_PROVISION_*intents. (SeeLaunchActivityandSetupSyncAuthManagementfor examples).Due to the potentially asynchronous nature of the setup process, the DPC can't rely on a result code of
RESULT_OKto indicate that provisioning succeeded. The only guaranteed way is to rely onDeviceAdminReceivercallbacks on provisioning success.RESULT_CANCELEDindicates that the user backed out in a synchronous part of the setup flow, and the DPC should react to this.In this example, the DPC launches provisioning and waits for the result code from an activity:
Intent intent = new Intent(ACTION_PROVISION_MANAGED_PROFILE);
startActivityForResult(intent, REQUEST_MANAGED_PROFILE);
...

@Override
public void onActivityResult(int req, int res, Intent i) {
    if (req == REQUEST_MANAGED_PROFILE) {
        if (res == Activity.RESULT_OK) {
            setResult(Activity.RESULT_OK);
            finish();
        } else {
            Toast.makeText(this, “Provisioning failed”,
                    Toast.LENGTH_SHORT).show();
        }
    }
}
The DPC should not attempt to set up the device owner mode of operation if the device is already provisioned (see
ProvisioningStateUtil.isDeviceProvisioned()). In this example, the DPC checks if the device is provisioned:public static boolean isDeviceProvisioned(Context context) { ContentResolver cr = context.getContentResolver(); return Settings.Global.getInt(cr, DEVICE_PROVISIONED, 0) != 0; }Optional. The DPC can use the
EXTRA_PROVISIONING_ADMIN_EXTRAS_BUNDLEextra when launching provisioning to pass state information back to itsDeviceAdminReceiver(which in the profile owner case is running inside the work profile). TestDPC uses this extra to enter a different set of activities in the Google Account flow after provisioning completes. For details seeDeviceAdminReceiver.public class DeviceAdminReceiver extends android.app.admin.DeviceAdminReceiver { @Override public void onProfileProvisioningComplete(Context context, Intent intent) { // Retrieve the admin extras bundle, which we can use to determine the original context for // Test DPC's launch. PersistableBundle extras = intent.getParcelableExtra( EXTRA_PROVISIONING_ADMIN_EXTRAS_BUNDLE); ...To set up a work profile, the DPC must migrate the added account into the new work profile. To do this, the DPC should pass the account provided in the launch intent for
ACTION_PROVISION_MANAGED_PROFILE.The DPC should provide the user with a clear call to action (such as a Finish button) to exit the app at the end of setup so the user doesn't think they've reached a dead end in the flow.
The DPC should use the setup wizard theme or layout library so the user experience is smooth and feels well integrated.
NFC method
A DPC can use the NFC provisioning method to set up device owner mode. In the NFC provisioning method, or NFC Tag, you create an NFC programmer app that contains the initial policies and Wi-Fi configuration, settings, and provisioning details required by your customer to configure the device owner mode of operation. When your or your customer install the NFC programmer app on an Android-powered device, that device becomes the programmer device.
To provision a device, the IT admin takes a new device out of the box and bumps it against the programmer device or NFC Tag. The bump transfers configurations to the device so it connects to the Internet and downloads the appropriate policies and settings. The device is then managed by your DPC.
After a device is provisioned, for a short time Google Play displays unmanaged consumer content instead of the approved apps and collections that should display. This delay can last from a few minutes up to an hour.
Create the NFC programmer app and programmer device
For devices using Android 10 or older it is possible to use Android Beam to complete an NFC provisioning:
- Download the NFC programmer sample app. You can use the sample as is without additions or you can modify it for your default values.
- Install the programmer app on the chosen device.
- Launch the NFC programmer app and select Load Defaults
for
com.example.android.apis. (This text can vary depending on the default parameters that you set.)
Provision a customer device
- Bump the programmer device or NFC Tag with a new device or one that has been factory reset.
- Verify that the device remains on the initial Welcome screen that's
displayed when it starts. The text is specified in
Ready to send:{...}in the programmer app. - Wait while the DPC:
- Encrypts the device.
- If it's a Code-Division Multiple Access (CDMA) device: Activates the phone while a telephony user interface is shown (no interaction required).
- Sets up the Wi-Fi connection.
- Downloads the APK file for com.example.android.apis.
- Installs com.example.android.apis.
- Sets the Sample Device Admin in com.example.android.apis as the device owner.
- Shows a success "toast" when the device owner is activated.
- After returning to the home page (setup wizard is skipped automatically),
check that com.example.android.apis is set as the device owner:
- In Settings > Security > Device admins, make sure that Sample Device Admin can't be removed.
- In Settings > Users > Users & profiles > You (owner), make sure that Owner is the only account available (a device can have only one active device owner at a time).
Additional resources
Advanced NFC describes topics such as working with various tag technologies, writing to NFC tags, and foreground dispatching.
Manual DPC install method
To set up profile owner mode using the manual DPC install provisioning method, the user downloads your DPC from Google Play and installs it. Then the DPC guides the user through the rest of the process to set up the profile owner for the managed Google Account.
The DPC can add the managed Google Account before or after creating the work profile. For example, the DPC can create a work profile based on a user's EMM credentials instead of prompting for the managed Google Account first.
Set up profile owner mode
Add the managed Google Account first
- The user downloads your DPC from Google Play and installs it.
- The DPC adds the managed Google Account before creating the work profile
using
AccountManager.addAccount(). - The DPC starts running in the personal profile and initiates the process to
create a work profile using:
ACTION_PROVISION_MANAGED_PROFILE— Provisions the work profile.EXTRA_PROVISIONING_ADMIN_EXTRAS_BUNDLE— Extra information for the work profile such as locale, Wi-Fi, email address.EXTRA_PROVISIONING_ACCOUNT_TO_MIGRATE— Name of the authenticated account to be migrated into the new work profile.
- The DPC in the work profile completes the provisioning process. Once the work profile is created, the DPC is also running inside the work profile. The DPC in the work profile completes the provisioning process by pushing policies for that managed Google Account, ensuring that the device isn't in a compromised state, and verifying that the policies are enforced (such as requiring a password).
- When the work profile is provisioned, the DPC receives the broadcast
ACTION_PROFILE_PROVISIONING_COMPLETE. - The DPC in the personal profile disables itself or the user removes it.

Create the work profile first
- The user downloads your DPC from Google Play and installs it.
- The DPC starts running in the personal profile and initiates the process to
create a work profile using:
ACTION_PROVISION_MANAGED_PROFILE— Provisions the work profile.EXTRA_PROVISIONING_ADMIN_EXTRAS_BUNDLE— Extra information for the work profile such as locale, Wi-Fi, email address.
- The DPC adds the managed Google Account using
AccountManager.addAccount(). - The DPC receives the broadcast
ACTION_PROFILE_PROVISIONING_COMPLETEand readsEXTRA_PROVISIONING_ADMIN_EXTRAS_BUNDLE. - The DPC in the work profile completes the provisioning process. Once the work profile is created, the DPC is also running inside the work profile. The DPC in the work profile completes the provisioning process by pushing policies for that managed Google Account, ensuring that the device isn't in a compromised state, and verifying that the policies are enforced (such as requiring a password).
- The DPC enables the work profile using
DevicePolicyManager.setProfileEnabled(). - The DPC in the personal profile disables itself or the user removes it.

-
The Google Account method in Android 5.1 supports only the profile owner mode of operation, and the user can configure it only from Settings > Add account. ↩