
Provisioning is the process of setting up a device to be managed using
policies by an enterprise. During the process a device installs
Android Device Policy, which is used to receive and enforce policies.
If provisioning is successful, the API creates a devices object, binding
the device to an enterprise.
Android Management API uses enrollment tokens to trigger the provisioning process. The enrollment token and provisioning method you use establishes a device's ownership (personally-owned or company-owned) and management mode (work profile or fully managed device).
Personally-owned devices
Android 5.1+
Devices owned by employees can be set up with a work profile. A work profile
provides a self-contained space for work apps and data, separate from personal
apps and data. Most app, data, and other management policies apply to the
work profile only, while the employee's personal apps and data remain private.
To set up a work profile on a personally-owned device, create an enrollment
token (ensure
allowPersonalUsage is set to PERSONAL_USAGE_ALLOWED) and use one of the
following provisioning methods:
Company-owned devices for work and personal use
Android 8+
Setting up a company-owned device with a work profile enables the device for both work and personal use. On company-owned devices with work profiles:
- Most app, data, and other management
policiesapply to the work profile only. - The employee's personal profile remains private. However, enterprises can enforce certain device-wide policies and personal usage policies.
- Enterprises can use
blockScopeto enforce compliance actions on an entire device or only its work profile. devices.deleteand device commands apply to an entire device.
To set up a company-owned device with a work profile, create an enrollment
token (ensure
allowPersonalUsage is set to PERSONAL_USAGE_ALLOWED) and use one of the
following provisioning methods:
Company-owned devices for work use only
Android 5.1+
Full device management is suitable for company-owned devices intended exclusively for work purposes. Enterprises can manage all apps on the device and can enforce the full spectrum of Android Management API's policies and commands.
It's also possible to lock a device down (via policy) to a single app or small set of apps to serve a dedicated purpose or use case. This subset of fully managed devices is referred to as dedicated devices.
To set up full management on a company-owned device, create an enrollment token
(ensure allowPersonalUsage is set to PERSONAL_USAGE_DISALLOWED) and use one
of the following provisioning methods:
- Zero-touch enrollment
- QR code
- Sign-in URL (not suitable for dedicated devices)
- NFC
- DPC identifier
Policies can impact the generation of the UI during device provisioning. Such policies are:
PasswordPolicyScope: This determines password requirements.PermittedInputMethods: This determines package input methods.PermittedAccessibilityServices: This determines which accessibility services are permitted for fully managed devices and work profile.SetupActions: This determines what actions are executed during setup.ApplicationsPolicy: This determines the policy for an individual app.
If you want for password steps to be shown alongside installation of work apps and device register cards during device provisioning, we suggest updating your policies to delay initiation of the UI generation by keeping the device in a quarantine state, which occurs if enrolled without an associated policy, until specifying the final selected policy for device setup populated with items relevant to your setup needs. Once provisioning of the device has been completed, you can change the policy as required.
Create an enrollment token
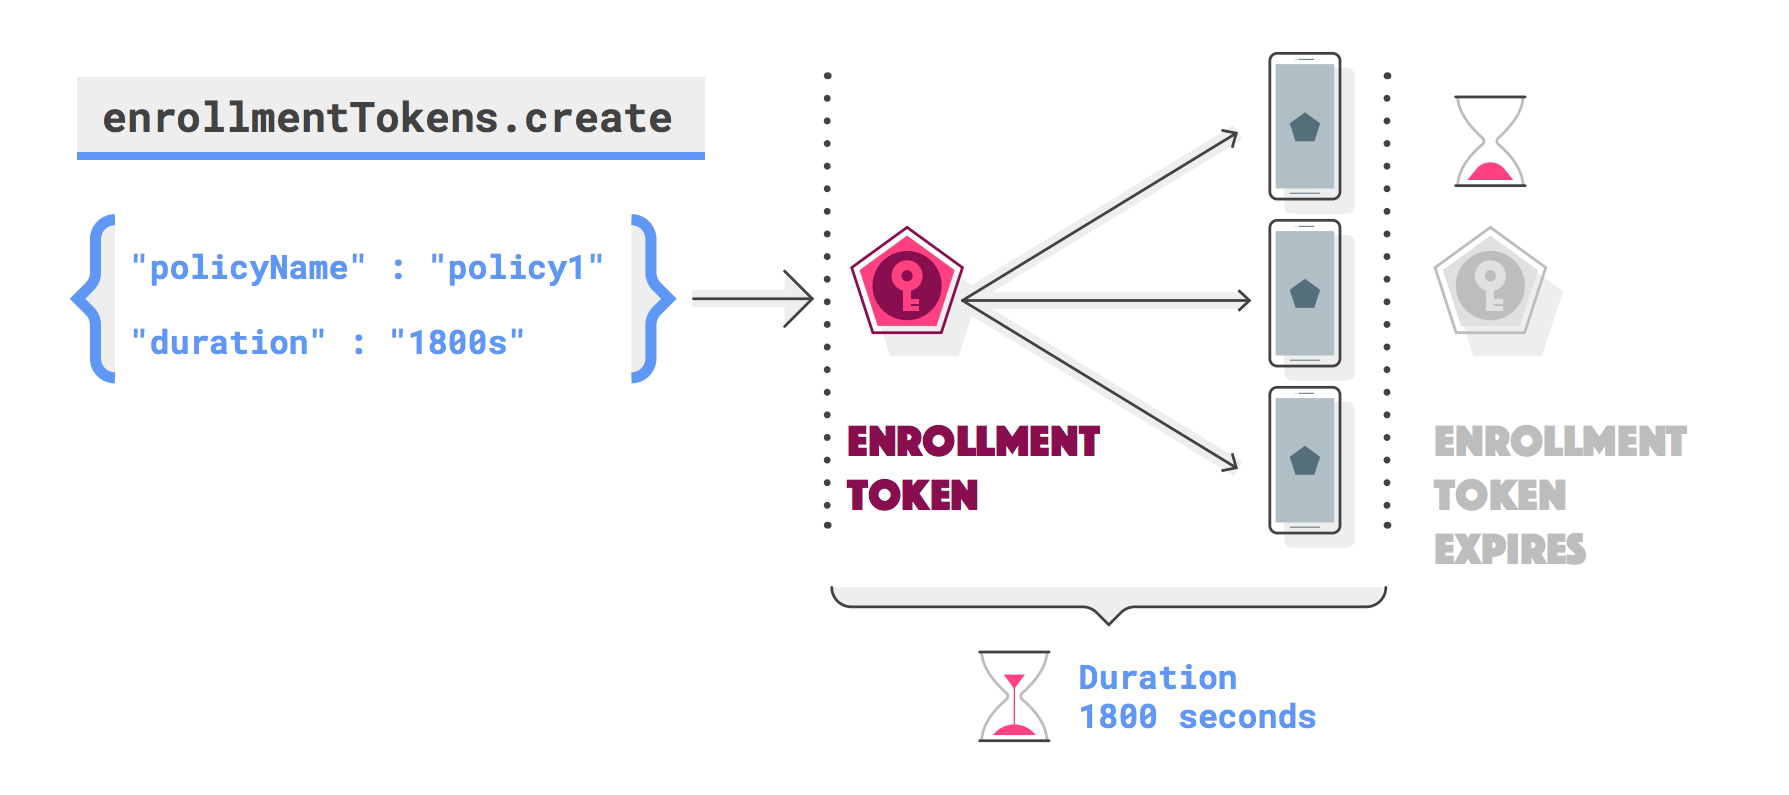
You need an enrollment token for each device that you want to enroll (you can
use the same token for multiple devices). To request an enrollment token, call
enterprises.enrollmentTokens.create. Enrollment tokens expire after one
hour by default, but you can specify a custom expiration time (duration)
up to approximately 10,000 years.
A successful request returns an enrollmentToken object containing an
enrollmentTokenId and a qrcode that IT admins and end users can use to
provision devices.
Specify a policy
You might also want to specify a policyName in the request to apply a policy
at the same time a device is enrolled. If you don't specify a policyName,
see Enroll a device without a policy.
Specify personal usage
allowPersonalUsage determines if a work profile can be added to the device
during provisioning. Set to PERSONAL_USAGE_ALLOWED to allow a user to create a
work profile (required for personally-owned devices, optional for company-owned
devices).
About QR Codes
QR codes work as an efficient device provisioning method for enterprises that
maintain many different policies. The QR Code returned from
enterprises.enrollmentTokens.create is made up of a payload of key-value pairs
containing an enrollment token and all the information that's needed for Android
Device Policy to provision a device.
Example QR Code bundle
The bundle includes the download location of Android Device Policy and an enrollment token.
{
    "android.app.extra.PROVISIONING_DEVICE_ADMIN_COMPONENT_NAME": "com.google.android.apps.work.clouddpc/.receivers.CloudDeviceAdminReceiver",
    "android.app.extra.PROVISIONING_DEVICE_ADMIN_SIGNATURE_CHECKSUM": "I5YvS0O5hXY46mb01BlRjq4oJJGs2kuUcHvVkAPEXlg",
    "android.app.extra.PROVISIONING_DEVICE_ADMIN_PACKAGE_DOWNLOAD_LOCATION": "https://play.google.com/managed/downloadManagingApp?identifier=setup",
    "android.app.extra.PROVISIONING_ADMIN_EXTRAS_BUNDLE":{
        "com.google.android.apps.work.clouddpc.EXTRA_ENROLLMENT_TOKEN": "{enrollment-token}"
    }
}
You can use the QR Code returned from enterprises.enrollmentTokens.create
directly or customize it. For a full list of properties that you can include in
a QR Code bundle, see Create a QR Code.
To convert the qrcode string into a scannable QR Code, use a QR Code generator
such as ZXing.
Provisioning methods
This section describes different methods for provisioning a device.
Add work profile from "Settings"
Android 5.1+
To set up a work profile on their device, a user can:
- Go to Settings > Google > Set up & restore.
- Tap Set up your work profile.
These steps initiate a setup wizard that downloads Android Device Policy on the device. Next, the user will be prompted to scan a QR code or manually enter an enrollment token to complete the work profile setup.
Download Android Device Policy
Android 5.1+
To set up a work profile on their device, a user can download Android Device Policy from the Google Play Store. After the app is installed, the user will be prompted to QR code or manually enter an enrollment token to complete the work profile setup.
Enrollment token link
Android 5.1+
Using the enrollment token returned from enrollmentTokens.create or the
enterprise's signinEnrollmentToken (see Sign-in URL
below), generate a URL with the following format:
https://enterprise.google.com/android/enroll?et=<enrollmentToken>
You can provide this URL to IT admins, who can provide it to their end users. When an end user opens the link from their device, they will be guided through the work profile setup.
Sign-in URL
With this method, users are provided with a URL that prompts them for their credentials. Based on their credentials, you can calculate the appropriate policy for the user before proceeding with device provisioning. For example:
Specify your sign-in URL in
enterprises.signInDetails[]. SetallowPersonalUsagetoPERSONAL_USAGE_ALLOWEDif you want to allow a user to create a work profile (required for personally-owned devices, optional for company-owned devices).Add the resulting
signinEnrollmentTokenas provisioning extra to a QR code, NFC payload, or Zero-touch configuration. Alternatively, you can provide thesigninEnrollmentTokento users directly.Choose an option:
- Company-owned devices: After turning on a new or factory-reset
device, pass the
signinEnrollmentTokento the device (via QR Code, NFC bump, etc.) or ask users need to enter the token manually. The device will open the sign-in URL specified in Step 1. - Personally-owned devices: Ask users to
add a work profile from "Settings".
When prompted, the user scans a QR Code containing the
signinEnrollmentTokenor enters the token manually. The device will open the sign-in URL specified in Step 1. - Personally-owned devices: Provide users with an
enrollment token link,
where the enrollment token is the
signinEnrollmentToken. The device will open the sign-in URL specified in Step 1.
- Company-owned devices: After turning on a new or factory-reset
device, pass the
Your sign-in URL should prompt users to enter their credentials. Based on their identity, you can determine the appropriate policy.
Call
enrollmentTokens.create, specifying the appropriatepolicyIdbased on the user's credentials.Return the enrollment token generated in Step 4 using URL redirect, in the form
https://enterprise.google.com/android/enroll?et=<token>.
QR Code method
Android 7.0+
To provision a company-owned device, you can generate a QR code and display it in your EMM console:
- On a new or factory-reset device, the user (typically an IT admin) taps the screen six times in the same spot. This triggers the device to prompt the user to scan a QR Code.
- The user scans the QR Code that you display in your management console (or similar application) to enroll and provision the device.
NFC method
Android 6.0+
This method requires you to create an NFC programmer app that contains the enrollment token, initial policies and Wi-Fi configuration, settings, and all other provisioning details required by your customer to provision a fully managed or dedicated device. When you or your customer installs the NFC programmer app on an Android-powered device, that device becomes the programmer device.
Detailed guidance on how to support the NFC method is available in the Play EMM API developer documentation. The site also includes sample code of the default parameters pushed to a device on an NFC bump. To install Android Device Policy, set the download location of the device admin package to:
https://play.google.com/managed/downloadManagingApp?identifier=setup
DPC identifier method
If Android Device Policy can't be added using QR Code or NFC, a user or IT admin can follow these steps to provision a company-owned device:
- Follow the setup wizard on a new or factory-reset device.
- Enter Wifi login details to connect the device to the internet.
- When prompted to sign in, enter afw#setup, which downloads Android Device Policy.
- Scan a QR code or manually enter an enrollment token to provision the device.
Zero-touch enrollment
Android 8.0+ (Pixel 7.1+)
Devices purchased from an authorized zero-touch reseller are eligible for zero-touch enrollment, a streamlined method for preconfiguring devices to provision themselves automatically on first boot.
Organizations can create configurations containing provisioning details for their zero-touch devices, either through the zero-touch enrollment portal or using your EMM console (see the zero-touch customer API). On first boot, a zero-touch device checks if it's been assigned a configuration. If so, the device downloads Android Device Policy, which then completes setup of the device using the provisioning extras specified in its assigned configuration.
If your customers use the zero-touch enrollment portal, they need to select Android Device Policy as the EMM DPC for each configuration they create. Detailed instructions on how to use the portal, including how to create and assign configurations to devices, are available in the Android Enterprise help center.
If you prefer your customers to set and assign configurations directly from
your EMM console, you need to integrate with the zero-touch customer API.
When creating a configuration, you specify provisioning extras in the
dpcExtras field. The following JSON snippet shows a basic example of what to
include in dpcExtras, with an added sign-in token.
{
   "android.app.extra.PROVISIONING_DEVICE_ADMIN_COMPONENT_NAME":"com.google.android.apps.work.clouddpc/.receivers.CloudDeviceAdminReceiver",
   "android.app.extra.PROVISIONING_DEVICE_ADMIN_SIGNATURE_CHECKSUM":"I5YvS0O5hXY46mb01BlRjq4oJJGs2kuUcHvVkAPEXlg",
   "android.app.extra.PROVISIONING_ADMIN_EXTRAS_BUNDLE":{
      "com.google.android.apps.work.clouddpc.EXTRA_ENROLLMENT_TOKEN":"{Sign In URL token}"
   }
}
Launch an app during setup

setupActions to launch an app
during setup.In policies, you can specify one app for Android Device Policy to launch
during device or work profile setup. For example, you could launch a VPN app
so users can configure VPN settings as part of the setup process. The app must
return RESULT_OK to signal completion and allow Android Device Policy to
complete device or work profile provisioning. To launch an app during setup:
Ensure the app's installType is REQUIRED_FOR_SETUP. If the app can't be
installed or launched on the device, provisioning will fail.
{
   "applications":[
      {
         "packageName":"com.my.vpnapp.",
         "installType":"REQUIRED_FOR_SETUP"
      }
   ]
}
Add the app's package name to setupActions. Use title and description to
specify user-facing instructions.
{
   "setupActions":[
      {
         "title":{
            "defaultMessage":"Configure VPN"
         },
         "description":{
            "defaultMessage":"Enable your VPN client to access corporate resources."
         },
         "launchApp":{
            "packageName":"com.my.vpnapp."
         }
      }
   ]
}
To distinguish that an app is launched from launchApp, the activity that's
first launched as part of the app contains the boolean intent extra
com.google.android.apps.work.clouddpc.EXTRA_LAUNCHED_AS_SETUP_ACTION (set to
true). This extra lets you to customize your app based on whether it's
launched from setupActions or by a user.
After the app returns RESULT_OK, Android Device Policy completes any
remaining steps required to provision the device or work profile.
Cancel enrollment during setup
The app launched as SetupAction can cancel enrollment returning
RESULT_CANCELED.
Cancelling the enrollment resets a company-owned device or deletes the work profile on a personally-owned device.
Note: Cancelling the enrollment triggers the action without a user confirmation dialog. It is responsibility of the app to show an appropriate error dialog to user prior to returning result.
Apply a policy to newly enrolled devices
The method you use to apply policies to newly enrolled devices is up to you and the requirements of your customers. Here are the different approaches you can use:
(Recommended) When creating an enrollment token, you can specify the name of the policy (
policyName) that will be initially linked to the device. When you enroll a device with the token, the policy is automatically applied to the device.Set a policy as the default policy for an enterprise. If no policy name is specified in the enrollment token and there is a policy with the name
enterprises/<enterprise_id>/policies/default, each new device is automatically linked to the default policy at the time of enrollment.Subscribe to a Cloud Pub/Sub topic to receive notifications about newly enrolled devices. In response to an
ENROLLMENTnotification, callenterprises.devices.patchto link the device with a policy.
Enroll a device without a policy
If a device is enrolled without a valid policy, then the device is placed into quarantine. Quarantined devices are blocked from all device functions until the device is linked to a policy.
If a device is not linked to a policy in five minutes, then device enrollment fails and the device is factory reset. The quarantine device state gives you the opportunity to implement licensing checks or other enrollment validation processes as part of your solution.
Example licensing check workflow
- A device is enrolled without a default policy or specific policy.
- Check how many licenses the enterprise has remaining.
- If there are licences available, use
devices.patchto attach a policy to the device, and then decrement your license count. If there are no licenses available, usedevices.patchto disable the device. Alternatively, the API factory resets any device that is not attached to a policy within five minutes of enrollment.