> [!WARNING]
> **DEPRECATED:** The Google Mobile Ads C++ SDK is *deprecated* as of June 17, 2024 and should not be adopted in projects that don't already use it. It will enter *End-of-Maintenance (EoM)* on June 17, 2025. Note that versions of the SDK released before the EoM date will continue to function, but no further bug fixes or changes will be released after the EoM date.
>
> Instead of the Google Mobile Ads C++ SDK, consider using the
> [iOS](https://developers.google.com/admob/ios/quick-start.md.txt) and
> [Android](https://developers.google.com/admob/android/quick-start.md.txt) SDKs from AdMob.
> For support, reach out to the
> [contact us form](https://support.google.com/admob/contact/contact_us_gma_sdk).
[Ad inspector](https://support.google.com/admob/answer/10159602) is an in-app overlay that enables authorized devices to perform real-time analysis of test ad requests directly within a mobile app. It is included with the Google Mobile Ads SDK version 9.1.0 and higher, and can be enabled with no coding required.
This guide demonstrates how to launch and use the different features in ad
inspector.
## Prerequisites
In order to use ad inspector, you need to:
- [Create an AdMob account](https://support.google.com/admob/answer/7356219) and [set up an app](https://support.google.com/admob/answer/9989980).
- Complete the [Get Started guide](https://developers.google.com/admob/cpp/quick-start.md.txt).
- Use Google Mobile Ads SDK version 9.1.0 or higher.
- [Add your device as a test device](https://developers.google.com/admob/cpp/test-ads.md.txt#enable_test_devices). Ad inspector only launches on test devices.
## Launch ad inspector
[Video](https://www.youtube.com/watch?v=seWbUbptcUI)
Ad inspector can be launched from anywhere in your app in the following ways:
1. Use the gesture selected in the AdMob UI when [registering a test device](https://support.google.com/admob/answer/9691433).
2. Programmatically using the [provided API](https://developers.google.com/admob/cpp/ad-inspector.md.txt#programmatically).
3. Use the launch button from the debug menu.
### Launch using gestures
No changes are needed to your app to launch ad inspector with a gesture; just
perform the gesture (double flick or shake) that you configured in AdMob for
that test device. [Learn more](https://support.google.com/admob/answer/10159602)
After setting a gesture in the AdMob UI (and waiting 15 minutes for it to
propagate), your app needs to make an ad request for the Google Mobile Ads
SDK to learn about your gesture setting. If your specified gesture isn't
working, try loading an ad, restarting your app, and testing the gesture again.
### Launch programmatically
Ad inspector can also be launched programmatically:
This API works for test devices
[registered](https://developers.google.com/admob/cpp/test-ads.md.txt#enable_test_devices)
programmatically or in the AdMob UI.
## View and troubleshoot ad units
[Video](https://www.youtube.com/watch?v=ajkifYNBuBI)
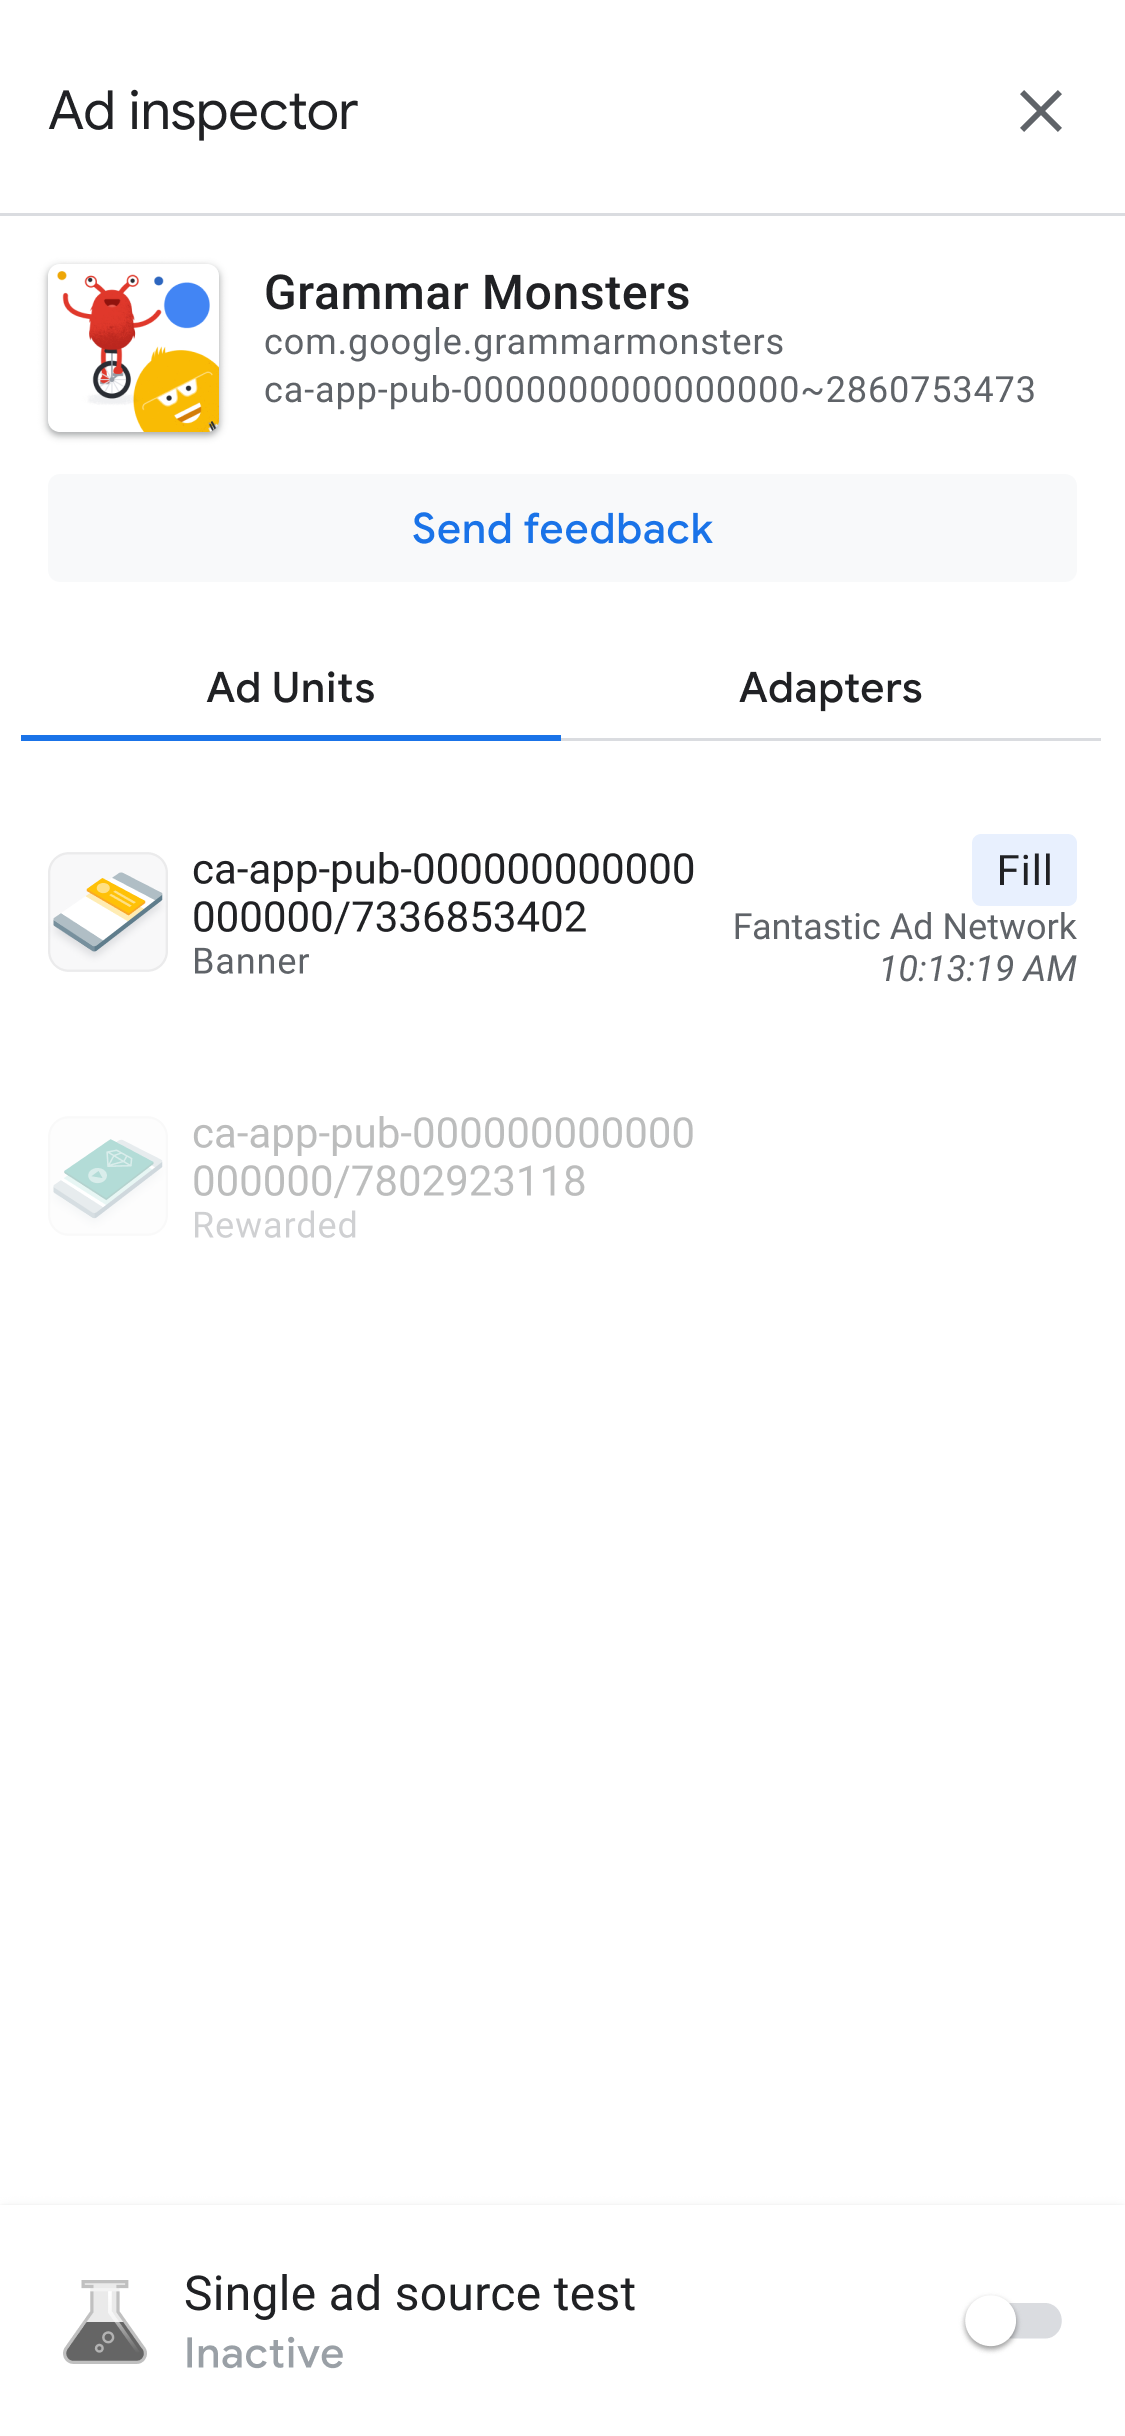
Once launched, the main ad inspector screen appears, containing a list of all ad
units
in the AdMob UI associated with your AdMob app ID that have bidding or mediation
configurations:
We recommend [initializing the Google Mobile Ads
SDK](https://developers.google.com/admob/cpp/quick-start#initialize_the_mobile_ads_sdk) before using ad
inspector.
### View mediation waterfall details for an ad unit
[Video](https://www.youtube.com/watch?v=gqxfJ9El6s4)
Tap an ad unit to view its SDK request log, which gives details about the
mediation waterfall up to the point when the ad was filled (or the waterfall
ended without a fill) for the latest ad requests.

Each request can be expanded using the disclosure indicator to show the results
of the mediation waterfall for that request, along with any error and latency
that was applicable for that request.
For third-party ad sources, the error messages are sent directly from the
ad source. If you need more information, consult your third-party ad source.
### View bidding details for an ad unit
[Video](https://www.youtube.com/watch?v=f_--pZHrvIw)
If you are new to bidding, read the
[overview](https://support.google.com/admob/answer/9234488).
In the SDK request log, you can see the bidding ad sources that are called in
the ad request. Tap an ad unit in the SDK request log to view the details of
each ad source in the bidding auction.

The bidding results are sorted in order to bring the actionable items closer to
the top of the list:
- At the top is the ad network that won the auction.
- Next are the ad networks with issues. You can follow the
[troubleshooting steps for the issues](https://support.google.com/admob/answer/9360574#biddingissue&zippy=%2Ci-found-an-issue-when-testing-in-ad-inspector-what-does-this-mean).
- Then, there are the ad networks that had no ads returned or did not bid. This
is a possible indicator of many different issues with the ad source as it
might not have bid due to its setup or decisioning. You can refer to the ad
source's setup guide or
[contact the ad source directly for
support](https://support.google.com/admob/answer/9360574#contact&zippy=%2Cim-having-trouble-with-a-third-party-ad-source-what-can-i-do).
- Finally, at the bottom of the list are the ad networks that lost the bidding
auction.

Mediation waterfall can place the ad source that won the bidding auction
according to their eCPM value.
When an ad source is called in the mediation waterfall, it is able to serve ads.
To learn more about how bidding works with mediation waterfall, see
[example 2](https://support.google.com/admob/answer/9234488#example2) and
[example 3](https://support.google.com/admob/answer/9234488#example3) of bidding
and waterfall ad sources in a mediation group.
### Advanced ad unit debugging
When troubleshooting ad units, it can be helpful to dig into the ad request
and response to identify where something is failing, or to share with Google
Support to aid in debugging. Tap the menu icon at the top of the waterfall
chain and select **Share ad request and response** to export the full ad request
and response. This saves you the trouble of having to run network traces on your
own app.
> [!NOTE]
> **Note:** You can export the ad response only after you [add your test device in the AdMob UI](https://developers.google.com/admob/cpp/test-ads.md.txt#add_your_test_device_in_the_admob_ui). {# AdMob/Ad Manager check}

Additionally, you can view decoded third-party bidding parameters by tapping
the **Third-party bidding parameter** option on the same menu as the request
string. This provides details about which third-party bidding parameters might
be having issues, helping you to debug your app or validate that a network is
collecting its signals successfully.

## View available adapters
[Video](https://www.youtube.com/watch?v=-19mGZ6hOj8)
Click the **Adapters** tab to see a list of all third-party adapters associated
with the ad sources in the bidding or mediation configurations in your app.
Then, expand cards to view their initialization statuses and SDK versions.
Along with supported third-party adapters, you can also view custom event
adapters.
[Custom events](https://developers.google.com/admob/cpp/custom-events/overview) let publishers use
ad networks that AdMob doesn't support. Custom events are
distinguishable from standard third-party adapters in the adapter list by their
unique class names. In addition to providing class name and status information,
ad inspector also displays the labels assigned to those custom events in the
AdMob web interface.
In the event the adapter isn't found or fails to initialize, see
[Troubleshoot issues found using ad inspector](https://support.google.com/admob/answer/12659455)
for more information.

> [!NOTE]
> **Note:** Earlier implementations of custom events, prior to API that subclass deprecated APIs don't support initialization and show up as **Issue found** within ad inspector. If you see that warning in ad inspector even though your custom event integration appears to be working, check to see if your app is using deprecated interfaces like `CustomEventBanner` (Android) \| `GADCustomEventBanner` (iOS) and replace them with the new `Adapter` (Android) \| `GADMediationAdapter` (iOS) class.
## Test your ad units
If you'd like to test your ad unit without having to navigate to it in your
app's UI, ad inspector supports this directly from the ad unit detail screen.
Additionally, you're able to test multiple ad units at once, asynchronously load
and view your test ad requests, and even perform single ad source tests.
> [!IMPORTANT]
> **Important:** When you run one of these ad inspector tests, your requests don't carry a number of the parameters they would if triggered in your app's UI, including child-directed treatment configuration, custom targeting, network extras, different sizes, and more. Because of the more limited nature of these requests, we recommend testing using your app's UI when possible.
### Ad testing
The ad inspector ad tests outlined in this section are a great tool for
verifying your base ad experience and for validating your mediation
configuration when used with single ad source testing.
When you're ready to test your ad unit, tap the **Request test ad** button at
the top of your ad inspector screen to trigger your ad inspector ad test. Test
results then appear in the SDK request log underneath the header **Requested
from ad inspector**.

[Learn how to use ad inspector in your
app](https://support.google.com/admob/answer/13063114)
### Single ad source testing
Ad inspector has a feature to restrict ad requests in your app to only serve
ads from a single bidding or waterfall mediation ad source. This lets you verify
that you've correctly implemented the third-party adapter and that the ad source
is serving as expected.
To enable this feature, toggle the **Single ad source test** switch at the
bottom of the screen. This displays the following ad source selection dialog:

You must [initialize the Google Mobile Ads
SDK](https://developers.google.com/admob/cpp/quick-start#initialize_the_mobile_ads_sdk) before you can use
single ad source testing.
You can then select a single ad source to test. Once an ad source is selected,
the following screen appears:

The single ad source test setting applies to any future ad requests you make in
the same session. However, it doesn't apply to any previously cached ads in that
session that have not yet been shown. Force restarting your app is recommended
when applying a single ad source test in order to invalidate any cached ads that
could be served instead of your chosen ad source receiving a request.
After restarting your app, all ad unit placements attempt to show an ad from the
selected network only. Launching ad inspector when a single ad source test is
active shows the active test ad source:

In single ad source test mode, all ad requests attempt to fill with the selected
ad source, regardless of whether that ad source was configured for bidding or
mediation for the requested ad unit. If the ad source you're testing is not in
the mediation waterfall for an ad unit, you get a "No fill" error message.
In a single ad source test, you can tap an ad unit to view its SDK request log.
This lets you know whether the ad source filled the ad requests made after
single ad source testing is enabled. If the ad source failed to load an ad,
an error message appears describing the error.
If you've added multiple instances of the selected ad source to a mediation
waterfall, you would see each instance of the call to the ad source in the
waterfall until the ad is either filled or the waterfall ended without a fill.
### Stop a single ad source test
To stop the test, toggle off the switch:

A confirmation message then appears over the following restart screen:

We recommend a force restart of your app after stopping the test in order to
invalidate any cached ads for the ad source that was tested.
## Debug privacy settings
**Prerequisites:
Google Mobile Ads
SDK
version
9.6.0
or higher**
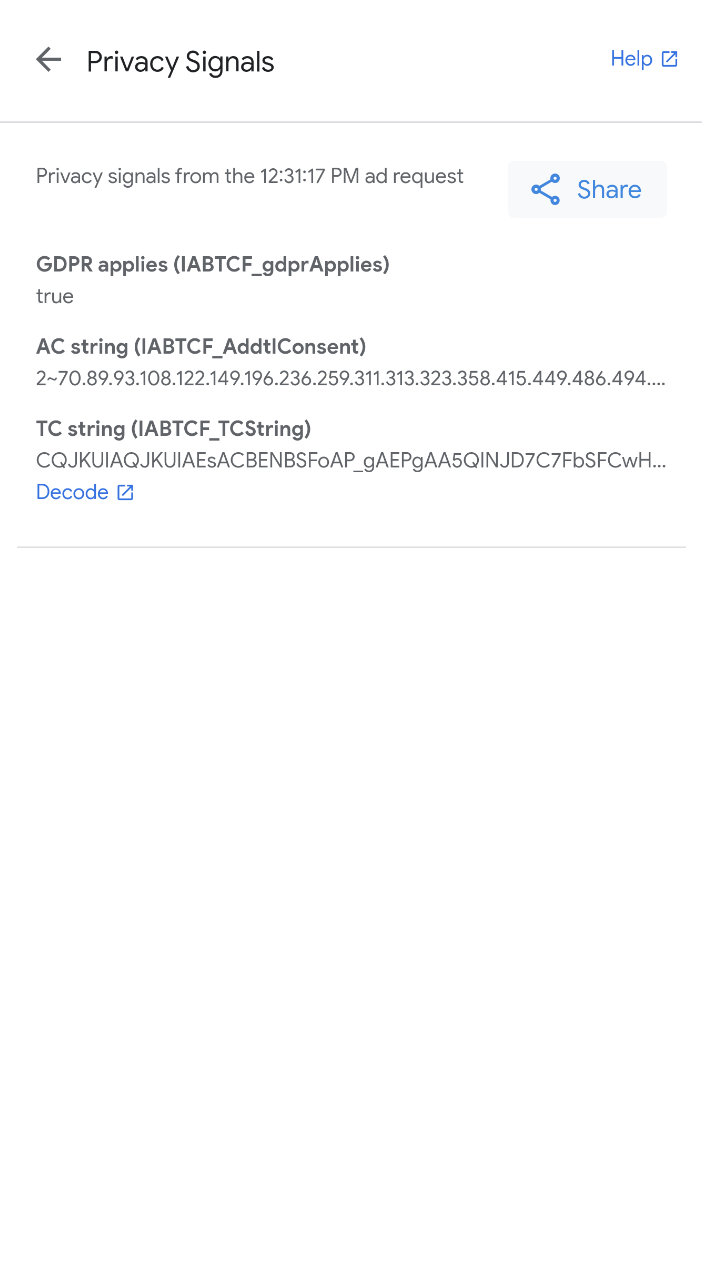
You can use ad inspector to view the following privacy signals passed in the ad
request as part of
[Publisher integration with the IAB Europe TCF](https://support.google.com/admob/answer/9760862):
- GDPR applies (`IABTCF_gdprApplies`)
- AC string (`IABTCF_AddtlConsent`)
- TC string (`IABTCF_TCString`)
After loading an ad or performing
[ad testing](https://developers.google.com/admob/cpp/ad-inspector.md.txt#ad_testing)
in ad inspector, tap the menu icon on the request under **SDK request log** .
Next, select the **Privacy signals** option.

The **Privacy signals** screen displays the privacy signals passed in the ad
request.
To learn more about the AC string, see
[Google's Additional Consent technical specification](https://support.google.com/admob/answer/9681920).
To view granular consent details in the TC string, such as the CMP ID and the list
of consented vendor identifiers associated with IAB, click **Decode** to open
the [IAB GPP Encoder / Decoder](https://iabgpp.com/).
If you encounter any errors, follow the steps in
[Understand privacy issues](https://support.google.com/admob/answer/12659455#understand-privacy-issues)
to troubleshoot.
## Copy entire debugging outputs
The ad inspector supports copying a JSON string containing entire debugging
outputs from the tool, including details of your AdMob app,
adapter initialization statuses, and the testing results of all ad units.
To do so, tap the app icon seven times until you see the message **Copied ad
inspector JSON to clipboard**.