使用低於20.2.0的 Mobile Ads SDK 版本中的廣告檢查器,您就能:
- 檢查廣告單元
- 檢查第三方轉接程式
- 檢查廣告是否正常供應
- 找出錯誤並進一步瞭解如何解決
- 查看每次請求的每個廣告聯播網的中介服務詳細資料
- 測試個別第三方中介服務廣告來源
- 確認您已為刊登序列中介服務正確設定每個廣告單元
- 測試自訂事件整合
如果是 Mobile Ads SDK 20.2.0 以上版本,也可以:
- 查看每次請求的每個廣告聯播網的出價詳細資料
- 同時查看每個廣告請求的出價和刊登序列中介服務詳細資料
- 測試個別第三方出價或刊登序列中介服務廣告來源
確認每個廣告單元的出價和刊登序列中介服務都已正確設定
本指南說明如何在廣告檢查器中啟動及使用各種功能。
必要條件
如要使用廣告檢查器,您必須:
- 完整閱讀入門指南
- 使用 Google Mobile Ads SDK 20.0.0 以上版本。
- 將裝置新增為測試裝置。廣告檢查器只會在測試裝置上啟動。
啟動廣告檢查器
您可以從應用程式中的任何位置啟動廣告檢查器,方法如下:
使用手勢啟動
如果使用手勢啟動廣告檢查器,應用程式無須進行任何變更;只要執行您在 AdMob 中為該測試裝置設定的手勢 (輕觸兩下或搖動) 即可。瞭解詳情
在 AdMob 使用者介面中設定手勢 (等待 15 分鐘後,讓動作生效) 後,應用程式需要向 Google Mobile Ads SDK 發出廣告請求,瞭解您的手勢設定。如果您指定的手勢無法運作,請嘗試載入廣告,然後重新啟動應用程式,然後再次測試手勢。
以程式輔助方式啟動
您也可以透過程式輔助方式啟動廣告檢查器:
Java
MobileAds.openAdInspector(context, new OnAdInspectorClosedListener() {
  public void onAdInspectorClosed(@Nullable AdInspectorError error) {
    // Error will be non-null if ad inspector closed due to an error.
  }
});
Kotlin
MobileAds.openAdInspector(context) { error ->
  // Error will be non-null if ad inspector closed due to an error.
}
這個 API 適用於透過程式輔助方式或在 AdMob UI 中註冊 的測試裝置。
查看及排解廣告單元相關問題
啟動後,主要廣告檢查器畫面會顯示主要廣告檢查器畫面,其中包含與 AdMob 應用程式 ID 相關聯,且已設定出價或中介服務設定的 AdMob 應用程式 ID 的所有廣告單元::

使用廣告檢查器前,建議您先初始化 Google Mobile Ads SDK。
查看廣告單元的中介服務刊登序列詳細資料
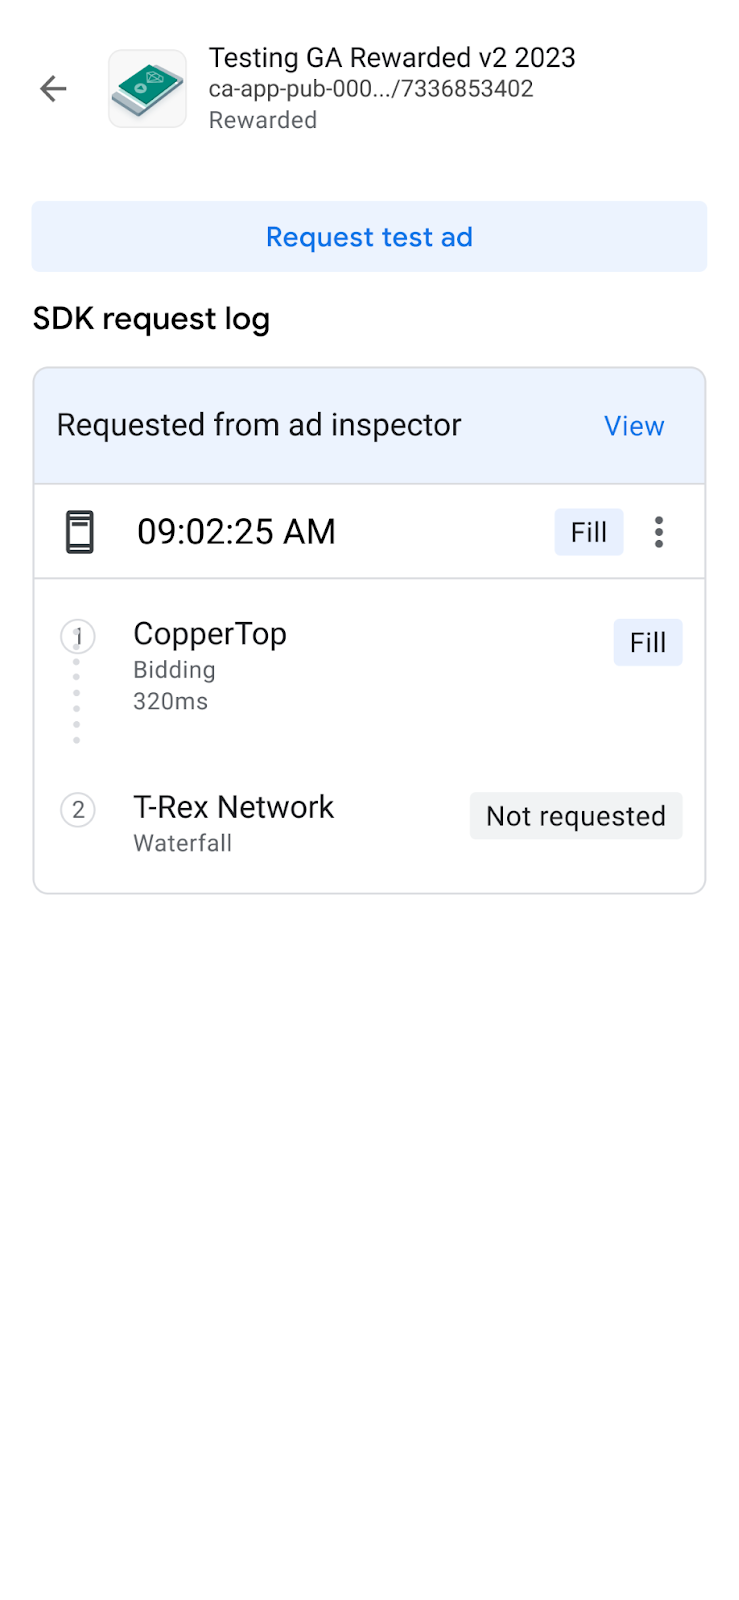
輕觸廣告單元即可查看 SDK 請求記錄,針對最新的廣告請求,提供廣告供應當下 (或沒有供應廣告的刊登序列) 的詳細資料。
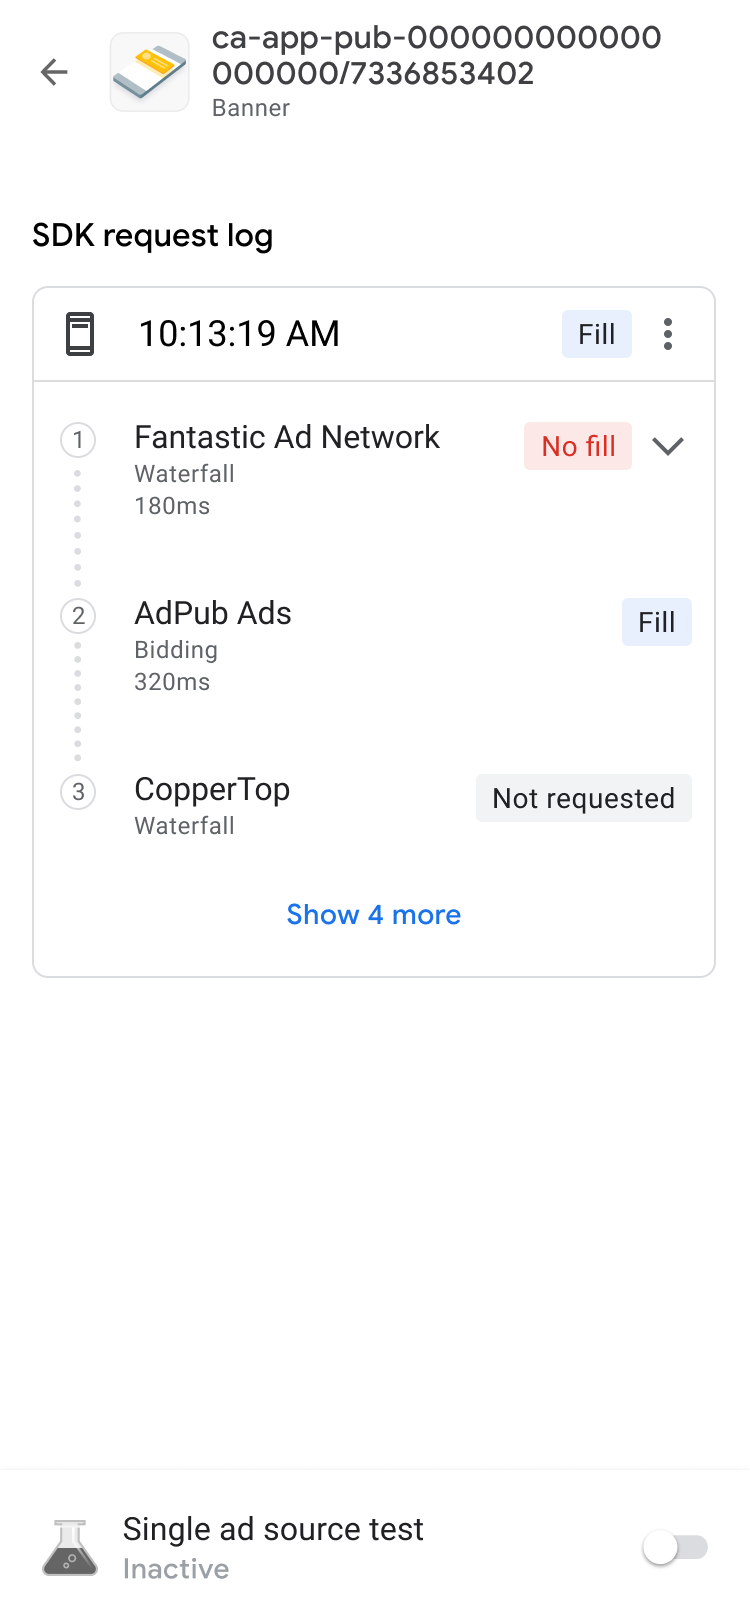
您可以使用揭露事項指標展開每項要求,顯示該要求的中介服務刊登序列結果,以及該要求適用的任何錯誤和延遲時間。
如果是第三方廣告來源,系統會直接從廣告來源傳送錯誤訊息。如需詳細資訊,請洽詢第三方廣告來源。
查看廣告單元的出價詳細資料
必備條件:Google Mobile Ads SDK 20.2.0 或更高版本
如果您是第一次使用出價,請參閱總覽。
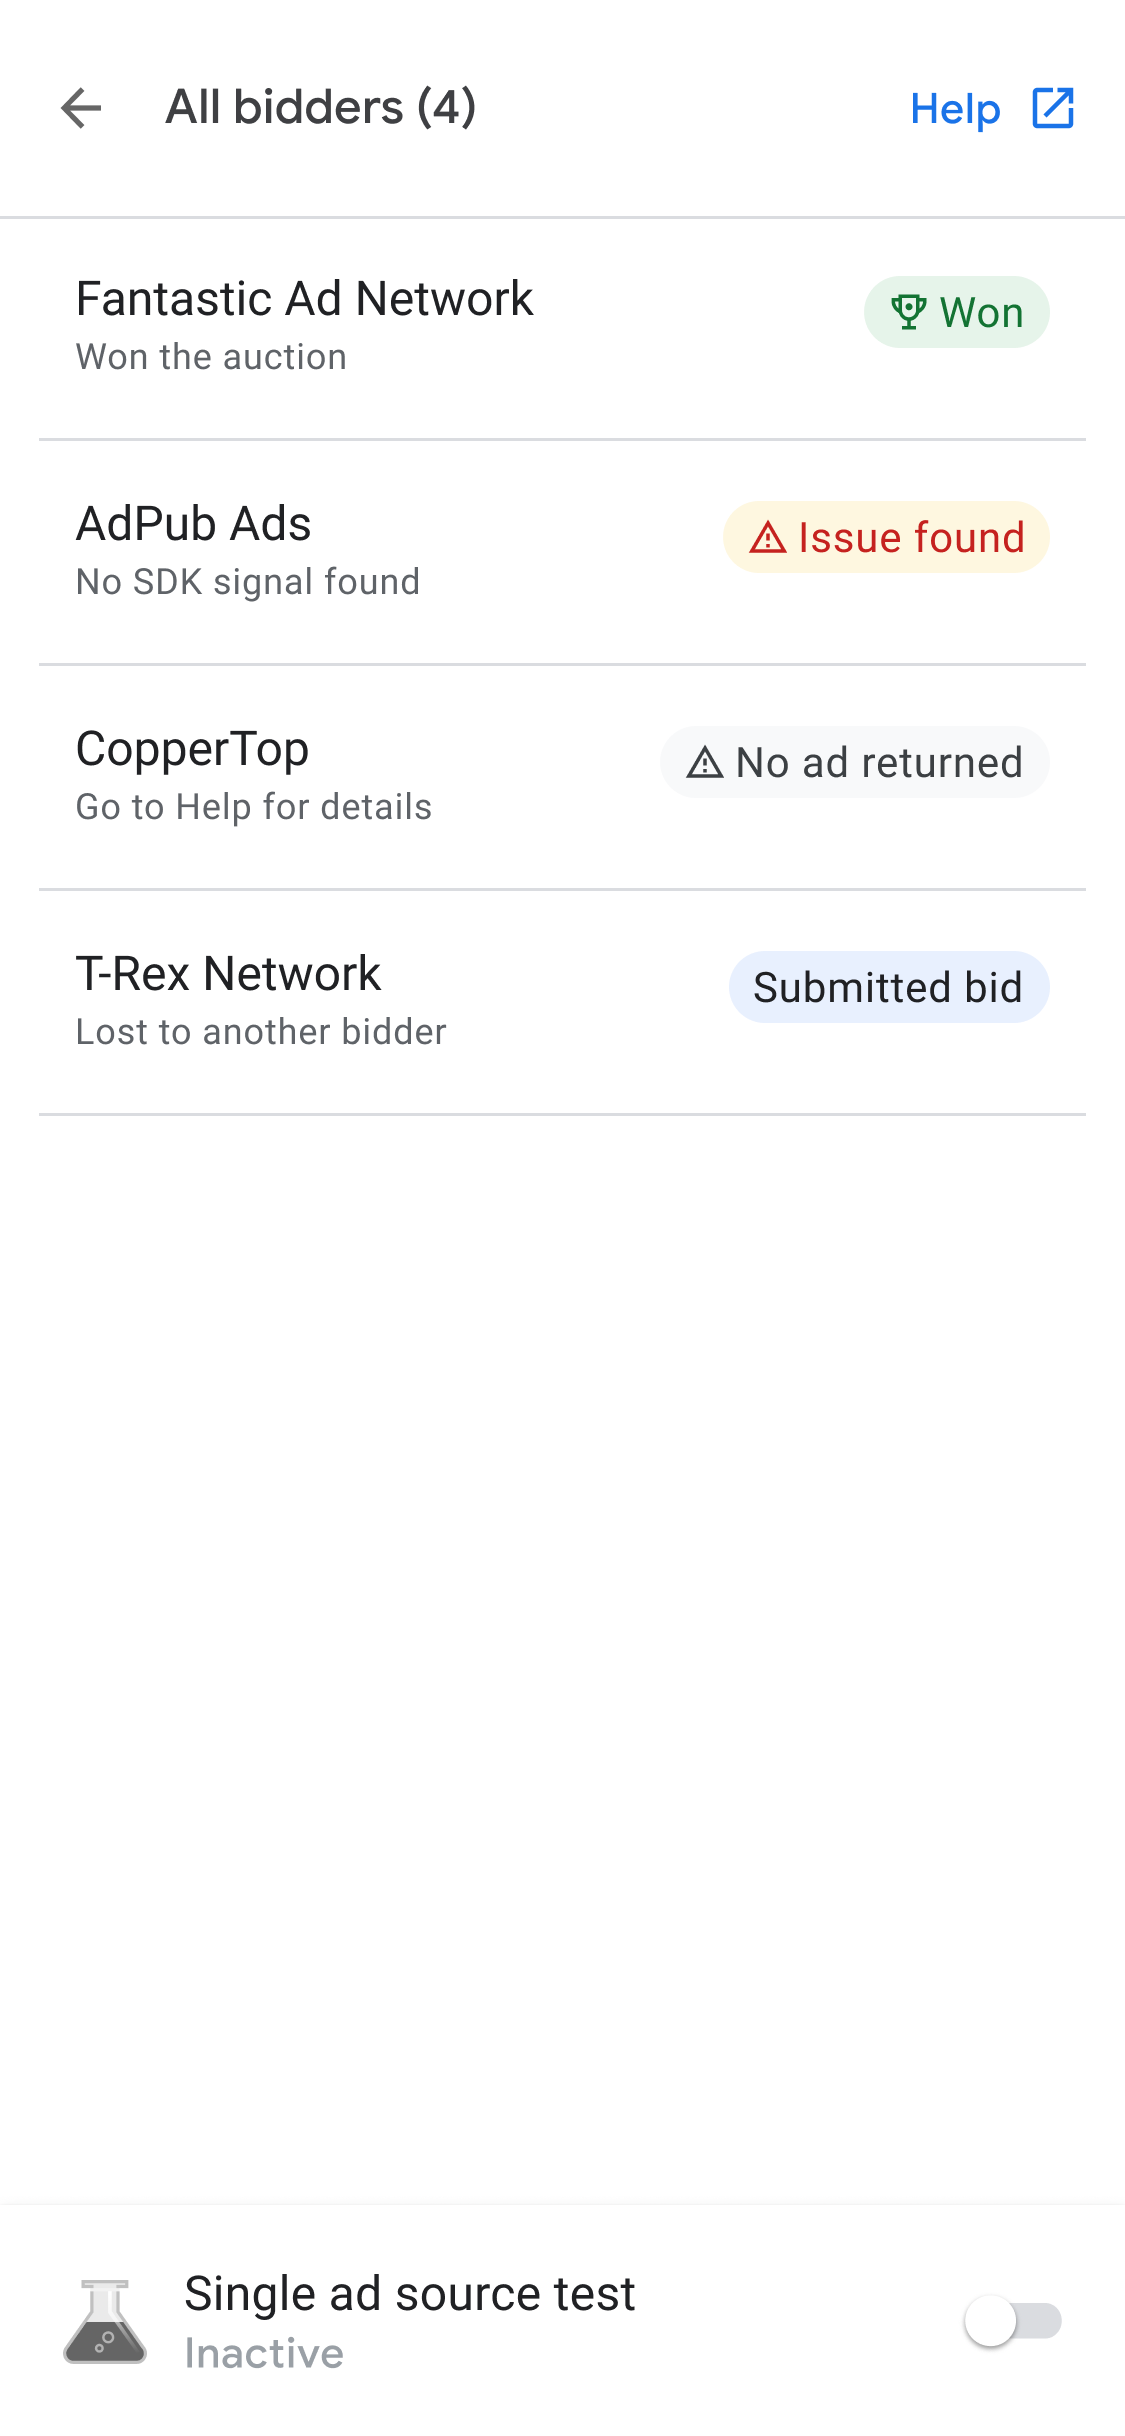
在 SDK 請求記錄中,您可以看到廣告請求中呼叫的 bidding 廣告來源。輕觸 SDK 請求記錄中的廣告單元,查看競價中每個廣告來源的詳細資料。 bidding

系統會將 bidding 結果排序,讓可操作項目靠近清單頂端:
頂端是贏得競價的廣告聯播網。
接著是有問題的廣告聯播網你可以按照 問題疑難排解步驟操作。
接著,是哪些廣告聯播網沒有傳回任何廣告,或是未出價。這表示廣告來源可能因為設定或決策而沒有出價,所以可能代表廣告來源的諸多問題。您可以參閱廣告來源的設定指南,或 直接與廣告來源聯絡以取得支援。
最後,清單最下方是失去bidding 競價的廣告聯播網。
中介服務刊登序列可以根據有效千次曝光出價,決定贏得競價的bidding 廣告來源。
在中介服務刊登序列呼叫廣告來源後,該廣告來源即可放送廣告。 如要進一步瞭解出價如何與中介服務刊登序列搭配運作,請參閱中介服務群組出價和刊登序列廣告來源的範例 2 和範例 3。
進階廣告單元偵錯
排解廣告單元問題時,建議您深入瞭解廣告請求和回應,找出故障的位置,或與 Google 支援團隊分享,以協助偵錯。輕觸刊登序列鏈頂端的選單圖示,然後選取「共用廣告請求和回應」,即可匯出完整的廣告請求和回應。這樣就能省去在自家應用程式執行網路追蹤的麻煩。
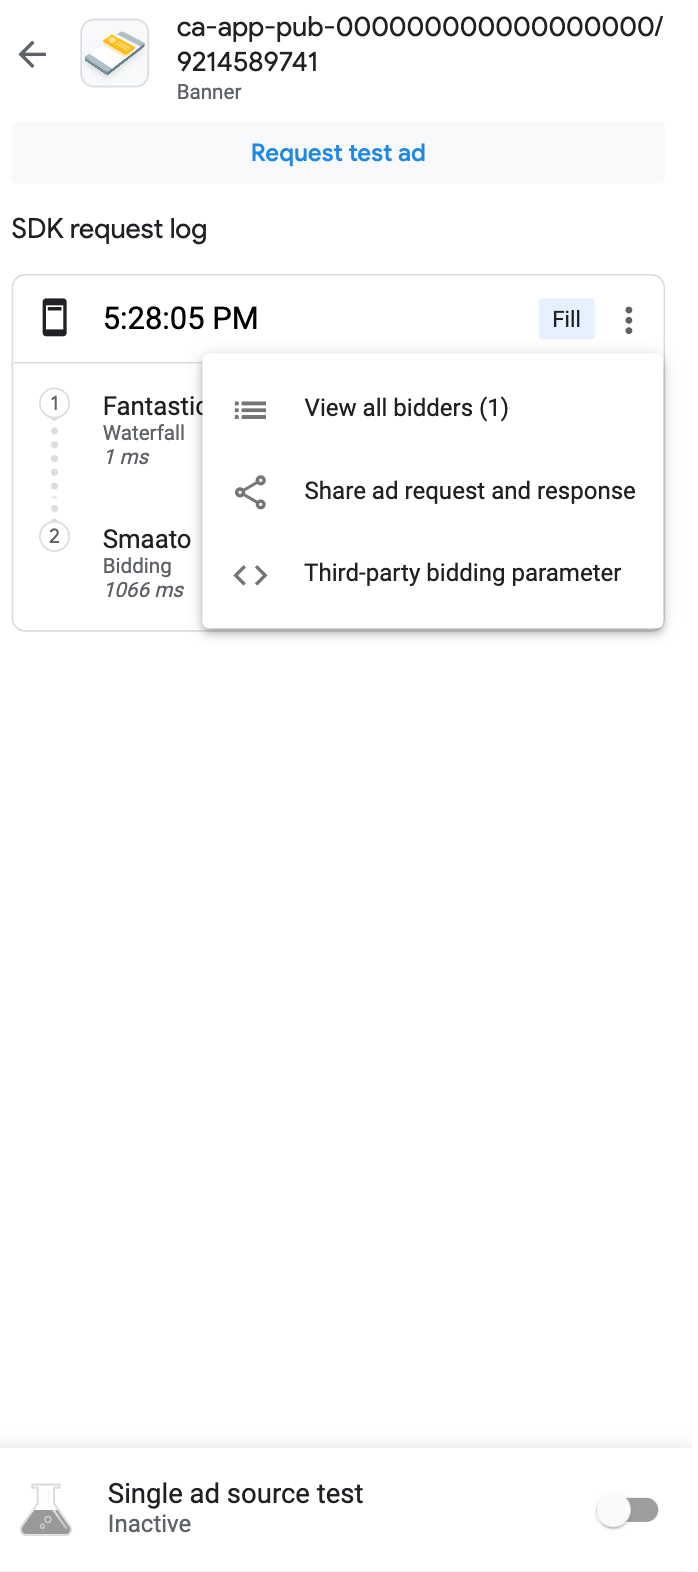
此外,您可以在請求字串相同的選單上輕觸「第三方出價參數」選項,查看已解碼的第三方出價參數。藉此詳細瞭解哪些第三方出價參數可能發生問題,以便對應用程式進行偵錯,或驗證聯播網是否成功收集信號。

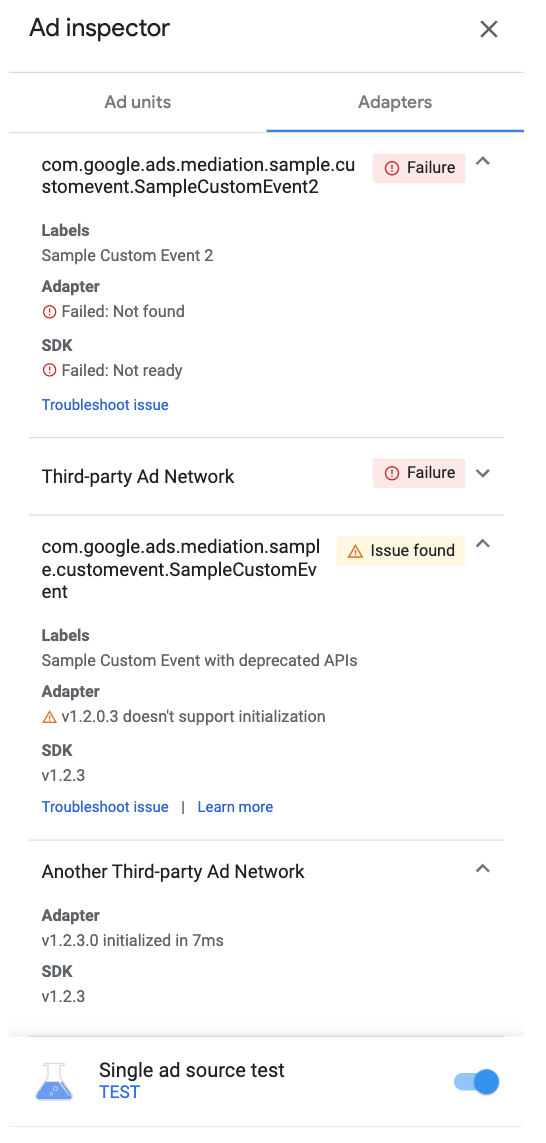
查看可用的轉接程式
按一下「轉接程式」分頁標籤,查看應用程式出價或中介服務設定中與廣告來源相關的所有第三方轉接程式清單。接著,展開資訊卡即可查看初始化狀態和 SDK 版本。除了支援的第三方轉接程式外,您也可以查看自訂事件轉接程式。自訂事件可讓發布商使用 AdMob不支援的廣告聯播網。自訂事件與轉接程式清單中的標準第三方轉接程式可透過專屬的類別名稱區分。除了提供類別名稱和狀態資訊,廣告檢查器也會在AdMob 網頁介面中,顯示指派給這些自訂事件的標籤。
如果找不到轉接程式或無法初始化,請參閱「 排解使用廣告檢查器發現的問題」 瞭解詳情。
測試您的廣告單元
如果您想測試廣告單元,但不想前往應用程式使用者介面中的廣告單元,廣告檢查器可以直接在廣告單元詳細資料畫面中提供支援。此外,您還可以一次測試多個廣告單元、以非同步方式載入及查看測試廣告請求,甚至執行單一廣告來源測試。
廣告測試
本節所述的廣告檢查器廣告測試是驗證基本廣告體驗的實用工具,以及在用於單一廣告來源測試時驗證中介服務設定。
準備好測試廣告單元時,請輕觸廣告檢查器畫面頂端的「請求測試廣告」按鈕,即可觸發廣告檢查器廣告測試。接著,測試結果會顯示在 SDK 要求記錄中,位於「Requested from ad Inspector」標頭下方。
單一廣告來源測試
廣告檢查器功能可限制應用程式中的廣告請求,只放送單一 bidding 或刊登序列中介服務廣告來源的廣告。藉此確認是否已正確導入第三方轉接程式,以及廣告來源是否正常放送。
如要啟用這項功能,請切換畫面底部的「單一廣告來源測試」切換鈕。畫面上會顯示下列廣告來源選取對話方塊:
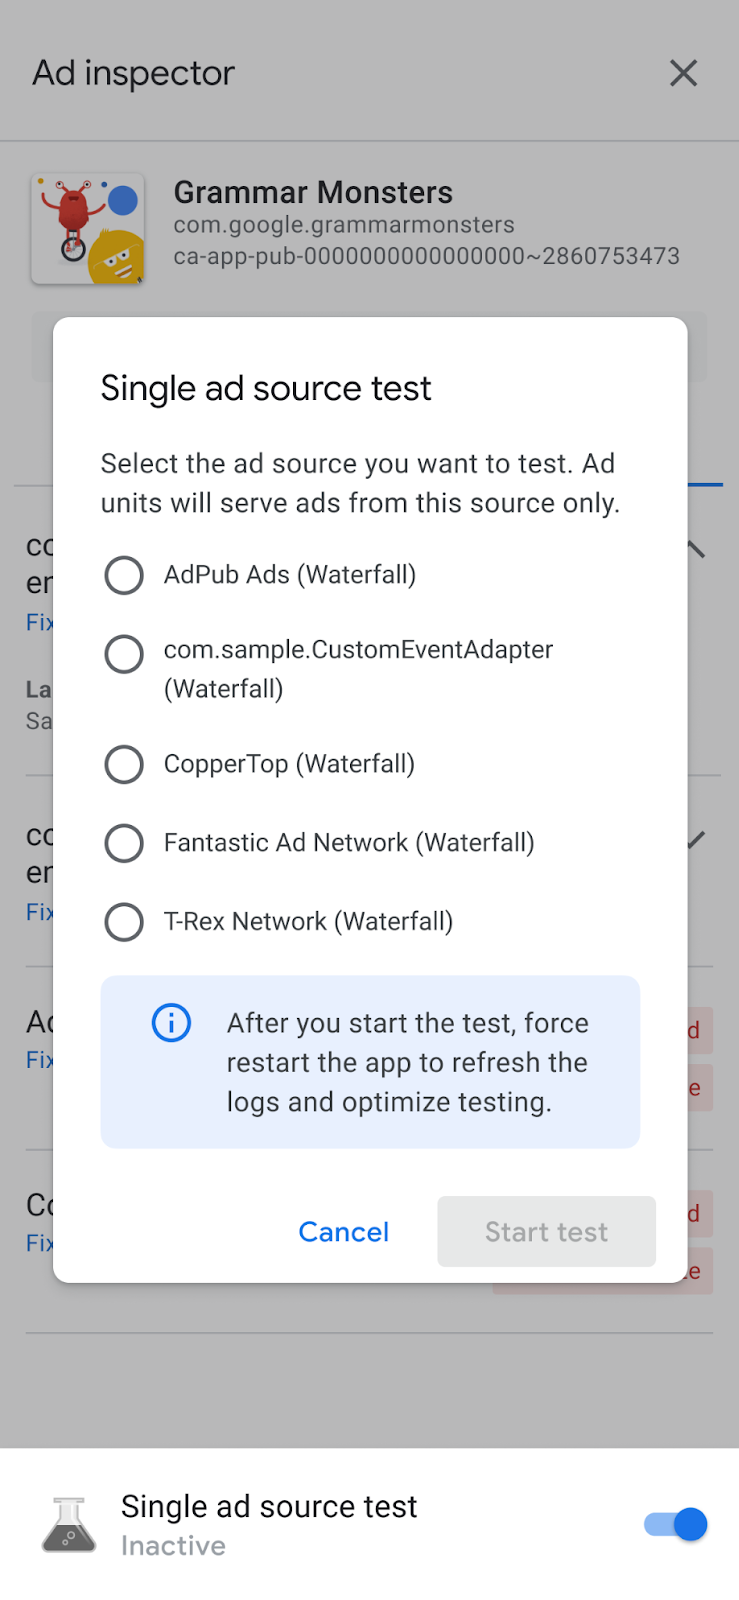
您必須先初始化 Google Mobile Ads SDK,才能使用單一廣告來源測試功能。
然後您就可以選取單一要測試的廣告來源。選取廣告來源後,畫面會顯示以下畫面:
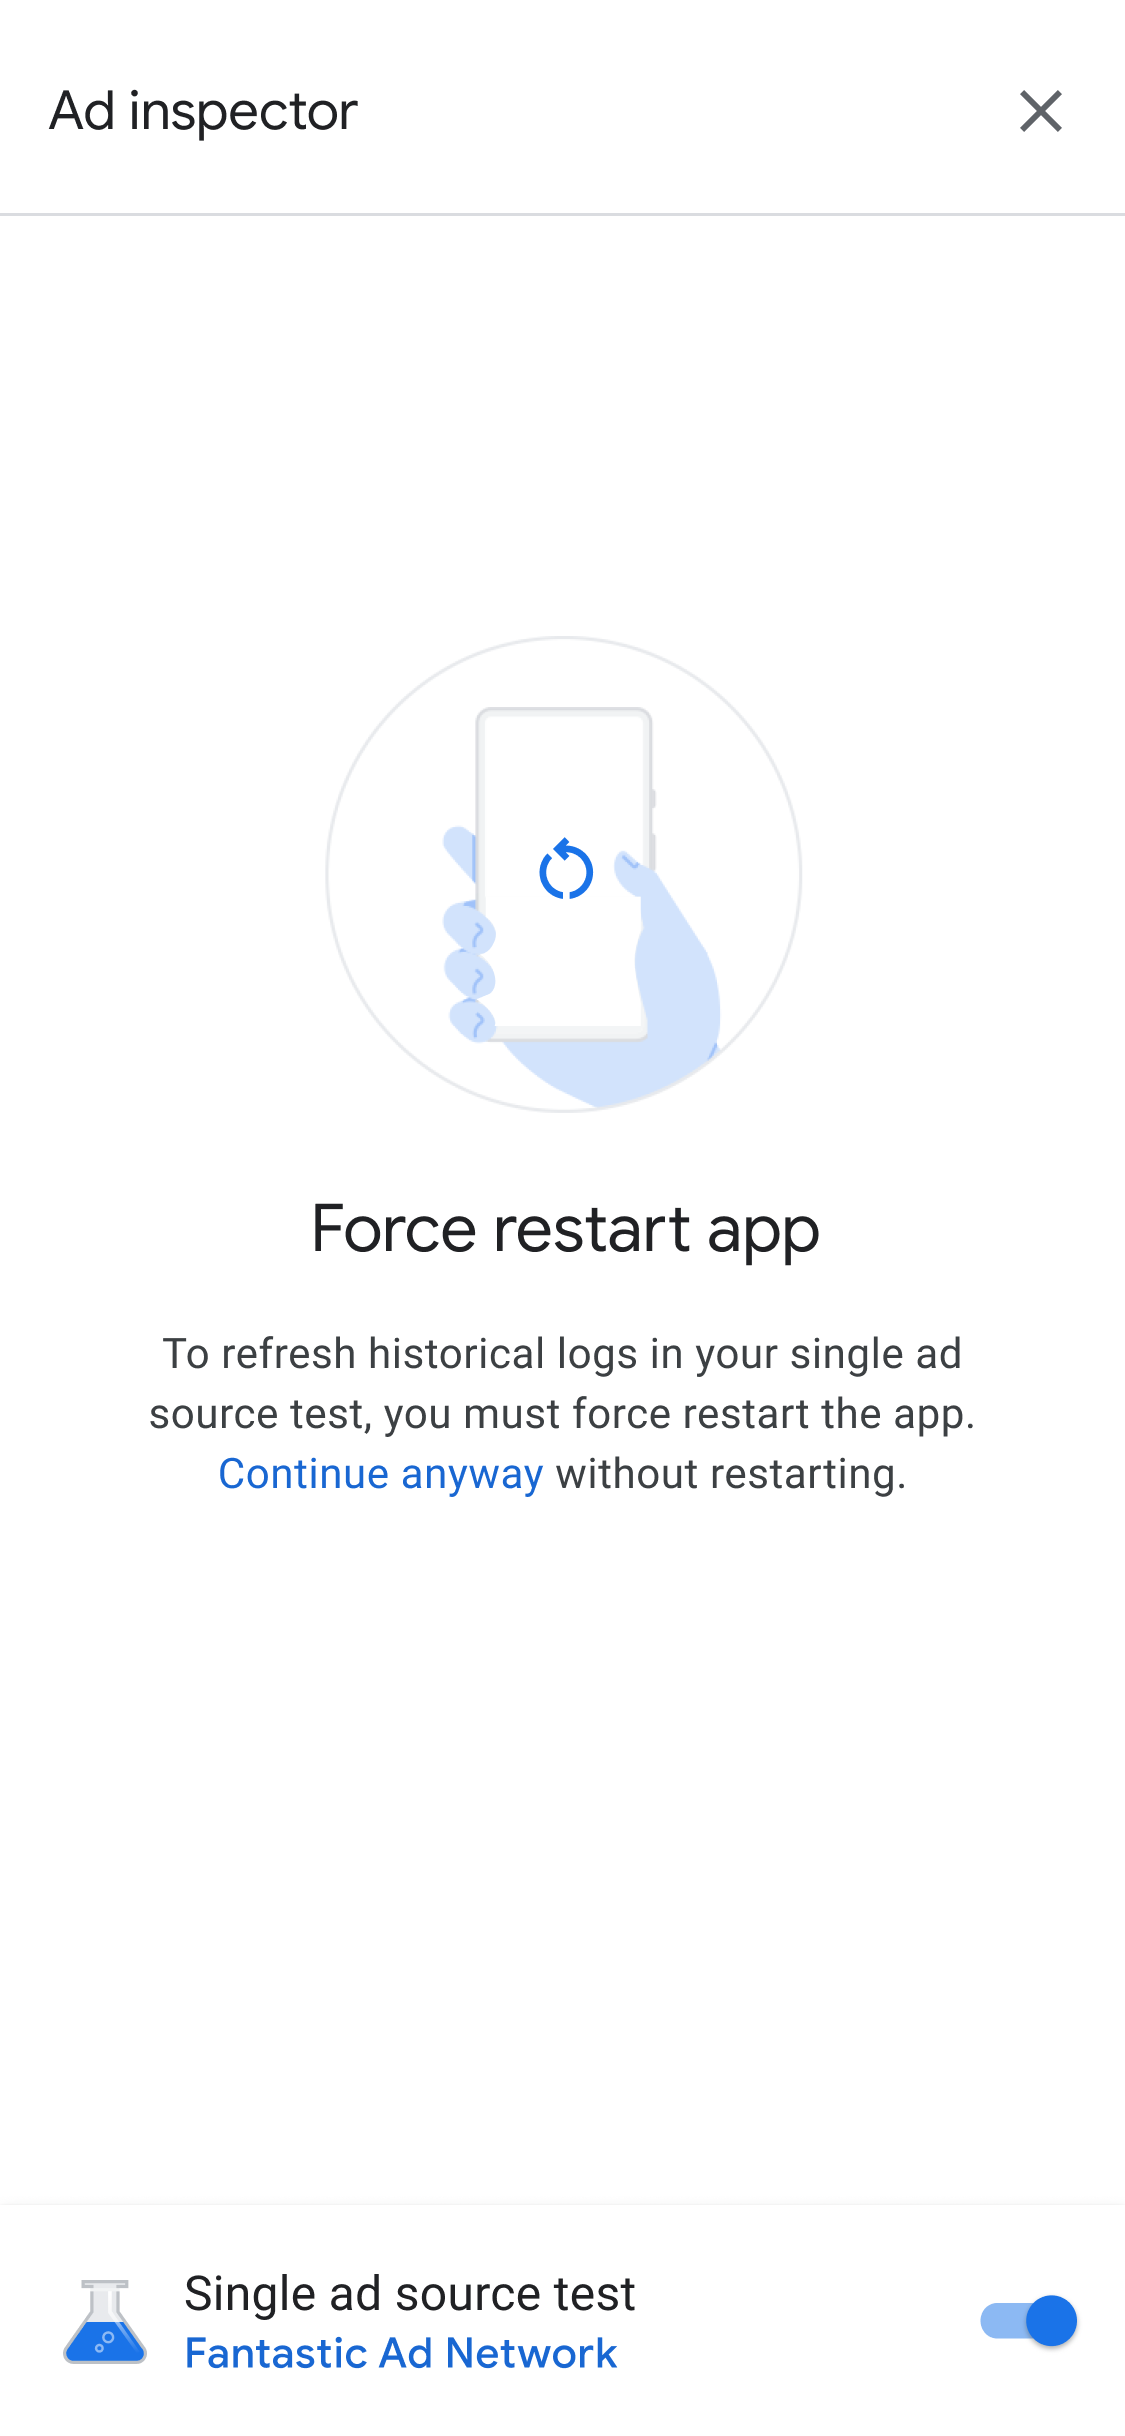
單一廣告來源測試設定會套用至日後在相同工作階段中提出的所有廣告請求。然而,這並不適用於該工作階段中先前未快取的任何廣告。套用單一廣告來源測試時,建議您強制重新啟動應用程式,以便撤銷所有可能放送的快取廣告 (而不是所選廣告來源收到請求)。
應用程式重新啟動後,所有廣告單元刊登位置會嘗試只顯示所選聯播網的廣告。單一廣告來源測試有效時啟動廣告檢查器,顯示有效測試廣告來源:
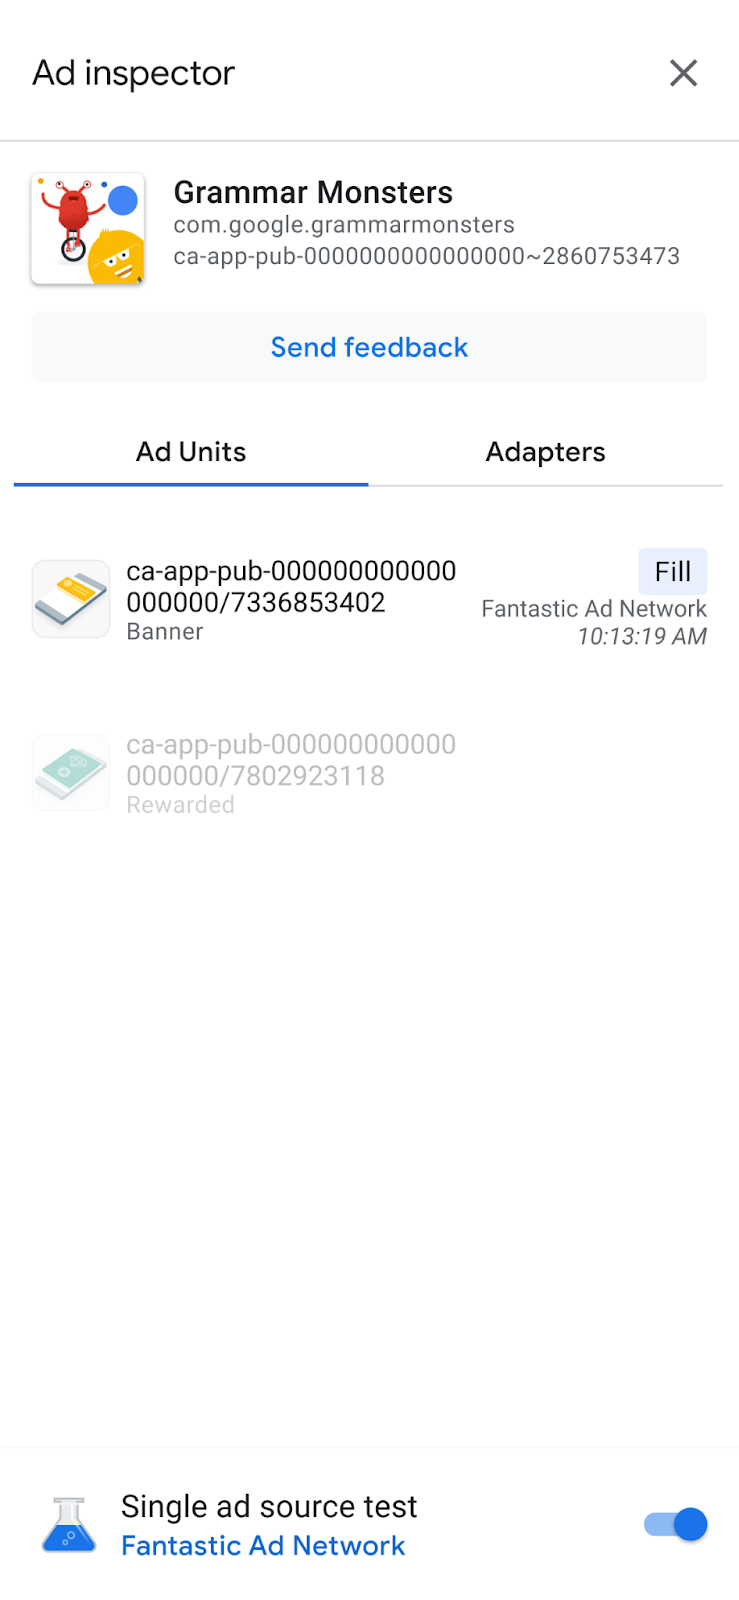
在單一廣告來源測試模式中,無論廣告來源是否針對所請求的廣告單元設定出價或中介服務,都會嘗試以所選廣告來源供應廣告。如果您要測試的廣告來源不在廣告單元的中介服務刊登序列裡,您會收到「未供應廣告」錯誤訊息。
在單一廣告來源測試中,您可以輕觸廣告單元來查看 SDK 請求記錄。讓您瞭解在啟用單一廣告來源測試後,廣告來源是否履行了廣告請求。如果廣告來源無法載入廣告,系統會顯示錯誤訊息說明錯誤。
如果您已在某個中介服務刊登序列中加入了所選廣告來源的多個例項,那麼在廣告供應前或刊登序列未有供應就結束時,刊登序列會顯示該廣告來源的每個呼叫例項。
停止單一廣告來源測試
如要停止測試,請關閉切換鈕:
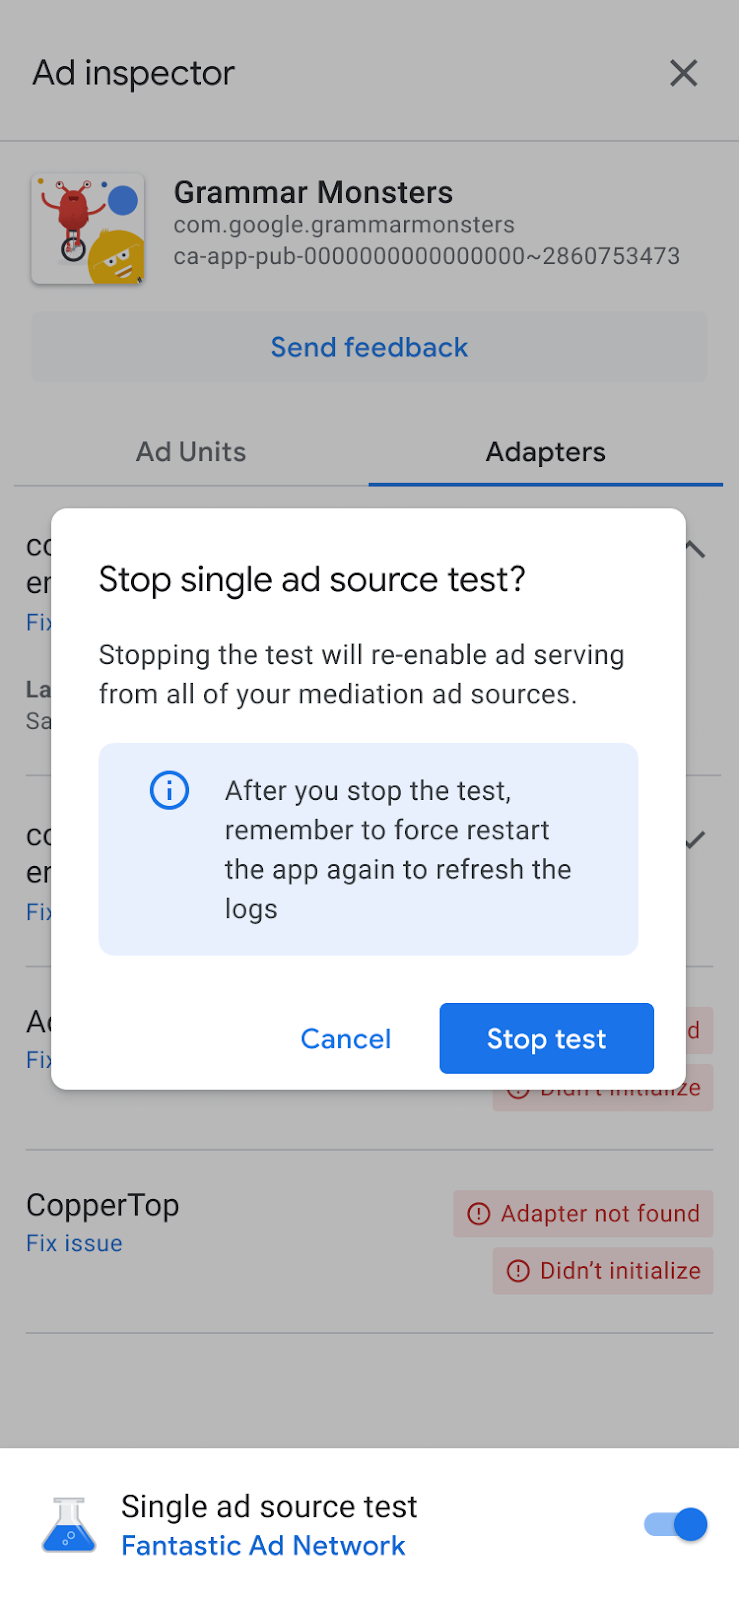
然後下列重新啟動畫面會顯示確認訊息:
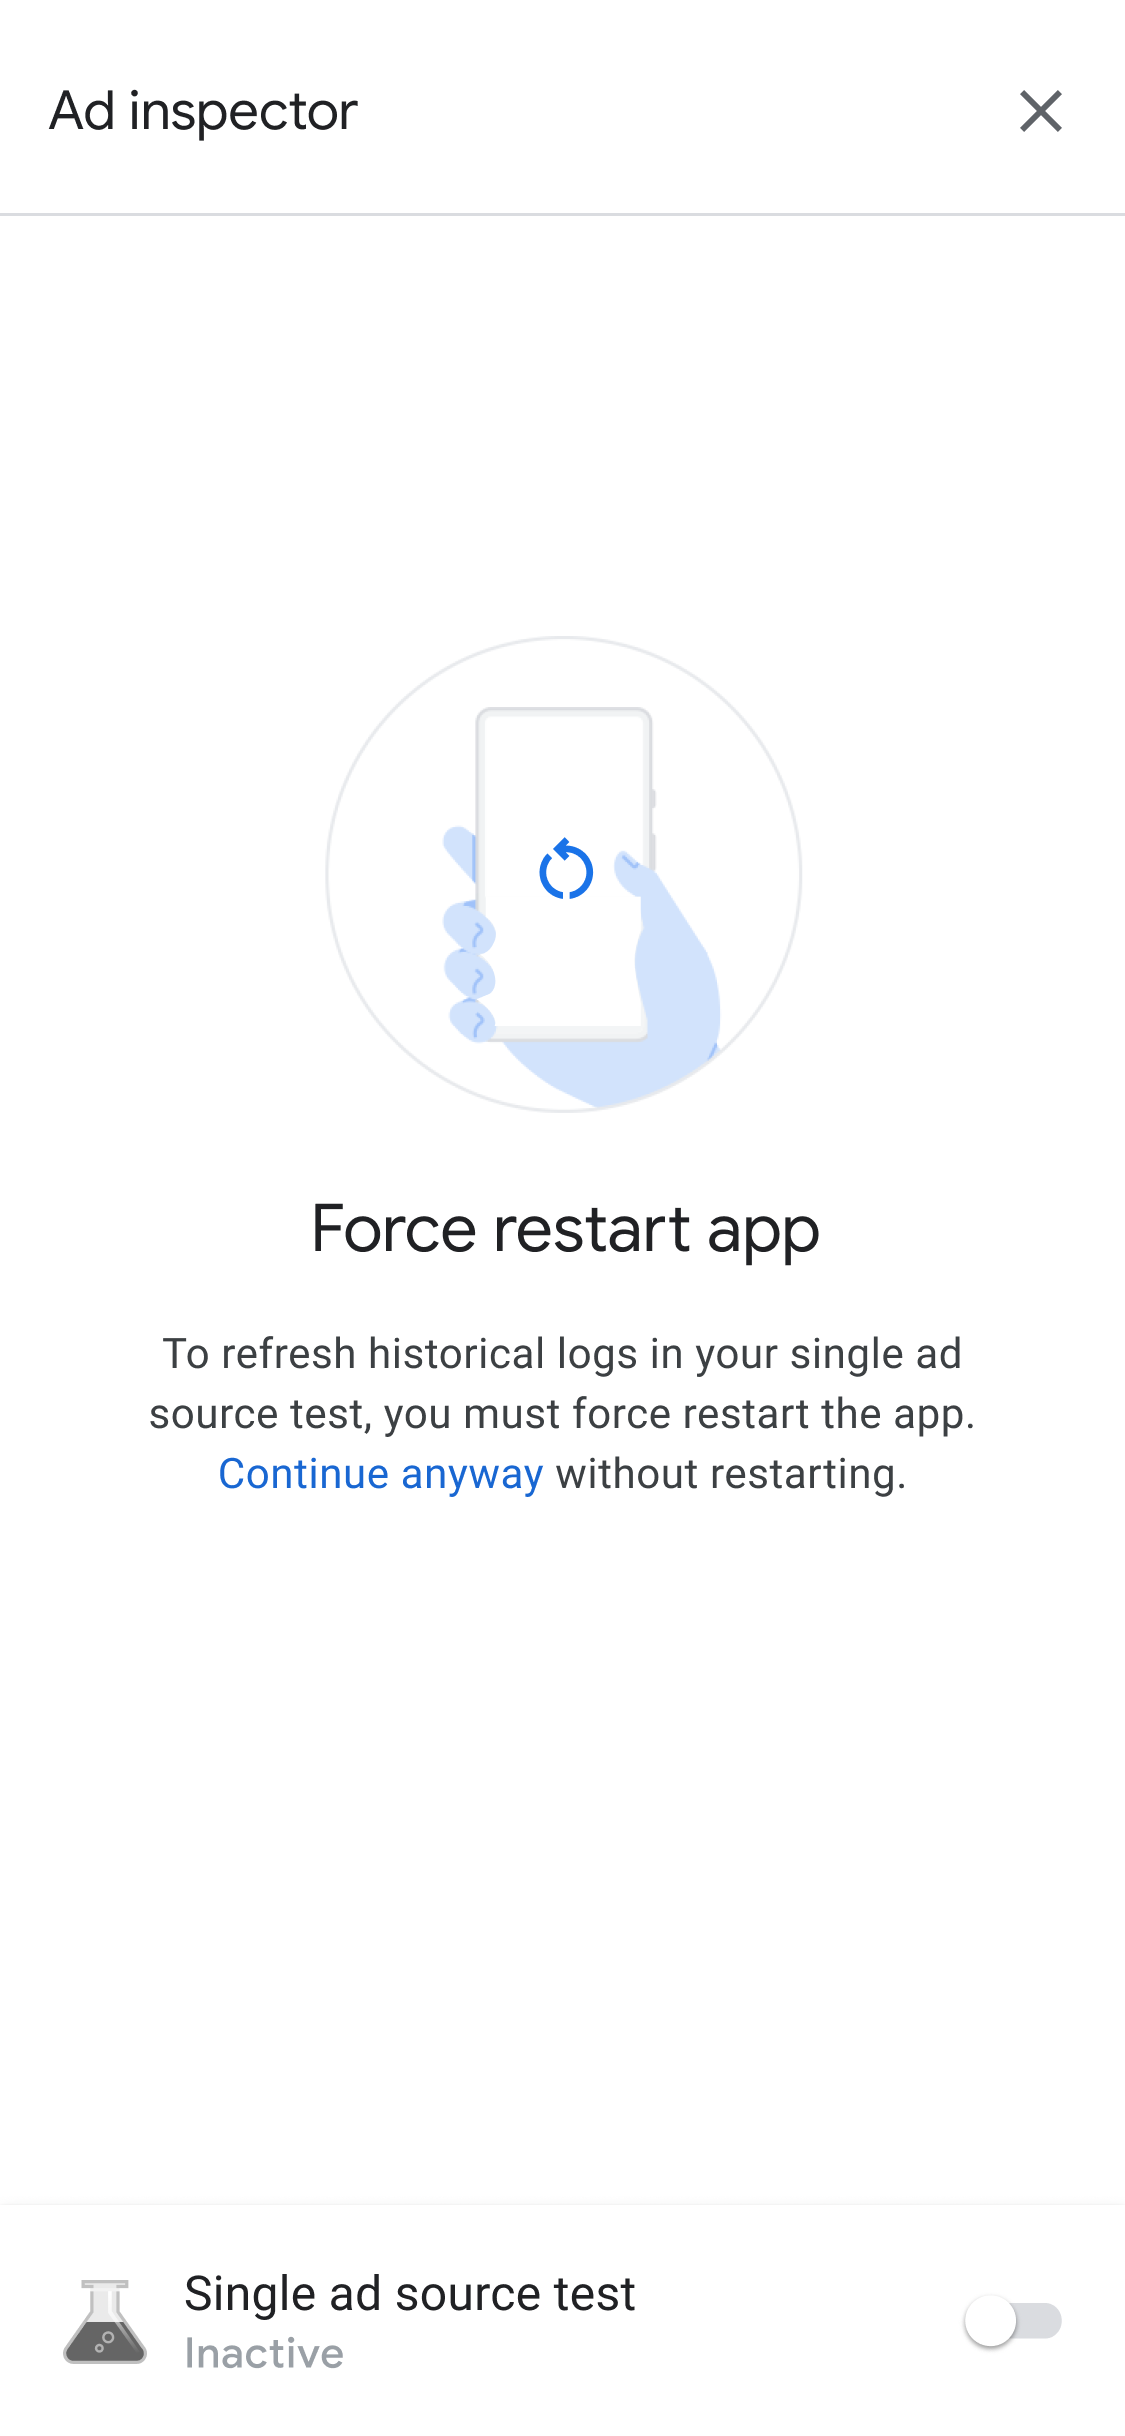
建議您在停止測試後強制重新啟動應用程式,以便針對測試的廣告來源失效任何快取廣告。
複製完整偵錯輸出內容
廣告檢查器支援從工具複製內含完整偵錯輸出內容的 JSON 字串,包括AdMob 應用程式的詳細資料、轉接程式初始化狀態,以及所有廣告單元的測試結果。
方法是輕觸應用程式圖示七次,直到畫面上顯示「將廣告檢查器 JSON 複製到剪貼簿」訊息為止。